Santa Fe Mountain Trails Shaw
by Mara Bishop Statnekov This is the second in a series of gossamer lace shawls using symbols and graphic elements from the American Southwest. My teacher, Galina Khmeleva, has been my principal source of inspiration as well as my source for patterns and information, both from her outstanding books and her wonderful workshops & classes.This pattern has itsroots in the Orenburg-style or Russian gossamer lace knitting, but with Southwesternmotifs. I understand that most patterns specify a particular brand and type of yarn to use, but I'm rather inclined to leave it open; that is, to only go so far as to specify "any fine lace weight yarn". Since the designing of a knitted work is a such personal thing, I want to encourage you to feel free to explore your preferences. When I choose a yarn for a particular pattern, I look for the yarn weight (diameter),amount of twist,halo or lack of fuzziness, the color,..ah, yes...the COLOR. All of these things interact with the needle size and one's personal knitting tension to determine the outcome. So you can use any lace weight yarn that captures your fancy. Thisisoneof the wonderful things about knitting shawls; they don't have "to fit" like a sweater, vest or socks. This gives us a lot of freedom.

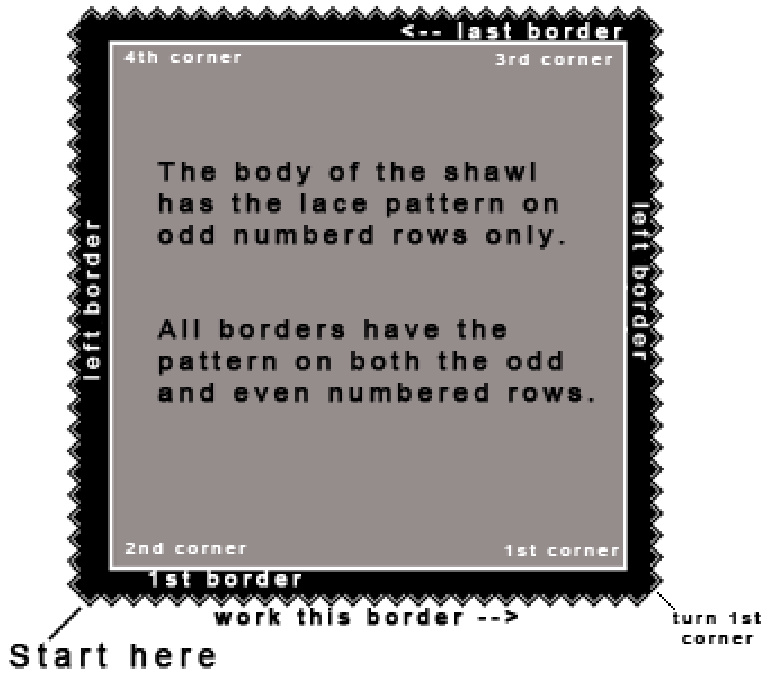
If you've never tried an Orenburg-style shawl, here's a brief outline of the construction. Start by knitting the lower border in the thin strip (see the graphic below), then turn your 1st corner and pick up stitches along the interior edge. Turn the second corner, and you're ready to knit the body with both the right and left edges on each row. When you've finished the body, you'llturn the 3'd corner, and knit the top border in a strip, ataching it to the top "live" edge of the body by k2tog. Don't panic - there are detailed instructions.
personal note:
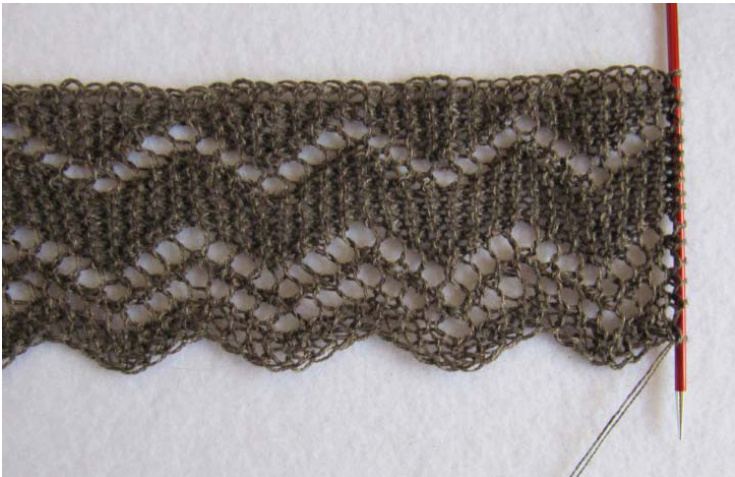
I love using Signature Needle Arts needles. For this project, I used 10" straight needles with a stiletto point. I usually use one of these 3 sizes for gossamer laceshawls: Size 1 (2.25 mm) Size 1 1/2 (2.50 mm) Size 2 (2.75 mm) The peaks or teeth are on the side of the shawl; there is not a point in the corners. This shawl has 36 teeth per side. Every row is started with a Slip stitch: Slip 1 purlwise (s1wyif),with theyarnheld in front and then shifted tothe back so that it is in place to make the next stitch a knit stitch.
Yarns:
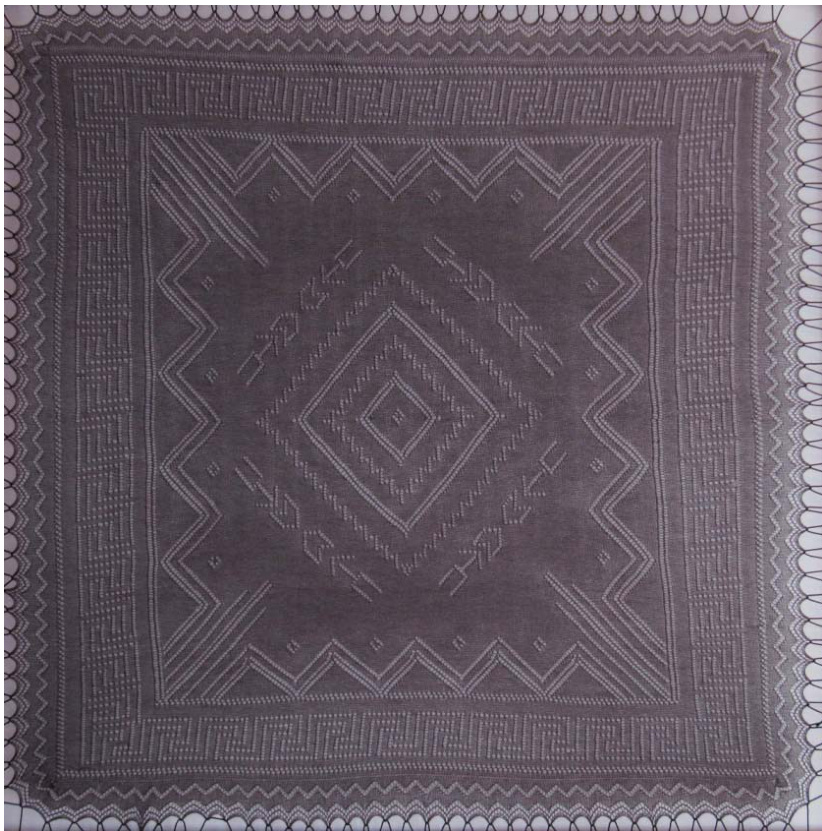
I've used the weight and ply designation, such as 30/2, to indicate the weight of the yarn. It's more specific than the general terminology of fingering, lace-weight, or cobweb. I find a great deal of variation in the terminology so I have to remind myself that it's not rocket science, and just relax about it. For a heavier lace weight yarn, 18/2 weight Jaggerspun Zephyr Superfine wool/silk (50% merino and 50% tussah silk) works well on 2.75mm = US size 2 needles, and comes in a wide range of coiors. For a much finer yarn, I'm especially fond of the lace-weight yarns available from Galina Khmeleva's website, Skaska.com, which are usually in the 30/2 to 32/2 range, and are from exotic fibers like yak and silk, camel and silk, or cashmere and silk. Most of the photos in this pattern are of the brown shawl below which I knitted using 2 different yarns, not plied but held together as one yarn. One is a 36/2 cashmere and silk blend; the other is a 32/2 cashmere, llama, & merino blend, making the final yarn approximately a 18/4. Both are on cones from Colourmart in the United Kingdoms (U.K.). These two yarns are not exactly the same color, but close, and one is just slightly thinner than the other. I used approximately 2650 yards of each.
Of course, I had to be careful not to split them as I was knitting, but the end effect is a heavy shawl with a lot of threedimensionality to the surface. I used size 2 US needles (2.75mm). The finished brown shawl was66"x68".
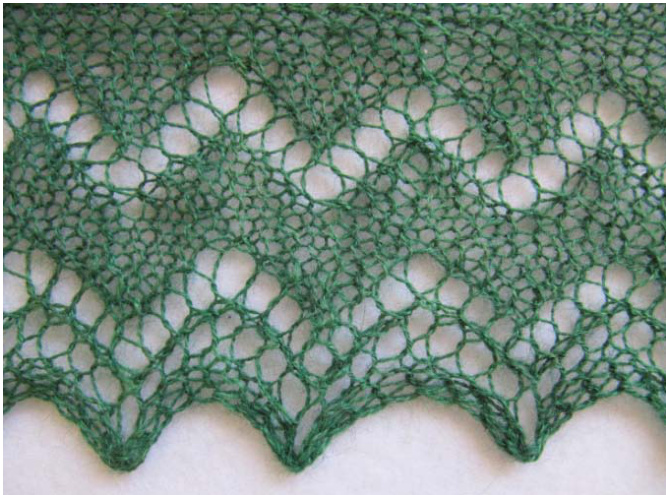
This green shawl is another version of this pattern in a lighter weight yarn. Luckily,I bought 3 skeins of 26/2 Spruce Dragon Hand Painted yarn by Jan Seltman in Divide,Coloradobecause thepiece went50yards over 2 skeins or about 2650 yd. 丨 believe this is called "flying by the seat of one's pants" or "winging it". In this case, I bought the yarn first because the feel and color were so beautiful,and then 丨decided on the project. I used size 11/2 US needles (2.50mm). The finished green shawl was a large 64" x 68" shawl, blocked tight. yo (yarn over) k2tog k3tog Slip 1, purlwise, with yarn in front knit, and put back on left needle do not knit last stitch castonrow setuprows
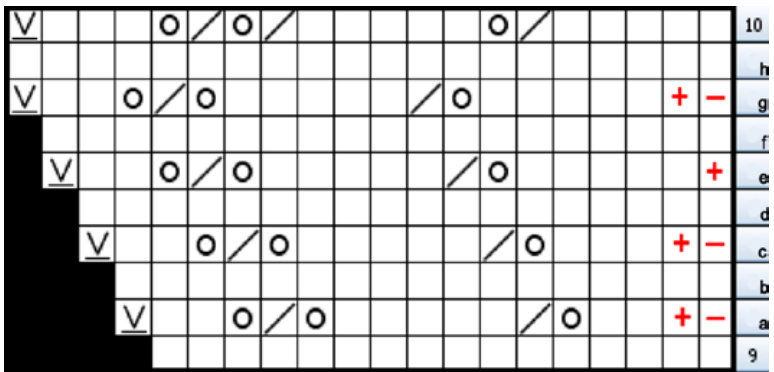
Chart notes:
All odd numbered rows are read from right to left. All even numbered rows are read from left to right. You will be knitting a ribbon of border that has 36 peaks before turning the 1st corner where you will start working on the main body of the shawl. Orenburg-style knitted lace is based in garter stitch; that is, there are no purl stitches in this piece essentially using a knit stitch onboth the right side (RS) and the wrong side (WS). The right side will have the lace pattern made with yarn-overs, knit 2 togethers, and an occasional knit 3 together. The wrong side will have lace pattern on the borders with plain knitting in between the side borders. This is what I call a "relief" row which I find comforting.
Edging:
Cast on loosely: 15 stitches using the long tail cast-on method (or using your preferred method). You can use two needles held together or one larger-sized needle for the caston if you find that helpful. On Bottom Border chart (to the right), Row “-2" is your caston row. Work both Row “-1", and Row 0 (zero) as set-up rows. Each peak consists of 16 rows. This first strip of border has576rows.
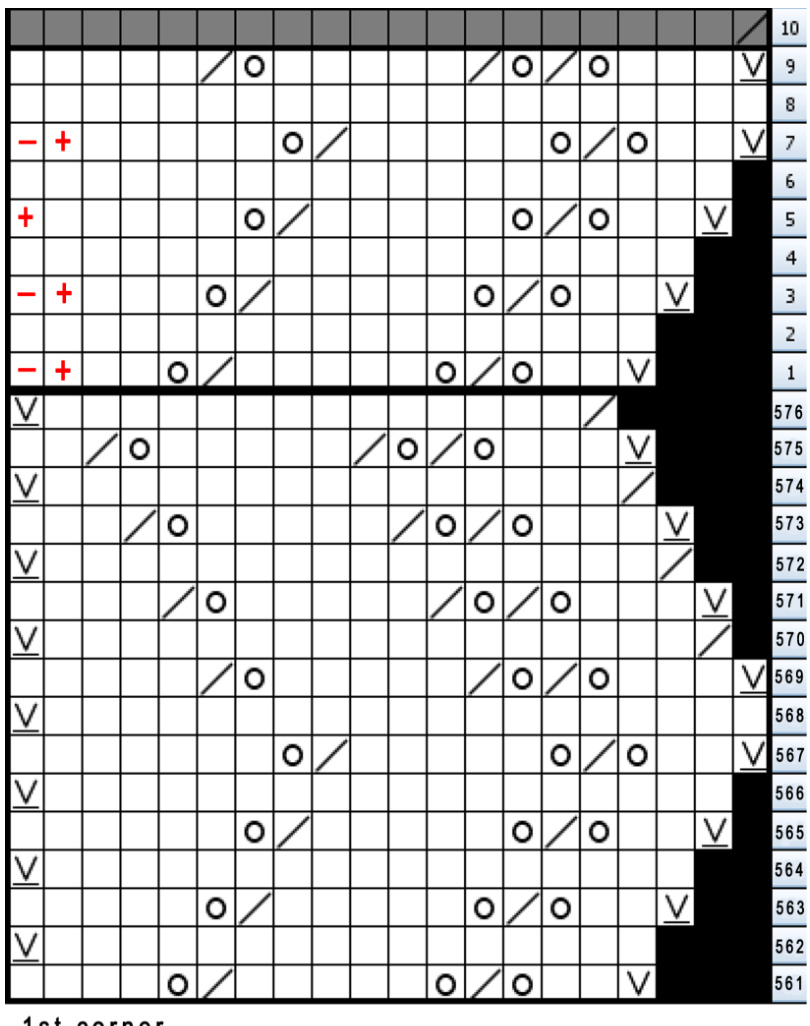
When you have finished your 36 peaks at Row 576, you will be ready to turn the 1st corner (see chart on next page). Then pick up your "slipped" stitches with which to make up the body of the shawl. As you knit each pattern row,keep alert to the previous pattern row and how the rows relate to each other as the pattern develops, paying attention to how the yarn overs (holes) build the pattern. At the end of each row, take hold of the bottom of your knitting and give it a tug or two. This straightens out and aligns the stitches.
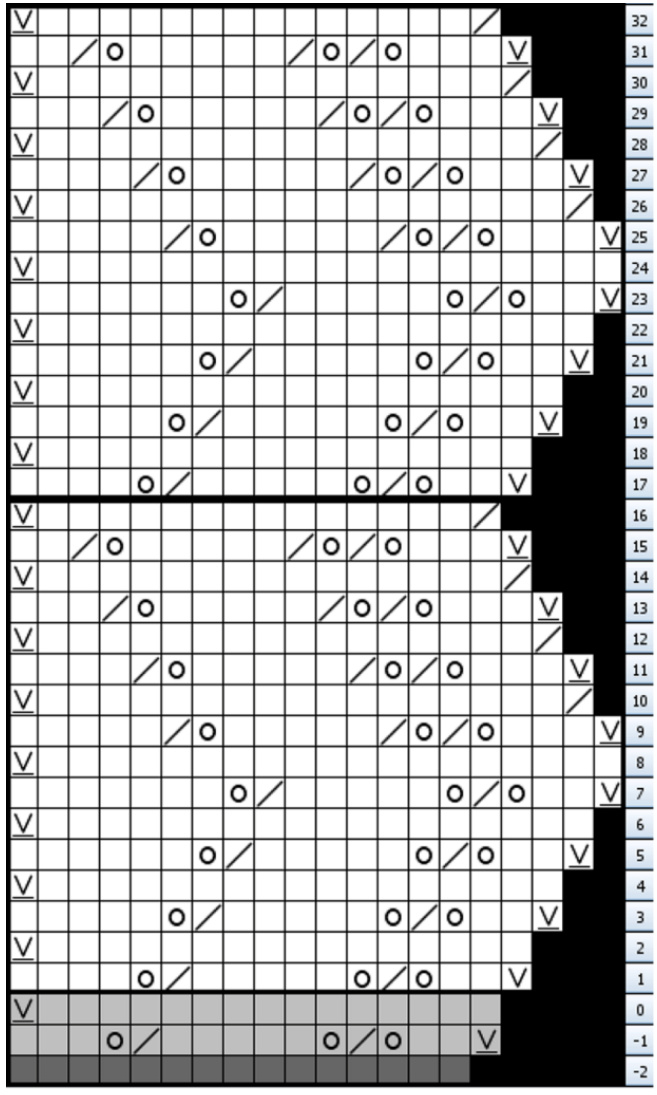
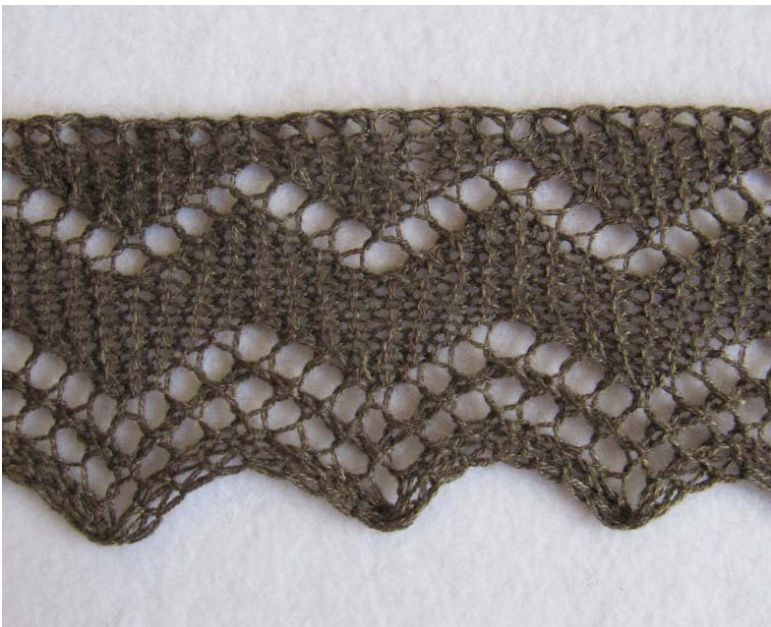
Bottom Border This border has typical Orenburg 5-hole peaks. The hole at the peaks and at the narrowest part are counted twice (see thephotobelow). Since there is one slipped stitch for every 2 rows of border, you will end up picking up 288 stitches to make up the body.

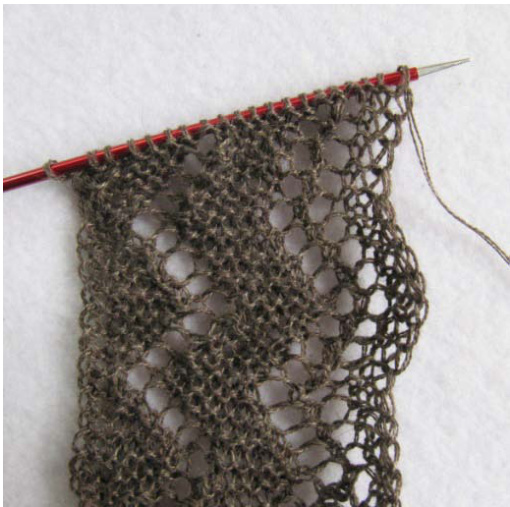
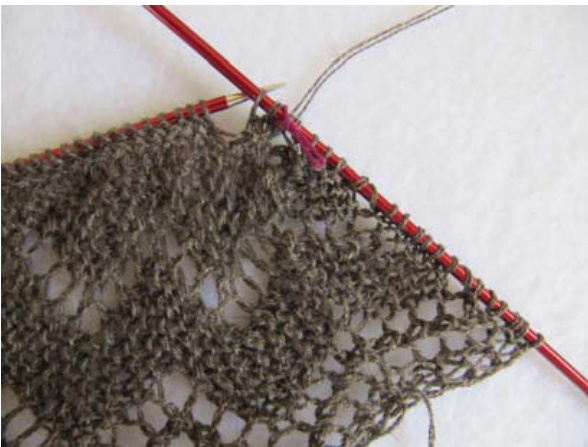
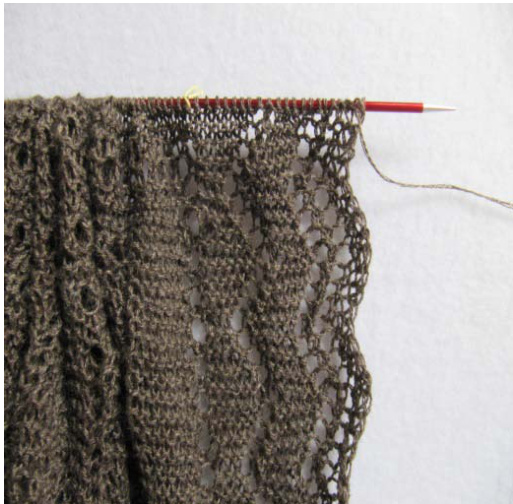
This is a photo of Row 1 where you are beginning to turn the 1st corner with short rows.

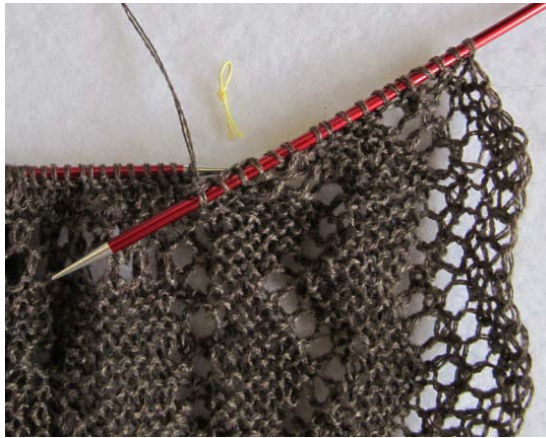
This photo shows the beginning of Row 9, after you have finished the short rows on the chart for the 1st corner.
Starting at the far end of the slipped stitches where you first cast-on, pick up 288 slipped stitches with your empty needle until you arrive at the 1st turned corner.
Place a marker in between the 20 border stitches and the 288 body stitches. Knit these body stitches through the back ofeachstitch.
Turning the Second Corner:
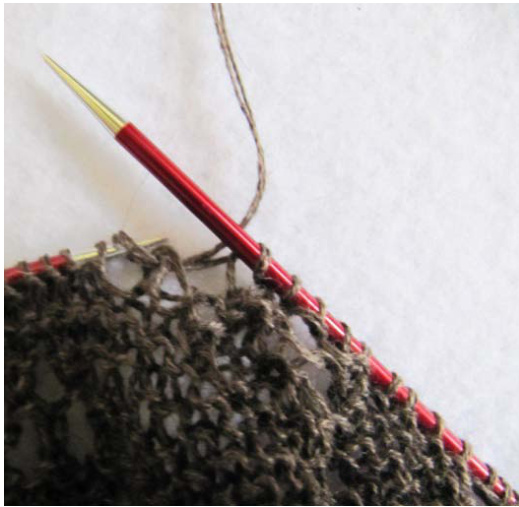
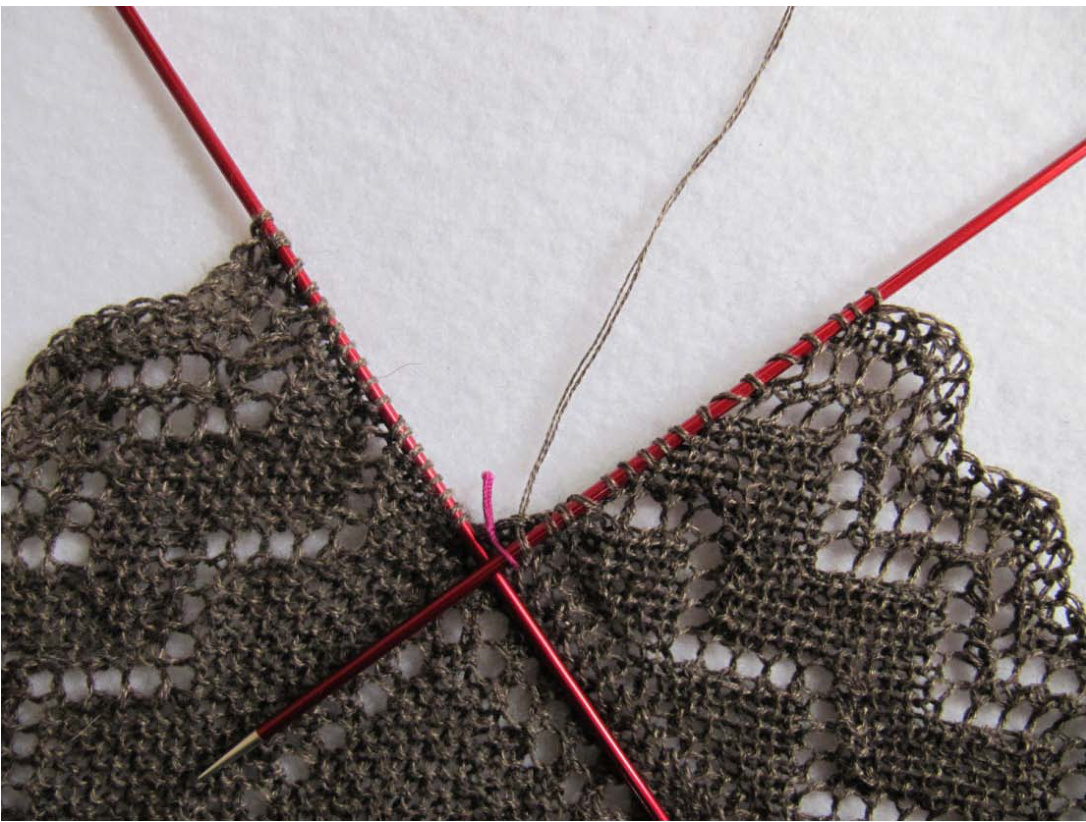
This photo shows where you have finished knitting across the 288 slipped stitches.
When you have finished knitting across the picked up stitches, take your empty needle and carefully pick up 16 stitches from your original cast-on edge from the outer edge to the inner.
These 16 stitches are picked up along the edge of your original 15 stitch cast-on. Try to pick up through the centers of the yarn overs, with the correct amount of stitches around them to make the patterns merge. Knit across these 16 stitches to the end of Row 9. Turn the "2nd Corner" border stitches, with this chart.
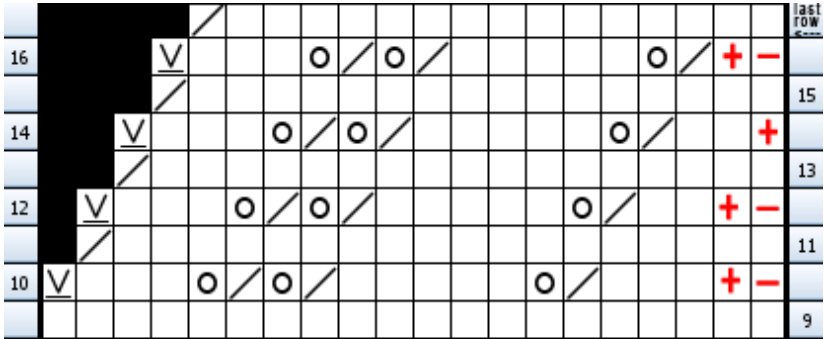
2nd Corner Work Row 10 of the left border (WS) (see photo to the right). Then continue knitting (remember this is a garter stitch garment) all the wayacrosstheentirepiecetothelast2stitches. Reminder: when you get to the end of this row (past the 2nd marker) and into the right border, remember to knit the last 2 stitches together (as indicated on Row 10 of the "Turning the First Corner" chart).

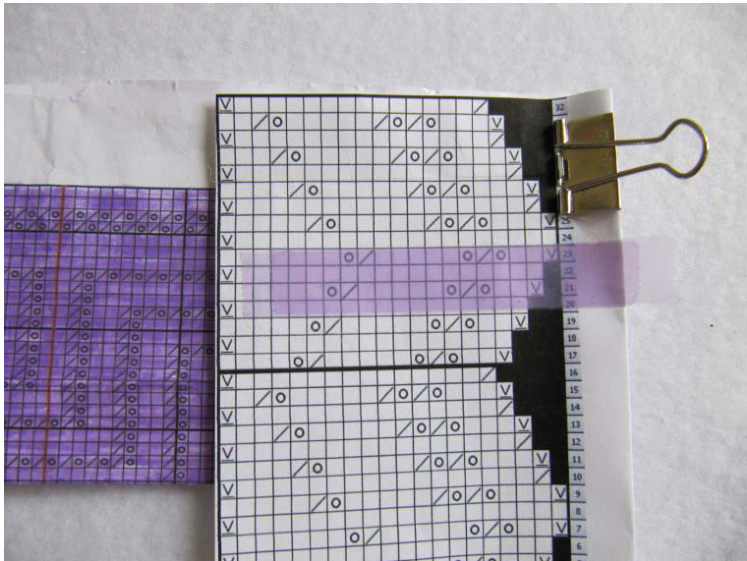
As you start Row 11, you should have: 19 border stitches (right edge)+ 288 body stitches + 20 border stitches (left edge). Remember that the right border pattern is always one row ahead of the left border pattern. AfterRow16,you will continuewithbodyrowstoRow568. At the same time you willbe repeating the 16 row border on both the right and the left sides. Here's a photo of how I keep track of it all. I use highlighter tape on the border chart (because I use it repeatedly), and I use highlighter pens on the body charts.Reminder:the black horizontal lines on the charts are every 16 rows to reflect the16 rowbordercharts.
Charts:
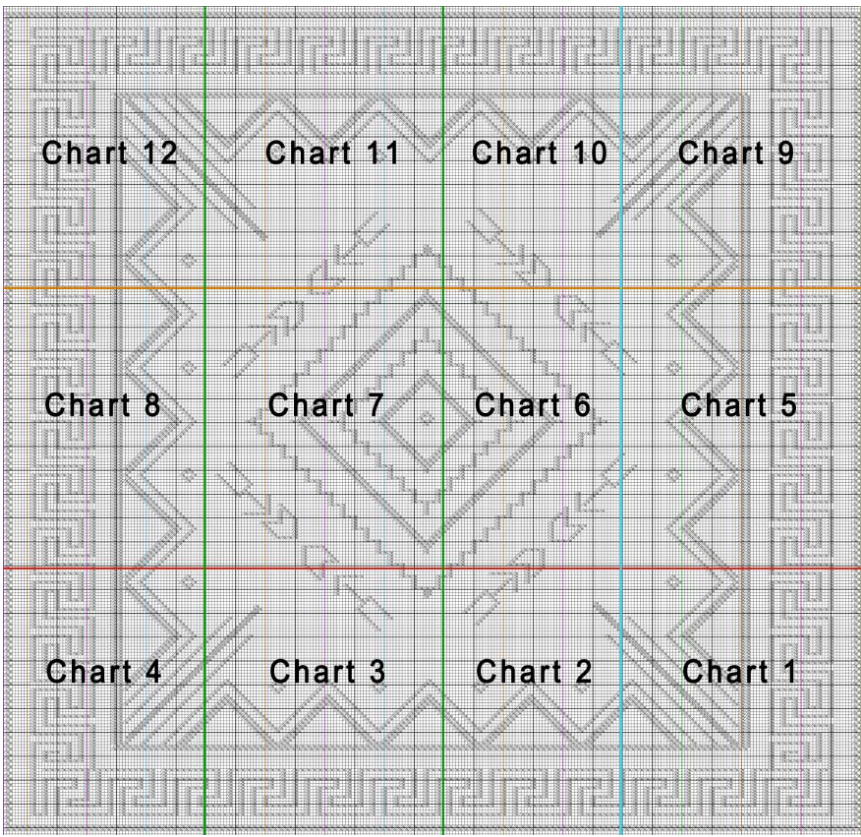
When you downloaded this pattern, you should see: Santa-Fe-Mountain-Trails-Shawl-text.pdf Santa-Fe- Mountain-Trails-Shawl-charts.pdf The border charts are included in the text, and also in the "charts" pdf. There are 12 pages of body charts. Here is a diagram of how they fit together. There are horizontal lines on the body charts every 16 rows to correspond with the 16 row border pattern. The vertical lines are in 10 stitch increments. They are alternatelyblackandcolored.Iusethesecoloredlinesto indicate where to place colored markers across the rows.
Edges & Body:
You willbe incorporating the Right and Let Border charts (16 row repeats) with the charts for the body of the shawl from Row 11 to Row568). You should be at Row 11 on all three charts at this point. From Row 11 to Row 16, your border charts and the body chart row numbers match up. At that point, you will need to repeat the 16 rows of the border with the rest of the body charts.
On even numbered rows (WS):
From the first stitch to the border marker, you follow the Left Border chart. Remember to Slip 1 purlwise (s1wyif), at the beginning of every row. From the second border marker to the end, you use the Right Border chart. In between the markers is the body of the shawl which is plain knitting. You may find it easier if you have placed markers to delineate the borders from the body. I find that it helps me keep my place by placing colored markers at regular intervals across the row. I use colored #10 pearl cotton tied in loops to make my own markers. If it works for you, you can place your colored markers where the colored lines are on the pattern. With yarn as fine as 36/2, metal or plastic markers leave a space in your knitting that shows up in the finished piece in a bad way. 1 learned this the hard way. That's why I suggest using #10 (or finer) pearl cotton. It comes in colors. Upon finishing Row 568, you have finished the body of the shawl, and are ready to turn the 3"d corner. While kniing this last WS row, I usually remove all of my markers except the 2 indicating the right and left borders
Turning the 3rd corner:
You will have ended the body of your shawl by completing the wrong side row with: Left Border Row8+Body Row568+Right Border row 8.
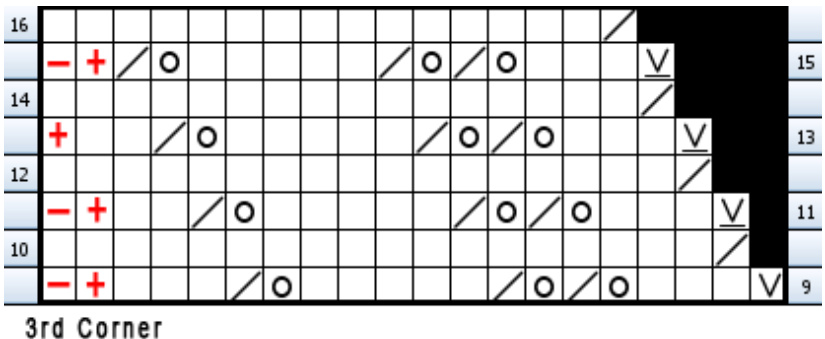
Complete Rows 9-16 of the right border with the "Turning the Third Corner" chart. This is the last peak on the right side. Then use the "Right Border Chart" on page 6 to work the last border at the top of the shawl.
This is after Row 568 when you are about to turn the 3'rd corner with short rows.
Having turned the 3'd corner, you're ready to start knitting the top border using the Right Border chart.
Knitting the last stitch of the border with one stitch from the upper (or "live") edge of the body. As you are knitting each row of the border pattern, knit the last stitch of the border together with one stitch of the body. Slip this last stitch back to the left hand needle before you turn your work. This attaches the border to the body of the shawl. Knit back to the outside edge of the border on the even numbered rows. Continue knitting 1 border stitch with 1 body stitch at the interior end of every odd numbered border row until your have finished your 36 peaks. When you come almost to the end of the 36th peak, do not knit the last Row 16. Complete Row 15 of the top border pattern. You should have 17 stitches on your right needle. To the left of your “left-side" marker, there should be 20 left -hand border stitches on your left needle.
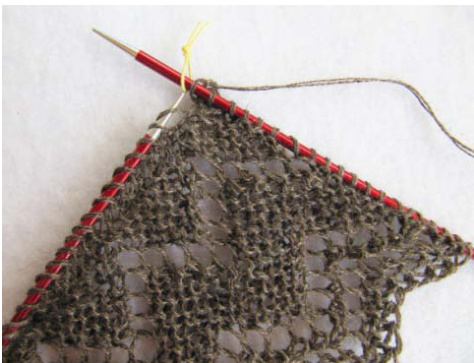
Turning the 4th corner:
ing 20 stitches which is Row 9 in the chart below so that all of your stitches are on one needl
Use this chart to turn the last corner.You will be working only the left -hand border stitches. Work this entire chart through Row 16 and through (what I fondly call) "the last row". You should have 16 stitches remaining on the left of the marker.
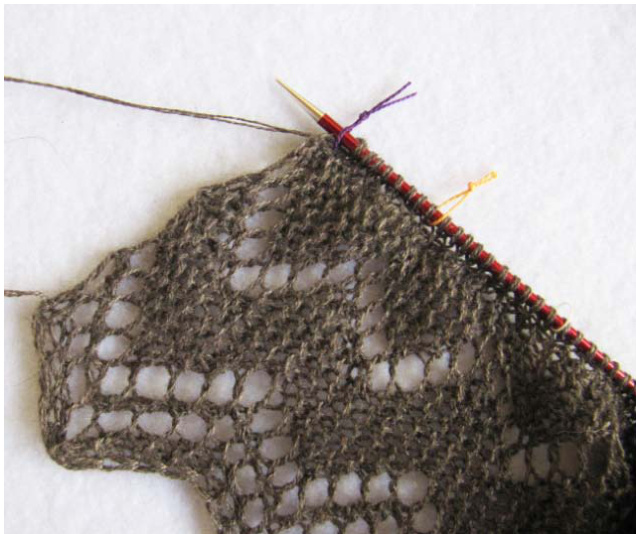
4th Corner
You now have all of your stitches on one needle with the marker in the middle. Slip the 16 left border stitches up to the marker onto the empty needle. Get rid of the marker and take a deep breath because you are almost finished! le right of the marker on your right needle, and 16 stitches to the left of the marker on your leff r.Remove the marker.
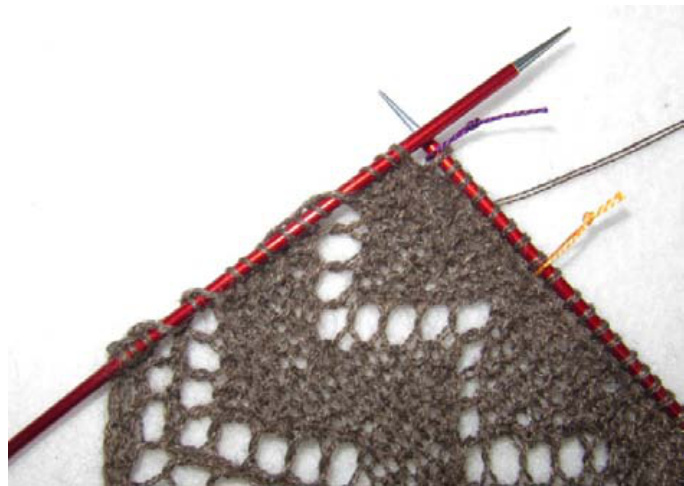
Graft last corner:
Slip 1 stitch from the right hand needle to the left hand needle. Bring the second stitch on the left needle through the slipped stitch, putting it on the right hand needle as you drop the first stitch off your needle. (Clear as mud.) It's difficult to write, but if you do each step, I believe you'llfind the actions fairly simple. Now, bring the second stitch on the right needle through the slipped stitch, puting it on the left needle and dropping the first stitch off. Do this back and forth until 1 stitch remains. Break the yarn leaving a few inches, and thread the tail end of the yarn through the last stitch, and then weave that end into the edge. Voila!
Blocking or Finishing:
There are lots of ways to block a square or rectangular shawl. Ifyou are not familiar with this process, you can find good videos on youtube.com, and explanations in Galina's books on Orenburg-style shawls. May you enjoy this pattern, and wear your shawl in good health and cheer.

MaraBishopStatnekov Santa Fe, New Mexico USA note: The pattern around the border (not the edging) is called a "Key Pattern" or "Meander Pattern". They are most familiar to me from Mayan ruins in the Yucatan. Recently, I saw a photo of an Anasazi cotton garment in "Sprang Unsprung" by Carol James (pg.35) from the Tonto Ruins on the Salt River in Arizona dated to the 11th century; the item is in the Arizona State Museum. This new world garment had a key design! I think it's spectacular, and because of it, I wanted to put a key pattern in this design.


