Christmas Caroler : Lord Bertram
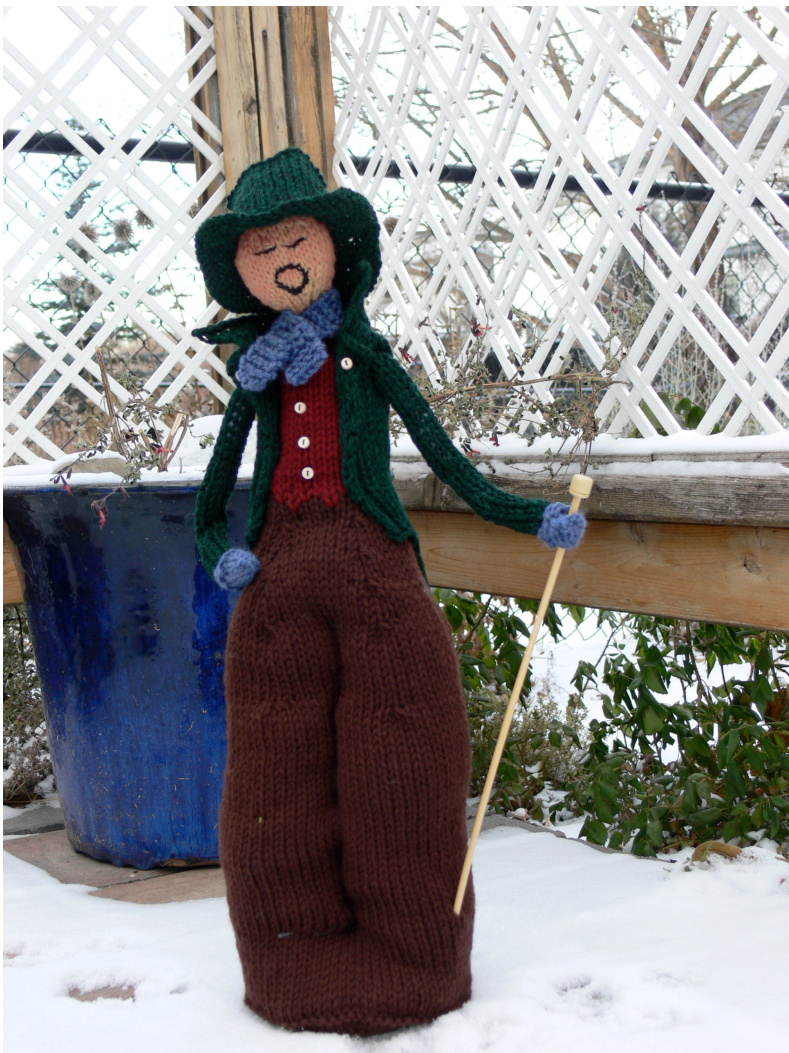
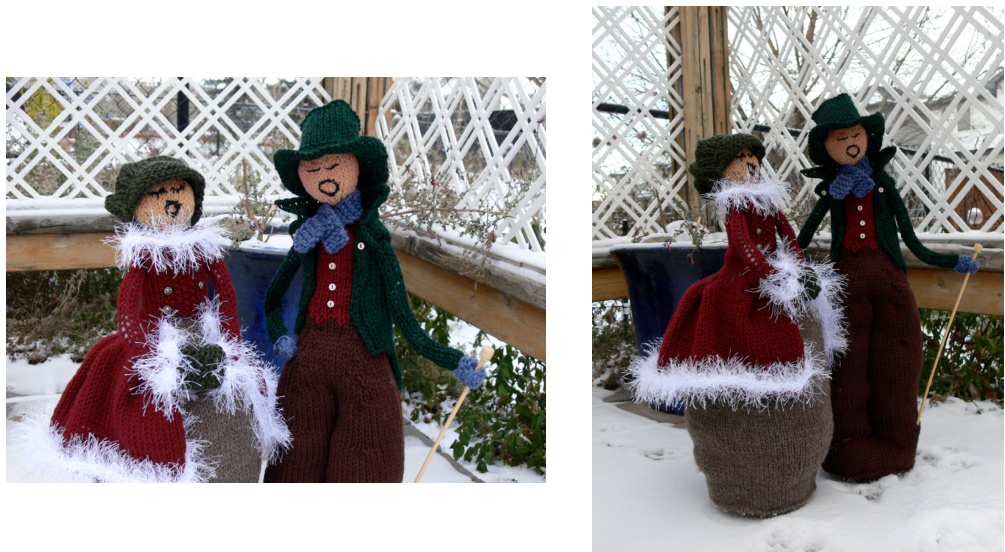
Lord Bertram is the second figure of a series of three to four figures that I am planning. A weighted Christmas Caroler, he is the perfect chaperone to Lady Beatrice. He is approximately 51cm (20") tall and 13cm (5") wide. You will need to be able to knit in the round and use duplicate stitch.
Materials:
Pants: 1 Ball of Cascade Heathers 220 (Colour: brown) Jacket/arms/Hat: 1 Ball of Cascade Heathers 220 (Colour 9447: Forest Heather ) Head: remnant of Cascade 220 (Colour 8412: Pear) Vest: small amount of Cascade 220 (Colour 2401: Burgundy) Mittens/Cravat: small amount of Cascade 220 (Colour 9326: Colonial Blue ) - small amount of embroidery thread - 5 small buttons or beads -Toy Stuffing - remnant of material and something for weight (l used rice): Optional - Cane: I used a spare knitting needle, which I thought was perfect! (Additional knitting needle may be needed to add extra vertical support to Lord Bertram.) - Needle: 4.0mm (US size 6) needle (either DPNs or circulars for magic loop or 2 circular method, whichever method you prefer). Gauge is not super important, but mine was 20sts = 10cm (4") SS (in the round) - Tapestry needle for weaving in ends
Abbreviations:
k: knit p: purl c/o: cast on b/o: bind off sS: stockinette stitch st(s): stitch(es) pm: place marker sm: slip marker sl: slip stitch rs: Right Side of garment ws: Wrong Side of garment k2tog: knit two stitches together (decrease one stitch, right slant) ssk: slip 2 stitches knit wise one at a time, then slip both of these stitches back to the left needle and knit them together through the back loops (decrease one stitch, left slant) skp: sl1, k1, PSSO PSSO: Pass slip stitch(s) over KFB: knit into the front and back of the same stitch (one stitch increased) m1L: make one stitch, left slant. m1R: make one stitch, right slant w&t: wrap and turn (short row shaping)
Notes:
Making the weight:
Cut two pieces of fabric (Il like to use felt or fleece, but it doesn't matter.. it's going in the body) into a 15.25cm (6") circle and sew them together leaving a small gap to fill. Using the material of your choice (l used rice) fill the bag as much as you can and sew up the final section. Place in the bottom of the body before adding the stuffing. Additional Note: I found that because I didn't stuff Lord Bertram as fully as Lady Beatrice, he was a little top heavy. In order to provide a little extra support, I pushed an extra knitting needle down his back (hidden by jacket, cravat and hat).
Instructions:
Pants:
Using pants colour, cast on 8 stitches and join to knit in the round being careful not to twist the stitches
Round 1: Kfb in each stitch (16 stitches) Round 2: Knit Round 3: \*Kfb, K1, pm,\* repeat \*\* to end. Round 4: Knit Round 5: \*Kfb, K to marker, sm,\* repeat\*\* to end. Round 6: Knit Continue rounds 5 & 6 until there are 9 stitches between markers (Diameter of circle should be approx. 13cm(5")). Round 7: Purl removing alternate markers so that there are four evenly placed markers around the body. Round 8: Knit, slipping markers as you come to them. Continue Knitting in SS Until the body is approx. 18cm (7") tall. At this point you need to make the weight for the bottom (if desired), place it in the base and stuff thebody. Decrease for waist Decrease Round 1: \*knit to two stitches before marker, SSK, sm,K2tog\* repeat \*\* 3 times more. Decrease Round 2: Knit in SS for 5cm (2") Next Round: Repeat the decrease round 1. Knit 3 rounds of ss. Repeat last 4 rounds until there are 6 sts between the markers. Torso Section: switch to vest colour and knit in SS for 10cm (4") Decrease for top: Repeat Decrease Round 1 and knit one round even, until there are a total of 6 stitches. Cut yarn and thread through the loops and draw to a close, ensuring that the body is completely stuffed. Pants/Body complete.
Jacket:
Note: Use Jacket colour for arms and body of jacket.
Make arm (two times):
You will be making an I-cord for the arms: Cast on 6 stitches onto a DPN and knit them, Slide the stitches to the other end of the needle (do NoT turn needle) and knit them again, bringing the yarn across the back (tightly). Continue in this manner until the Icord is approx. 18cm (7") long (sew up the end and stuff very lightly as you go). Attach arms to sides of body just under the shoulder decreases.
Jacket Body:
Make Tail (2x) c/o 3 stitches Row 1: sl1, p to end Row 2: sl1, m1r, k1, m1L, K1 (5sts) Row 3 and all ws rows: repeat row 1 Row 4: sl1, k to end Row 6: sl1, m1r, k to last stitch, m1l, k1 (7sts) Row 8 & 10: repeat row 4 Row 12: repeat row 6 (9sts) Row 14: repeat row 4 Row 16: repeat row 6 (11sts) Row 17: repeat row 1
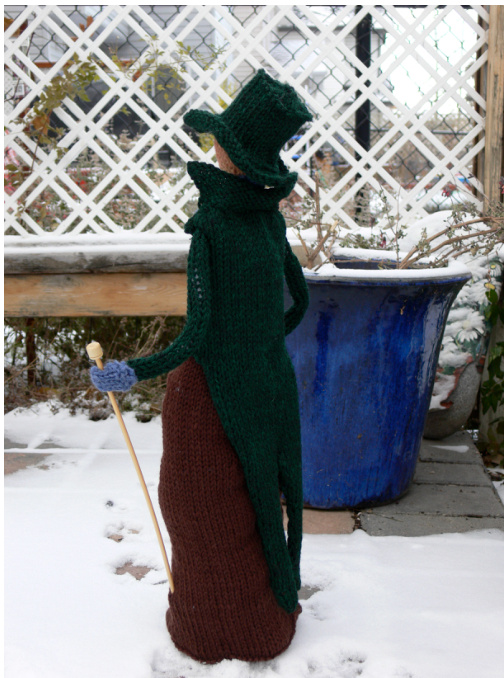
Place on DPN and put to the side to make the second tail. Once both tails are complete put them on the same needle with the RS facing. Knit across all stitches, joining the tails asoncepiece. Next Row: sl1, p to end Next Row: sl1, m1r, knit to last stitch, m1l, k1 (24sts) Next Row: sl1, p to end New Row: sl1, k to end Repeat last two rows until back measures 9cm (3.5") from the tail joining ending with a WSrow. Next row (rs): sl1, k to end, c/o 4 stitches Next row (ws): k2, p to end, c/o 4 stitches (32sts) Main jacket body: Row 1 (rs): p2, k to end. Row 2: kfb, k1, p to last 2 sts, kfb, k1 Row 3: p3, k to last 3, p3 Row 4: k3, p to last 3, k3 Row 5: repeat row 3 Row 6: kfb, k2, p to last 3, k1, kfb, k1 Row 7 (rs): p4, k to last 4, p4 Row 8: k4, p to last 4, k4 Row 9 & 11: repeat row 7 Row 10: repeat row 8 Row 12 (ws): kfb, k3, p to last 4, k2, kfb, k1 (38sts) Row 13 (rs): p5, k to last 5, p5 Row 14: k5, p to last 5, k5 Repeat row 13 & 14 once more. Next row (armholes): p5, k3, wrap yarn around needle twice (double yo), k2tog, knit to last 10 sts, k2tog, wrap yarn around needle twice (double yo), k3, p5 Next row (armholes): kfb, k4, \*p to yo, purl one wrap and drop the second off the needle,\* repeat \*\* once, p to last 5, k3, kfb, k1 (40sts) Next row (rs): p6, k to last 6, p6 Next row (ws): b/o 4 sts, k1, p to last 6, k6 Next row (rs): b/o 4 sts, p1, k to last 2, p2. (32sts)
Shape shoulders:
b/o 2 sts (lapel). Arrange the next 8 stitches (including the last stitch from b/o) so that 4 stitches each, are on 2 needles. Hold needles so that the rs are facing and do a three needle b/o over those 4 sts. Break yarn. attach yarn at neck and b/o 12 sts. Repeat 3 needle b/o for other shoulder. leaving the last 2 stitches (from the lapel) on holder. Collar: pick up and knit, 2sts (lapel), 2 sts across shoulder, 12 sts from back, 2 sts across shoulder and k the 2 sts from holder (20sts) Row 1: (inside of jacket, but RS of collar): kfb, k to last 2 sts, kfb, k1 Row 2: (ws of collar, rs of jacket): p Repeat row 1 & 2 twice more. B/O all stitches.
Head:
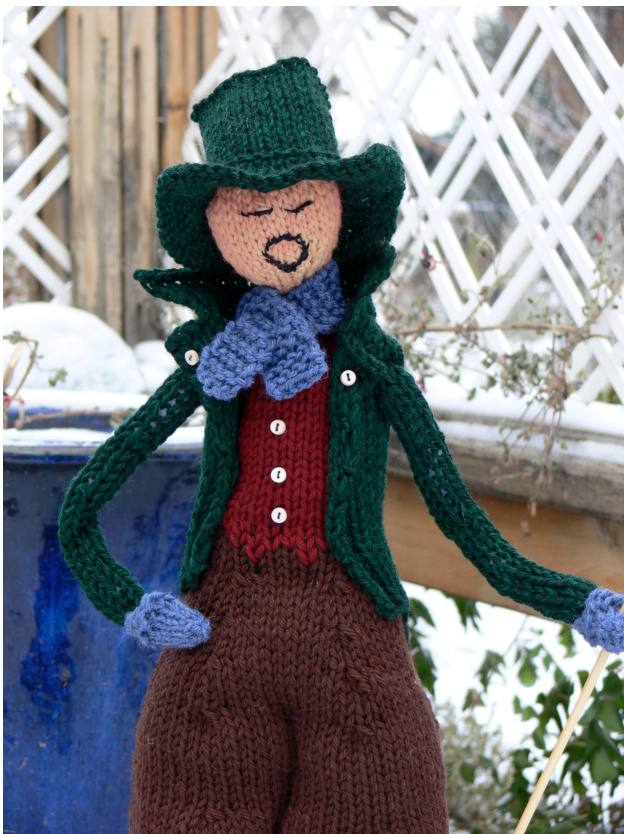
Using the head colour, cast on 6 sts and join to knit in the round. Round 1: KFB around (12 sts). Round 2 & 3: Knit all stitches Round 4: \*KFB, K1, pm,\* repeat \*\* to end of round Round 5: Knit Round 6: \*KFB, Knit to marker, sm,\* repeat \*\* to end of round Repeat Round 5&6 until there are 5 stitches between markers. Knit 5 rounds even adding stuffing as you go. Decrease Round 1: \*K2tog, Knit to marker, sm,\* repeat \*\* to end of round Decrease Round 2: Knit Repeat Decrease Round 1&2 until there are 6 stitches left, cut yarn and thread througl loops ensuring that there is enough stuffing before closing the hole completely. Note: I used some blush to make the slight yellow of the Pear colourway to a more flesh tone before I added the embroidery Using small amount of embroidery thread, stitch mouth and eyes.
Hat:
Using jacket/arms/hat colour cast on 6 sts and join to knit in round. Round 1: KFB in each stitch (12) Round 2: \*KFB, K1, pm\* repeat \*\* to end Round 3: \*KFB, K to m, sm,\* repeat \*\* to end of round Repeat Round 3 until there are 5 sts between markers (30 sts) Purl one round Knit 13 rounds of SS Purl one round
Brim:
Row 1: \*kfb, k1\* repeat \*\* to end of round Row2:k Row 3: \*kfb, k2\* repeat \*\* to end of round Row 4: k Row5:k Row 6: b/o all sts
Cravat and mittens:
Cravat:
c/o 5 sts and k every row (garter stitch) for 15.25cm (6") next row: k2, yo, k2tog, k1 k 8 more rows of garter stitch and b/o all stitches
ns: c/o 8 sts and join to knit in round. Round 1: p Round 2: K Round 3: p knit 6 rounds of ss Decrease round: \*ssk, k2tog\* repeat once more (4 sts) Decrease round 2: skp twice (2sts) Break yarn and thread through the two stitches left.
Assembly:
Using duplicate stitch, add two points to the bottom of the vest. Using the pants colour and starting at the second decrease (from bottom) sew a seam down the middle of his pants to give the suggestion of legs. Block all unstuffed items (particularly the jacket. In order for the tails to lay flat, this item must be blocked). I blocked the rim of the hat using a touch of spray starch. This worked really well and provides a little stiffening of the brim. Stuff the top hat so that it is the right shape. Weave in all ends (except one on the bottom of the head, and on the mittens). Sew 3 buttons/beads onto the middle section of the vest. Sew one button on each lapel of the jacket (as pictured). Slide Jacket onto body, pulling arms through the YO holes (gently). Adjust as required. Sew Jacket to body if desired. Sew mittens onto the ends of the arms and position as pictured. Attach one mitten to hip and one around the top of the knitting needle used as a cane (stick the bottom of the “cane" through the bottom of the pants). Attach Head to body. Place hat on head so that the hat is sitting from the back of the neck to the top of the "forehead". Attach hat with matching yarn. Weave in remaining ends. Wrap scarf around neck slipping one end through the yarn over button hole on the other end.
d images copyright 2011: Myrna Batten (mdbatten@shaw.ca). Pattern is for personal use onl)


