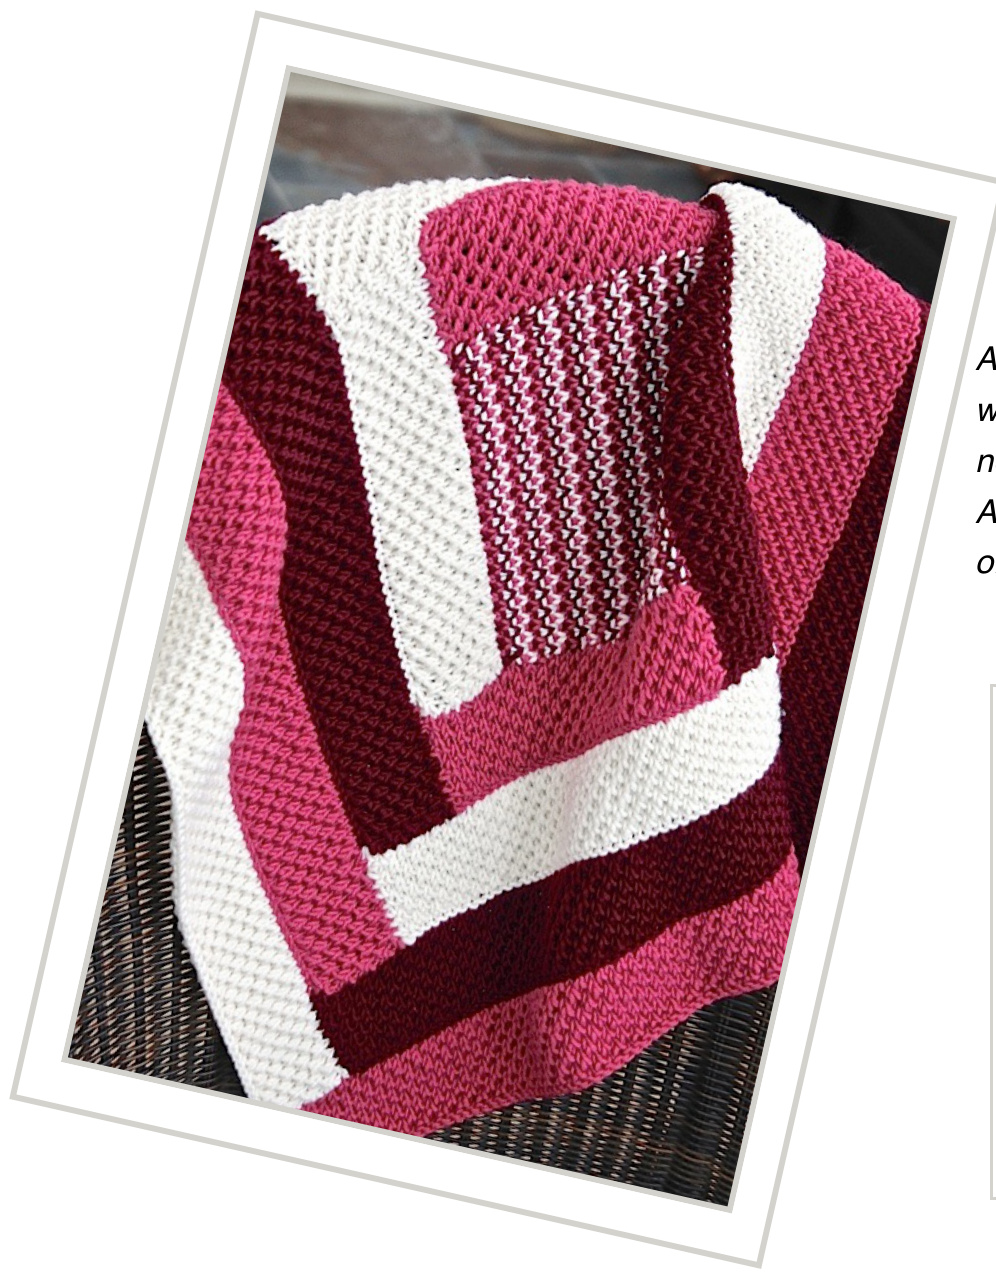
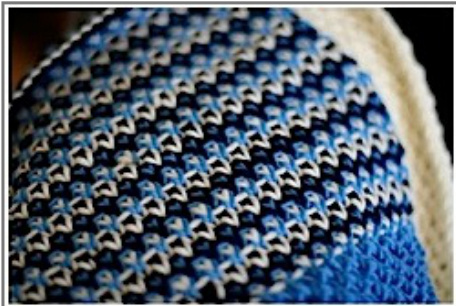
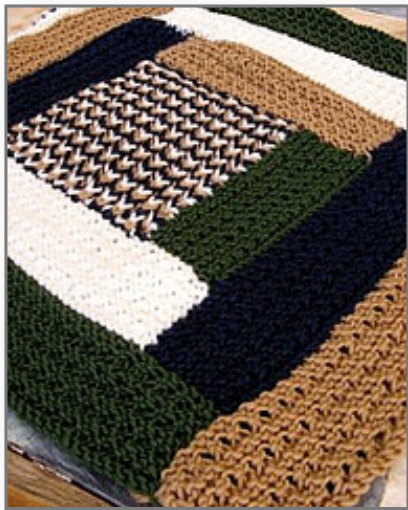
A new twist on an old favorite with a multi-color center and not a garter stitch in sight. An instant classic for your self or favorite baby.
What's Inside
Log Cabin Tutorial with Planning Sheet Color Palette & Layout Recommendations 2 Different Pattern Options
Vuance Qog Cabin Blanket
From the Designer
Stroller blankets are a win win for both new moms and knitters. The compact size is easy to tuck into car seats or strollers and can not be found in stores. They knit up quickly and so make perfect gifts for the busy knitter. In no time at all this adorable baby will be toddling around dragging your blanket around. Not for baby only, my own much larger log cabin sits patiently by my chair where logs are added when time allows. Not only is this one of my favorite blankets but one of my favorite patterns as well. Originally published on the Bella Knitting site. There's a lot of details --> how the log cabin works, color planning, sample palettes and 2 center stitch and 2 log patterns. Laura
Gauge
Gauge is flexible for this project but is recommended at 4.5 to 5.5 stitches/1" in St. st. The Garter-esque pattern gauge for logs is 3.5 st per 1". See tip on page 4 on adjusting for gauge. Sample: Yarn label gauge of 4.5" per 1" in St. st.
Size
Sample Blanket is 26" square but can be knit to any size by adding sections.
Yarn/Yardage
Sample:
Notions
Karabella Aurora 8 (98 yds) 100% Extra Fine Merino which results in a nice squishy blanket. Ball gauge of 4.5 stitches per 1" in St. st. A multiple of yarns will work: merino or blends, bamboo or cotton blended with wool for a lighter weight. I wouldn't recumbent pure cotton.
Yardage
3-Color Palette: 3 balls each color )4-Color Palette:2 balls each color · Circular Needle 36" long. You'll want a circular needle to handle the larger number of stitches as you progress. · US 5-7 Needle (or as needed to knit to gauge). Start with the recommended needle size for your yarn. You may end up using 2 different needle sizes for the center square and logs. · Tapestry Needle
Picking Up Stitches
Pick up stitches from the right side of a finished log (or center square at first) working from right to left. The needle is inserted from front to back and grabs the yarn held in your left hand behind the blanket bringing it back through to the front and creating a loop on the needle. Spacing of the stitches is important. The pattern indicates how many stitches to pick up for each log. We recommend you mark the 25%, 50%, and 75% points on the existing edge to help space the stitches. The good news is that pick up stitches are easy to take out and redo. More pictures and examples are available on our Photobucket.com site.
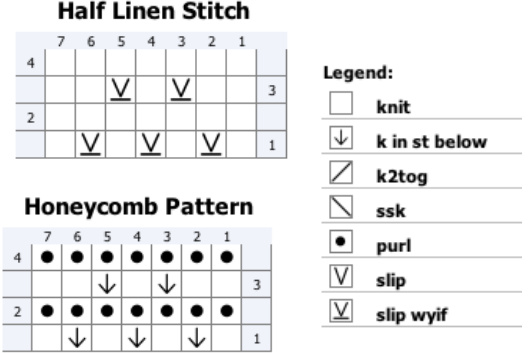
Chart Legend
| knit |
| k in st below |
| kfb |
| k2tog |
| purl |
| V slip |
| slip wyif |
Abbreviations
| k1rb | knit1intorowbelow |
| k1fb | knit1frontandbackincrease |
| k2tog | knit 2 together decrease |
| sl1 | slip as if to purl w/ yarn in back |
| sl1wyif | slip as if to purl w/ yarn in front |
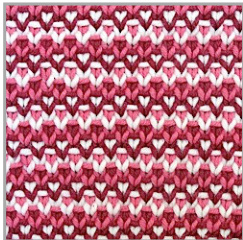
Knitting with 3 Colors
Working with 3 colors means you knit just 1 row with each color. Carry the yarn up the side pulling it softly so it does not gap but does not warp the knit fabric. It is easy to figure out which color to use ... it's the one waiting for you as you start the next row. Note how a color used on a RSR one time will be on a WSR the next.
| Row1 | ColorA | RSR |
| Row2 | ColorB | WSR |
| Row3 | ColorC | RSR |
| Row4 | ColorA | WSR |
| Row5 | ColorB | RSR |
| Row6 | ColorC | WSR |
Before You Begin
One of the best things about this blanket is its simplicity. However, just a bit of prep work will prevent future headaches. So take a little time to knit your swatches and plan out your colors. Once you get going the knitting will be a breeze! Read our Log Cabin Planning Guide starting onpage6.
Swatching
We recommend two swatches, one for the center square and one for the ‘log' pattern. This is an important step to assure the gauges match up and the blanket does not torque. You are looking for consistency in your knitting not necessarily a perfect match to our 4" swatch. Does Swatch 2 line up evenly along the side of Swatch 1? Consider using different size needles for each if it does not.
Swatch 1: Center Square Pattern:
You can swatch in one color or practice working in 3 colors. Cast on 19 stitches with Color 1 and change colors after each row (see tips on page 2).
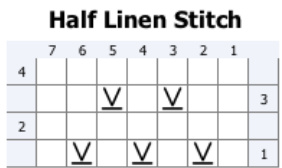
Option 1: Half Linen Stitch
| Odd | ||
| Row1 | RSR | k1 *S sl1wyif, k1 |
| Row2 | WSR | nd |
| Row3 | RSR | k2 sl1wyif, k1 *k1 |
| Row4 | WSR | nd |
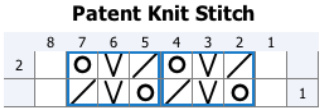
Option 2: Patent Knitting Stitch
Patent knitting was once as common as garter or stockinette is today. It is easy to work in 3 colors. The pattern is worked the same on right and wrong sides which makes it fully reversible. Cast on 17 stitches to work this swatch.
| AllRows | k1 *yo, sl1,k2tog k1 |
Swatch 2: Side Sections
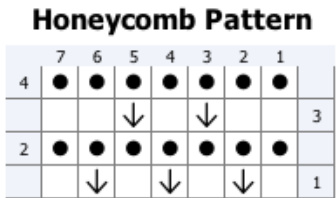
You'll swatch with an odd number of stitches, however, when working the blanket you will sometimes pick up an even number so we include both in table below. Cast on 15 sts and work for a few inches. Bind off with Suspended Bind Off (see side tip). It is the width that mattershere. Option 1: Honeycomb Stitch
| Odd | Even | ||
| Row1 | RSR | k1 * k1rb, k1 | *k1, k1rb *k2 |
| Row2 | WSR | knit | knit |
| Row3 | RSR | k2 * k1br, k1 * k1 | k1 *k1,k1rb*k1 |
| Row4 | WSR | knit | knit |
Option 2: Eyelet Rib
| Row 1 | RSR | k1*k2tog *k1 |
| Row2 | WSR | k1 k1f&b*k1 |
| Row3 | RSR | knit |
| Row4 | WSR | knit |
Casting On & Binding Off
If you do not cast on and bind off loosely the blanket will not lie flat. The trick to casting on is not to do it so loosely so the stitches sag, it is to put space between each stitch as you cast on gently. Continue to move the stitches down the needle. Do not let them bunch up. You can find more about the Suspended Bind Off on our web site in the Learn section.You'll use this on every section.
Adjusting for Gauge / Yarn
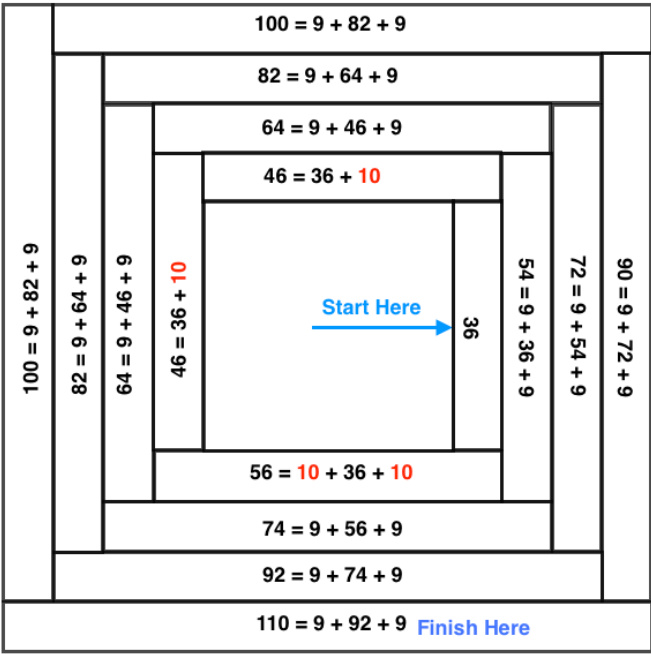
The stitch patterns look best if not too loose. Work your test swatch at the recommended needle and see how you like the drape. The test swatches below are 4". However, if you are using a different type of yarn or gauge you might want to cast on 27 stitches for the Honeycomb blanket (36 for Ridges) to see how wide your first log would be. If you adjust your center square to that size you will be able to follow the pick up instructions for the pattern as is. In summary: if you gauge is different, use the same number of stitches in the pattern for your logs and adjust the size of your center square to match the width of the first log.
Picking Up Tips
· On a Top Edge: Pick up both loops of the existing bind off stitches. > On Sides: Look for the garter ridge and pick up through the knot.
HoneyComb Blanket with Half Linen Center
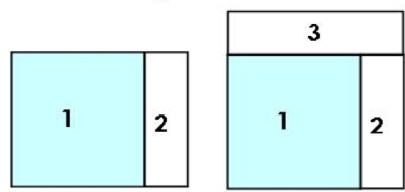
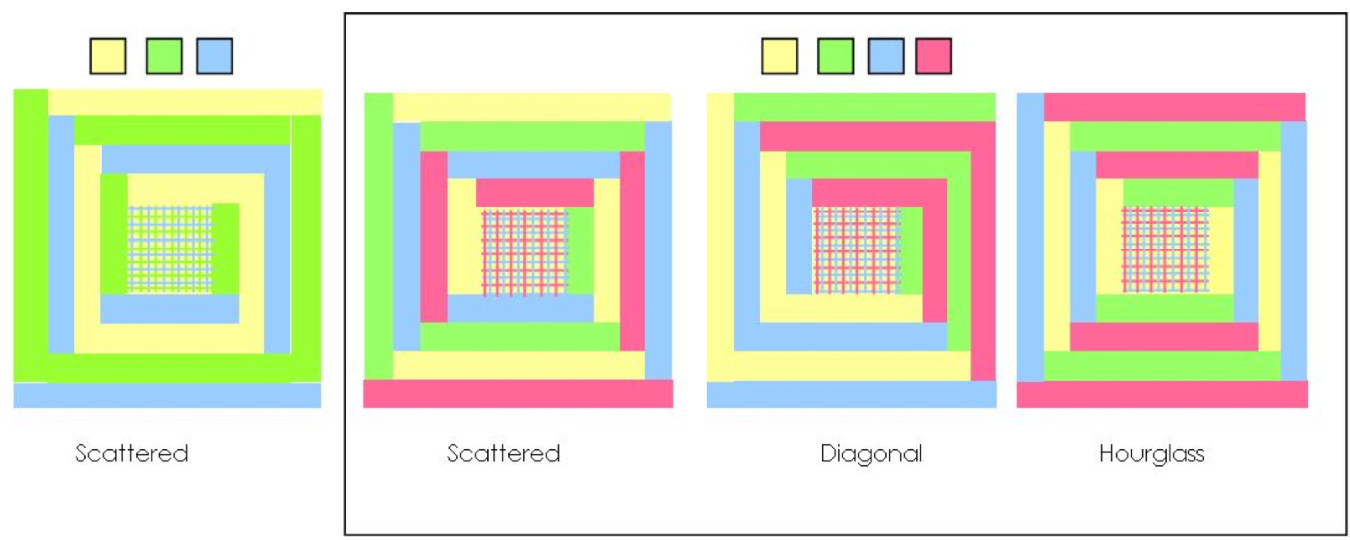
Color Planning
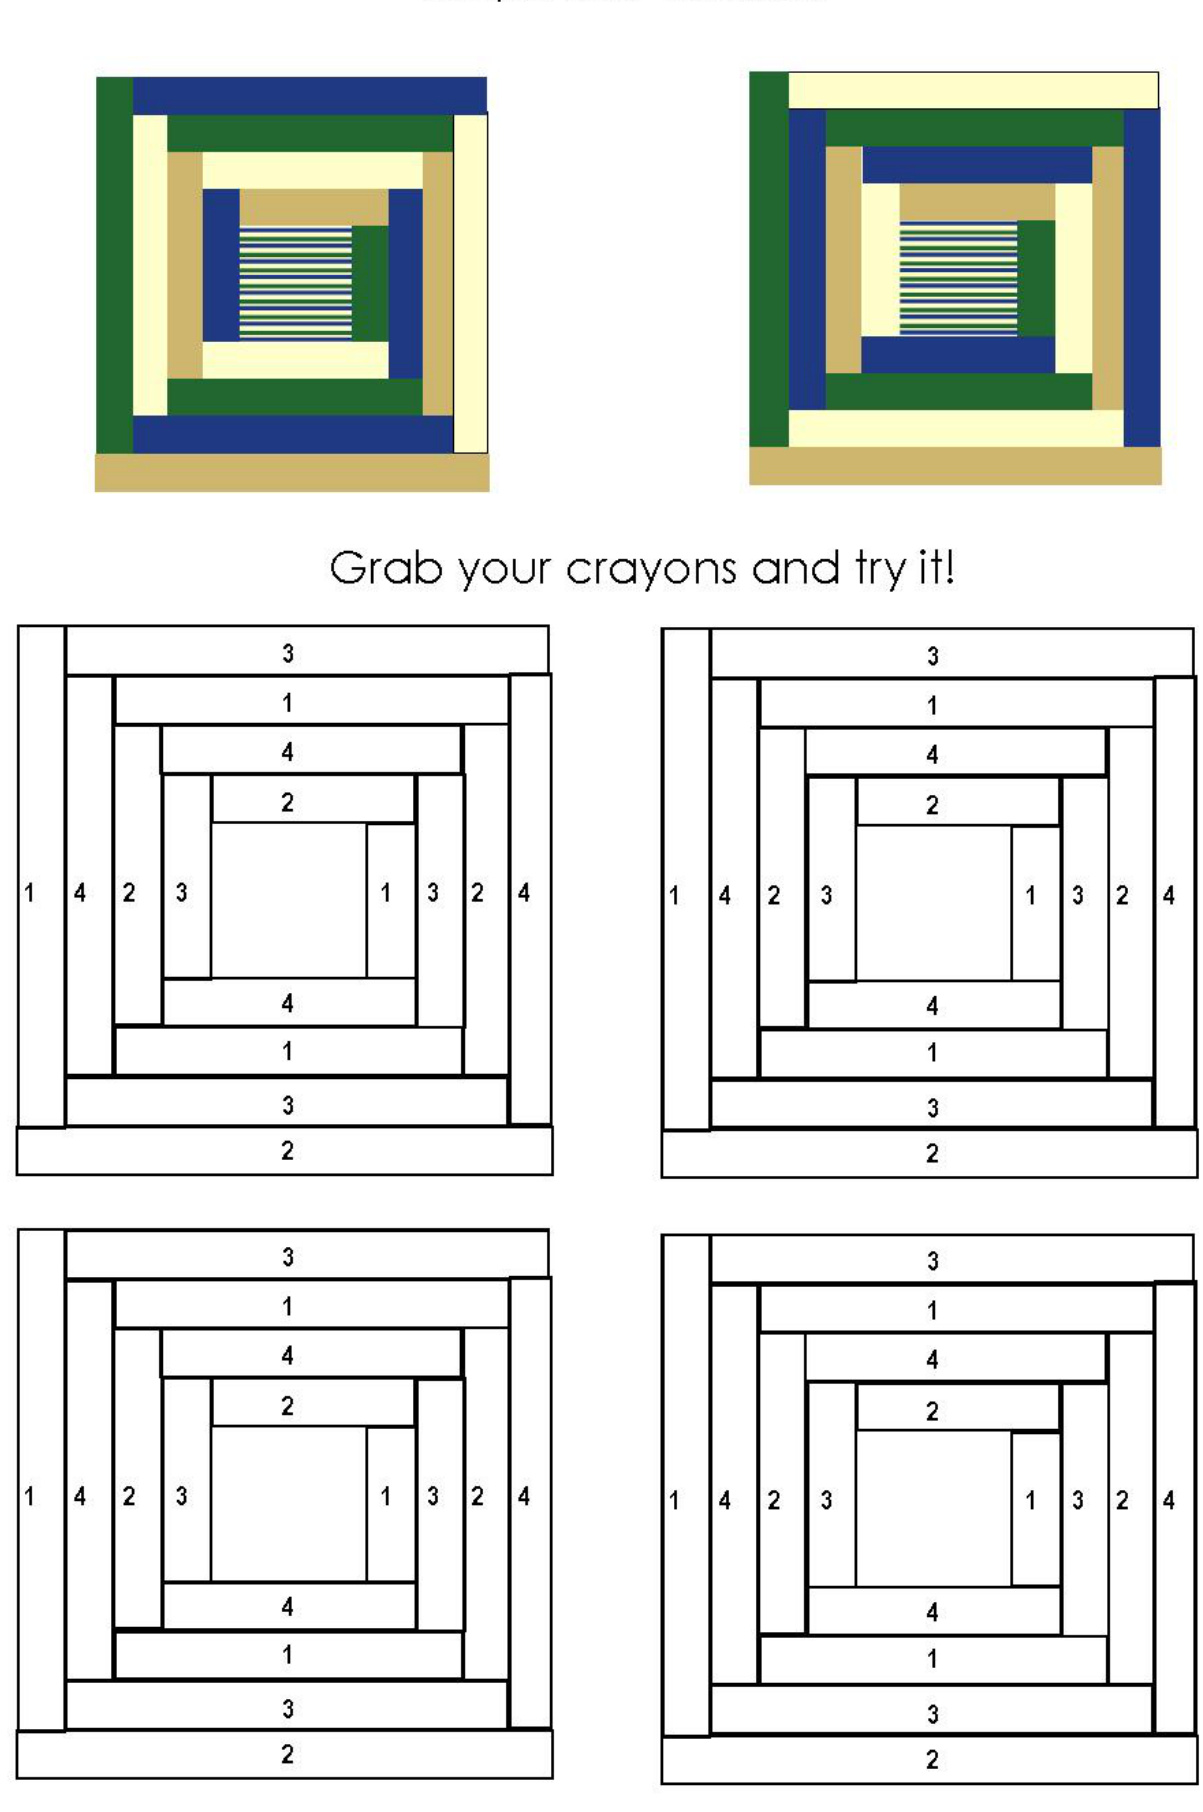
Grab some colored pencils or crayons and have fun picking out colors and the pattern layout for your blanket using our planning guide at the end of this pattern. Once you've decided on a 3 or 4 color palette use the diagram below to layout your colors. We've used a simple 3-color palette for our sample to demonstrate how well that can work. You can order them as you chose, the color usage is relatively consistent.
Knitting the Center Square
Cast on 36 stitches with Color A 2. Work in Half Linen Stitch in three for 7 V2" or until square changing colors every row ending with a RSR. 3. Bind off with the next color in the pattern using the Suspended Bind Off.
Knitting the Blanket Sections
It's time to start with the first log. Pickup indicated number of stitches along a side of the center square. Since the center square is not Garter there are no ridges to indicate pickup points. See our tip on picking up on pages 2 & 3 of this pattern. 1. Pick up 27 stitches evenly across the side edge of the center square. 2. Knit back (these 2 rows start every new section) 3. Continue in Honeycomb Stitch pattern for 2 %2 inches (18 rows) ending on a RSR 4. Bind off using the Suspended Bind Off. Pick up for the next section adding 9 stitches to each section to account for the depth of the additional log. See Page 6 for more on how building the logs works.
Finishing
Weave in the ends and block the blanket as appropriate for your yarn. Done!!
| Your Color Selections | ||
| Color | Area | |
| A | ||
| B | ||
| C | ||
| D | ||
\* i.e which 3 color for center square.
Honeycomb Pattern (even)
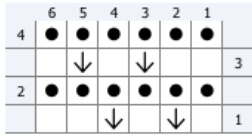
Honeycomb Help
Fix it of forget? There are 2 common errors with the pattern. One is to knit across a right side row. The other to repeat a RSR so the pattern is not offset properly. The first, knitting across a RSR, will show so you need to unknit it. If you miss align your k1rb, you may notice but others will not. You decide what you can live with. If you continue start with a new contrasting row.
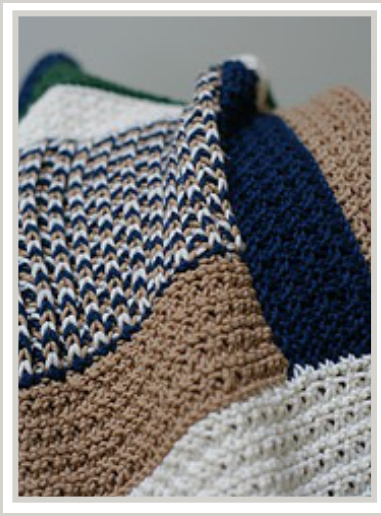
Ridges Blanket with Patent Knit Center
You can also work with the Half Linen Center from the other pattern.
Color Planning
Grab some colored pencils or crayons and have fun picking out colors and pattern layout for your blanket using our planning guide at the end of this pattern. Once you've decided on a 3 or 4 color palette use the diagram below to layout your colors. We've used a simple 3-color palette for our sample to demonstrate how well that can work. You can order them as you chose, the color usage is relatively consistent.
Knitting the Center Square: Patent Knit Stitch (multiple of 3 +2)
1. Cast on 36 stitches with Color A 2. Work in Patent Stitch for a total of 72 rows changing colors every row ending with a RSR. See counting tip in side bar.
| AllRows | k1 *yo, sl1, k2tog k1 |
3. Bind off with Color A using the Suspended Bind Off
Knitting the Blanket Sections
It's time to start with the first log. Pickup indicated number of stitches along the cast on edge of the center square. Picking up one stitch for every cast on stitch. See our tip on picking up on pages 2 & 3 of this pattern. 1. Pick up 36 stitches evenly across the cast on edge of the center square. 2. Knit back (these 2 rows start every new section) 3. Continue in Ridge Pattern (table to the right) for 2 %2 inches (16 pattern rows) ending w/ Row 3. 4. Bind off using the Suspended Bind Off. Continue picking up stitches as shown in the diagram. See Page 6 for more on building the logs. Note in the FIRST row of logs only you will add TEN stitches instead of 9. You can add one in the seam.
Finishing
Weave in the ends and block the blanket as appropriate for your yarn. Done!!
| Your Color Selections | ||
| Color | Area | |
| A | ||
| B | ||
| C | ||
| D | ||
Counting Rows
It is easy to count rows in tricolor Patent Knit Stitch. Since the raised "ribs" are 2-row slip stitches, just count 36 of them and you're done. Wehave a freePatent Knit scarf on our sister SportsEanKnitting.com site.It has more details on this fun, versatileandreversiblestitch.
| Row 1 | RSR | k1 *ktog *k1 |
| Row2 | WSR | k1*k1f&b*k1 |
| Row3 | RSR | knit |
| Row4 | WSR | knit |
Row1reduces thenumberofstitches by half and Row 2 puts them all back.
A Tutorial for those who like to know how things work
I. Why we love it. Knitting a Log Cabin blanket is versatile and fun. It can be contemporary or traditional based on your layout and color selections.
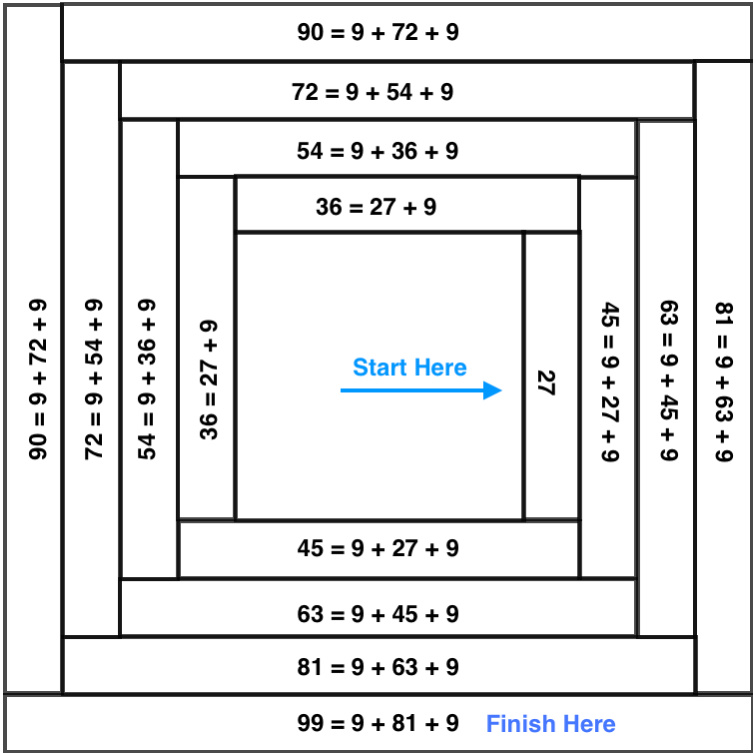
Il. Building a Log Cabin Blanket
Building a Log Cabin blanket starts with a square .. Add one panel of the same height... then another of the total width.
And you're off an running (or knitting as the case may be).
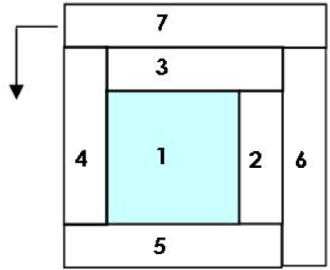
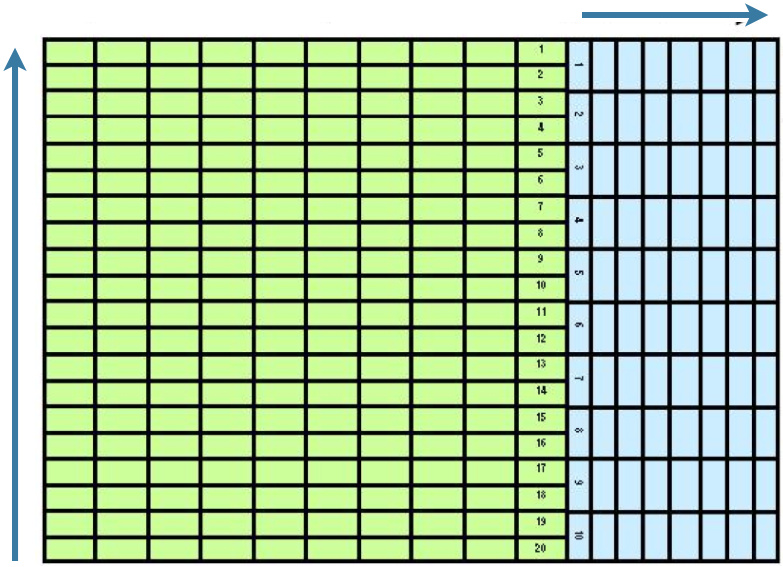
Ill. How it works... it's all about gauge.
Traditional Log Cabin designs are always knit in Garter stitch (knit every row). No one really likes Garter so why use it? The answer has to do with how closely the rows snuggle together. Stockinette requires more rows than stitches to knit a square. For example, a typical gauge might be 20 stitches and 28 rows per 4 inches. Garter stitch, is wider and pulls the rows more closely together. Stockinette 4"w×5.75h A Garter swatch 20 stitches wide and 40 rows long is square. What does that mean to us? It means that since there are twice as many rows as there are stitches, when you pick up stitches along the side of a Garter square you pick up 1 stitch for every 2 rows. Conveniently, that equates to 1 stitch for every Garter ridge bump. No counting, no muss, no fuss. Not quite sure what we just said? Here's a graphic image. The green square is 10 stitches wide by 20 rows high. The blue square, picked up along the right side, also has 10 stitches.
IV. Mixing it ip a bit. Stitches Now that we understand the importance of gauge (a 1 to 2 stitch to row ratio) why not try something a little more interesting because to be honest Garter isn't our favorite stitch. The pattern includes two decorative variations of Garter stitch that have the same benefits of Garter. Colors: You can use 3 or 4 colors for your blanket.

Center Square
There's no rule that the center square has to be solid. You can mix up three of the colors for a more interesting look. All of our patterns assume a tricolor center square which allows for a better balancing of colors and yarn requirements. We also think they're more interesting.
Sample Color Variations
LogCabin 4-Color Palettes
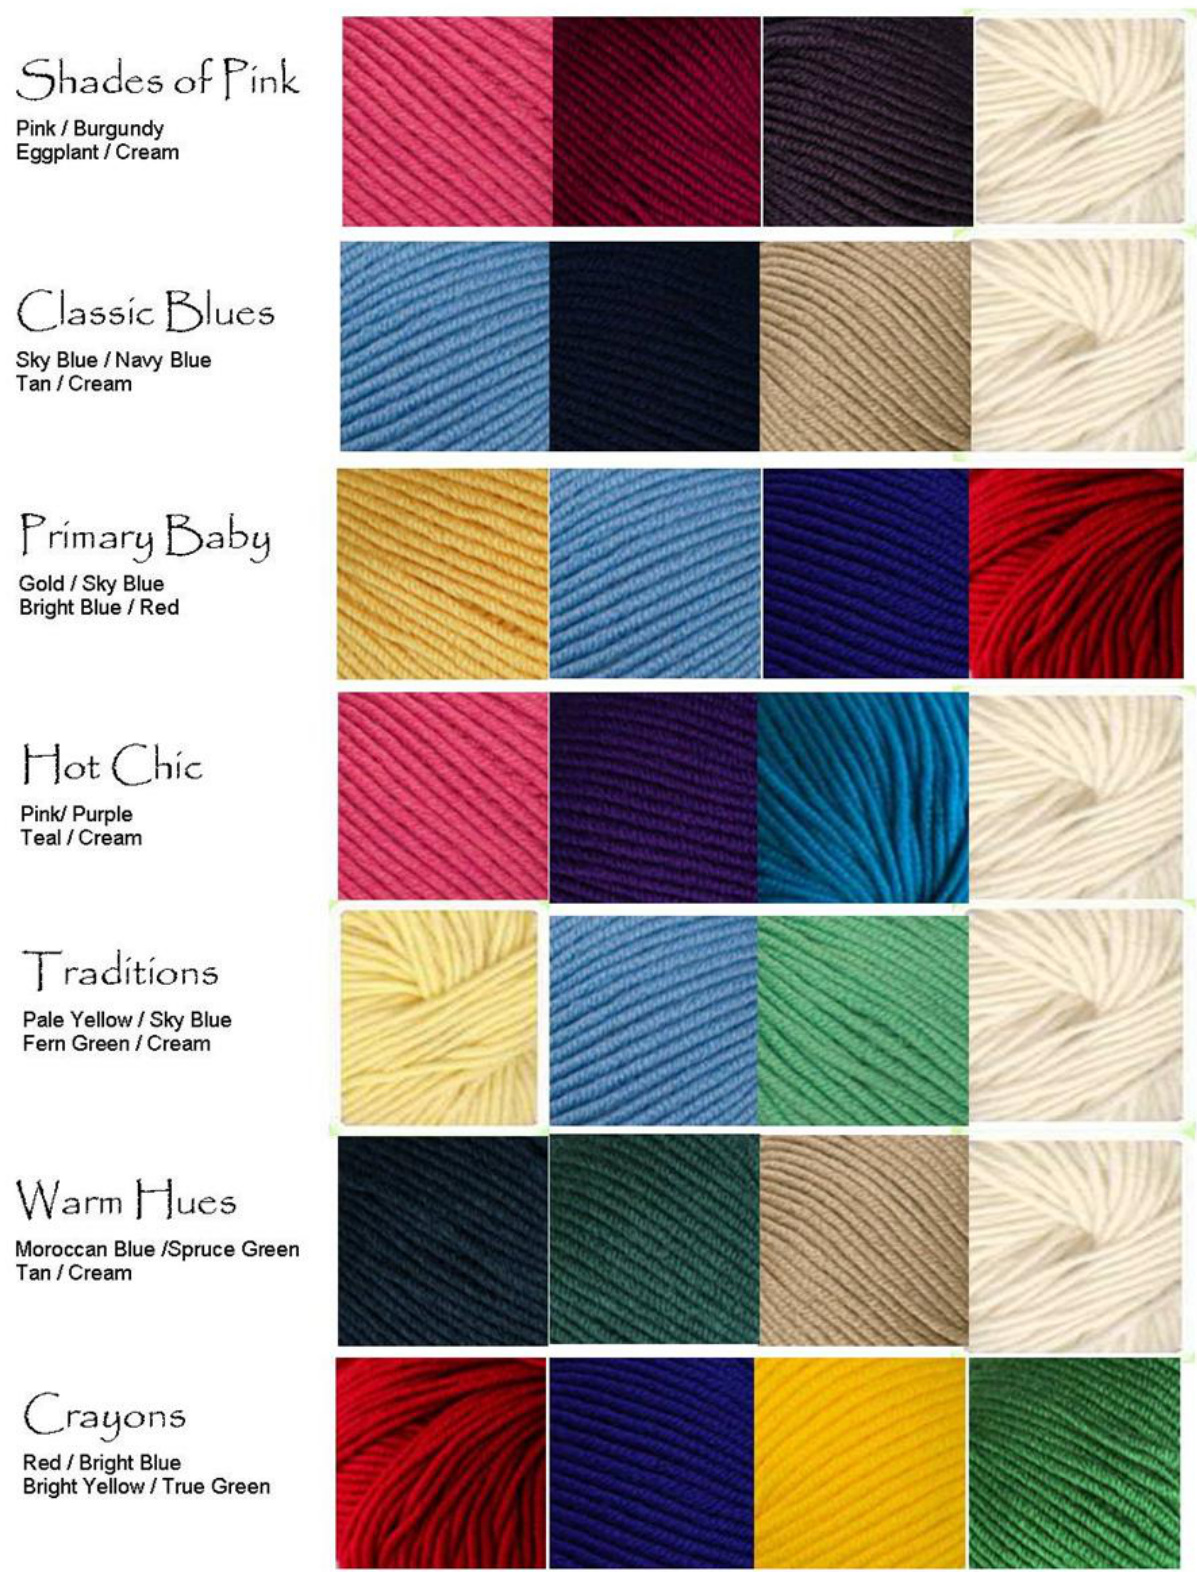
Note how almost every palette has a light neutral color.The blanket looks best with this contrast.


