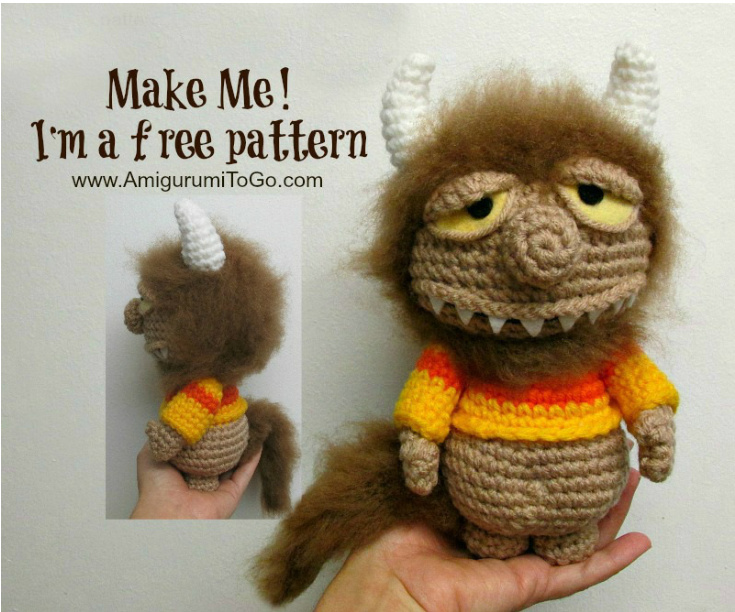
Video The Unnamed Monster Pattern
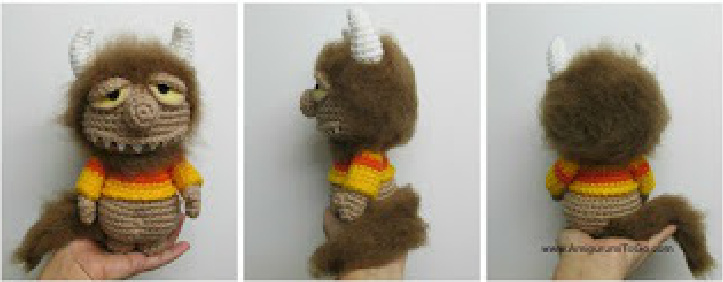
And the Unnamed Monster is here, finally! After a full day of youtube glitches the videos are uploaded and ready to view, yahoo! I think youtube is trying to strengthen my character or trying to bring out the monster in me. I swear if youtube would just upload a video without problems I might faint in disbelief! Anyway, lol it is done, whew! The Unnamed Monster is ready for you to bring to life. You can give him a name or let whoever you make him for name him... or her :) There is a full video tutorial, links below and the written patternisdownbelowwith a print friendly button at the bottom of the pattern. Have fun and take your time! Doll is about 9 1/2 inches tall to tip of horns Copyright 2014 Author: Sharon Ojala - Amigurumi To Go, All rights reserved Attention members of all cross stitch and DlY sites Read this copyright notice. Taking whole or parts of this pattern and/or photos away from Amigurumi To Go for any purpose is theft. Using one photo with a link back to the pattern is permitted.
Read me \~> Work in continuous rounds, do not join. I used Red Heart Comfort yarn with a 4.00 mm hook. If you crochet more on the loose side then use a smaller hook so you don't get gaps and stuffing showing through the stitches. Have any questions or if you come across a mistake in the patternpleaseleaveamessageinthecommentsectionbelow. Read me \~> How to read the rows: Each row has a sequence as given below. Example: 1sc then 2sc in next st means repeat that sequence 1sc then 2sc in next st followed by 1sc then 2sc in next st over and over to the end of that particular row. The number inside the parentheses ( \~) is the number of stitchesyoushouldhaveat theend of thatparticularrow. Read me \~> Add in a marker at the end of row 2 and move that marker at the end of every row. I just use a short length of yarn and pull it through the last stitch I put in at the end of every row.
Supplies:
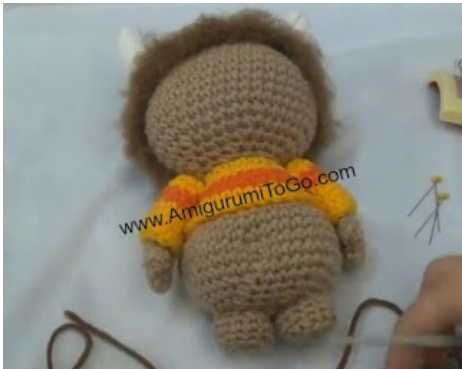
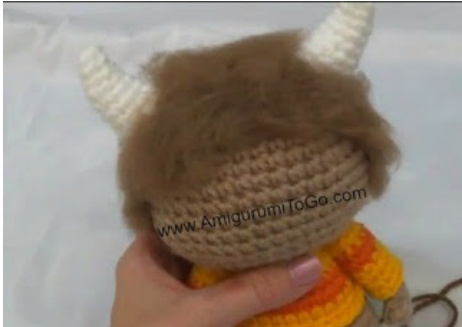
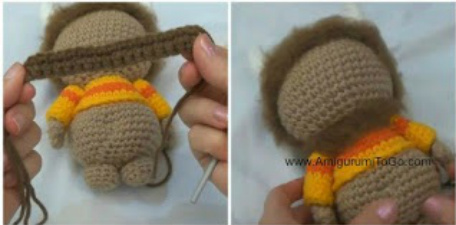
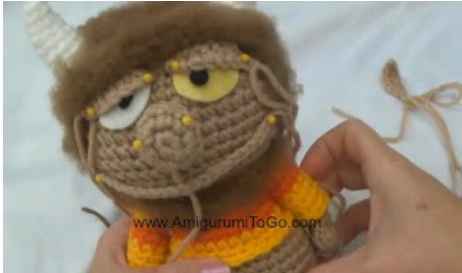
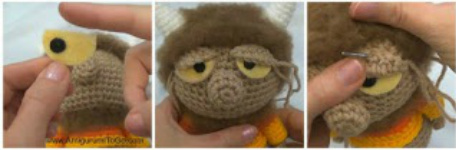
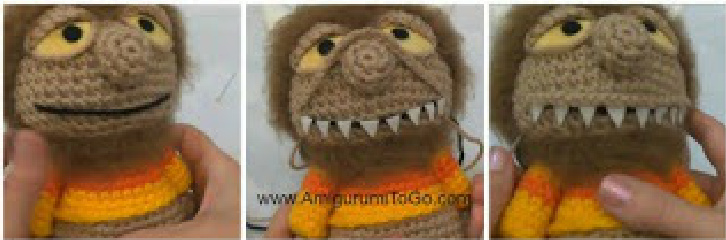
Red Heart Comfort worsted weight acrylic yarn \~ If you can't get Red Heart Comfort or Super Saver then use an acrylic, worsted weight yarn in similar colors and choose the appropriate hook size. :Body color~ 3167Hair and Tail \~ 3191Shirt \~ Bright Yellow 3182? Shirt Stripe \~ Tango 3232Horns \~ White 4.00 mm hook \*use a smaller hook if you see gaps in your stitches blunt end yarn needle for sewing steel pet brush or a stiff brush scissors 100% polyester stuffing felt for teeth and eyes fabric glue optional \~ 4 pipe cleaners for the tail This pattern uses the following stitches: st = stitch sc = single crochet sl st = slip stitch 2tog = crochet 2 stitches together BLO = back loops only f/o = finish off Please note the video follows along with the written pattern. The fuzzy cap, horns and face all need to be put together in the order given in the assembly section below. Also, I used a 4mm hook to make all parts (except for the nose) with the yarn weight and color code as given in the supplies list. \*How to crochet all the parts video tutorial is here \*If you'd rather just the sewing it together tutorial then click here Starting with body color at the top of the head working down to bottom of body: 1) magic circle or adjustable loop with 6st (6) 2) 2sc in each (12) 3) 1sc then 2sc in next st (18) 4) 1sc in next 2st then 2sc in next st (24) 5) 1sc in next 3st then 2sc in next st (30) 6) 1sc in next 4st then 2sc in next st (36) 7-8) 1sc in each st for 2 rows 9) 1sc in next 5st then 2sc in next st (42) 10-15) 1sc in each st for 6 rows 16) 1sc in next 5st then 2tog (36) 17) 1sc in next 4st then 2tog (30) 18) 1sc in next 3st then 2tog (24) 19) 1sc in next 2st then 2tog (18) 20) 1sc then 2tog \* switch to shirt color on last 2tog (12) 21) 2sc in each st (24) \*stuff the head. Shape while you stuff. Continue stuffing as need over the next few rows 22) 1sc in next 3st then 2sc in next st, switch to stripe color on last st (30) 23) sl st first st then 1sc in next 29st (30) 24) 1sc in each st, switch to shirt color on last st (30) 25) sl st first st then 1sc in next 29st (30) 26) 1sc in each st, switch to body color on last st (30) 27) in the BLO 1sc in next 4st then 2sc in next st (36) 28-29) 1sc in each st for 2 rows 30) 1sc in next 5st then 2sc in next st (42) 31) 1sc in each st for 1 row 32) 1sc in next 5st then 2tog (36) 33) 1sc in next 4st then 2tog (30) \*stop here. Using shirt color add a row of sc to the outer loops of row 27 then sl st the last st to the first st when done. Bring the yarn tails inside the body and knot together. Cut up a bit shorter and leave them tucked inside the body 34) 1sc in next 3st then 2tog (24) 35) 1sc in next 2st then 2tog (18) \*stuff body and continue stuffing over the next few rows as needed 36) 1sc then 2tog (12) 37) 1sc then 2tog (8) 38) 2tog twice (6) f/o and leave a long tail for sewing and adding in belly button. Weave in and out the remaining stitches and pull to close up the gap. Bring the yarn tail up and out where the belly button will go. Make a french knot and bring the yarn tail back down and out where you f/o the body, pull on the yarn take to suck in the tummy a bit. Repeat the same steps again if you want the belly button to be bigger. Remember to pull on the yarn tail to suck in the belly. When finished knot the yarn tail off where you f/o the body then hide yarn tail inside body. Head Cap: with brown 1) loop with 6st (6) 2) 2sc in each (12) 3) 1sc then 2sc in next st (18) 4) 1sc in next 2st then 2sc in next st (24) 5) 1sc in next 3st then 2sc in next st (30) 6) 1sc in next 4st then 2sc in next st (36) 7) 1sc in next 5st then 2sc in next st (42) sl st and f/o leaving a long tail for sewing. Brush the entire cap with a pet brush, hair brush or whatever you can find that will brush up acrylic yarn. It will take a lot of brushing to make it really fuzzy. The horns should be sewn to the cap before the cap is sewn to the head. Read the assembly section below. ldll. wul vIuwII 1) loop with 6st (6) 2) 1sc in next 2st then 2sc in next st (8) 3) 1sc in each st 4) 1sc in next 3st then 2sc in next st (10) 5) 1sc in next 4st then 2sc in next st (12) 6) 1sc in next 5st then 2sc in next st (14) 7-18) 1sc in each st for 12 rows 19) 1sc in next 5st then 2tog (12) 20) 1sc in next 4st then 2tog (10) 21-23) 1sc in each st for 3 rows f/o leaving a long tail for sewing. Do not stuff tail. You can add in some pipe cleaners if desired to make the tail a bit poseable. Horns: with white make 2 1) loop with 6st (6) 2) 1sc in each st 3) 1sc in next 2st then 2sc in next st (8) 4) 1sc in each st 5) 1sc in next 3st then 2sc in next st (10) 6) 1sc in each st 7) 1sc in next 4st then 2sc in next st (12) 8) 1sc in each st sl st next st and f/o leaving a long tail for sewing. Stuffthe horn. Use a stuffing stick to get the stuffing into the tips. After you sew the horns in place bend the the tips down to give them a curved look. Nose: using body color \*I used a 4.5mm hook to make the nose so it came out slightly larger and also easier to shape 1) loop with 6st (6) 2) 3sc in the first st then 1sc in next 2st (10) 3) 1sc in each st 4) 1sc in next 3st then 2tog (8) sl st and f/o leaving a long tail for sewing. Stuff and shape Arms: using body color make 2 1) magic circle or adjustable loop with 6st (6) 2) 1sc in next 2st the 2sc in next st (8) 3-10) 1sc in each st for 8 rows flo and tuck yarn tail inside arm. Do not stuff arms. \*optional after you sew the arm into the sleeve you can add a thumb by inserting yarn and adding 2dc. Use the yarn tail to shape the thumb then hide yarn tails inside arm. Sleeves: Starting with main shirt color make 2 1) loop with 6st (6) 2) 2sc in each st (12) 3) 1sc in next 11st, switch to stripe color on next st (12) 4) sl st first st then 1sc in next 11st (12) 5)1sc in next 11st then switch colors on next st (12) 6) sl st first st then 1sc in next 11st (12) 7-9) 1sc in each st for 3 rows sl st next st and f/o leaving a long tail for sewing. Knot off all color change pairs. Push arm into sleeve and add in a few stitches to hold it in place. If you add thumbs make sure that all color jumps will be facing towards the body once you sew the arms to the body. Legs: with body color make 2 1) loop with 6st (6) 2) 2sc in each (12) 3) In BLO 1sc in each st for 1 row 4-5) 1sc in each st for 2 rows sl st next st and f/o leaving a long tail for sewing. Stretch out and shape leg before stuffing. Stuff then use lots of pins to hold the legs in place then sew in. FacePieces are inpart 2of thevideo tutorial Fuzzy Piece around the front of the face: Make a chain that reaches across from one side to the other. The number of chains will vary, for me it was 18. Make sure the chain has to stretch a bit to reach across as you don't want it to overlap onto the cap. Again, the video explains this part.1) ch18 begin with a long yarn tail that you can sew into the head 2-3) 1sc in each ch starting with the 2nd ch from the hook flo leaving a tail for sewing Mouth: You can make the mouth completely different as far as the type of smile if desired. Just play around with it and see what looks best to you. I gave him a closed mouth with 8 teeth showing and for that I made a chain of 18 using the body color with the end yarn tails long enough to sew into the head. Cut 8 triangular shapes from felt. The rest of the instructions are in the assembly instructions below. Eyebrows: using body color 1) ch7 \* begin with a long enough yarn tail that you can sew into the head 2) starting with the 2nd chain from the hook, 1sc, 1hdc, 2dc, 1dc, 1sc, sl st and f/o leaving a long tail for sewing. View video for outlining. Please do not outline the eye if unsure as it looks just fine without it. And please don't stress over the eyebrows if you struggle with working in chains. You can also just ch7 and sew that over the top edge of the eye and it'll look just fine. Eyes: I cut eyes from felt and colored them with chalk since I didn't have any yellow felt that I thought would look good. More instructions are in the assembly section below Assembly: part 2 of the video tutorial is here. It would be best to watch that first for the best results, especially for thefaceparts. 1) sew on the legs tirst then the arms 2) sew horns to cap then stitch part of the cap on leaving the front top edge loose without stitches until after the eyes are done. 3) sew on the fuzzy face part 4) (starting at 15:11 in the video I show every detail on making the face. It would be helpful to wat ch that before starting the face) Pin the mouth, nose and eyes in to make sure of spacing. Once you know where everything will go, remove it all except for the nose. Add lots of pins to hold the nose in place then sew it in. 5) assemble the felt eyes with the eyebrows to be sure that they look best as they are. Remove the eyebrows then glue the eyes in. Sew the eyebrows in 6) now you can glue or sew the rest of the cap in place 7) assemble the mouth. Pin a black piece in then place the chain over to be sure they look best as they are. Remove the chain. Remove the black strand of yarn leaving the pins in as markers, then sew in the black strand leaving long yarn tails hanging on each side of the head. Sew in the mouth chain now leaving the yarns tails hanging on each side of the head. Pull the chain up and out of the way. Assemble the teeth over the black strand with a bit of space between them. Leave the teeth where they are and then glue them in starting at one end working across to the other end. Now add a bead of glue along the underside of the mouth chain, lay it over the top edge of the teeth then pull the mouth chain yarn tails until it is in place. Knot off the yarns tails, cut them up shorter then push the knots inside the head to hide them. 8) sew the tail in enlarge the pictures by clicking on them Now you're done! Leave a picture of your monster on my facebook page, I'd love tosee!