Little Me Doll
@ Designed by Kimberly Kwon For personal use only. Not for resale or distribution.
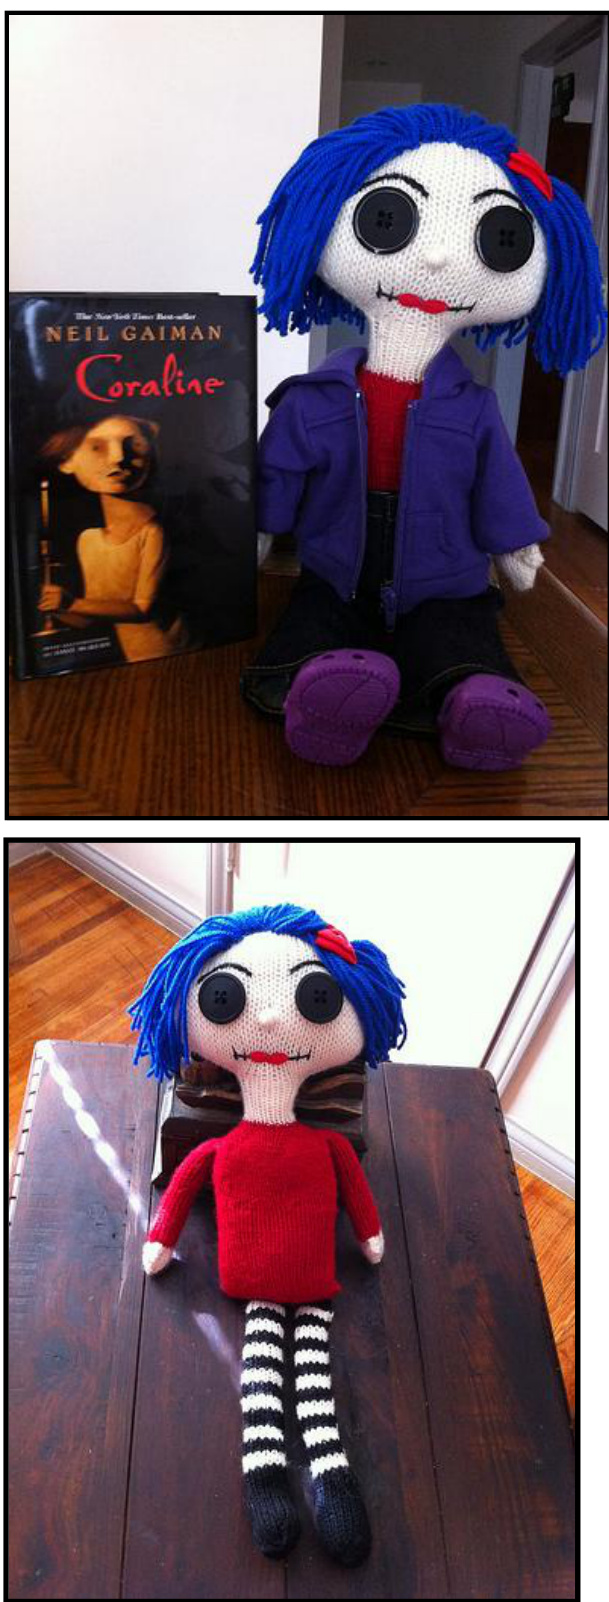
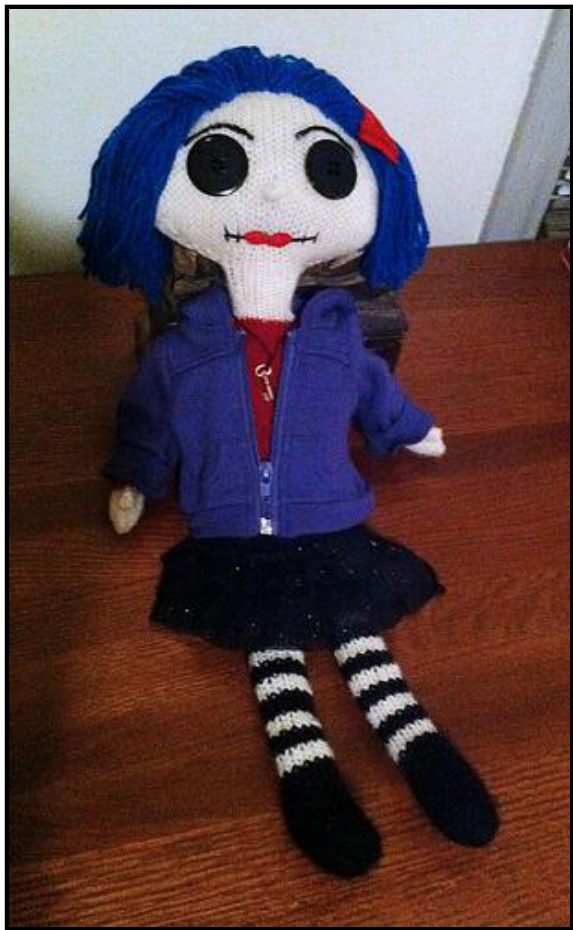
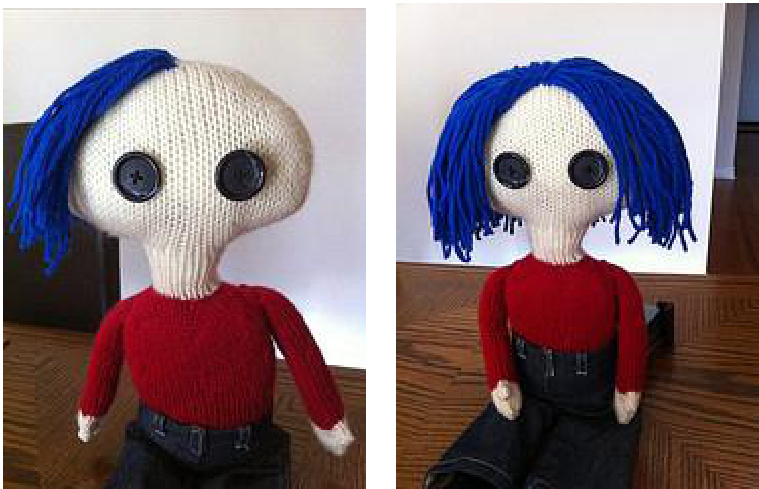
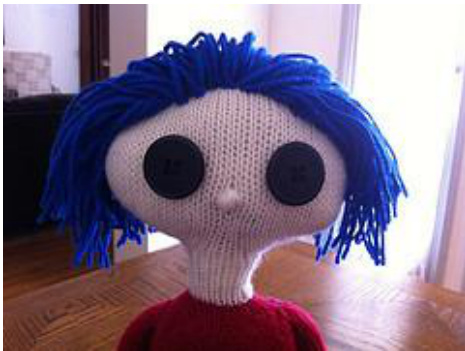
This Little Me Doll is inspired by one of my favorite movies, Coraline. Your finished Little Me Doll will be 19 to 20 inches in length, depending on how you stuff the doll. This pattern is for the doll only, including facial features and hair. Other doll clothing items shown e.g, skirt, blue jeans, hoodie, shoes were purchased separately; sized for 18 inch dolls. You can dress your Little Me Doll to look more like the original Coraline character by changing the colors of her shirt/torso, wearing a yellow raincoat and jeans, with a dragonfly barrette in her hair.
Materials:
· One skein or less each of Plymouth Encore worsted yarn in the following colors 0200 yards Off-White (# 0256, MC) 200 yards, Bright blue (# 0133) for hair 150 yards Color of choice (Color A) for the shirt (torso) and arms O150 yards Color of Choice (Color B) for the legs Pair of Blue Jeans, jacket or other clothing and accessories made for 18 inch dolls US Size 6 circular needles (24 inches or longer) and set of US Size 6 dpns Polyester stuffing ·Tapestry needle ?Set of two large buttons, any color. Embroidery thread (black, brown, or color desired for mouth and/or eyebrows) Two stitch markers or safety pins to hold 4 stitches for thumb. Crochet hook, Size G or H to help add hair Fabric glue Small amount of red felt for mouth Fabric Paint in a pen (black, brown, or desired color for eyebrows - optional) 6 to 8 inch length wooden or plastic dowel or old dpn (optional, recommended) Small knee high panty hose and small amount of plastic pellets (optional) Decorative extras for Coraline's outfit - hair pin, necklace, etc. (optional)
Head and Neck:
With MC, cast on 8 stitches on either a 24 inch circular needle or set of dpns. Divide the stitches evenly and join to work in the round, making sure the stitches are not twisted. R1: kfb all sts
Knitting Abbreviations:
KFB: knit into the front and back of the samestitch K2tog: knit two stitches together SSK: slip 2 stitches as if to knit, then knit those 2 stitches together
(16 sts)
R2: Knit all sts R3: (kfb first two sts, k4, kfb last two sts), repeat around (24 sts) R4: Knit all sts R5: (kfb first two sts, k8, kfb last two sts), repeat around (32 sts) R6: Knit all sts R7: (kfb first two sts, k12, kfb last two sts), repeat around (40 sts) R8: Knit all sts R9: (kfb first two sts, k16, kfb last two sts), repeat around (48 sts) R10: Knit all sts R11: (kfb first two sts, k20, kfb last two sts), repeat around (56 sts) R12: Knit all sts R13: (kfb first two sts, k24, kfb last two sts), repeat around (64 sts) R14: Knit all sts R15: (kfb first stitch, k30, kfb last stitch), repeat around (68 sts) R16 - 28: Knit (68 sts) R29: (k2tog, k30, k2tog), repeat around (64 sts) R30: (k2tog, k28, K2tog), repeat around (60 sts) R31: (k2tog, ssk, k22, ssk, k2tog), repeat around (52 sts) R32: (K2tog, ssk, k18, ssk, k2tog), repeat around (44 sts) R33: (k2tog, ssk, k10 , ssk, k2tog), repeat around (36 sts) R34: (k2tog, ssk, k6 , ssk, k2tog), repeat around (28 sts) R35: (k2tog, ssk, k2 , ssk, k2tog), repeat around (20 sts) R36: (k2tog, k4 , k2tog), repeat around (16 sts) R37 - R47: Knit all sts (the neck) (16 sts) Cut yarn. Now it is time to shape and firmly overstuff your head. Shape it so that the head looks similar to an oval shape, with a slim neck at the base.
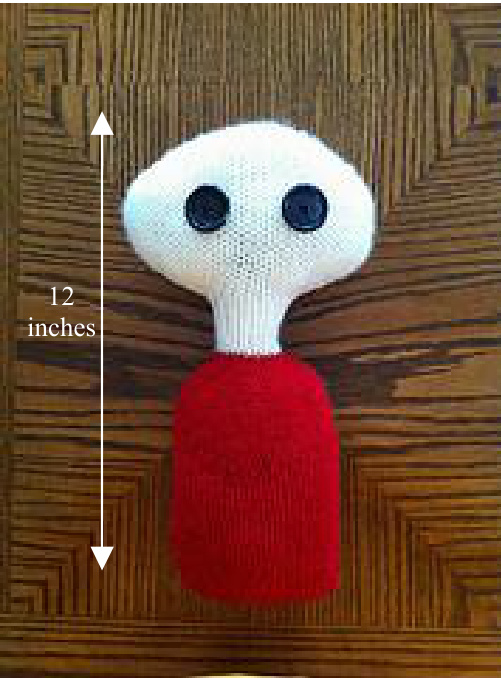
Sew on the Button Eyes:
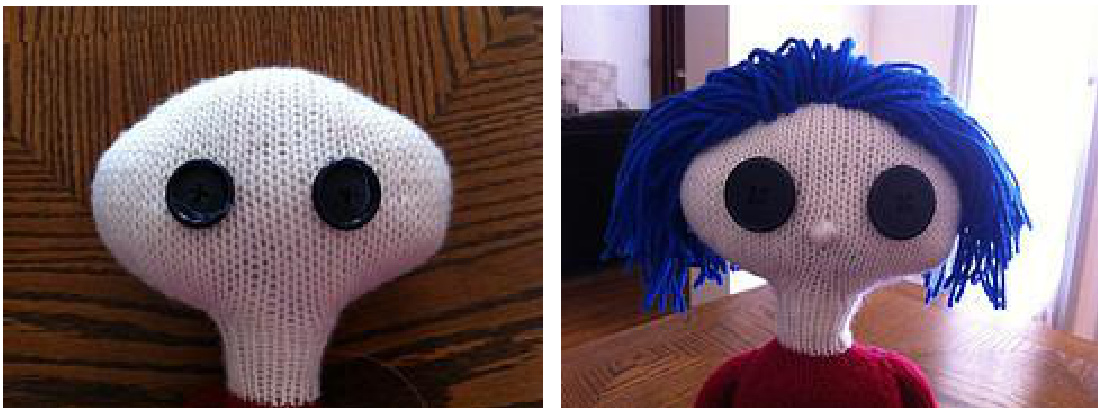
Select two large buttons to sew on the face for your eyes. With a needle and embroidery thread, sew the eyes on the face so that the center of each button is approximately 2.5 inches down from the top of the stuffed head. The eyes should be aligned with the edges of the neck. The photos above show two different sized buttons. The larger size is 1.5 inches.
Neck Stability: (optional, recommended)
To ensure that the neck stays stiff and does not flop, insert a 6 to 8 inch-length wooden or plastic dowel or used dpn into the center of the neck and head. It will stabilize as you continue to stuff the doll.
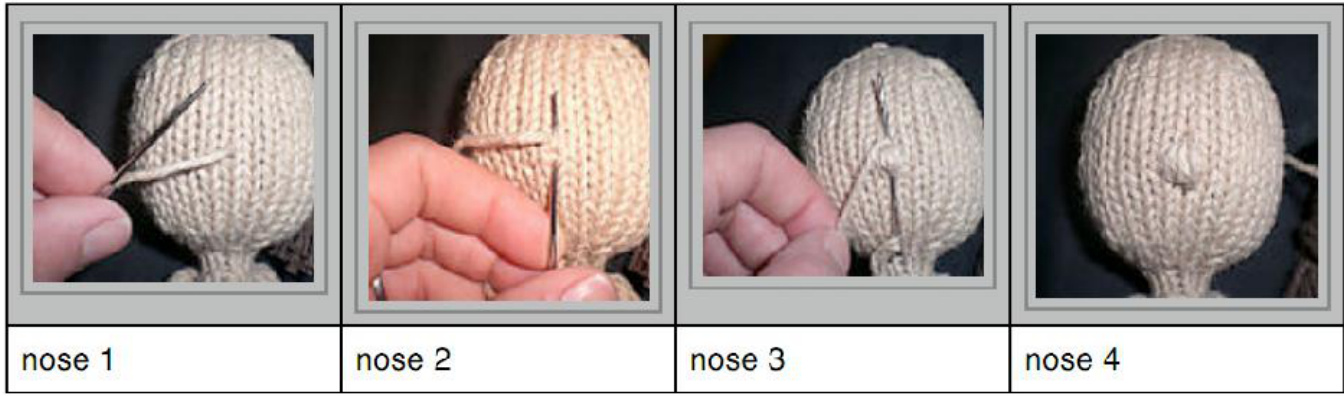
Adding the Nose:
To embroider on nose, find spot on face where you would like to place it. Thread a yarn needle with a length (8-10 inches) of MC yarn. Wrap the yarn around 2 or 3 stitches vertically where you want the nose over and over again until the nose is the desired size. See pictures below:
You will add the hair and other facial features later in the pattern.
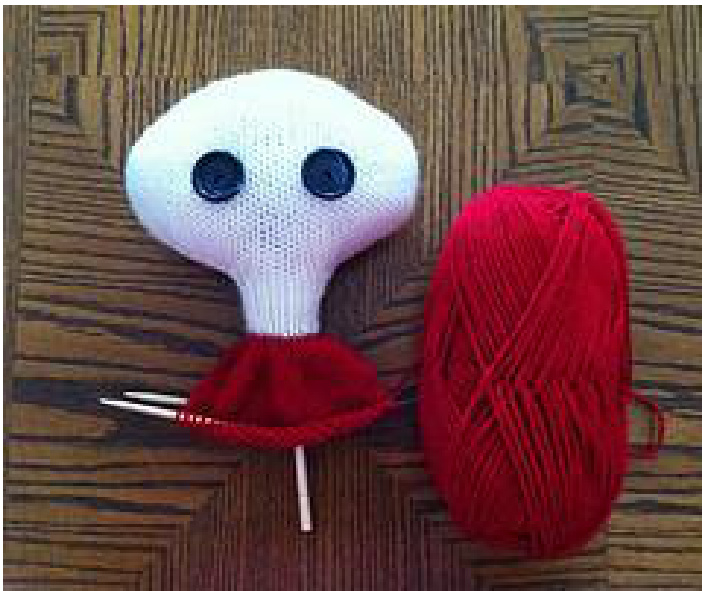
Torso or Shirt:
Change to the Color A for the Little Me Doll's Torso or Shirt. R48: Knit all sts (16 sts) R49: kfb, k14, kfb (18 sts) R50: (kfb, k2) around (24 sts) R50: (kfb, k3) around (30 sts) R50: (kfb, k4) around (36 sts) R50: (kfb, k5) around (42 sts) R50: (kfb, k6) around (48 sts) R50: (kfb, k7) around (54 sts) R51 - R59: Knit all sts (54 sts) R60: (k2tog, k7) around (48 sts) R61 - R63: Knit all sts (48 sts) R64: (k2tog, k6) around (42 sts) Take a moment to stuff the neck and shoulders of the body with the wooden dowel secured in place as you stuff. R65 - R87: Knit all sts Torso Flap: R88: Knit the first 21 sts on your needles. (this should be the front of the body) Turl Leave the last 21 sts on your second needle or dpn. (21 sts) R89: Purl all sts from that first needle. Turn. (21 sts) R90: Knit all sts on that first needle. Turn. (21 sts) R91: Purl all sts on that first needle. Turn. (21 sts) R92: Knit all sts on that first needle. Turn. (21 sts) R93: Bind off the 21 sts on that first needle. R94: Continue to the rest of round, binding off the last 21 sts on the second needle.
Stuff the body so that it is medium firm. And the torso/shirt is shaped like a coke bottle. For added weight, at a small sack of plastic pellets. To make pellet sack: Take one knee high panty hose foot and fill it with the desired amount of pellets. Tie the top of your sack with a knot, and cut off any excess. Place the closed sack near the bottom of the body. Cut yarn and with your tapestry needle, close the body with a sewn seam at the back base. The length of the head and torso is approximately 12 inches, depending on how much you stuff and stretch. Overstuffing is better than less stuffing when it comes to the torso.
Adding the Hair:
Now it is time to take a break from your knitting to add your hair. Using the Bright Blue yarn, wrap the yarn several times around a flat square or rectangular shaped object about 7 to 10 inches in width. Cut one side of the wrapped yarn. You will now have several even strands of hair. Each cut strand of hair should measure between 14 to 20 inches in length. You are now going to “latch hook" each strand of yarn onto the head by creating individually secure slip knots, but using your crochet hook:
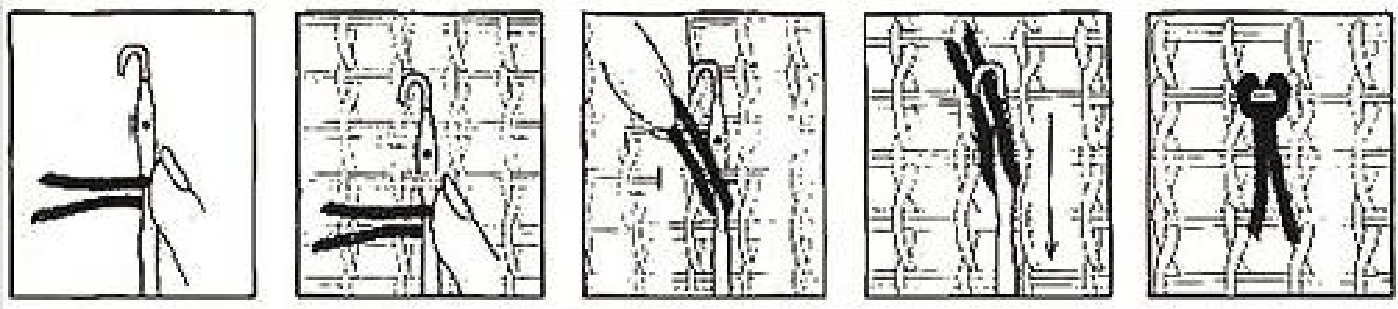
Place your crochet hook in the center of a single strand of yarn, creating a loop. Slip the loop through one of the stitches near the top of the scalp. Take the two loose ends of your yarn strand and pull it through the loop on your crochet hook. Tighten it to secure it on the scalp.
Start adding strands to the head by following the hairline at the center of the head. Start at the top, center of the head. Create a natural part in the hair by placing the strands and moving them to the right and left sides of your Little Me Doll's face.
The Mouth:
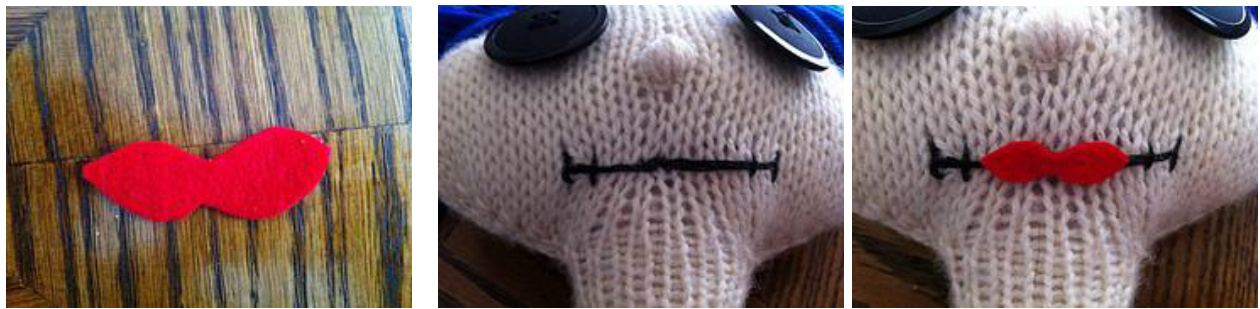
Continue adding strands down the center hairline, on both sides of the face. Continue adding hair to at least 1/3 of theheadso that the enitrebackof the head is covered by hair. Go insane. The more hair, the better. Trim the strands of yarn as needed. I added shorter strands in the front and longer strands towards the back of the head. Let the strands lie naturally on the face. Start the mouth by first creating your lips. Cut out the hourglass like image for the lips. I find it easier to cut a large version of the lips first and then gradually trim it to the size and shape I want. Set the lips aside. Now take your embroidery thread and create your mouth stitches. You want to create a horizontal line longer than the length of your lips. Then stitch shorter vertical lines that will appear around the lips:

Place a good amount of fabric glue on your felt lips. Place it on the mouth above your embroidered stitches. Place several heavy books on top of the felt lips for 10-15 minutes. This will flatten the lips to the face. Then use your blow dryer to dry the felted mouth completely.
Eyebrows:
You have a several options for creating your eyebrows: You can use the embroidery thread to carefully stitch each eyebrow. Embroidering curved stitches can be a challenge. But, you can always cut the stitches out when making any mistakes and start over. You can use fabric paint to draw the eyebrows to the face. I used a fabric paint that came in a pen to make it easiest for me. The only risk is that you don't have an opportunity to fix any mistakes. Or, you can do what I did - both! I drew on the brows first with the fabric paint and then worked the embroidery stitches.

Ready to get back to some knitting?
Hand and Arms: (make two)
With Color A (shirt color), cast on 14 sts. Divide evenly between two dpns, join in the round, making sure not to twist your stitches. With third dpn, work the following: R1 - R15: Knit all sts (14 sts) R16: (k2tog, k6) around (12 sts) R17 - R31: Knit all sts (12 sts) Cut yarn for Color A. Change to MC for the hand and thumb. Leave a long 12 to 15 inch tail. (12 sts) (18 sts) The next round begins the shaping of the hand and thumb. You will be setting up your stitches so that there are 7 sts divided on two dpns, and 4 sts in the center for the thumb, held with a stitch marker or safety pin. R34: Knit the first 2 sts in this round. Place the last 2 sts from previous round with the first 2 sts of this round onto a stitch marker or safety pin. These are the 4 center sts for the thumb. Place the long tail of MC through the front of the thumb to be knit later.
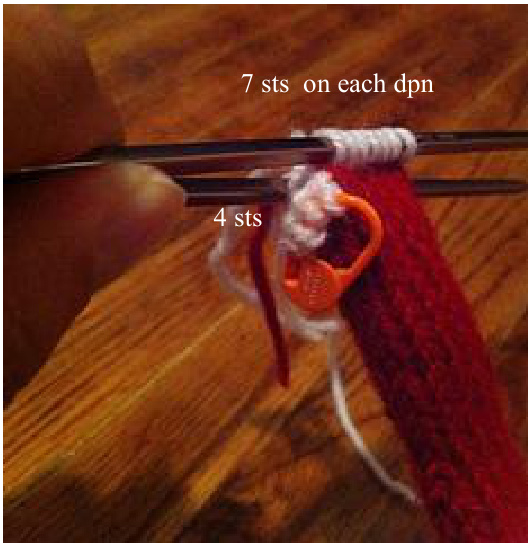
Your round now has 7 sts on one dpn, and 7 sts on the second dpn, skipping the 4 middle sts in the center. You will be joining the round at R36. Using MC yarn (attached to the skein), work the following: R35: k7 sts, k7 sts, skip 4 sts in center (14 sts) R36: Join the round. k7, k7, skip 4 sts (14 sts) R37 - R39: k7, k7, skip 4 sts (14 sts) R40: (k2, k2tog, k1, k2tog) around (10 sts) R41: Knit all sts (10 sts) R42: (k1, k2tog, k2tog) around (6 sts) R43: Knit all sts (6 sts) Cut yarn and with your tapestry needle, pull yarn through remaining 6 sts and sew the top of the hand closed. Or, you can choose to kitchener stitch the last 6 sts of the hand.
Working the Thumb Stitches:
R1: Go back to the area where the 4 sts are held for the thumb. Place on a dpn. With your second dpn, pick up 3 new sts above the 4 sts. R2: Using the long yarn tail, join and knit in the round, all 7 sts R3: Knit all 7 sts around R4: Bind off all 7 sts. You will now have a long thumb. Don't panic.
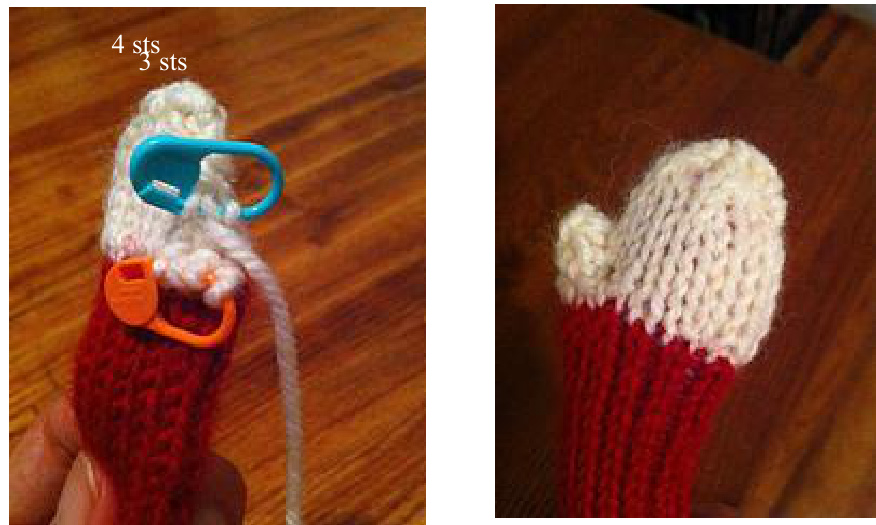
Pull tail yarn through back towards center of the thumb. This will bring the thumb towards the hand and start its shape. Weave the yarn through the hand and thumb several times as needed to finish shaping the hand. Stuff arm and hand. Sew the arm to the shoulder area of your torso. Be sure that the thumb is pointed forward, on the inside of the body.
Legs: (make 2)
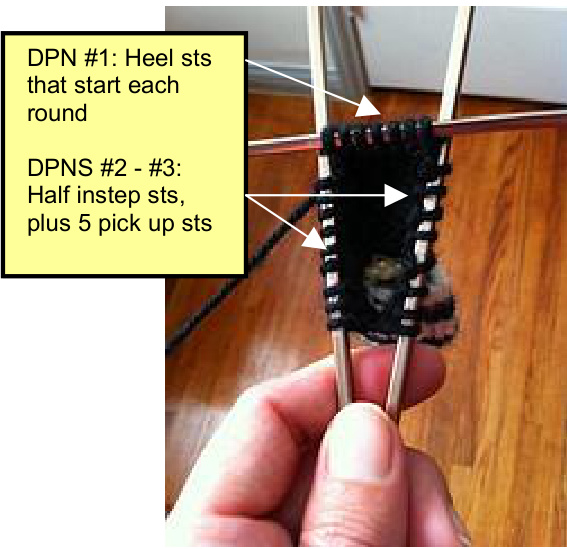
You can decide to use Color B for both legs, without any stripes. Or, you can decide to use any two colors to create striped legs. Using Color B, evenly cast on 14 sts onto two dpns and join, being careful not to twist the stitches. With your third dpn, work the following: R1 - R45: Knit all sts. For striped legs, change colors every 3 rows. This will be 15 sets of alternating color. Whatever color you start with will be the color of the foot. (14 sts) Work rest of the leg in a solid color. Begin heel. You are only working on the first set of 7 sts on the first dpn. R1: K7 on the first needle. Turn. (7 sts) R2: Slip1, P6 to the end. Turn. (7 sts) R3: Slip 1, K6 to the end. Turn. (7 sts) R4: Slip1, P6 to the end. Turn. (7 sts) R5: Slip 1, K6 to the end. Turn (7 sts) R6: Slip1, P6 to the end. Turn. (7 sts) R7: Slip 1, K6 to the end. Turn. (7 sts) R8: Slip1, P6 to the end. Turn. (7 sts) This next round will set up the stitches for your foot. The heel stitches will always be the beginning of your round. You will end up with 24 sts on three dpns: R1: Knit all 7 sts on the heel. (dpn #1) With second dpn, pick up and knit 5 sts from the left side of the heel flap. Knit across half of the held instep stitches with the same needle. (dpn #2) With a third dpn, knit across the rest of the held instep stitches and pick up and knit 5 sts from the right side of the heel flap with the same dpn. (dpn #3). (24 sts)
You should be back at the beginning of your heel stitches to start a new round. With fourth dpn, work the following: R2: (k8, k2tog, k2tog) around (20 sts) R3: Knit all sts (20 sts) R4: (k8, k2tog) around (18 sts) R5 - R15: Knit all sts (18 sts) R16: k2tog around (9 sts) R17: (k1, k2tog) around (6 sts) Cut yarn and with your tapestry needle, thread through remaining sts at top of the foot. Weave in ends to shape the foot closed. Stuff the entire leg and sew to the bottom of the torso.
Clothing Your Little Me Doll:
Now it is time to play dress up with your Little Me Doll. If you can knit, crochet or sew doll clothes, find patterns that are made for 16 to 18 inch dolls. Most should fit your Litle Me Doll, with some minor modifications. I find that pants for size 18 inch dolls fit well both in length and waist. Skirts vary, however and you may need to get one for a 16 inch doll. Doll clothes can also be purchased online and in toy stores. Not all the shoes for 18 inch dolls willfit on your Litle Me Doll, as the feet are skinny. The little key necklace is a simple charm that was added to embroidery thread.
About the Designer:

Kimberly has been knitting for several years, and finds monster making as one of her favorite things to knit and purl. She lives with a long list of chronic health conditions, and knits to help her fight her daily battles with pain and fatigue. Kimberly lives “one stitch at a time" and chronicles her life on her blog at http://kkhymn.wordpress.com. She can be contacted via Ravelry as kkhymn.


