TRON MAN PINCUSHION
By Emma Jayne Cooper @ThreadCetera
WHATYOU N&&D..
4ply acrylic wool in: -Red -Yellow -Black -White Love the avengers? Me too! This little pin cushion is the perfect nod to a cracking? series while still being easy enough for the total novice. I would suggest using about.com or youtube to see how to do the basic stitches but I have tried to keep it easy as possible. Any questions, fire them over to the contact details on the next page. Most of this pattern will be in rounds. Use a stitchmarker onthefirststitch ofthe round to remember where you are!
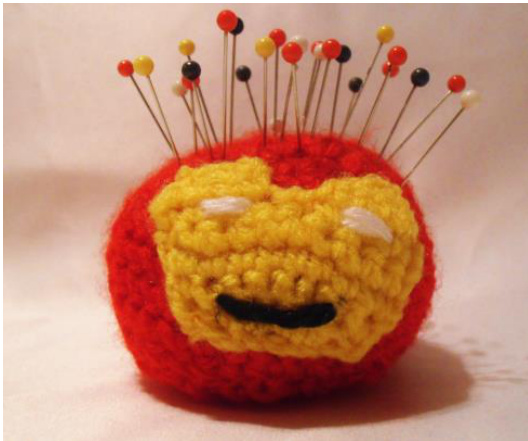
Perfect for all your color appropriate pins! ;) Body
What you need
- Red/Yellow/Black/White Acrylic Wool (this is great for using up ends. It takes very little wool) - 2.5 mm crochet hook -Stitch Marker -Knitters Needle -Toy Filling (again, very little is needed) -Iron Man coloured pins... obviously ;) Methods used SC= Single Crochet Inc- Increase (2 single crochets in the next stitch) Dec- Decrease (crochet the next 2 SC together) SlipStitch Slip Knot
The Pattern
This is done in 2 sections- body and face, and then attached. Do not turn your work between rows, this is done in a spiral. 1 hook onto the first chain made to make a loop. You will be working round this loop Row 2- inc, inc, inc, inc, inc2 Row 3- inc, 2 SC, inc, 2 SC, inc, 2 SC, inc, 1 SC Row 4- 2 SC, inc, 3 SC, inc, 3 SC, inc, 3 SC, inc Row 5- 5 SC, inc, 6 SC, inc, 5 SC, inc Row 6- inc, 10 SC, inc, 10 SC Row 7- 23 SC, inc Row 8- 11 SC, dec, 12 SC Row 9- 5 SC, dec, 10 SC, dec, 5 SC Row 10- 1 SC, dec, 6 SC, dec, 5 SC, dec, 4 SC. Stuff your Pincushion now. Row 11- 2 SC, dec, 3 SC, dec, 3 SC, dec, 3 SC, dec Row 12- 2 SC, dec, 1 SC, dec, 2 SC, dec, 2 SC, dec Row 13- dec, dec, dec, dec, dec2 Row 14- fasten off Face Using yellow wool, chain 7 Row 1- in second chain from hook, 2xSC and SC in each chain along and do 2 SC in last chain. (We are increasing the face size, which gets the diagonals we need.) Turn Row 5- We are now working on the top square sections which we shall do individually. Skip the first chain, SC 6 times. Turn Row 6- Skip first chain, SC 5 times. Turn. Row 7- Slip stitch along to end of row, then continue slip stitch down the diagonal for 2. This should take you to the middle of the face again. Do not turn your work. Row 8- SC 6 times. Slip Stitch in last chain (i.e. chain 7), Turn. Row 9- Skip the first chain, SC 5 times. Fasten off Details- the face can be done using just lines as iron man's face is very angular. 2 lines of white wool for eyes and 1 line of black finishes his face and he is ready to attach. Attaching When attaching try and arrange the lines on your red ball to run in rows before attaching. It does not matter greatly other than allowing all the rows to run parallel. Use the yellow wool to attach, I used a running stitch. And that is you done! Simply add pins!


