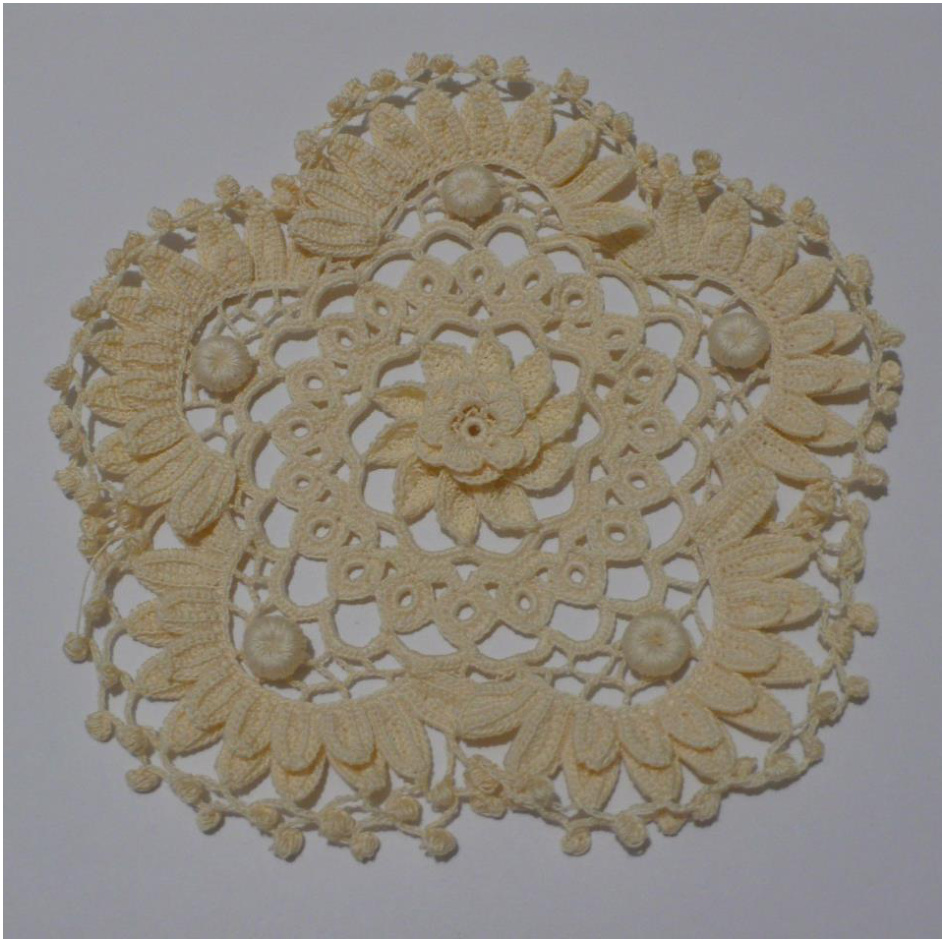
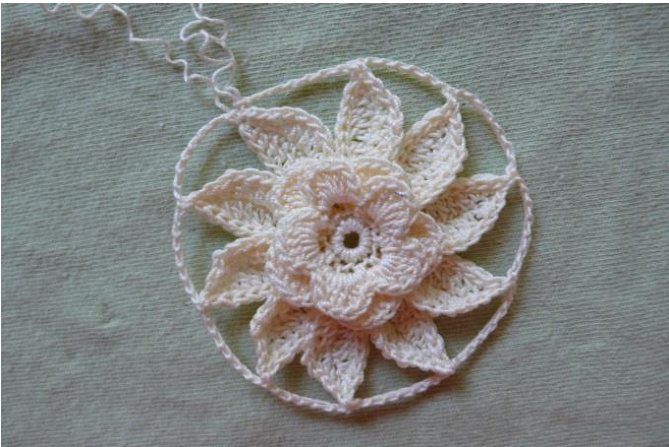
"Mandala" Irish Crochet Motif
Skill Level: Advanced
Before you get started...
Please, read the pattern through and pay attention to every word, every symbol, every term and every character - they all matter. I wrote this pattern in as many details as possible. Follow my instructions exactly as they are written, and you won't have to struggle almost at all. I used different font colors, to emphasize special or additional comments. The additional comments will always be in blue, but don't get thrown off by them. You will work only the text in black, sometimes green and red, but most specifically the underlined stitches. Other font colors, like green or red will emphasize the stitches to remember for the next rows. Nothing complicated. The text will always be followed by step-by-step pictures - these will provide great visual help. But don't lose your focus, as the pictures will be right in the middle of a phrase or sentence. Every picture will have a "sticker note" next to it; this sticker will contain my comments related to that particular photo. You'll see, this pattern is in the same time like a photo-tutorial for the entire motif. In spite of all the hard work and time spent on writing this pattern, I decided to share it for FREE. The only thing I kindly ask, is that you respect my work and dedication in creating this motif, because it was a really long process. You can make and sell your finished items, but you are not allowed to sell the written pattern itself. I also would like to ask, that you send me a picture of your finished motif, along with some honest comments or opinions about it, like how easy or hard was for you to follow my instructions and make it. I want to collect this info for my personal records. Thank you in advance! If any questions arise in the process, don't hesitate to contact me at: patterns@crochetrealm.com
MATERIALS NEEDED:
100% Mercerized Cotton Crochet Thread, Sizes 20 & 30. (l used: "JP Coats Big Cone 3-Ply Crochet Cotton, Size 20 Crochet Thread" - Cream; 2400yds/2195m per cone; Lot: 21458474 and "Red Heart Extra Fine, Size 30 Crochet Thread" - Cream; 500yds/457m per ball; No dye lot. Both bought at www.herrschners.com) // this motif can be made in one single or in many different colors. If single color, then obviously both threads must be of the same color. If you choose to make a colorful mandala, then it doesn't matter - you can use any color for any thread. · Hooks - use hook sizes appropriate for the threads you're using. Usually, the ones suggested on the crochet thread label. (l used: No. 15 / 0.85 mm - for the entire motif & No. 20 / 0.60 mm - for the background net within the motif; both Tulip brand, Japan.) Scissors. High Density Foam. Pins
ABREVIATIONS:
ST/sts = stitch/stitches DC = double crochet FL = front loop(s) CH = chain/chains prev = previous BL = back loop(s) SL ST = slip stitch beg = beginning RS = Right Side SC = single crochet (n c) = not counted WS = Wrong Side HDC = half double crochet rnd = round CK = Clones Knot
1st STAGE - The Flower (ROWS 1 - 7)
// If you choose to work the motif in single color, then don't cut the thread until the pattern says so. And sometimes it will be better to work with 2 balls of thread at a time - this way you won't have to worry about leaving a long tail for whatever needs the instructions might call for. If you choose to work the motif in different colors, then I believe you will know and decide when to cut it. Besides numbering, some rows will have a name attached to them in brackets. I thought this is an additional help when working and following the pattern. And I always start a row with a chain stitch - that's why every row in this pattern will start with "CH 1 (not counted)"; well.. sometimes it will count.
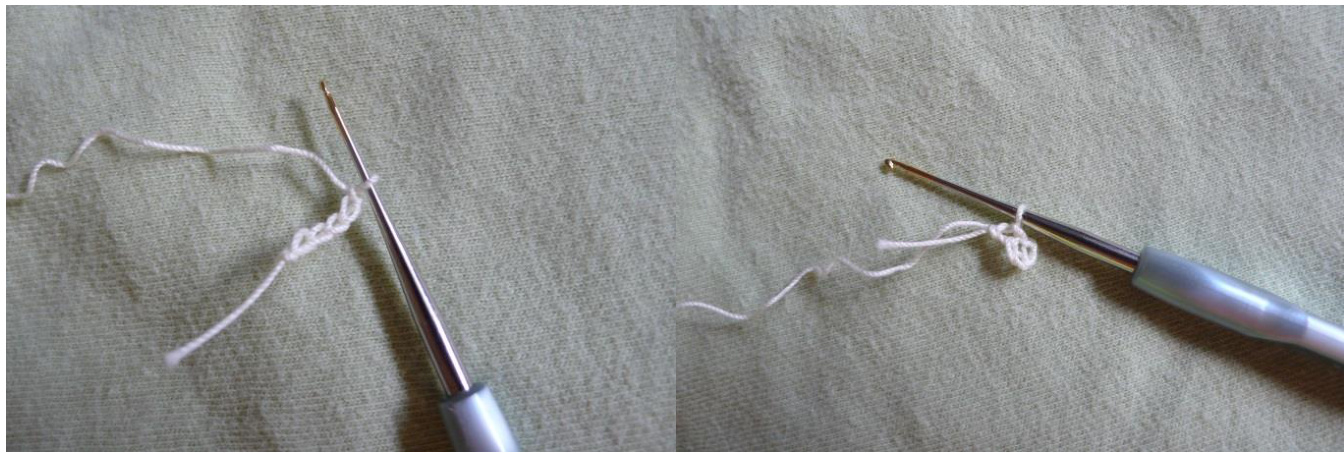
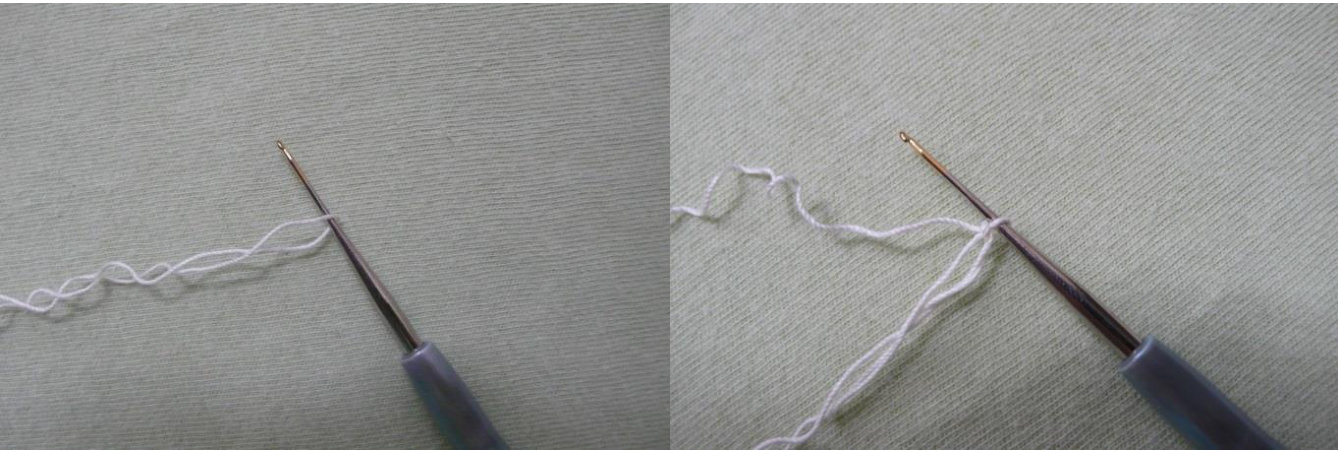
ROW 1: CH 5; close rnd with 1 SL ST in the 1st st to form a ring.
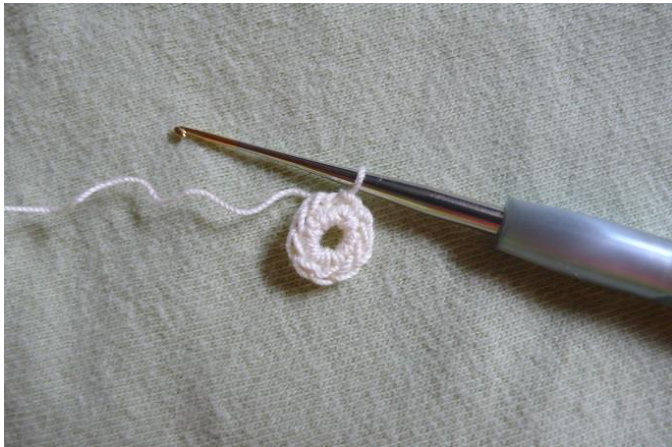
ROW 2 (Base Ring): CH 1 (n c); in ring & over tail, work 10 SC, close rnd with 1 SL SI in the 1st st of row.
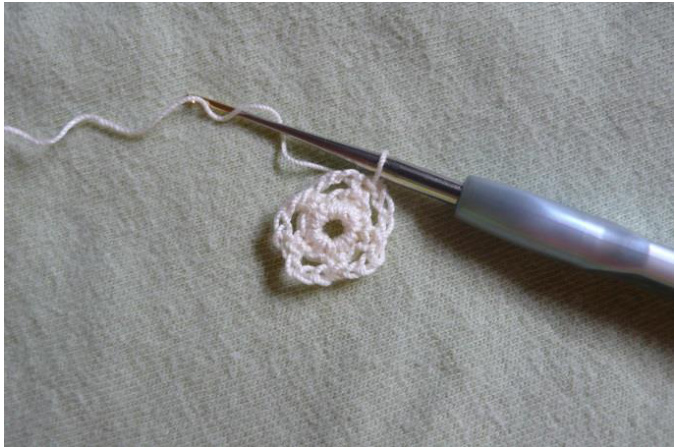
ROW 3: CH 1 (n c); in F L of Base Ring sts, work: 1 SC in the same st where you closed Base Ring, \*CH 3, 1 SC in the next 2nd st that lies ahead of Base Ring\*; repeat from \* to\* 4 more times; at the last repeat, close rnd with 1 SL ST in the 1st stof row. // You should have 5 arches of 3 ch each, separated by 1 SC. ROW 3 is the base of your 1st layer of petals.
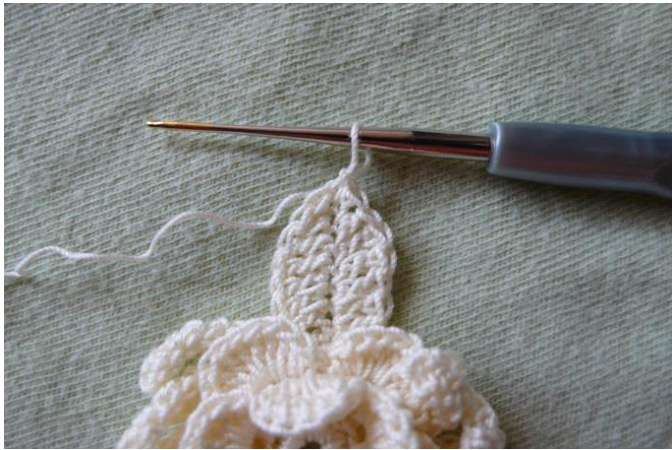
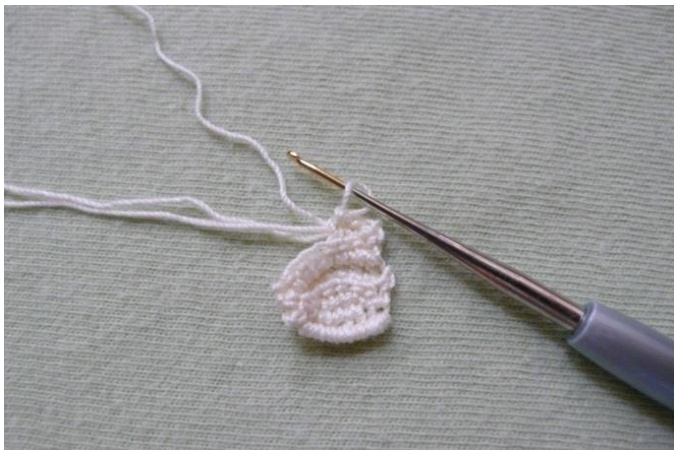
ROW 4 (1st Layer of Petals): CH 1, over each arch (that is, in the spaces only) work: \*1 SC, 1 HDC, 5 DC, 1 HDC, 1Sc\*. // This is your i't petal:
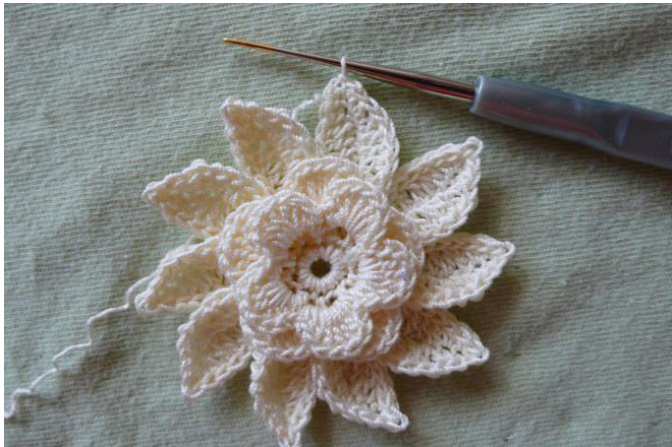
repeat from \* to \* 4 more times; close rnd with 1 SL ST in the 1"t st at the beg of row. // You should have 5 petals now:

ROW 5: CH 2 (n c);
// "ch 2 (n c)" is the transition from the 1st layer of petals to the 2nd.
Behind the petals, in the other "free" F L of Base Ring, work: 1 SC in the next sc st available of Base Ring, \*CH 4, 1 SC in the next sc st available of Base Ring\*; repeat from \* to \* 3 more times; for the last arch of 4 ch sts work: CH 4, 1 SL ST in the 1st st of this row (that is, you skip the "Ch2 (n c)" transition). // This is what you should have on ws of your work:
I/ And if you look at the very center of your flower on the RS, you can see the F L of Base Ring are completely worked with sc sts:
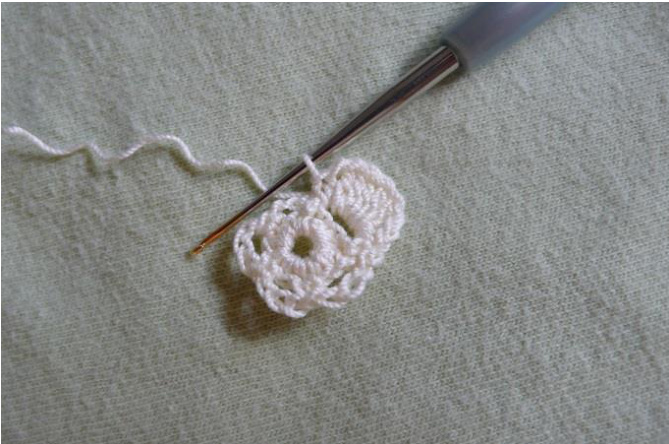
ROW 6 (2"d Layer of Petals): CH 1, \*1 SC, 1 HDC, 7 DC, 1 HDC, 1 SC\*
// This is your 1"t p petal of 2nd Layer of Petals:
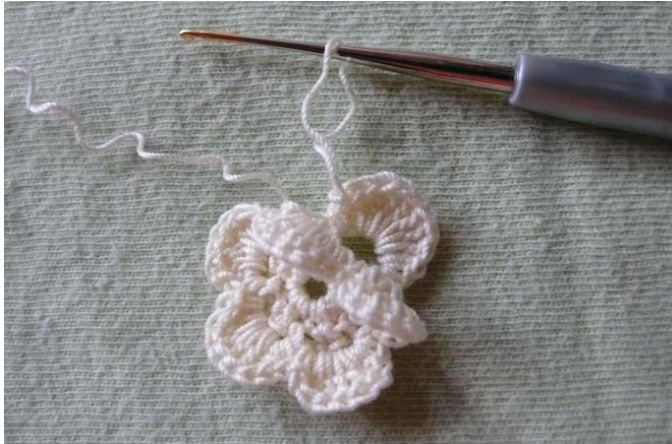
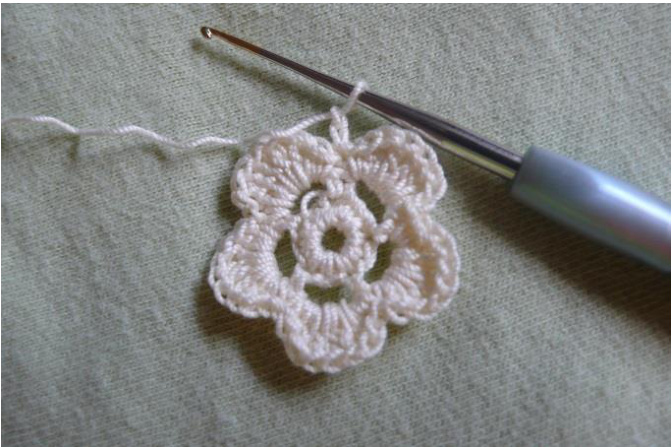
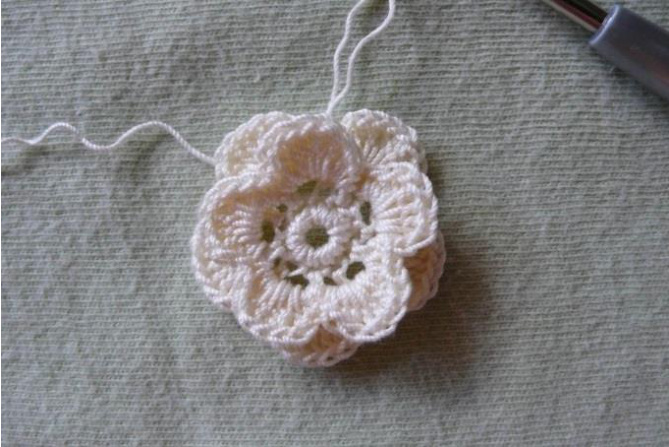
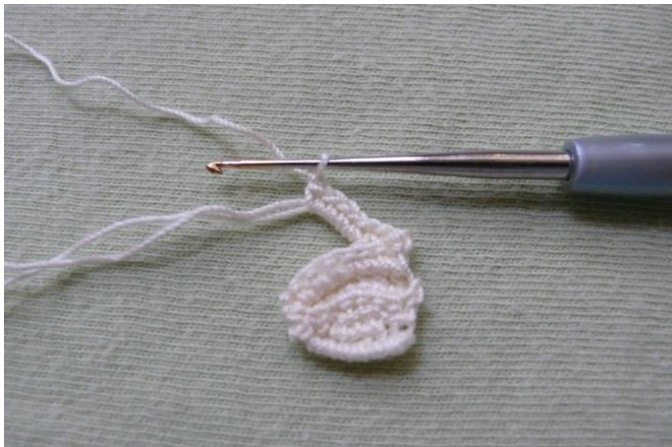
repeat from \* to \* 4 more times; close rnd with 1 SL ST in the "Ch 1" st or in the 1st sc of the 1st petal of this row. // You should have a 2nd layer of 5 bigger petals:
// Now, look on the WS of your flower, you see the B L of the Base Ring. We'll work the 3rd Layer of Petals in these B L. That's why Row 7 is divided into Row 7.1 & Row 7.2. Right where we left off, continue with: ROw 7 (3rd Layer of Petals): ROW 7.1 ("Half-Petals"): CH 3 (n c), // = transition from the 2nd to the 3rd layer of petals \*1 SC in one B L of Base Ring // this will be counted as your 1st st for this row, CH 10, (turn); // Remember the last 1oth ch st as we'll have use for it in ROW 7.2
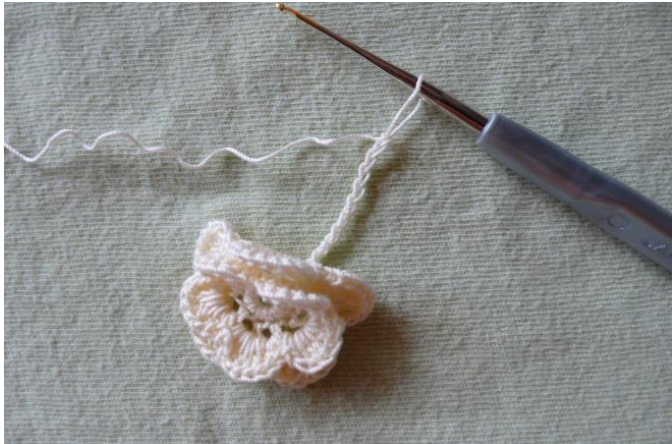
in the B L of these 10 ch sts work: 1 SC in the 2nd ch from hook, 1 HDC in the next st, 5 DC in the next 5 sts, 1 HDC in the next st, 1 SC in the next st, CH 1\*; // You have one half-petal now:
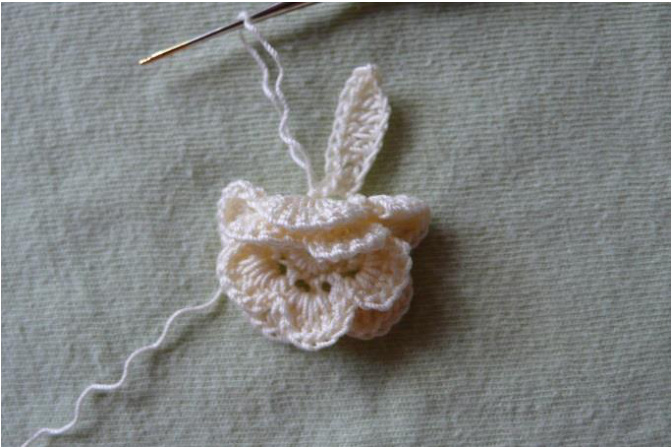
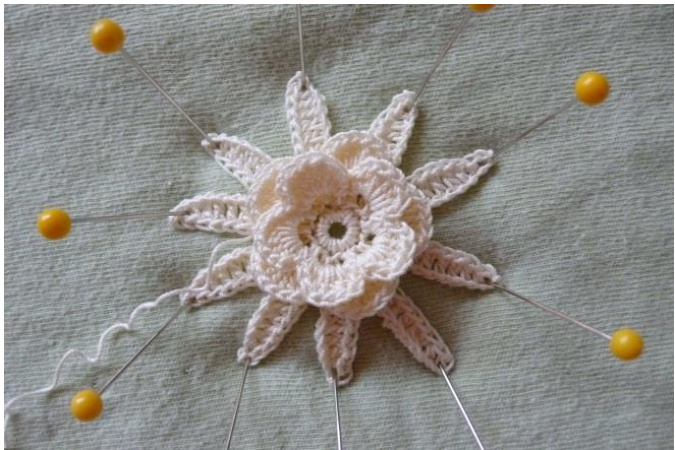
repeat from \* to \* 9 more times; close rnd with 1 SL ST in the 1st sc at the beg of this row. // You should have 10 "halfpetals"; I pinned them, so you could see them better:
ROW 7.2 ("the other half-petals"): \* CH 1, in the free loops of the half-petal, work: 1 SC, 1 HDC, 5 DC, 1 HDC, 1 SC, 1 SL ST in the 10th ch st of ROW 7.1, CH 1 // we'll use this "CH 1" st for ROW 8, 9SL STS in the next 9 sts, 1 SC in the next ch st of prev row\*; // this ch st lies between "the half-petals"; // This is how 1 full petal looks like now, before the 9 sl sts are worked:
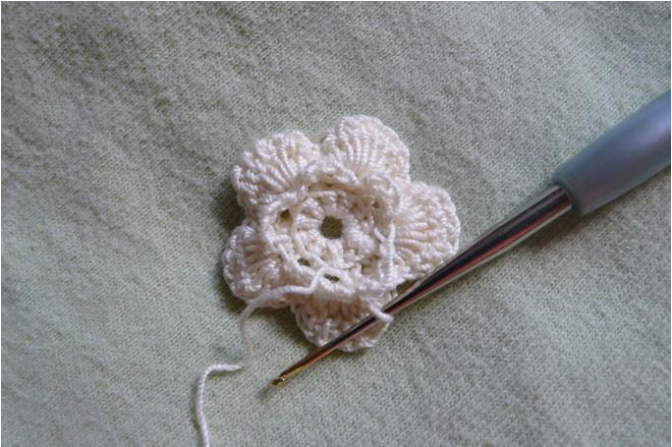
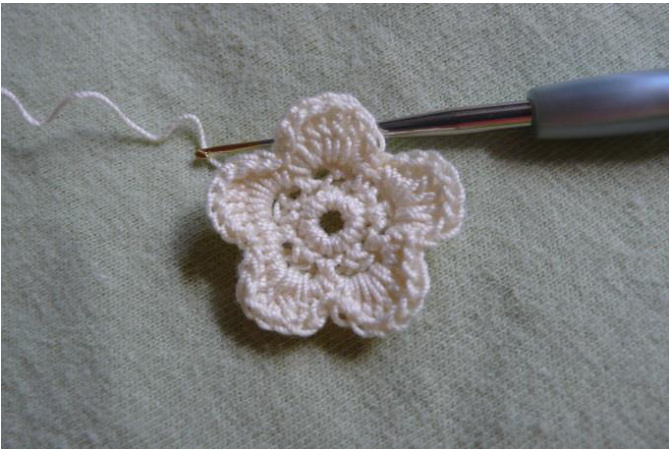
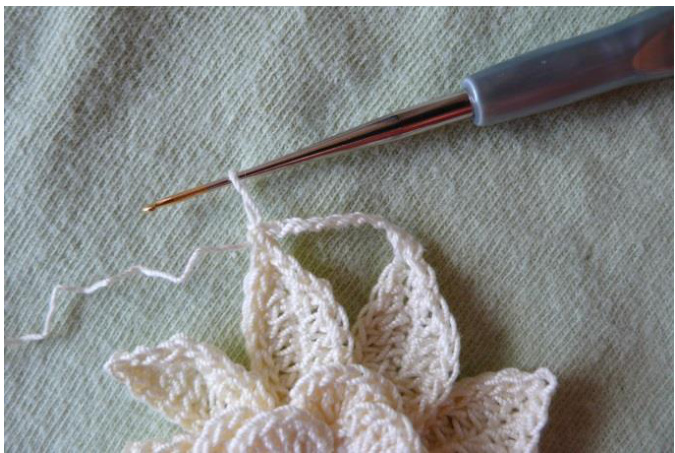
repeat from \* to \* 9 more times. For the last "half-petal" (gth repeat), work the same as the repeating section says to, but DO NOT go down making the 9 sl sts, but end it up on top (// just like in the photo above) with 1 SL ST. // This is what you should have at this point:
2"d STAGE - 20 Small Rings (ROWS 8 - 12)
Exactly where you left off, continue with: ROW 8: CH 1, \*1 SC on top of petal (that is, in the sl st that finished ROW 7.2 for the 1't petal, and in the ch 1 st of ROW 7.2 for all the rest of the petals), CH 7\*,
repeat from \* to \* 9 more times; close rnd with 1SL ST in the "CH 1" st at the beg of this row. // You should have 10 arches/spaces between all petals.
ROW 9: CH 1, 13 SC over each arch only; close rnd with 1 SL ST in the "CH 1" st at the beg of this row.
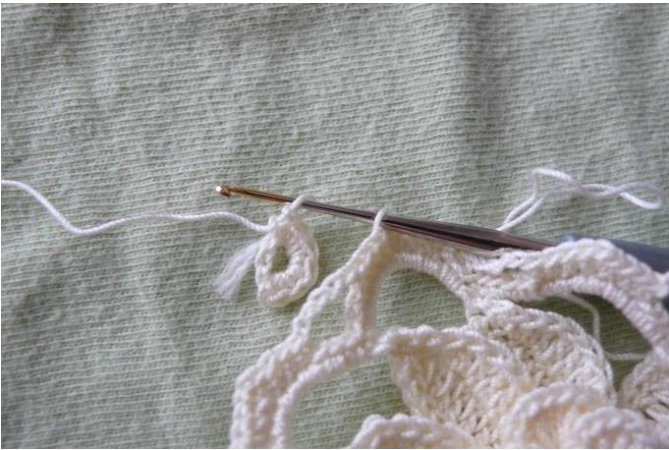
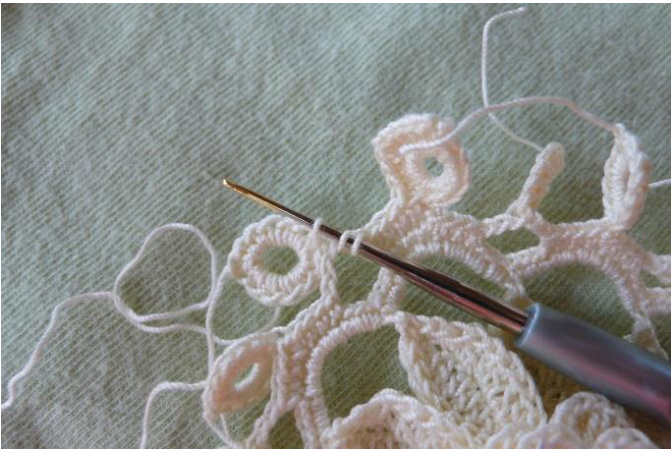
ROW 10: 3 SL STS in the next 3 sts of prev row. CH 1, \*3 SC in the next 3 sts; in the next st, work a cluster of "1 SC, CH 1, 1 SC"; 3 SC in the next 3 sts; CH 5, skip 6 sts of prev row\* and repeat from \* to \* 9 more times; close rnd in the "CH 1" st at the beg of this row. Fasten off & cut thread about 2 inches long. // If you look at your mandala now, you see 10 arches of 5 ch sts and 10 "sections" of sc sts. Next, we need to make a row of small rings; you'll attach them to the middle st of these arches (the 3rd ch st of 5) and sc sections (the “ch1" st of the cluster). And do not worry right now about weaving in the tails of these rings, we'll crochet over them in ROw 12.
ROW 11 (20 Small Rings): Work the small ring: \*CH 6, close rnd with 1 SL ST in the 1st ch st to form a ring; CH 1 (n c), work 6 SC in ring;
put aside this half-ring for 1 second, insert the hook in the B L of the middle ch st of the cluster of prev row, and back into the loop of the half-ring (you have 2 loops on hook right now),
pull 1st loop through the 2nd loop,
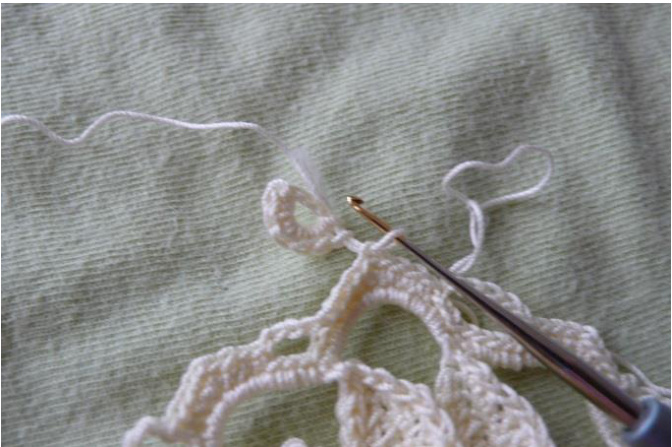
and work another 6 SC in the small ring; close rnd with 1 SL ST in the 1st sc of the ring Cut thread about 1.5-2 inches (2 cm) long and fasten off.\*
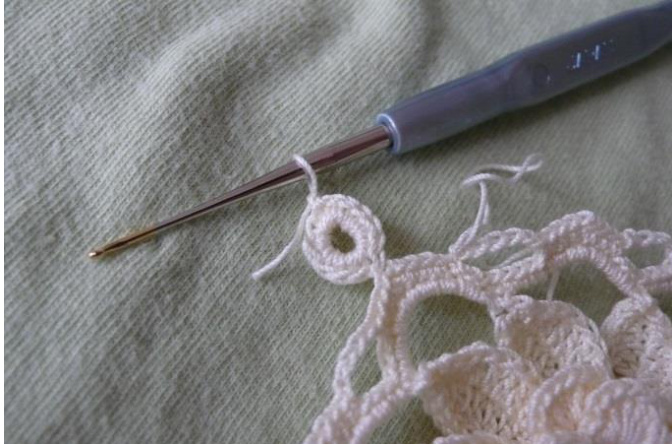
Repeat from \* to \* 19 more times. When you finish the last ring, don't cut thread. // You must end up with 20 small rings.
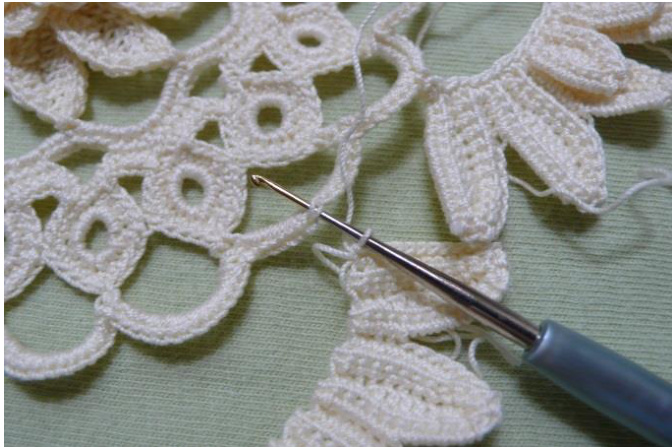
// In the next row, we will cover the rings and join them between them on both sides (right and left) with a row of sc sts. Be very attentive, don't mess it. Once you work it out you'll see that it's not complicated at all, it's sort of a "system"; unfortunately, in written form sounds more challenging than in a chart. ROW 12: CH 1 (n c), in the same st where you closed the small ring, work: \*1 SC, 2 SC in the next 2 sts, in the next st work the cluster "1 SC, CH 1, 1 SC", 2 SC in the next 2 sts, in the next st of ring (// on the bottom where it was joined to ROW 11) and the next st of ROw 11.
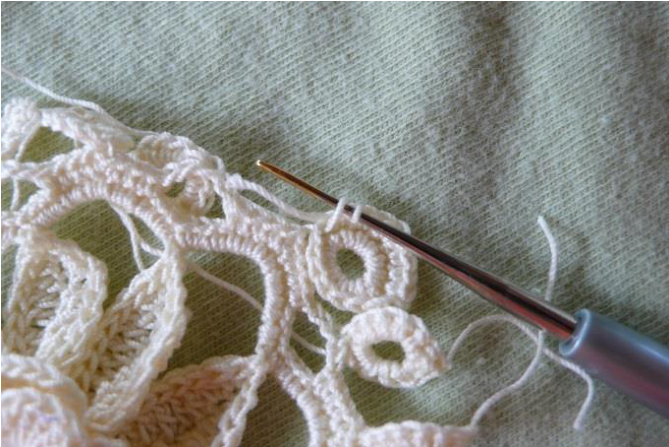
work 1 sC decrease;
3 SC in the next 3 sts, 1 SC on the "half-arch"; on the "half-arch"
and the next st on ring (// on the bottom where it was joined to ROW 11)
work 1 sC decrease;
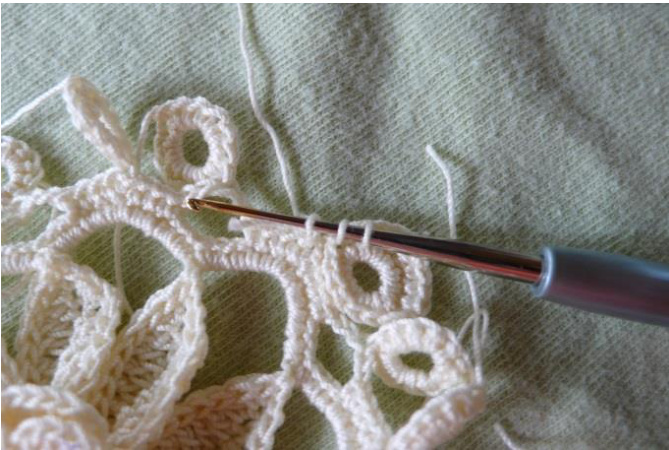
2 SC in the next 2 sts of ring; in the next st of ring, start working the cluster with "1SC, CH 1,
(right here, join this ring to the prev ring: insert hook in the "CH 1" st of the cluster of prev ring, and back into the working loop, you have 2 loops on hook now,
pull the 1st loop through the 2"d)

and finish cluster with 1 SC";
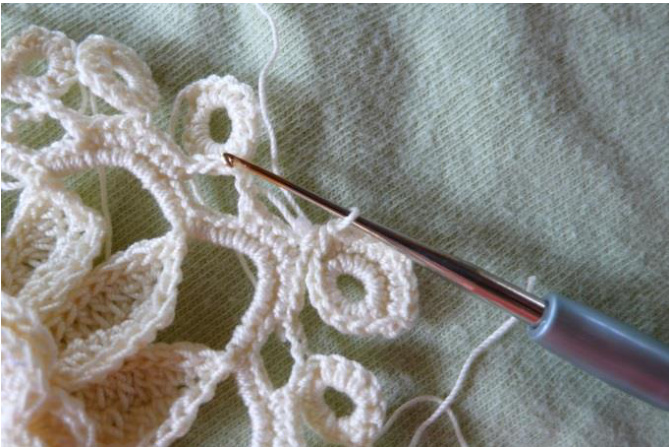
2 SC in the next 2 sts of ring, in the next st (// this is right on top of ring where you closed it with 1 SL ST) work "1 SC, CH 1, 1 SC"; 2 SC in the next 2 sts of ring, in the next st of ring work "1 SC, CH 1, 1 SC"; 2 SC in the next st of ring; in the next st of ring (on the bottom where it was joined) and on the "half-arch", work 1 SC decrease; 1 SC on the "half-arch"; 3 SC in the next 3 sts of prev row; in the next st of prev row and the next st on ring (still on the bottom where it was joined), work 1 SC decrease; 2 SC in the next 2 sts of ring, in the next st start the cluster "1 SC, CH 1 - here - join with the previous ring on the right side,
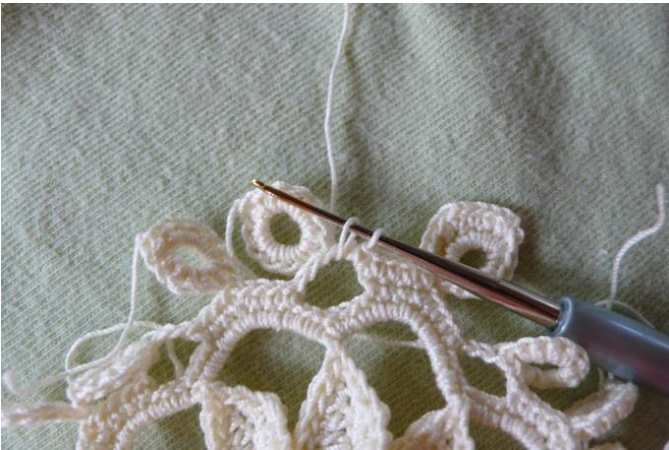
finish cluster with 1 SC"; 2 SC in the next 2 sts of ring, 1 SC, CH 1\* ;
repeat from \* to \* 9 more times (till the end of this row); close rnd on top of the 1st ring with 1 SL ST in the 1st sc of this row. // this is how the Mandala looks like at the end of ROW 12:
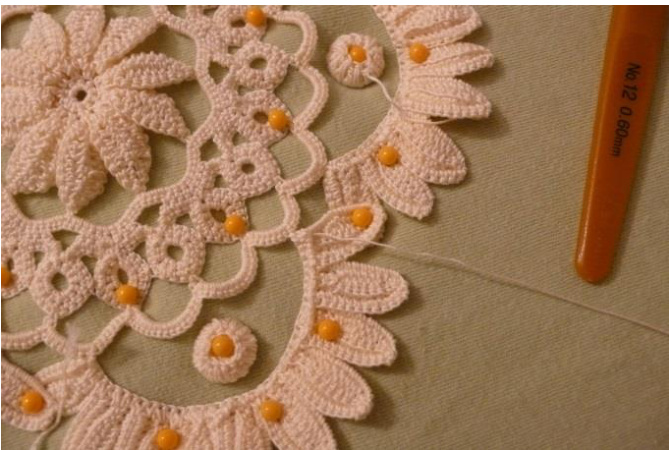
3'd STAGE - 5 motifs “Double-Layered Petal Leaves", 5 Buttonies & Background Net (ROWS 13-15)
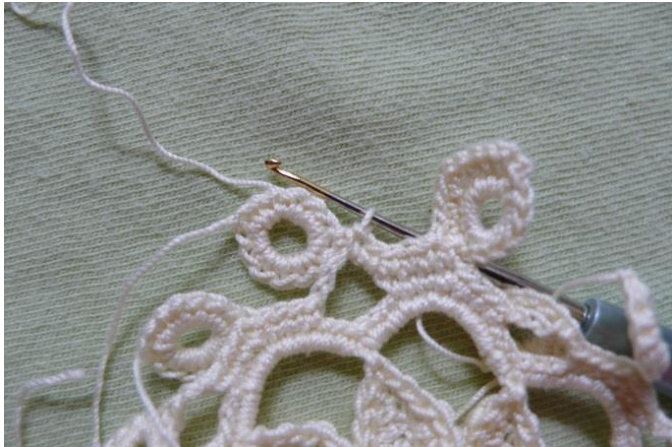
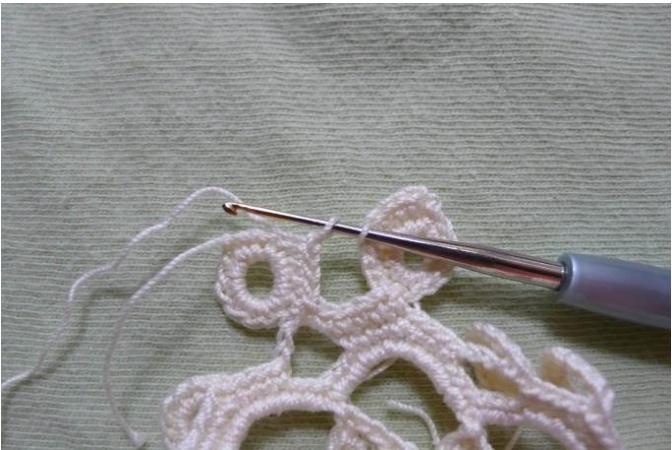
ROW 13: CH 1 (n c); 1 SC in the same st where you closed prev row, CH 8, \*1 SC in the next ch st of cluster of prev row, CH 8 \* - repeat 18 more times; close rnd with 1 SL ST in the 1st sc of this row. // You must have 20 arches in total, separated by 1 sc
ROW 14: CH 1 (n c), 15 SC on every arch only; close rnd with 1 SL ST in the 1t sc of this row. Cut thread 2 inches long and weave it in.
// If you haven't yet, now is the perfect time to familiarize yourself with how lrish Lace is made. I provided the sources that I learnt from at the end of this pattern. In short, there are 3 thread sizes used: packing cord (PC) - the thickest, working thread - a finer one, and the background net thread - the finest. Motifs are worked over the PC with the working thread; and the finest thread is used for the background net to join the motifs. I provided a brief photo-tutorial on how to start working with PC at the end of the pattern, but again, if you like, you can check www.youtube.com on free videos on the matter.
ROW 15
// I split this row in many others, to make it easier to follow the steps of the pattern. Make sure you pay attention to this mark "!!"; it starts on this page. !!! ROW 15.1 (The Motif "Double-Layered Petals Leaf"): ROW 15.1.1 ("10 Petals" Leaf or 2nd Layer): ROW 15.1.1.1 (Petal 1): On PC, work 11 SC;
drop cord, CH1, turn; 2SC in the next 2 sts, 6DC in the next 6 sts, 3SC in the last 3 sts, CH 1, turn;
11 SC in the next 11 sts, 1 SC on pc, turn;
pick up pc, work 11 SC in the next 11 sts (\*), CH 1, turn
ROW 15.1.1.2 (Petal 2): 4 SC in the next 4 sts of prev petal,
Z SC on pc alone;
repeat from to 1 time. ROW 15.1.1.3 (Petal 3): 6 SC in the next 6 sts of prev petal, 5 SC on pc alone; repeat from to 1 time.
ROW 15.1.1.4, 6, 8 (Petals 4, 6, 8): repeat ROW 15.1.1.2. ROW 15.1.1.5, 7, 9 (Petals 5, 7, 9): repeat ROW 15.1.1.3 ROW 15.1.1.10 (Petal 10): repeat ROW 15.1.1.2 up to (\*). I prefer not to cut thread here, but rather start with a new ball, as you'll still need to crochet further with that end. But if you don't have a new ball, cut the thread about 1.5 m (5 feet) long. Put this layer aside while you work on the 1"t layer. ROW 15.1.2 ("6 Petals" Leaf or 1st Layer): // This is how the “6 Petals" Leaf looks like: The “10 Petals" Leaf looks the same, but obviously, just bigger
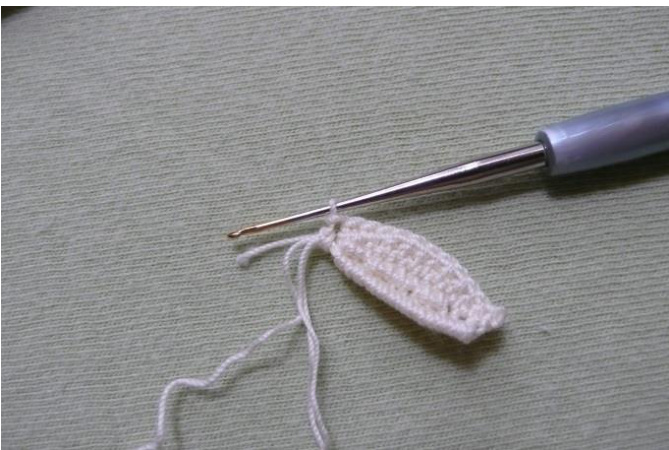
ROW 15.1.2.1 (Petal 1): On pc, work 7 SC;
O drop cord, CH 1, turn; 2 SC in the next 2 sts, 3 DC in the next 3 sts, 2 SC in the last 2 sts, CH 1, turn; ZSC in the next 7 sts, 1 SC on pc, turn; pick up pc, work Z SC in the next 7 sts (-),
CH 1, turn;
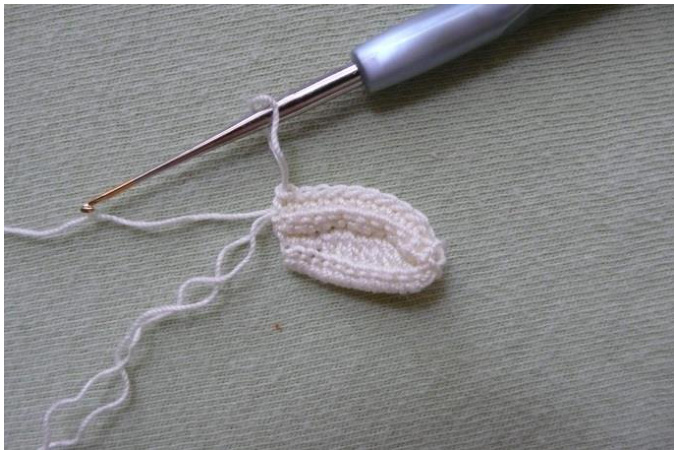
ROW 15.1.2.2 (Petal 2): 3 SC in the next 3 sts of prev petal,
4 SC on pc alone O; repeat from o to o 4 more times.
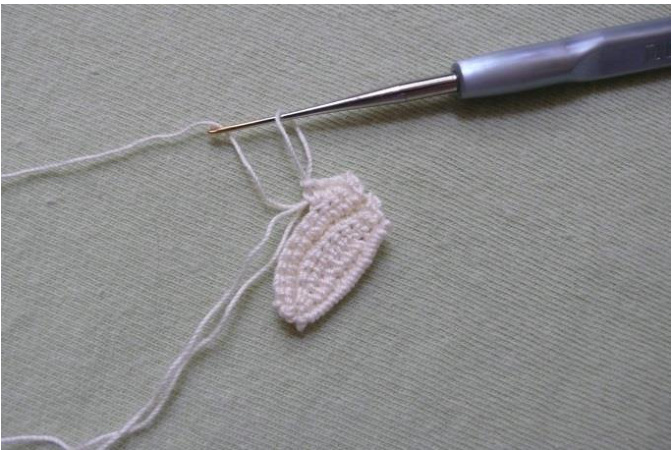
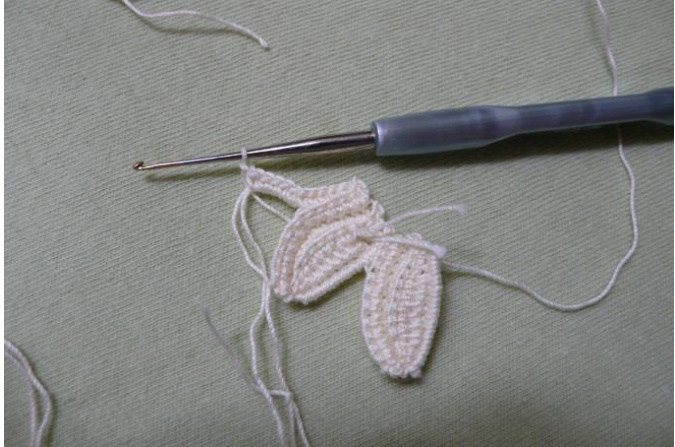
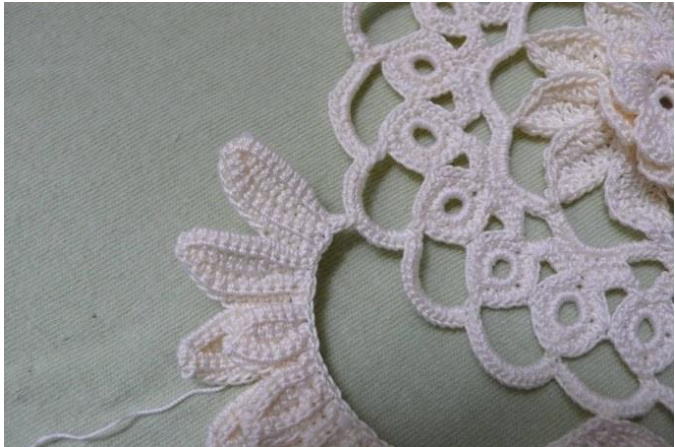
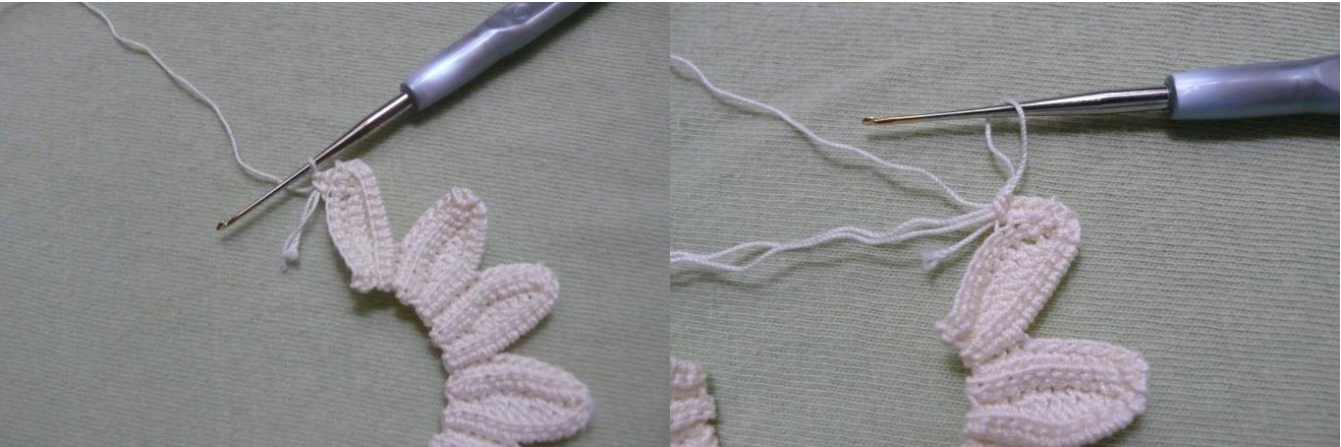
ROW 15.1.2.6 (Petal 6): repeat from 0 to (-). Fasten off and cut thread 2 inches long. Take the 2nd Layer (10 Petals), facing RS to you, join it to the middle sc st of one of the arches of Row 14. I/ If you have any pc or tails hanging out, crochet over them to hide them right away.
Joining method: insert hook in the middle st of arch of ROW 14, draw a loop, you have 2 loops on hook now, draw 1st loop on hook through the 2"d, CH 1, 1 SL ST in thelast sc st of the petal Work 3 SC over the edge of 1oth petal, 4 SC over the next (9th) petal.

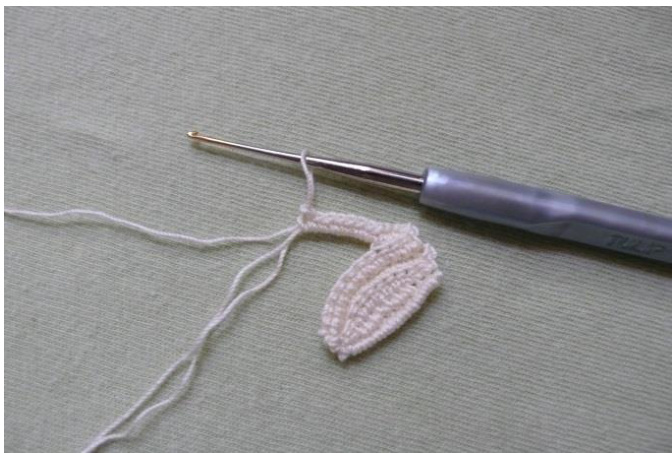
Now, take the 1"t Layer (6 Petals), also facing RS to you, put it on the 2nd Layer and continue working 4 SC over the edge of each and all the rest of petals of both layers, this way you join layers together while you crochet a nice edge along the inside shaping curve of the motif. // This is how these layers look like after they've been joined to each other and to ROw 14.
At the last sc st, join the motif to the middle sc st of the next 3rd arch of ROW 14.
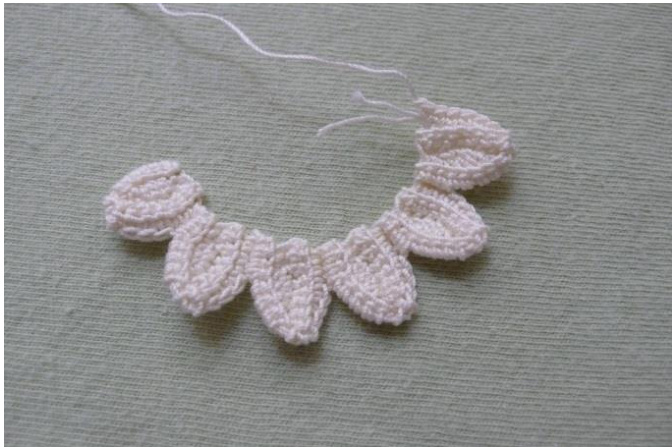
: enough thread to sew or weave in (on the Ws) all the tails left!! Repeat ROw 15.1 (from !!! to !!!) 4 more times. // This is how the Mandala looks like at the end of ROW 15.1
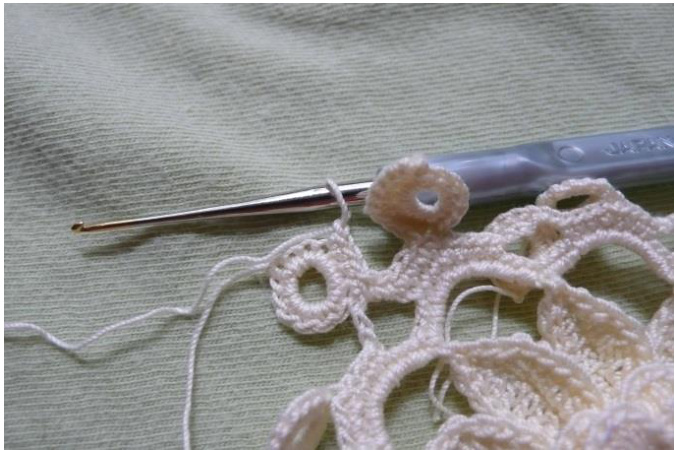
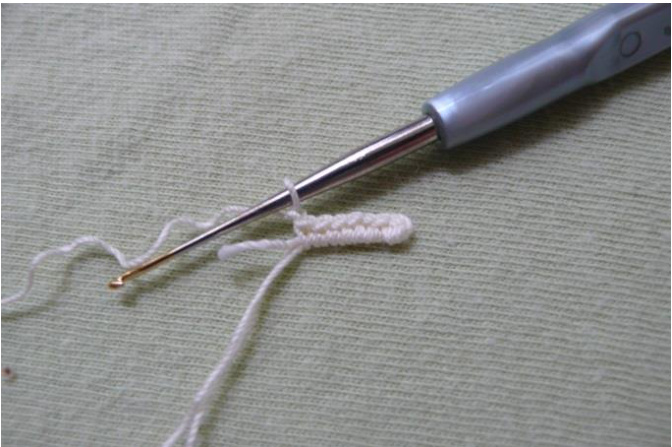
ROW 15.2 (Buttony.)
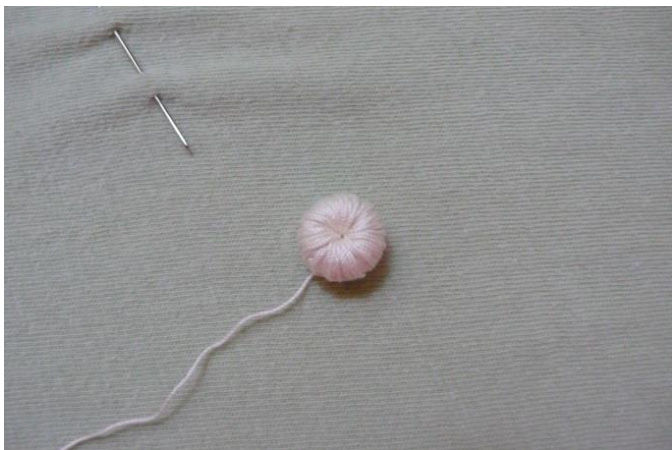
Wind thread around hook handle or a pen 15-20 times; work over this "ring" as many SC STS as you can to fill the ring completely, until there's no more space left to insert the hook. If you find it hard to work the buttony this way, there's another method: CH 8-10; close rnd with 1 SL ST to form a ring; work 60 SC (or as many as you can fill in) in ring, until there's no more space left for the hook to be inserted. // You'll have to keep crocheting sc sts - in round - one over the other, until the ring fills up - hope I explained this well. Either methods, the end result should look like this: I/ This is the RS of the buttony.
Repeat ROw 15.2 four more times. Weave in ends.
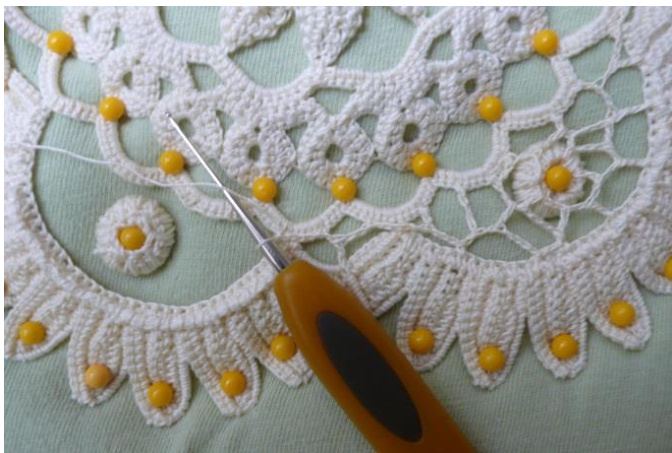
ROW 15.3 (Background Net):
Take your little Mandala and pin it to the foam RS down (WS up); pin it very well, you must not be able to move it when you work the background net. The same with the Buttonies; pin them WS up, just like in the picture below:
Weave thread # 30 in on the back of one of the petals, make sure the working thread is close to the point where you will start your background net. This thread must not come out from the motif in no way, when you try to pull it out. So, weave it in very well.
And be careful not to poke the motif through the RS, you don't want this thread to be seen on the Rs of motif. The background net will be seen as under the motif. Once you have everything firm and pinned in its place, you can start working the background net. Work the "irregular net" however you like, use your intuition and make it nice.
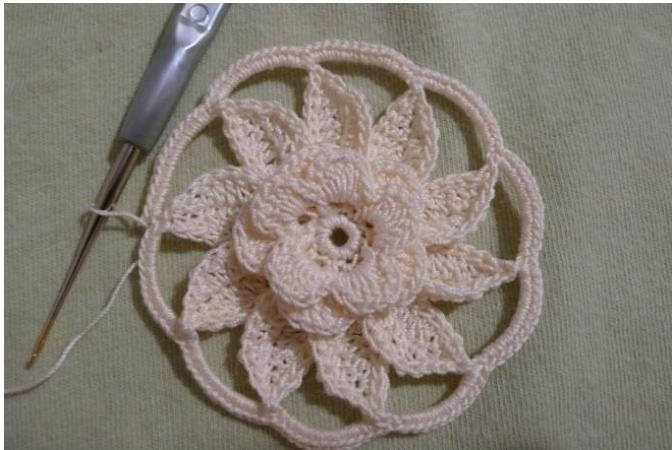
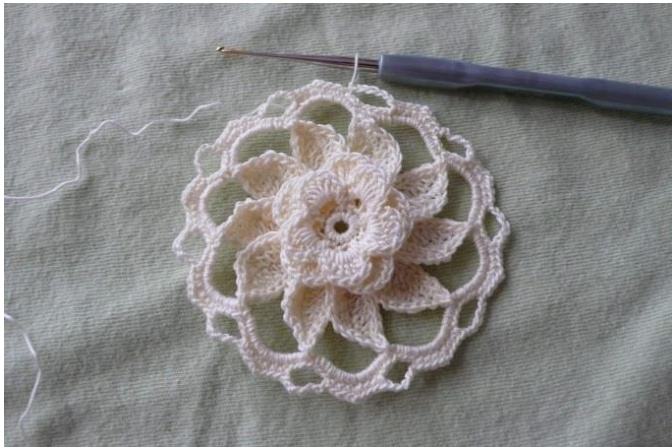
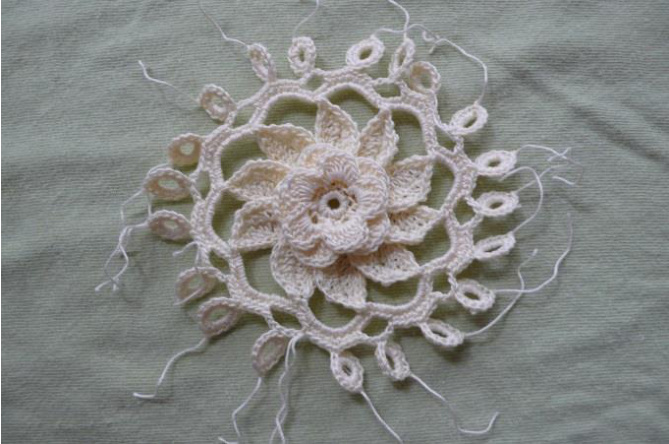
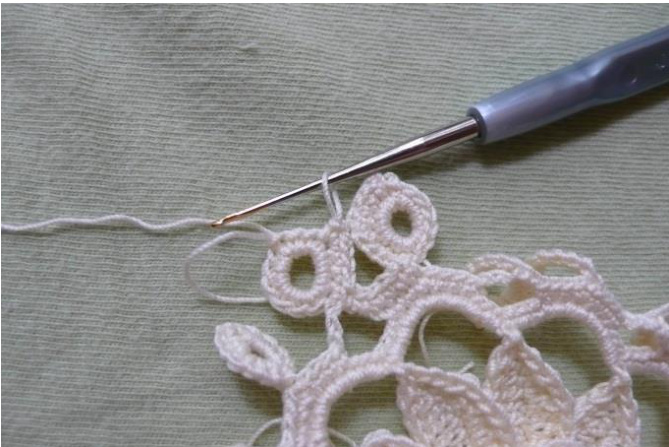
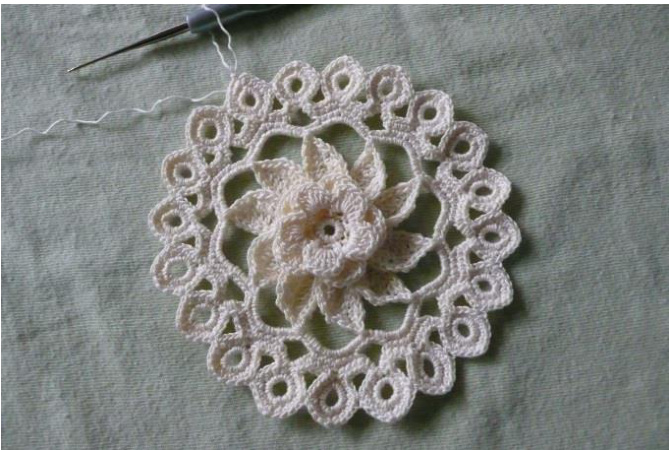
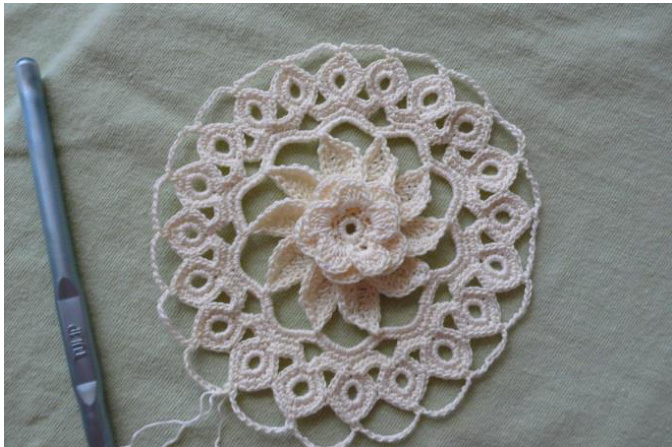
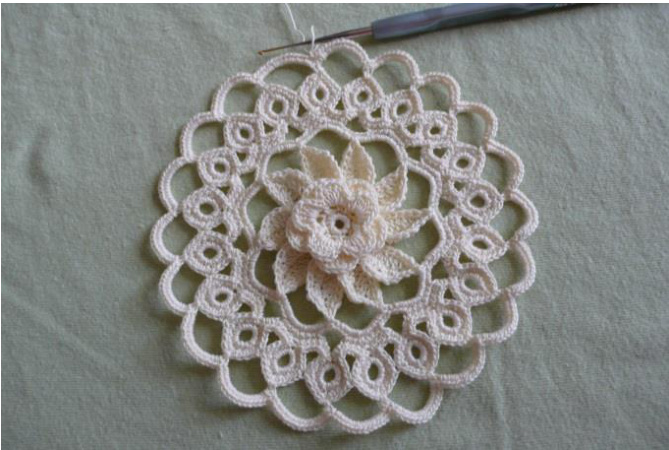
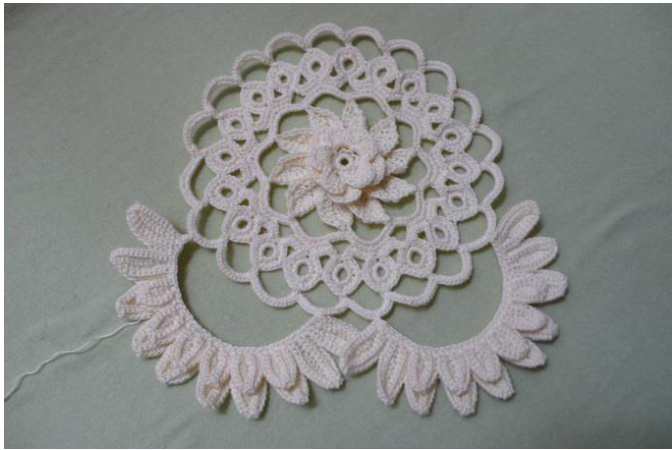
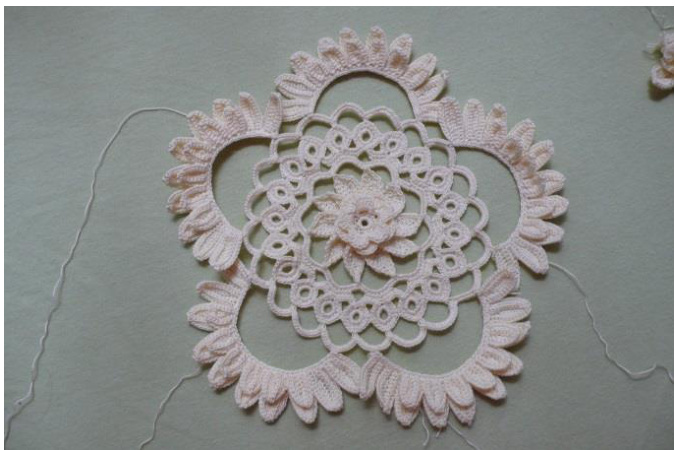
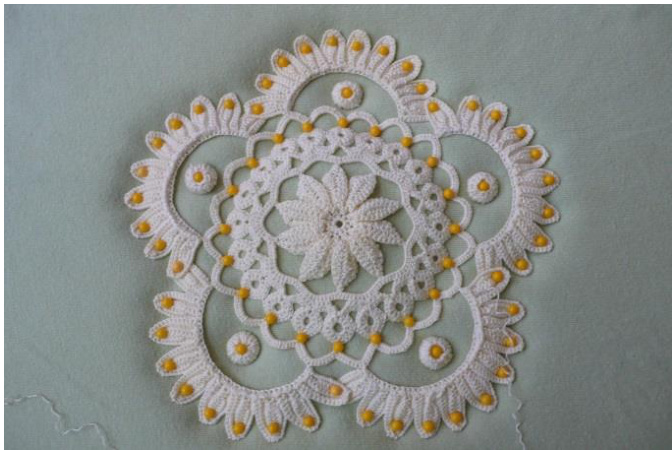
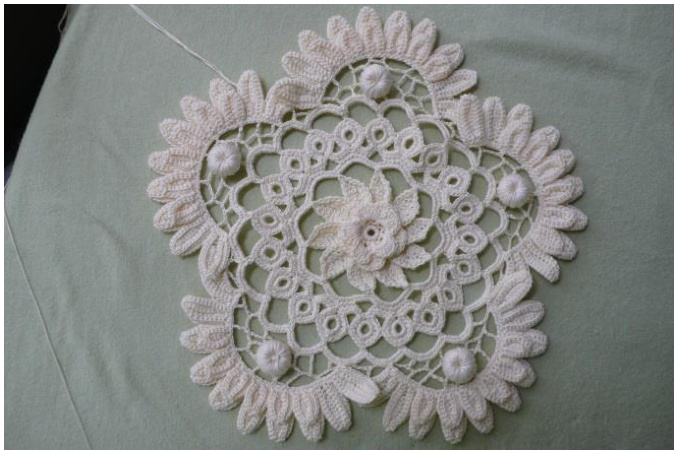
When you're done, don't cut this thread yet, instead.. Congratulate yourself now, because your Mandala at the end of STAGE 3 looks like this: I/ Now you can choose to finish your motif here, or you can add the extra 2 rows of Clones Knot netting around it. However you like, this is on you.@
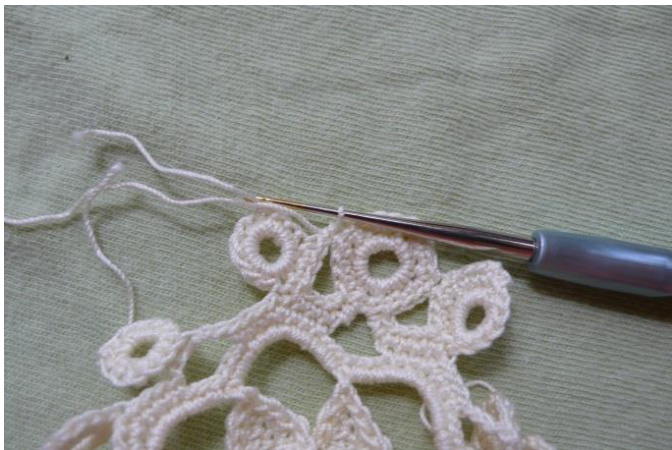
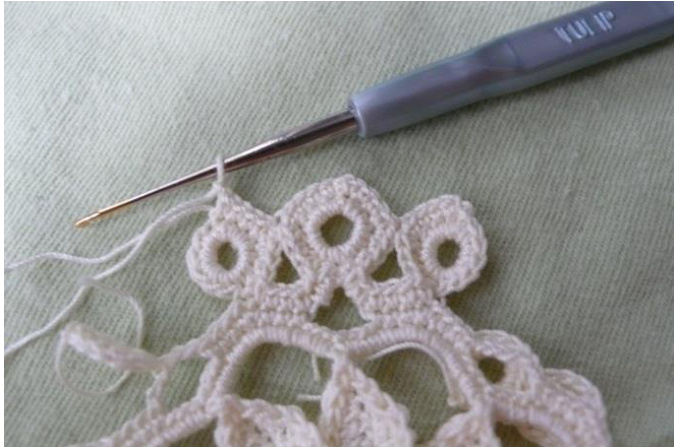
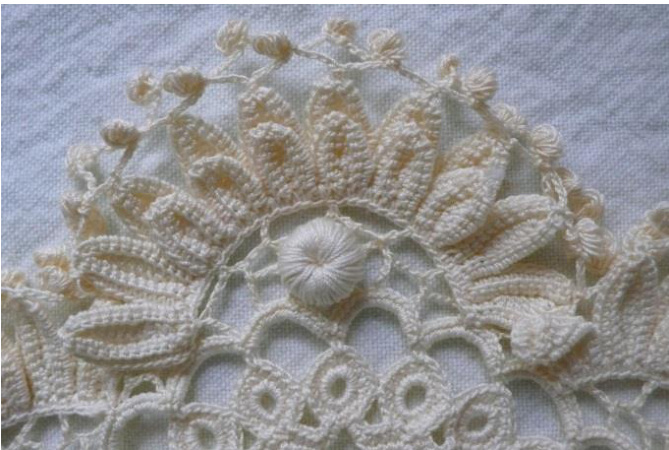
And the last step (which is totally OPTIONAL)! Unpin the motif from the foam board, and work 2 rows of "Clones Knot filling stitch" around the entire motif. // Here's a link for a video on youtube, where Maire Treanor shows how she does the Clones Knot: https://www.youtube.com/watch?v=PVGUMBZKR28 ; you can choose any method you like that there is out there. First row: Continue with same thread # 30 - start at the top of a petal - \* ch 5, Clones Knot, Ch 5, 1 sl st on the top of next petal\* (// the picture below shows very well what I mean); rep from \* to \* till end of row. Close rnd with 1 SL ST in the 1st st of row. Second row: 5 SLST in the next 5 sts, \*1SL ST at the base of 1st Clones Knot, CH7, Clones Knot, CH 7\*. Rep from \* to \* till end of row. Close rnd with 1 SL ST as usual.
When you're done, fasten off and cut thread. Weave in ends. Yayyyyy!!!! You're done!!! Congratulations!!!
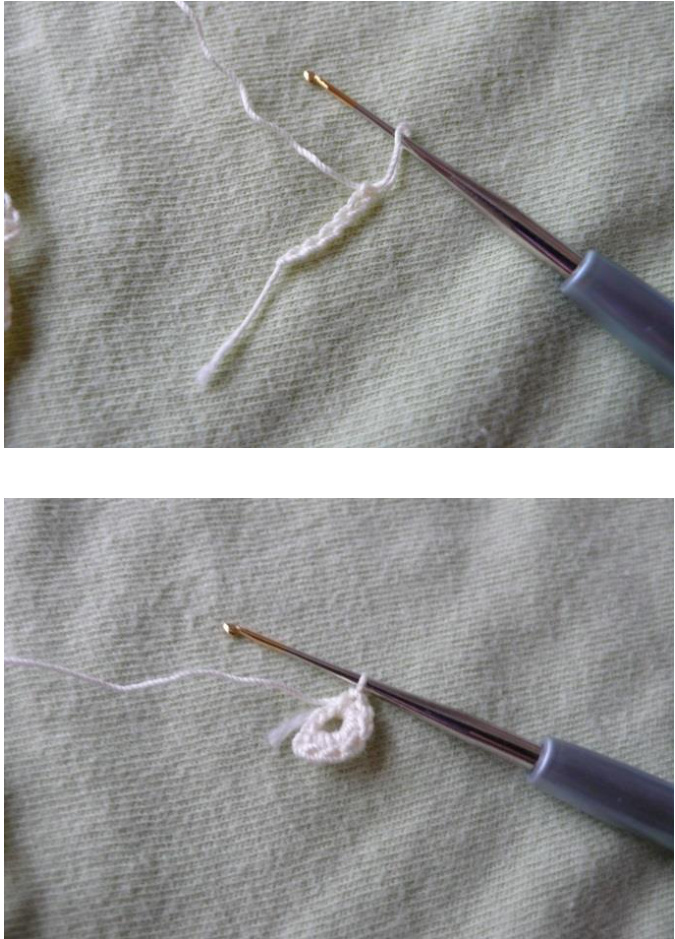
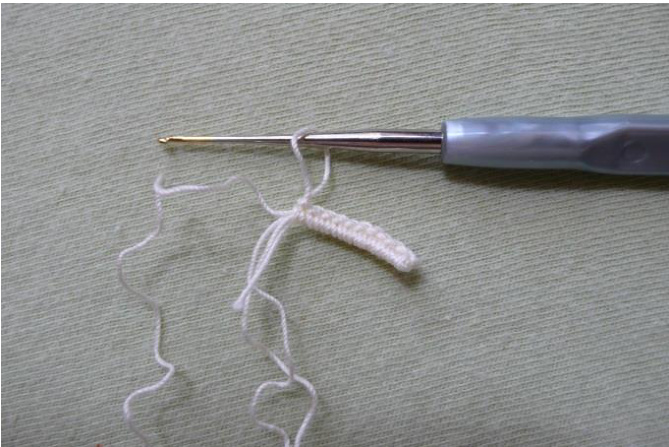
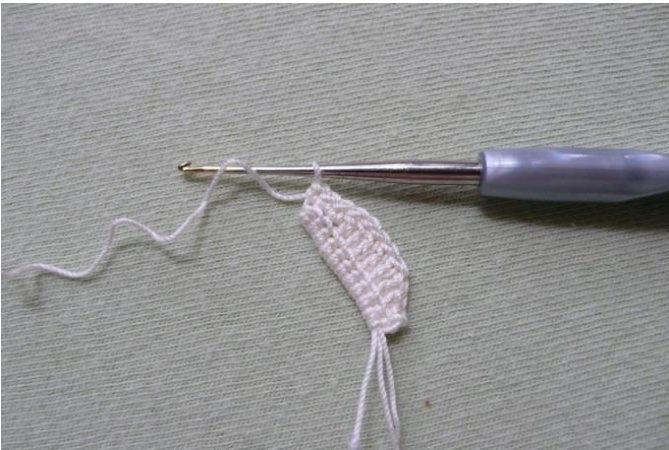
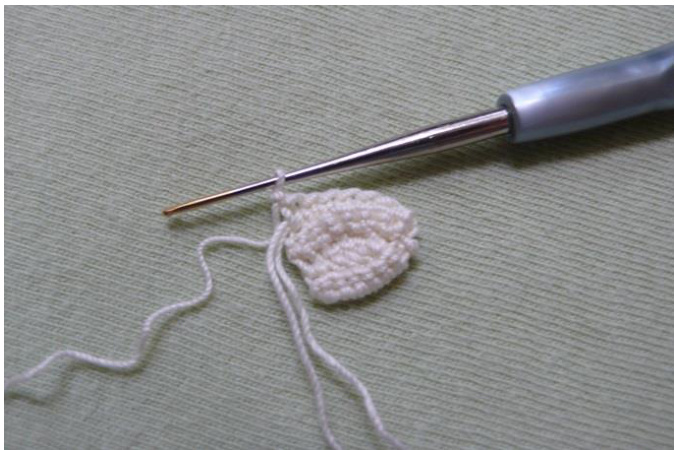
Brief photo tutorial on how to start working with and over the PC.
If you run out of PC, just add more in the same manner as when you start:
And here are a few sources that 1 learnt from and whichI highly recommend: Maire Treanor has a great DVD with her famous Clones Lace Workshop, you can get it from www.interweavecrochet.com www.antiquepatternlibrary.org to download FOR FREE books about Irish Crochet. www.irishcrochetlab.com with plenty online info and classes on the matter.


