Pattern # 001
Santa Fe Lightning Shawl by Mara Bishop Statnekov
For those of us who love to knit lace, there are a plethora of patterns from which to choose, and for those of us who want to delve deeper into gossamer lace, there are a growing number of printed patterns available. I'd like to add to what is out there by starting with this small shawl or large scarf (44 inches or 112 cm square) using symbols and graphic elements from my home, the desert Southwest. My teacher, Galina Khmeleva, has been my principal source of inspiration as well as my source for patterns and information, both from her outstanding books and from her wonderful workshops & classes.While this pattern is rooted in the Orenburg gossamer lace tradition, I have felt free to glean from all lace traditions while going off in my own direction.
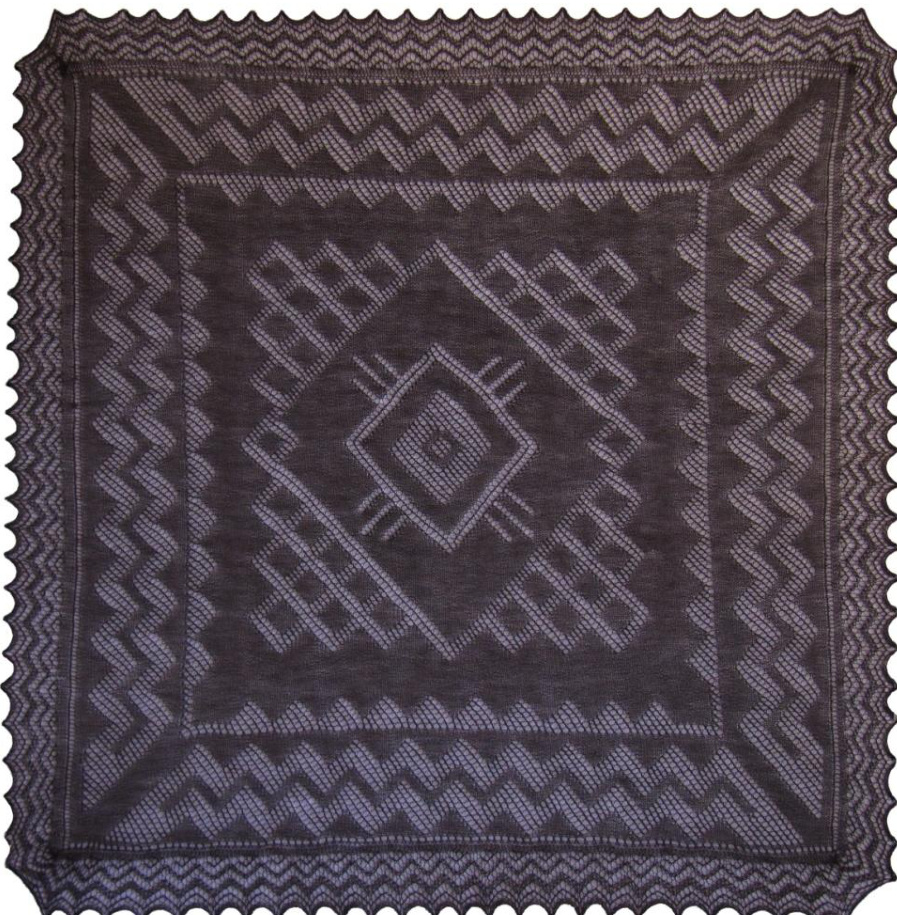
Overview:
There are detailed instructions, photos and charts later on, but first just a little bit of information. Orenburg-style shawls are worked in garter stitch so both sides look approximately the same. It may be helpful to mark the "front" to keep your bearings. Remember that the tail of your cast-on is always in that lower left hand corner. This shawl starts with knitting a ribbon of the edging which will be the bottom border and will look like this:
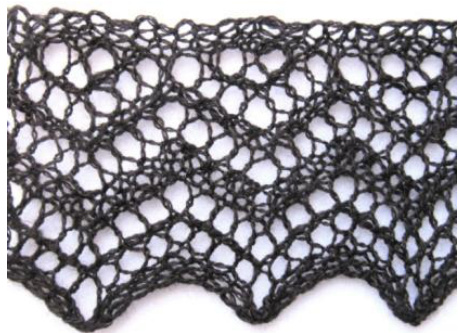
You will find the chart for this border below as well as charts for turning the corners with short rows. The graphic to the right indicates the overall construction of an Orenburg shawl.
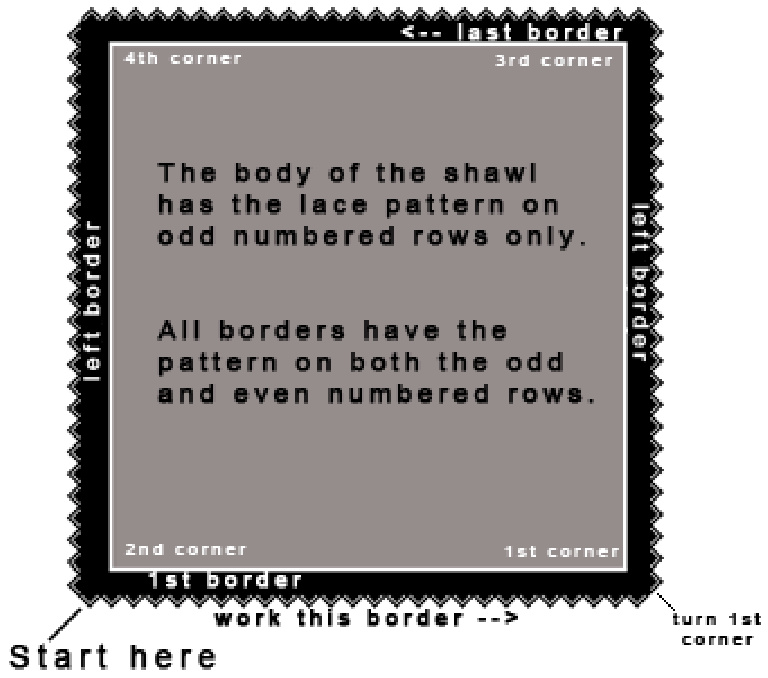
The peaks (or teeth or points) are on all four sides, but there is not a point in the exact corner. There are 26 peaks per side. Orenburg-style knitted lace is based in garter stitch; that is, there are no purl stitches in this piece. So you'll be using the knit stitch on both the right side (RS) and the wrong side (WS). The right side will have the lace pattern made with yarn-overs, knit 2 together and an occasional knit 3 together. The wrong side will have lace pattern on the borders, and plain knit in the body. Every rowis started witha Slip 1 purl-wise (s1wyif), with the yarn held in front and then shifted to the back so that it is in plac to make the next knit stitch. · On the charts, all odd numbered rows are read from right to left. All even numbered rows are read from let to right. · I've used the wraps-per-inch (wpi) and ply designation, such as 30/2, to indicate the weight of the yarn. 30/2 means 30 wraps-per-inch in a 2-ply. It's more specific than the general terminology of fingering or lace-weight or cobweb. There is a large variation in weights under the name “lace weight" and even under “cobweb". · At the end of each row, take hold of the bottom of your knitting and give it a tug or two. This straightens out and aligns the stitches.
Yarn and Needles:
I great deal of flexibility in yarn choice for this p In the photos of this pattern, I've used a 30/2 100% extra fine merino (100 grams = 1530 yds) from Colourmart, with size 1 US needles (2.25 mm). 30/2 is a cobweb lace-weight yarn. I used about 1350 yds. The wonderful thing about knitting lace shawls is that you can use a variety of lace-weight yarns with a good outcome. I suggest anything in between 18/2 and 32/2. It's always a good idea to swatch a couple of peaks of the border to find your ideal gauge in yarn weight and needle size. Remember that your personal knitting tension will also affect the results. ns available from Skaska.com which are usually in the 30/2 to 32/2 range, and are from exoti cashmere and silk. jerspun Zephyr (50% merino and 50% tussah silk) works well on 2.75mm = US size 2 needle Colourmart.com in the UK, always has a very interesting, though always changing, supply of very fine lace-weight yarrns. From Skaska.com: Galina's yak and silk blend (32/2 which is 100 gms = 1650 yds) wouldworkwellwiththis pattern.
personal note:
I absolutely love using Signature Needle Arts needles. For this project, I used 10" 2.25 mm straight needles with a stiletto point.

To start:
Symbols:
Cast-on loosely: 14 stitches, using the long tail cast-on method (or using your preferred method). I usually cast-on to 2 needles held together or a larger-sized needle for the cast-on row only. You will be knitting a ribbon of border that has 26 peaks before turning the 1st corner where you will start working on the main body of the shawl. On Bottom Border Chart (below), Row “-2" is your cast-on row. Do both Row “-1", and Row 0 (zero) as set-up rows. Each peak consists of16rows. At Row 416 you will have finished knitting 26 peaks for your bottom border. yo (yarn over) k2tog k3tog V Slip 1,purlwise,with yarn in front knit, and put back on left needle donotknitlast stitch castonrow setuprows This border has typical Orenburg 5-hole peaks. The hole at the peaks and at the narrowest part are counted twice (see the photo below).
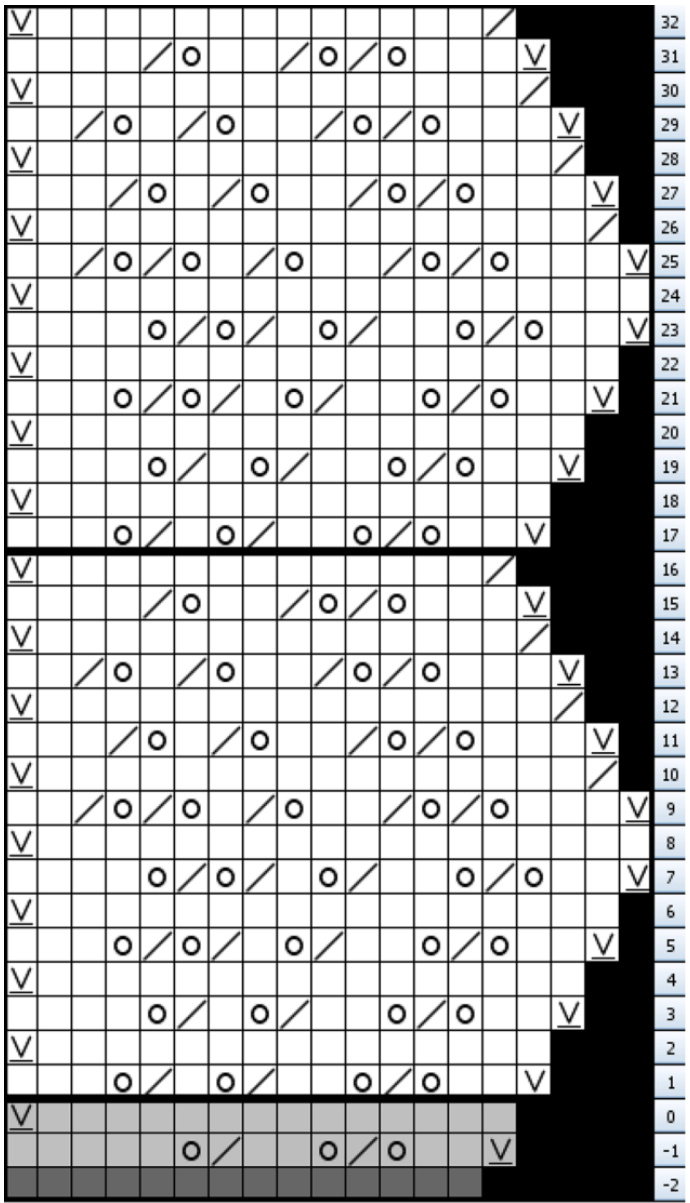
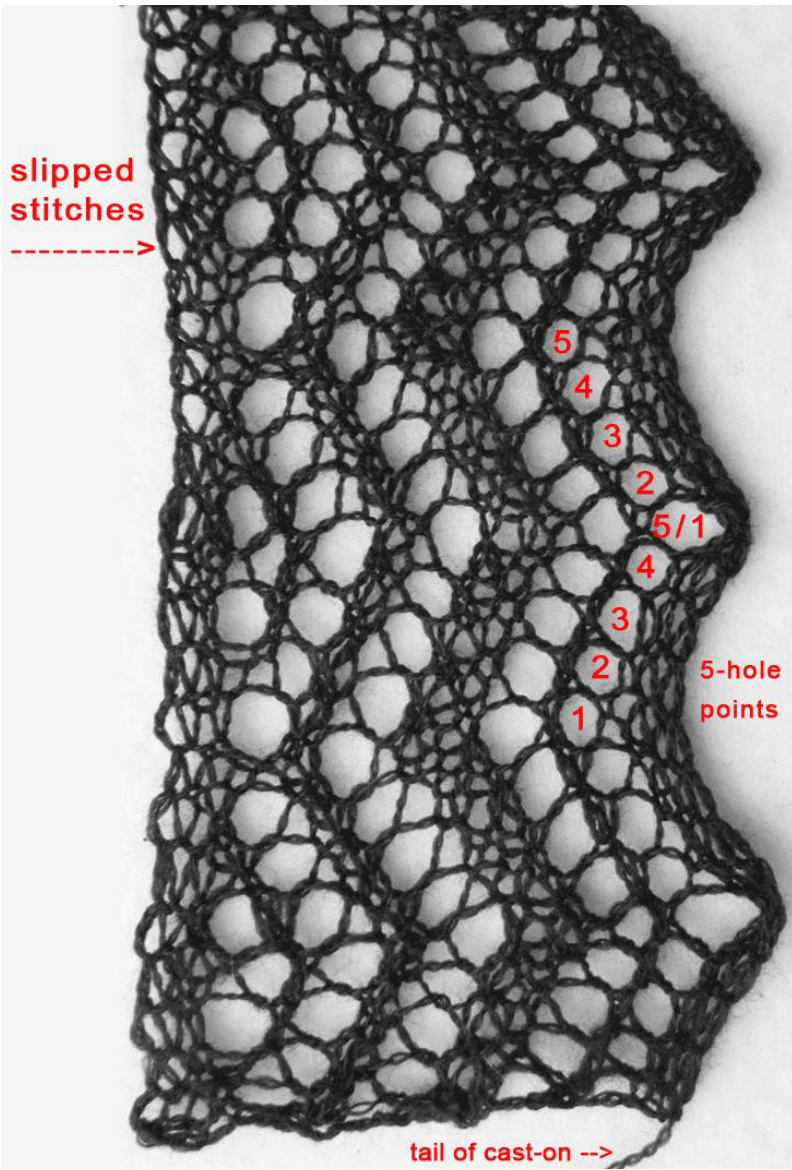
This first strip of border has 416 rows. When you have finished your 26 peaks at Row 416, you will be ready to turn the first corner (see chart below), and then pick up your “slipped" stitches that make up the body of the shawl. (There is a photo showing this below.) See the interior or left edge in the photo above for the location of these slipped stitches. Since there is one slipped stitch for every 2 rows of border, you will end up picking up 208 stitches to make up the body. As you knit each pattern row, keep alert to the previous pattern row, and how the rows relate to each other as the pattern develops, paying attention to how the yarn overs (holes) build the pattern.
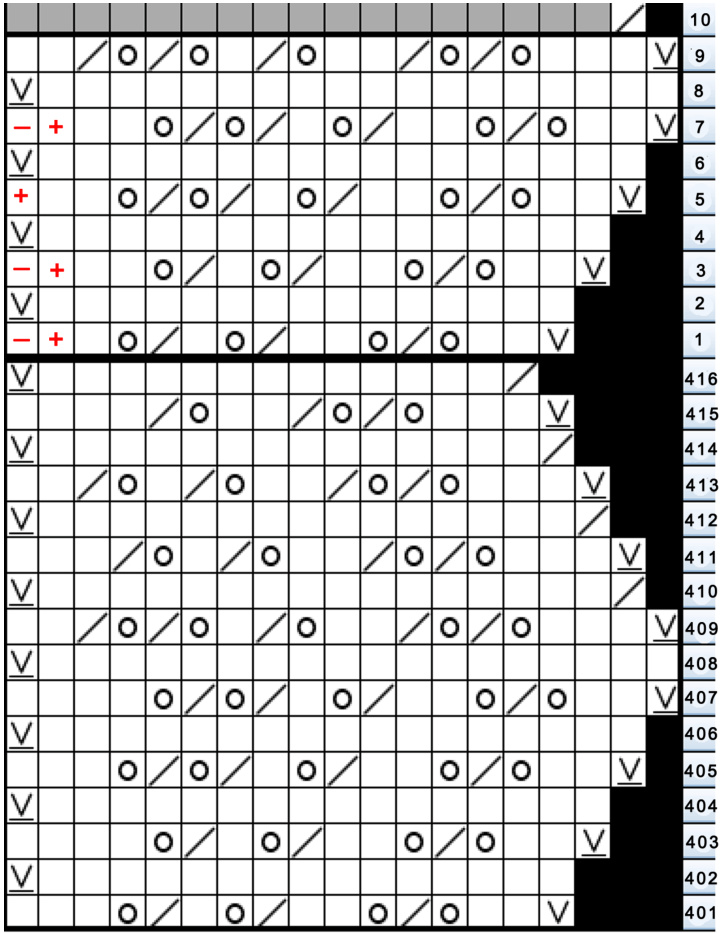
Turning First Corner chart
To Turn the First Corner:
After finishing your 26th peak at the narrowest part of the border pattern (after finishing Row 416), you are ready to turn your first corner using short rows. Work the chart to the left: Rows 1 through 8. At Row 9, you will knit the border pattern and then pick up the 208 slip stitches along the flat (or interior) part of your border (see photos below). This corner point is the 1st point of the side edge. (Don't worry: I'll talk about Row 10 at the bottom of page5.)
Picking up stitches:
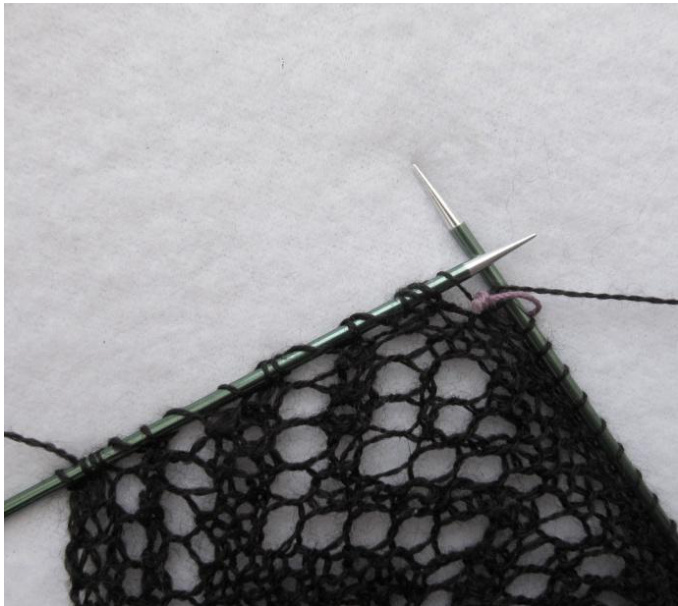
Start at the opposite end of the ribbon of border near your original cast-on.Pickupthefronthalfofeach slipped stitch (front to back) along the entire interior side of the border. You'll be picking up 208 stitches. (See the photos below)) After picking up the 208 body stitches on your left needle, place a marker between the 19 border stitches (on your right needle) and the body stitches. Knit the 208 stitches through the back that gives a very niceX pattern,and place anothermarker at the end before picking up the 15 stitches along your original cast-on.

This is the first border when you are ready to turn your first corner with short rows. This is after Row 9 when you have finished the short rows of the chart above. This shows the picked up 208 stitches on the interior side of the border (see the left needle).

Row 9 of the border is completed (on the right needle), and you are ready to knit across the “body" of the piece on the picked up stitches. Place a marker in between the 19 border stitches and the 208 body stitches. Knit these body stitches through the back of each stitch. You've knit the 208 body stitches and are ready to pick up the 15_corner stitches in preparation to turn the 2"d corner.
Turning the Second Corner:
When you have finished knitting across the picked up stitches, take your empty needle and carefully pick up 15 stitches from your original cast-on edge (see photos below) from the outer edge to the inner. These 15 stitches are picked up along the edge of your original 14 stitch cast on. Try to pick up through the centers of the yarn overs, with the correct amount of stitches around them to make the patternmerge. Knit across these 15 stitches as in Row 1 of the chart below. Continue working this “Turning the Second Corner Chart" on just the borderstitches.
Remember to place a marker in between the body stitches and these 15 border stitches.
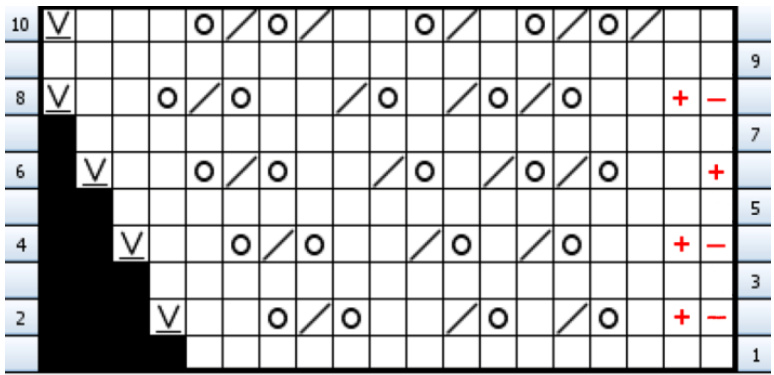
Turning Second Corner chart Work Row 10 of the chart (WS) and then continue knitting (remember this is a garter stitches garment) all the way across the entire piece. Reminder: when you get to the end of this row (past the 2"d marker) and into the right border, remember to knit the last 2 stitches together (as charted on Row 10 of the “Turning the First Corner" chart).
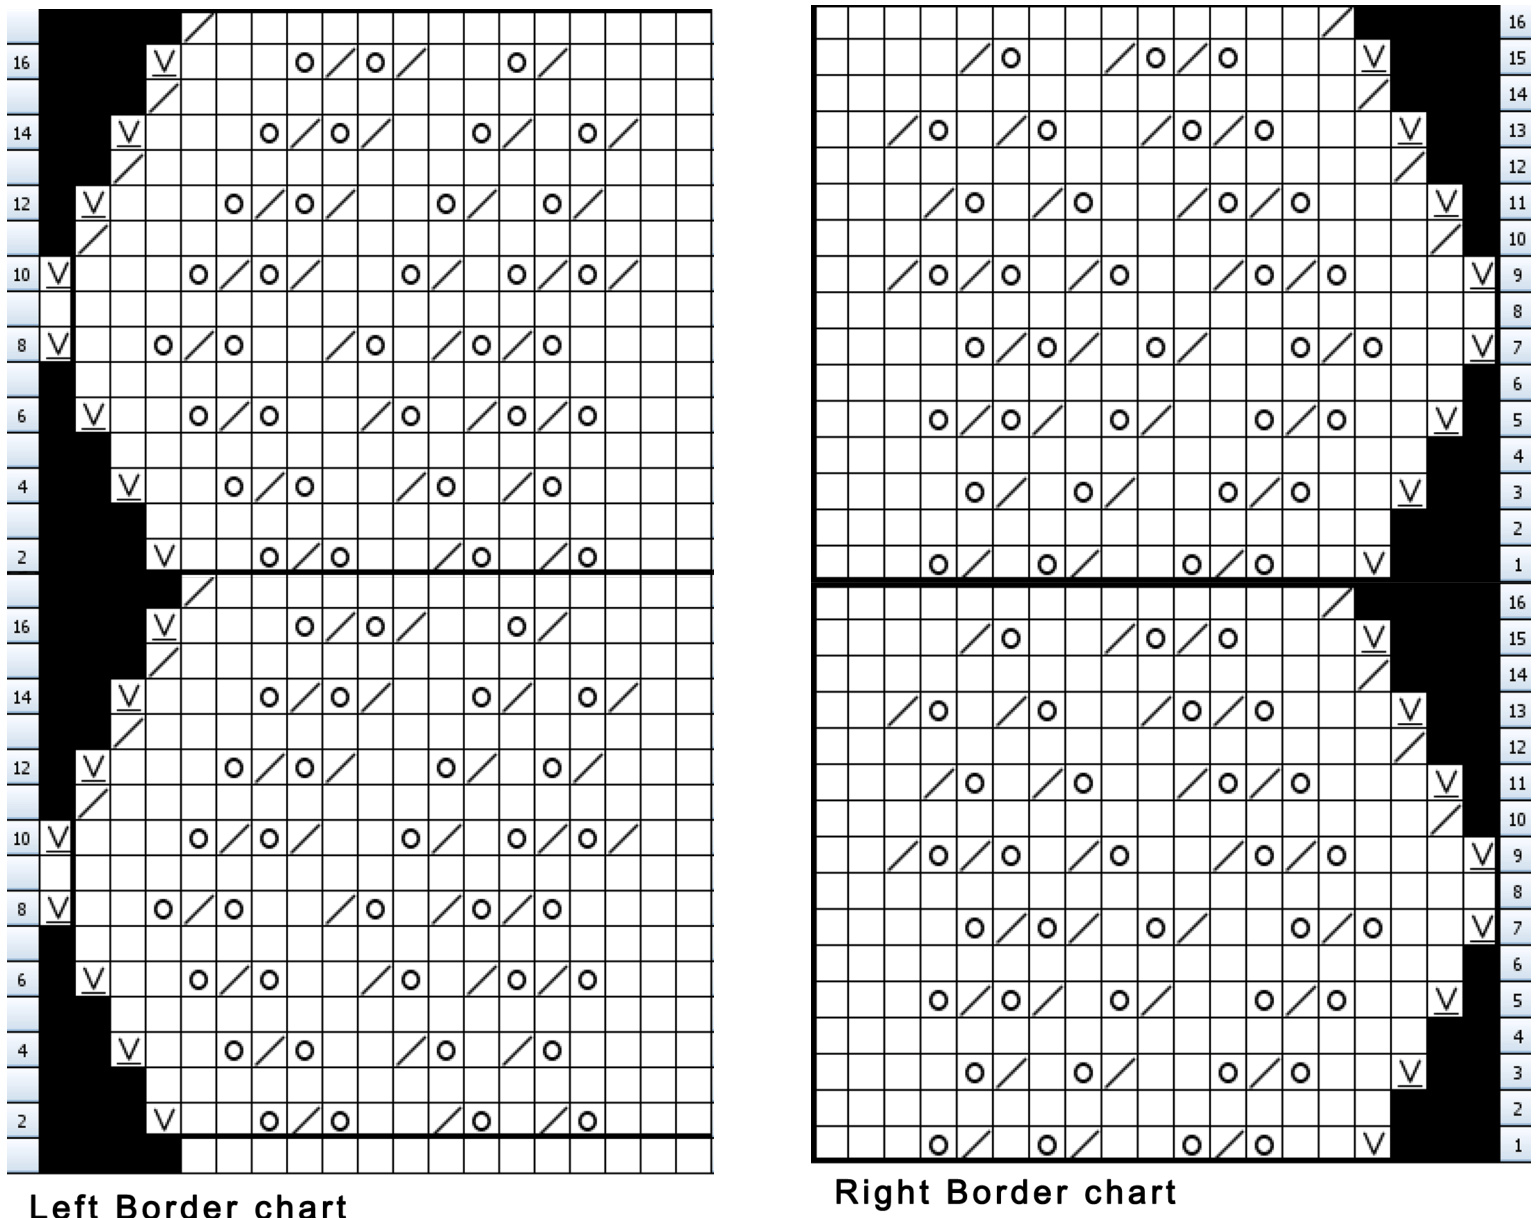
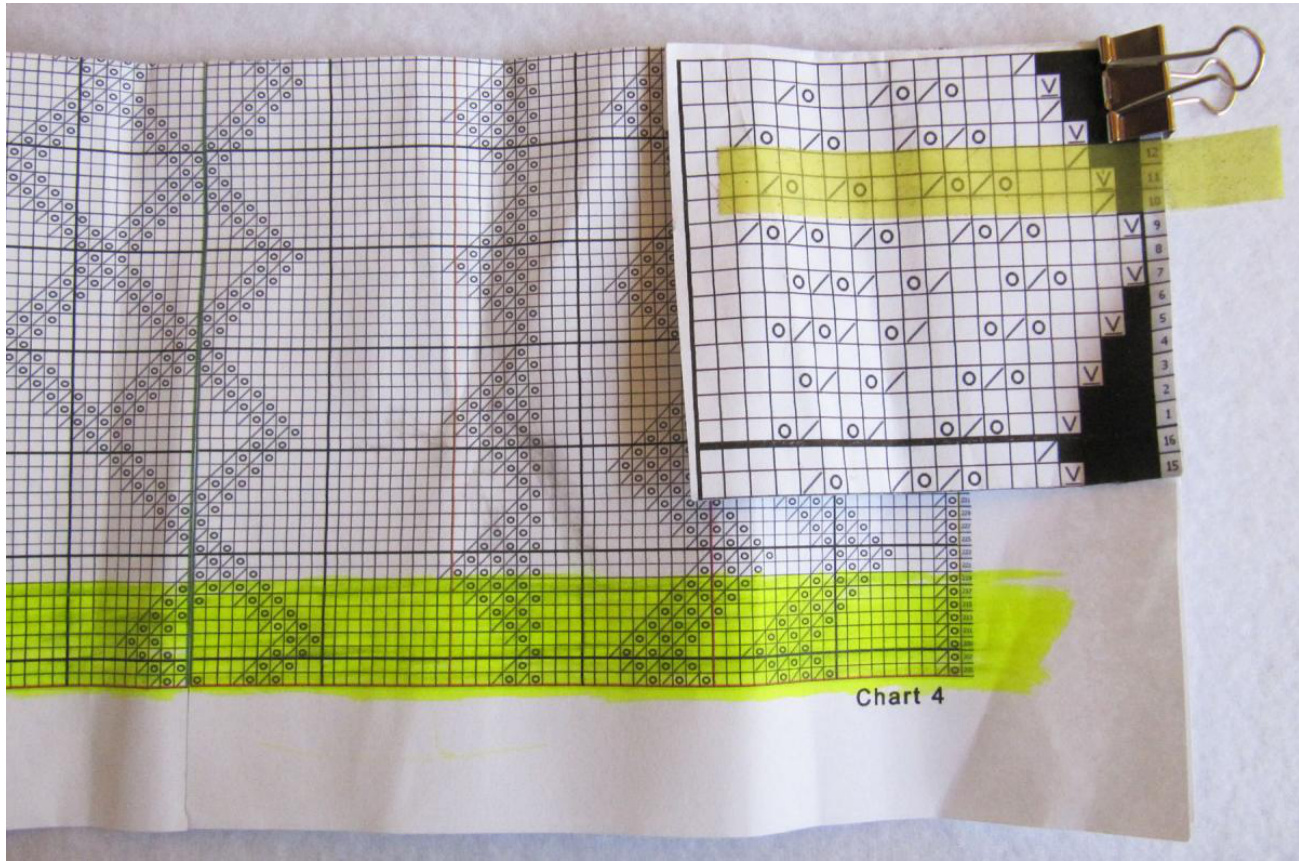
As you start Row 11, you should have: 18 border stitches (right edge) + 208 body stitches + 19 border stitches (left edge). After Row 16, you willcontinue with body rows to Row 408. At the same time you will be repeating the 16 row border charts (above) on both the right and the left borders. Here's a photo of how I keep track of it all. I use highlighter tape on the border chart (because I use it repeatedly), and I use highlighter pens on the body charts. Reminder: the black horizontal lines on the charts are every 16 rows to reflect the 16 row border charts.
When you downloaded this pattern, you should have seen:
Santa-Fe-Lightning-Shawl-text.pdf Santa-Fe-Lightning-Shawl-charts.pdf
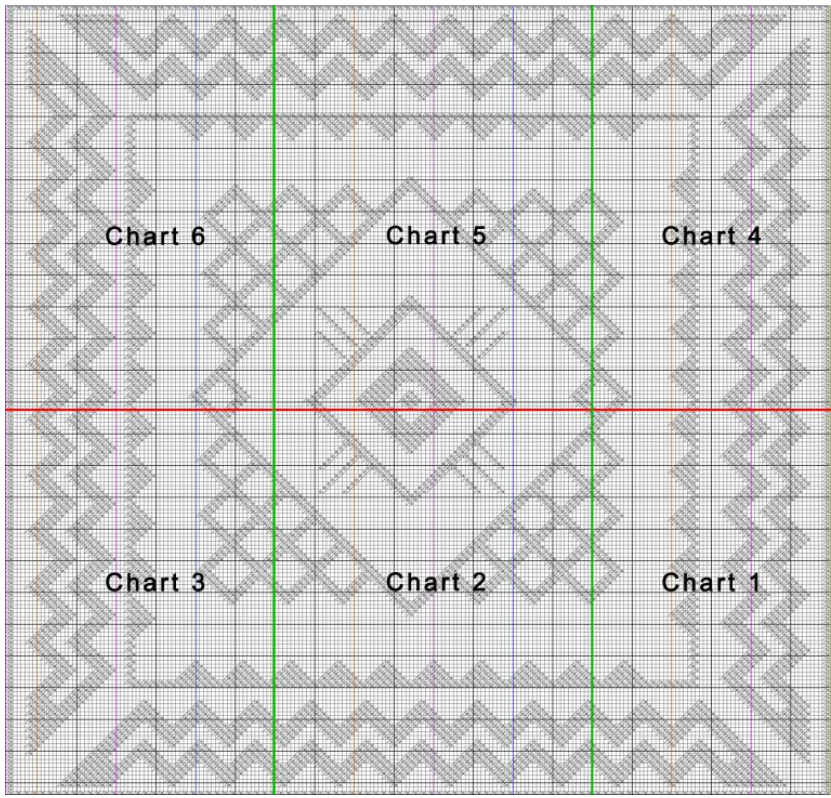
The border charts are included in the text. There are 6 pages of body charts. Here is a diagram of how they fit together. There are horizontal lines on the body charts every 16 rows to correspond with the 16 row border pattern. The vertical lines are in 10 stitch increments. They are alternatelyblack and colored.I use these colored lines to indicate where to place colored markers across the rows.
Edges & Body:
d Left Border charts (16 row repeats) with the charts for the body of the shawl from Row 11 to You should be at Row 11 on all three charts at this point. charts and the body chart row numbers match up. At that point, you will need to repeat the 16 bodycharts.
On even numbered rows (WS):
From the first stitch to the border marker, you follow the Left Border chart. Remember to Slip 1 purlwise (s1wyif), at the beginning of every row. From the second border marker to the end, you use the Right Border chart. In between the markers is the body of the shawl which is plain knitting. You have placed markers to delineate the borders from the body. I find that it helps me keep my place by placing colored markers at regular intervals across the row. I use colored #10 pearl cotton tied in loops to make my own markers. If it works for you, you can place your colored markers where the colored lines are on the pattern. With yarn as fine as 36/2, metal or plastic markers leave a space in your knitting that shows up in the finished piece in a bad way. I learned this the hard way. That's why I suggest using #10 (or finer) pearl cotton. It comes in colors. Upon finishing Row 408, you have finished the body of the shawl, and are ready to turn the 3'd corner. While knitting this WS row, I usually remove all of my markers except the 2 indicating the right and left borders
Turning the 3'd corner:
You will have ended the body of your shawl by completing the wrong side row with: Left Border Row 8 + Body Row 408 + Right Border row 8.
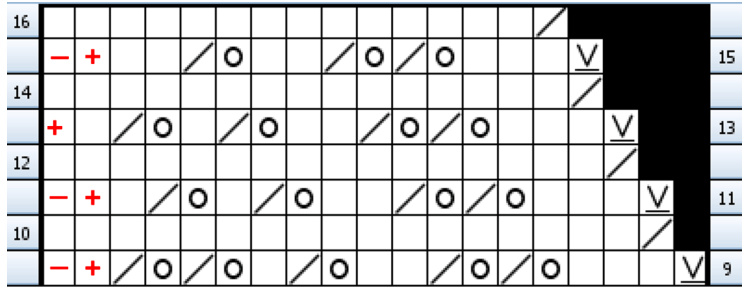
Turning Third Corner chart Complete Rows 9-16 of the right border with the "Turning the Third Corner" chart. This is the last peak on the right side. Then use the "Right Border Chart" to work the last border at the top of the shawl.
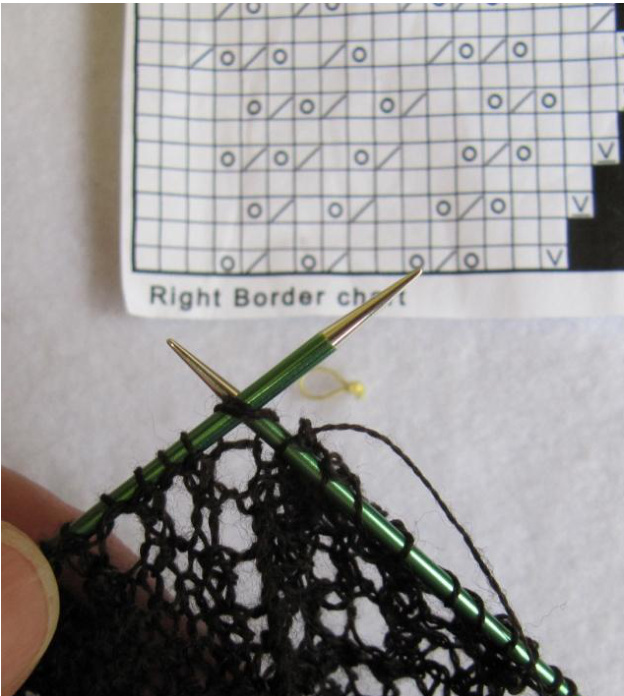
Knitting the last stitch of the border with one stitch from the upper edge of the body.
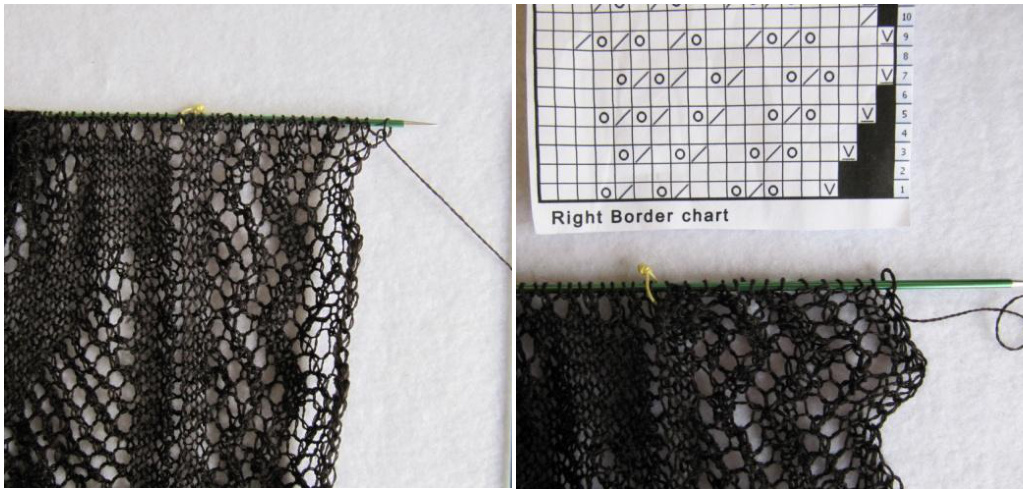
This is after Row 408 when you are about to turn the 3'd corner with short rows. Having turned the 3'd corner, you're ready to start knitting the top border using the Right Border chart. As you are knitting each row of the border pattern, knit the last stitch of the border together with one stitch of the body. Slip this last stitch back to the left hand needle before you turn your work. This attaches the border to the body of the shawl. Knit back to the outside edge of theborder on the even numbered rows.
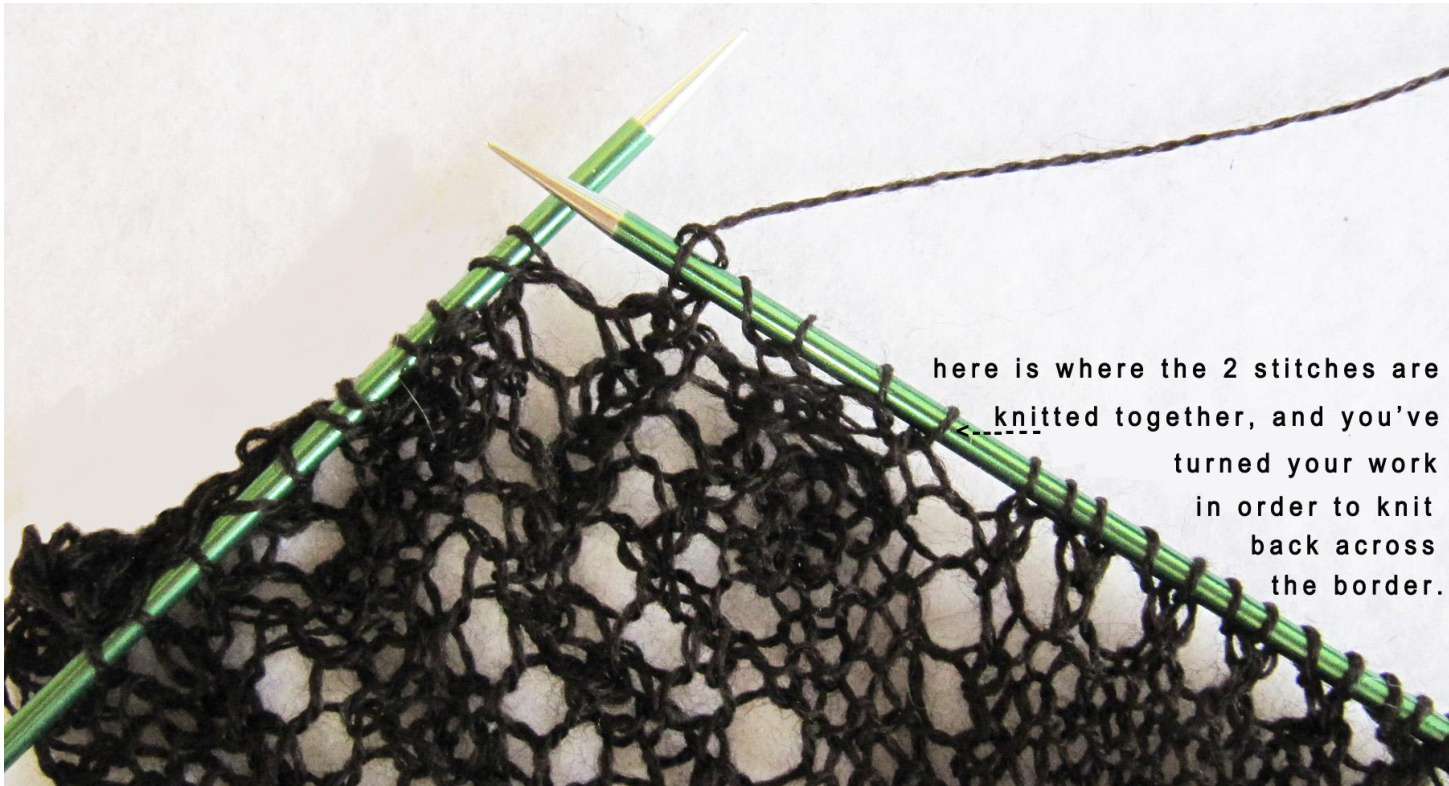
Continue knitting 1 border stitch with 1 body stitch at the interior end of every odd numbered border row until your have finished your 26 peaks.
Turning the 4th corner:
When you come almost to the end of the 26th peak, do not knit the last Row 16. Complete Row 15 of the top border pattern. You should have 16 stitches on your right needle. To the left of your “left-side" marker, there should be 19 left hand border stitches on your left needle. Continue kniting across on the remaining 19 stitches which is Row 9.
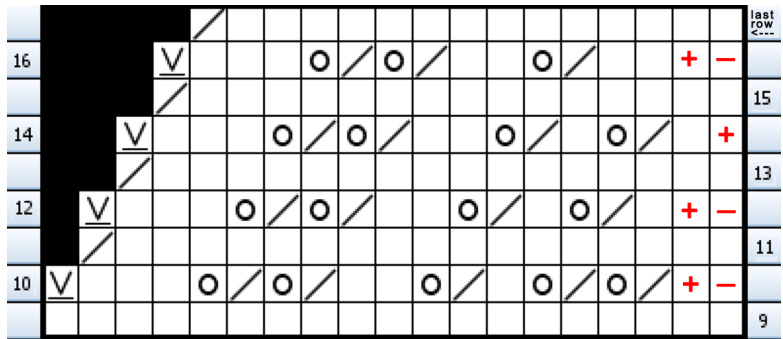
Turning Fourth Corner chart
Use this chart to turn the last corner. You will be just working the left hand border stitches. Work this entire chart through Row 16 and through (what I fondly call) "the last row". You should have 15 stitches remaining on the left of the marker. You now have all of your stitches on one needle with the marker in the middle. Slip the 15 lef border stitches up to the marker, onto the empty needle. Get rid of the marker and take a deep breath because you are almost finished! At this point, you have 16 stitches to the right of the marker and 15 stitches to the left of the marker that need to be grafted together.
Graft last corner:
Check to see that you have 15 live stitches on your left needle and 16 live stitches on your right needle, Slip 1 stitch from the right hand needle to the left hand needle. Bring the second stitch on the left needle through the slipped stitch, putting it on the right hand needle as you drop the first stitch off your needle. (Clear as mud.) It's difficult to write, but if you do each step, I believe you'll find the actions fairly simple. Now, bring the second stitch on the right needle through the slipped stitch, putting it on the left needle and dropping the first stitch off. Do this back and forth until 1 stitch remains. Break the yarn leaving a few inches, and thread the tail end of the yarn through the last stich, and then weave that end into the edge. Voila!
Blocking or Finishing:
There are lots of ways to block a square or rectangular shawl. The traditional way is to use a blocking frame. I've made one from four 72" long, 1" x 2"s of maple with holes drilled every 1" into which I place nails at convenient intervals and in the corners to make whatever size I need. By threading a nylon cord through all of the peaks (back to front counterclockwise) starting in one corner, go allthe way around and tie the cord ends together. Place it in a bowl of warm water so that it is thoroughly wet. Remove and gently squeeze out all of the water. I usually put a bath towel on my kitchen floor, put the shawl on half of it and fold the other half over the top. Then, I walk back and forth on it so that the towel absorbs the extra moisture. Stretch the nylon cord over the nails, starting in the corners, and then over the nails at intervals. I've also used my queen-sized mattress with just the mattress pad on it to block shawls. Using blocking rods (though stainless steel welding rods work fine and are cheaper), lace them through the peaks of the borders. I stretch out the rods and anchor them with largeT-pins at the appropriate finished size. You should stretch the shawl as much or as little as you like. I personally stretch mine quitetaut. May you enjoy this pattern, and wear your shawl in good health and cheer. Mara Bishop Statnekov


