A Leafin A LeafarMarL TOH
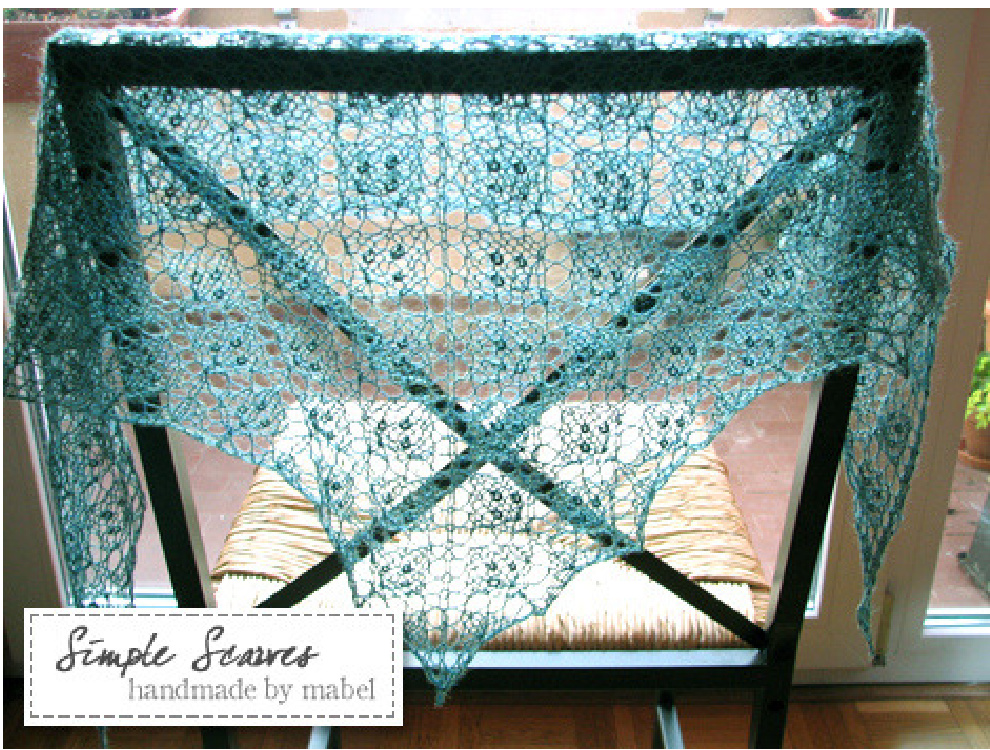
Since I started knitting, I've always been fascinated with lace shawls. I still remember the frustration yet excitement when I finished my first shawl and then, subsequently, the feelings that accompanied the other shawls that followed on - Shetland Triangle, Angel Lace, Swallowtail, Flower Basket and so forth. Yet, deep down inside, I've always wanted to knit up something to call my own and finally, after nearly two years of reading, knitting and plotting, A Leaf In A Leaf awaits. Based on the Leaf Lace stitch from Knitting Lace Triangles by Evelyn A. Clark, I was inspired to add in nupps - nupps that I have seen earlier in the Swallowtail - together with this stitch, creating a tiny leaf in, well, a bigger leaf. This shawl reminds me of the joys of spring and the colours of autumn, conjuring up vivid pictures of leaves floating gently in the breeze. I've knitted this in smooth laceweight yarn (KnitPicks Alpaca Cloud) with a regular 4.5mm needle, creating a floaty yet drapey shawl.
FINISHED SIZE
46" wide across the top edge and 19" long from the center top edge to the tip, after blockin: YARN About 500 yds of laceweight yarn for 10 (and above) number of repeats (KnitPicks Alpaca Cloud was used for this project, which features just 8 repeats - less than a full skein was used!)
Page 1
NEEDLES USD7/4.5mm circulars and 9mm for binding off. Adjust needle size to obtain correct gauge
NOTIONS
Crochet hook, waste yarn, markers, rust-proof pins for blocking
GAUGE
20 to 22 sts over 4" square in stockinette stitch before blocking. This is only a suggested gauge; you can feel free to change the needle size to suit the yarn weight chosen. Bear in mind that a tighter or loose gauge will have an impact on the amount of yarn needed plus overall size and feel of the shawl.

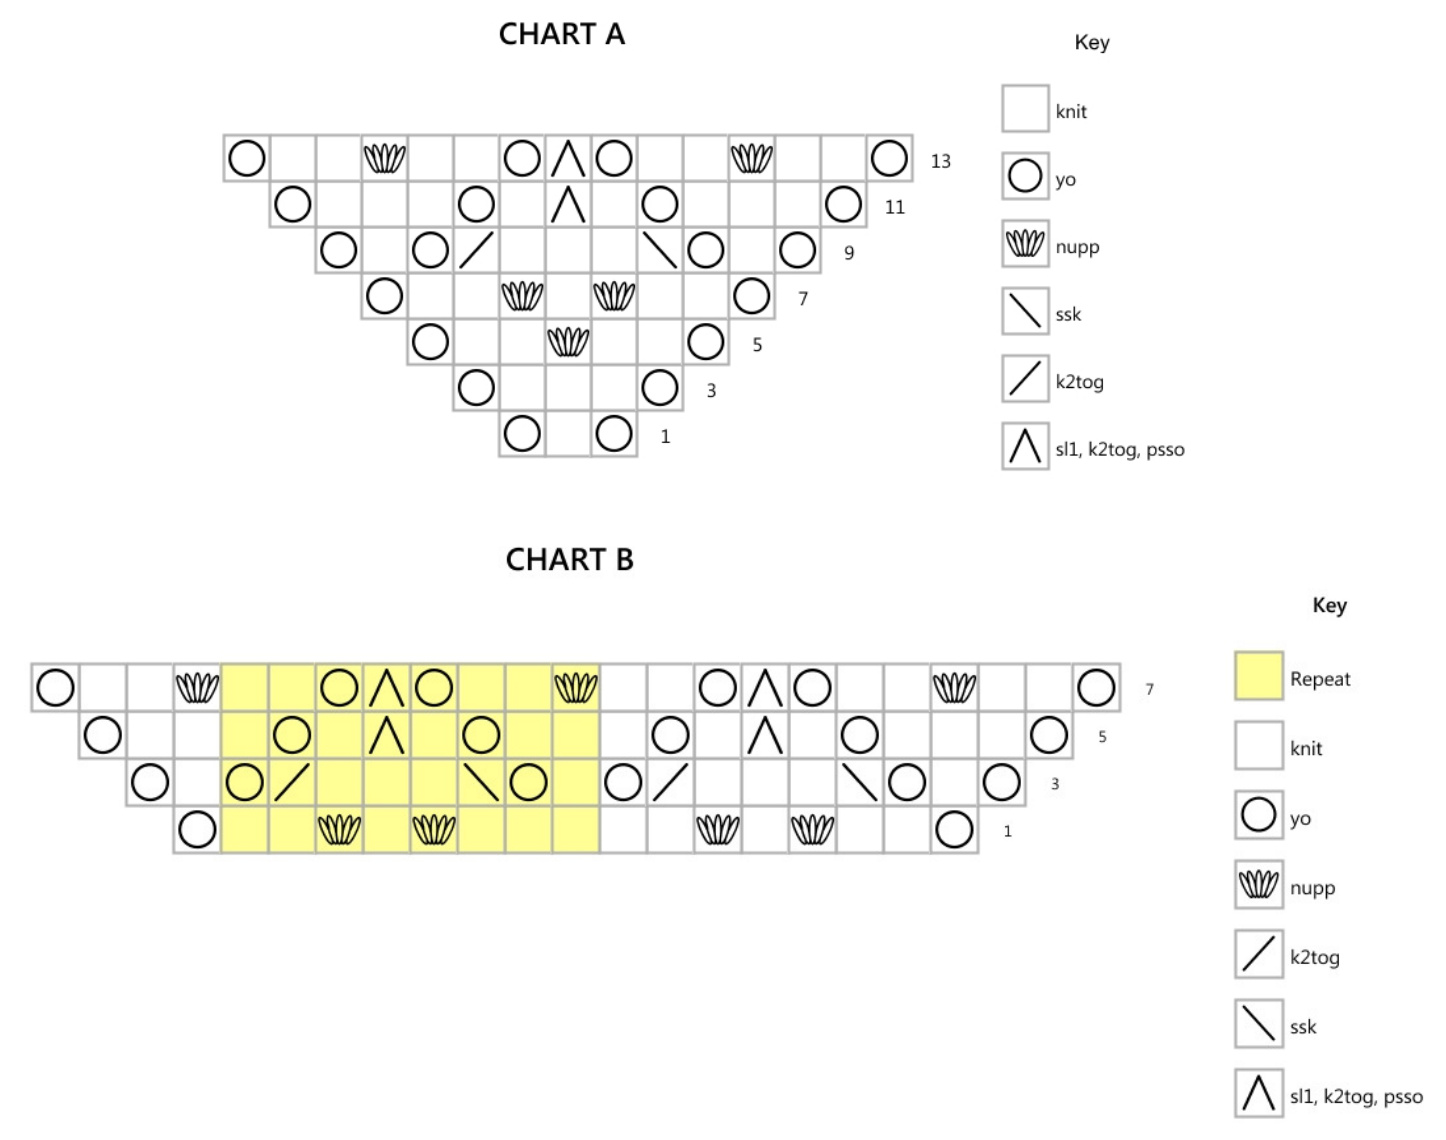
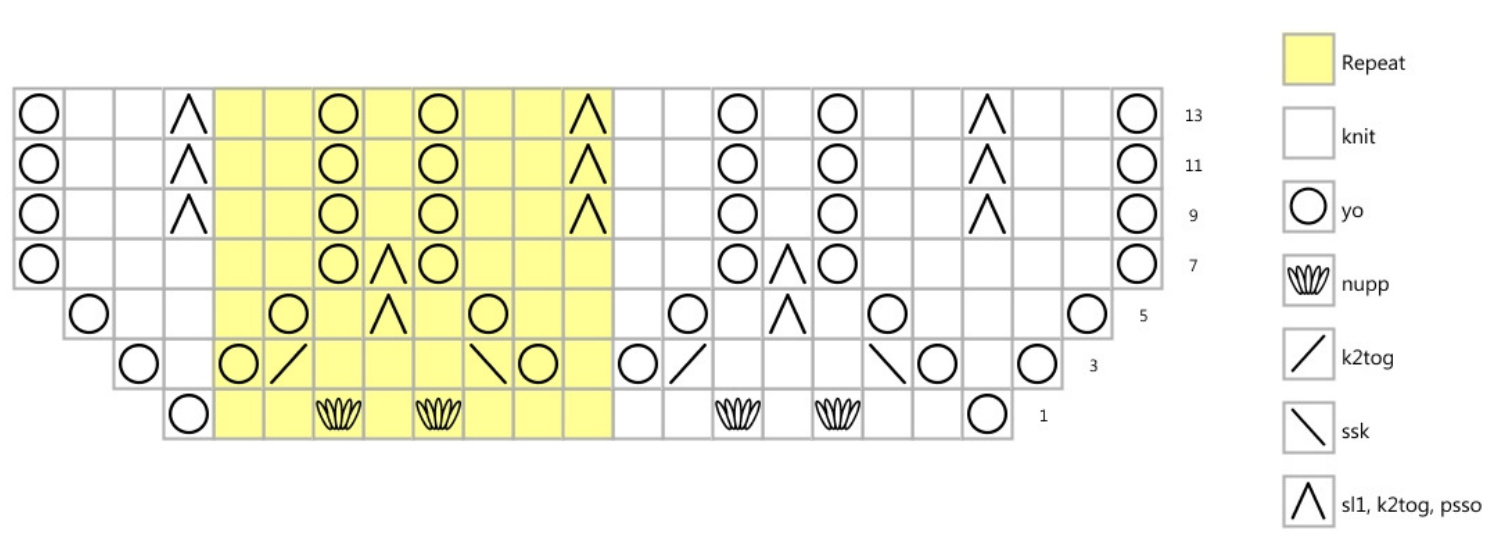
NOTES You can easily work a larger shawl by adding more pattern repeats (Chart B). d offs must not be too tight; the looser the bind-off,the more elongated the scallops will be. ABBREVIATIONS k = knit p =purl st(s) = stitch/es k2tog = knit 2 together ssk = slip 1 st as if to knit, knit 1, slip first stitch onto the knitted stitch nupp = knit 1, yo, knit 1 in the same stitch sl1, k2, psso = slip 1 as if to knit, knit 2, slip first stitch onto the knitted stitch
PLEASEREADTHEPATTERNTHOROUGHLYBEFORESTARTINGTHEPROJECT!
Page 2
@2013Mabel Teoh All rights reserved. Unauthorized reproduction slightly prohibited. This pattern is for your personal, non-commercial use only. You may not reproduce this pattern for distribution, sale or any other purposes. Finished items made from this pattern may not be sold Under any circumstances.
KNITTING UP THE SHAWL
With the shawl yarn and needles, cast on 5 stitches. Rows 1 & 2: Knit Rows 3: k1, kfb, k1, kfb, k1 (7 sts) Rows 4: Knit all. For the entire shawl, work the shawl as follows: Odd rows: k2 (edge stitches), chart, k1(center stitch), chart, k2 (edge stitches) Even rows: k2, purl to center, k1, purl to last two, k2 Edge and center stitches are to be in garter stitch (knit on RS and WS) All charts and instructions below shown are for only half of the triangle. Only odd rows are charted. Read the chart from right to left for for the first half and then left to right for the second half (imagine a mirror image). Unless indicated, purl all even rows. For the nupp, purl all the stitches together for all even rows. Work rows 1-14 of Chart A before continuing with Chart B. Repeat Chart B at least 8 times for a small-sized shawl (as per measurements stated above) or repeat until the desired length is reached. Change to Chart C for the edging and bind off loosely. DO NOT weave in the ends.
FINISHING
Soak shawl for at least 20 minutes. Wrap in a towel to remove excess water. Lay on a flat surface, smooth out and using pins, start by blocking the center, edges and tip to a same distance before pinning the top edge completely. Each scallop point must be pinned out along the side edge at an even tension/distance. Leave the shawl in its place until thoroughly dry. Then unpin, weave in ends and trim off the excess. Page 3
A Leaf in A Leaf evMABeLTOH
Page 5


