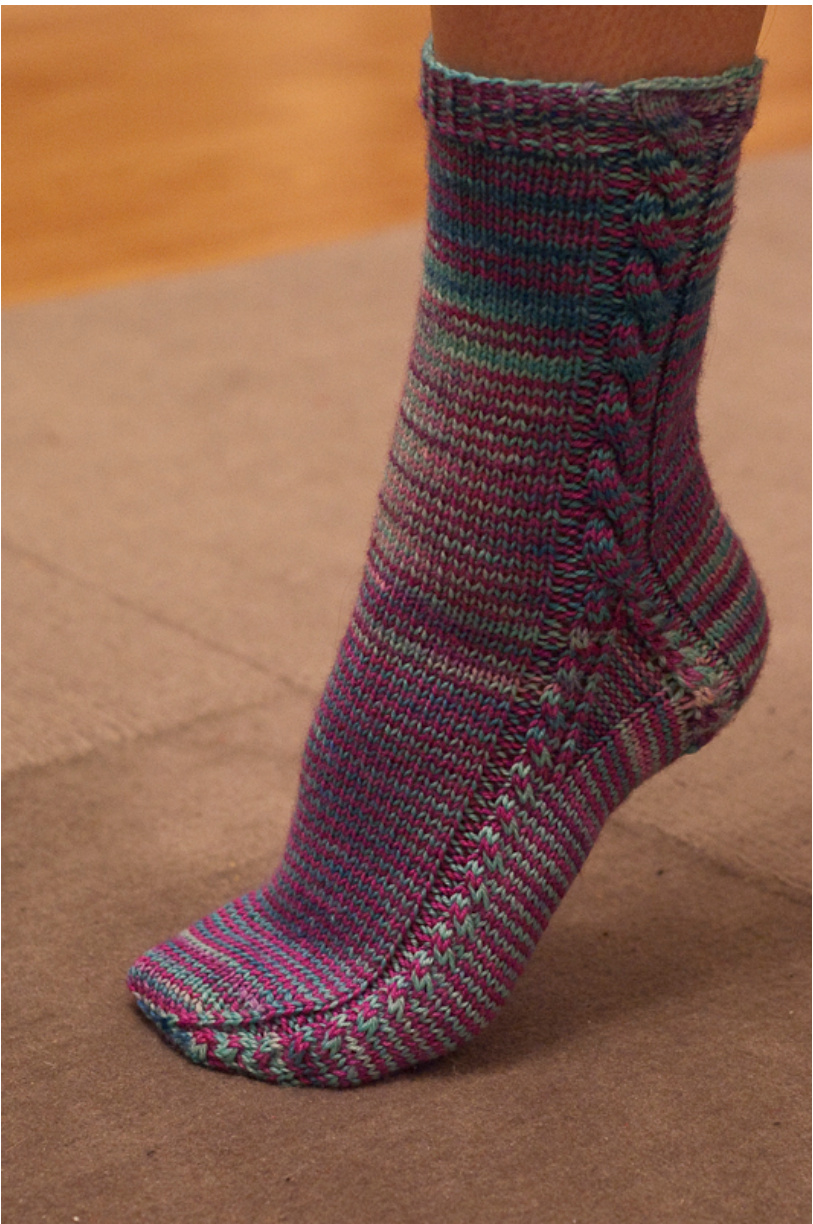
I'll walk my way
I got a lovely skein of wool/silk sock yarn in Handu's sock club this summer. The colourway was named after the artist representing Finland in the Eurovision Song Contest this year. The name of these socks, therefore, is taken from the lyrics of Paradise Oscar's Da Da Dam. The pattern is intended to suit variegated yarns as well as solid and semisolid colourways. I wanted a simple pattern with a little something happening all the time, so there are cables running from top to toe and along the heel flap. The right and left socks are mirror images of each other.
SIZING AND MATERIALS
Size
Woman's small/medium (apprx. Eur 36-39, UK 3-5) (To decrease or increase the size of the sock, changing the number of stitches in the stockinette stitch portion of the sock should work.)
You'll need
100 g fingering-weight sock yarn (shown in Handu Villa/Silkki sock yarn in Paradise Oscar (85% w0ol, 15% silk, 400m/100g) 2,5 mm dpns Cable needle (optional)
INSTRUCTIONS
CO 64 sts. Divide sts evenly on 3 needles. From this point on, the right and left sock are given separate instructions.
LEFT SOCK
Cuff
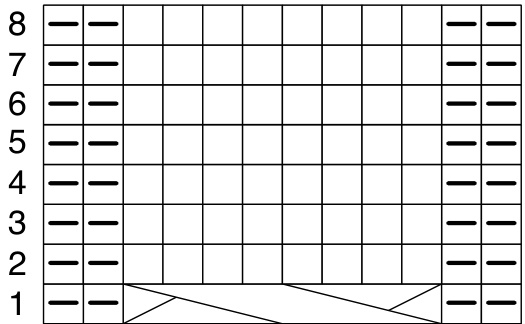
On Needle 1, work Chart 1 (12 sts). On the rest of the stitches, work \*k1 tbl, p1\* ribbing. Continue working Chart 1 and ribbing as established for 10 rounds or as long as you wish.
Leg
On Needle 1, continue working Chart 1 on the first 12 sts as established; knit the rest of the stitches in stockinette. Repeat \*Chart 1, k to end of round\* until you are happy with the length of the leg portion. End after knitting Row 3 of Chart 1. Knit the first 6 sts from Needle 1 to Needle 3, following Chart 1 Row 4. This is the new beginning of round (in the middle of the cable).
Heel
Heel flap
The first 32 sts of the round will be used for the heel flap. Work the first 6 sts according to Chart 2, beginning on Row 1, then knit the next 26 sts in stockinette. The first stitch is knit on RS and slipped on WS rows. Continue knitting back and forth in established pattern, knitting the first 6 sts on RS (and last 6 sts on WS) rows according to Chart 2 and working the rest of the sts in stockinette. The cabling will take place on RS rows. Repeat the chart 8 times (or as many times as needed). End afterRound 4. Heel turn Rnd 1: Sl 1, k17, skp, k1, turn. Rnd 2: Sl 1, p5, p2tog, p1, turn. Rnd 3: Sl 1, knit to 1 st before the gap, skp, k1, turn. Rnd 4: Sl 1, purl to 1 st before the gap, p2tog, p1, turn. Repeat Rounds 3-4 until all the heel sts have been worked = 18 heel sts.
Gusset
Needle 1: Knit the 18 heel sts. Pick up and knit 6 - purl 9 - knit 1 sts from the left side of the heel flap (= altogether 16 sts picked up). Needle 2 (top of foot): Knit 26 sts, work the remaining 6 sts according to Chart 3, starting from Row 1. Needle 3: Pick up and knit 1- purl 9 - knit 6 sts (= altogether 16 sts) from the right side of the heel flap from Ws, 'behind' the edge - this way, the possible holes are hidden by the cable. Knit the first 9 heel sts from needle 1 to needle 3. This is the new beginning of round. You now have 25-32-25 sts on the needles. Round 1: Needle 1: K 15, p8, k2tog Needle 2: Knit 26 sts, work the remaining sts according to Chart 3 as established Needle 3: Ssk, p8, k to end of round Round 2: Needle 1: Knit/purl the sts as established (e.g. on Round 2, k15, p8, k1) Needle 2: K26, work the remaining sts as established Needle 3: Knit/purl the sts as established (e.g. on Round 2, k1, p8, k to end) On every decrease round, a purl stitch is decreased. Repeat the decrease round and the non-decrease round until you have 16-32-16 sts on the needles = 64 sts; all the purl stitches on needles 1 and 3 have been decreased away.
Foot
Continue in established pattern: Needle 1: Knit Needle 2: K26, work the remaining sts according to Chart 3 as established. Needle 3: Knit Round 1:
Round 2:
Needle 1: Knit. Needle 2: Knit to the Chart 3 section, work Chart 3 as established. Needle 3: Knit. Repeat Rounds 1-2 until there are 32 sts left (top 16, sole 16). Then repeat Round 1 until there are 20 sts left (top 10, sole 10). Knit the sts on Needle 1 to Needle 3. Cut yarn, graft sts together (or work a 3-needle bind-off) and weaveinends.
RIGHT SOCK
Cuff
Work in \*p1, k1 tbl\* ribbing until there are 12 sts left on Needle 3. Work Chart 4 on the last 12 sts. Continue working Chart 1 and ribbing as established for 10 rounds or as long as you wish.
Leg
On Needle 3, continue working Chart 4 on the last 12 sts as established; knit the rest of the stitches in stockinette. Repeat \*k to last 12 sts, work Chart 4\* until you are happy with the length of the leg portion. End after knitting the first 26 sts of Row 4. The heel flap will be worked on the next 32 sts. This is the new beginning of round (on the opposite side from the middle of the cable).
Heel
Heel flap
The first 32 sts of the round will be used for the heel flap. K 26 sts, then work the next 6 sts according to Chart 5, beginning on Row 1. (The left edge of the heel flap is on the middle of the cable.) The first stitch is slipped on RS and purled on WS rows. Continue knitting back and forth in established pattern, knitting the last 6 sts on RS (and first 6 sts on Ws) rows according to Chart 5 and working the rest of the sts in stockinette. The cabling will take place on RS rows. Repeat the chart 8 times (or as many times as needed). End after Round 4. Heel turn Rnd 1: Sl 1, k17, skp, k1, turn. Rnd 2: Sl 1, p5, p2tog, p1, turn. Rnd 3: Sl 1, knit to 1 st before the gap, skp, k1, turn. Rnd 4: Sl 1, purl to 1 st before the gap, p2tog, p1, turn. Repeat Rounds 3-4 until all the heel sts have been worked = 18 heel sts.
Gusset
Needle 1: Knit the 18 heel sts. Pick up and knit 6 - purl 9 - knit 1 sts (= altogether 16 sts) from the left side of the heel flap from WS, 'behind' the edge - this way, the possible holes are hidden by the cable. Needle 2 (top of foot): Work the first 6 sts according to Chart 6, starting from Row 1, knit 26 sts. Needle 3: Pick up and knit 1 - purl 9 - knit 6 sts from the left side of the heel flap (= altogether 16 sts picked up).Knit the first 9 heel sts from needle 1 to needle 3. This is the new beginning of round. You now have 25-32-25 sts on the needles. Round 1: Needle 1: K 15, p8, k2tog Needle 2: Work the first 6 sts according to Chart 6 as established, k26 Needle 3: Ssk, p8, k to end of round Round 2: Needle 1: Knit/purl the sts as established (e.g. on Round 2, k15, p8, k1) Needle 2: Work the first 6 sts as established, k26 Needle 3: Knit/purl the sts as established (e.g. on Round 2, k1, p8, k to end) On every decrease round, a purl stitch is decreased. Repeat the decrease round and the non-decrease round until you have 16-32-16 sts on the needles = 64 sts; all the purl stitches on needles 1 and 3 have been decreased away.
Foot
Continue in established pattern: Needle 1: Knit Needle 2: Work the first 6 sts according to Chart 6 as established, k26 Needle 3: Knit Work in this way until Chart 3 has been repeated 14 times, or as many times as needed, ending after Row 4 of Chart 6.
Toe
Round 1: Needle 1: K to last 3 sts, k2tog, k1. Needle 2: Work the first 6 sts according to Chart 6, ssk, k to last 3 sts, k2tog, k1 Needle 3: K1, ssk, k to end. Round 2: Needle 1: Knit. Needle 2: Work Chart 6 as established, k to end Needle 3: Knit. Repeat Rounds 1-2 until there are 32 sts left (top 16, sole 16). Then repeat Round 1 until there are 20 sts left (top 10, sole 10). Knit the sts on Needle 1 to Needle 3. Cut yarn, graft sts together (or work a 3-needle bind-off) and weaveinends.
Guide to symbols
Cable guide
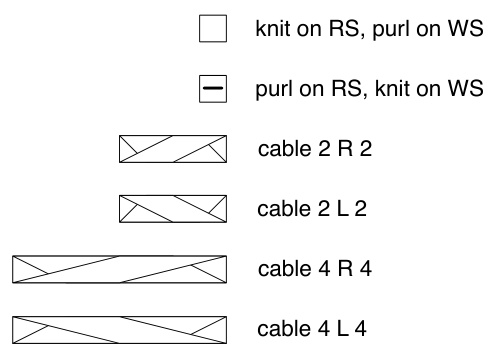
Cable 2 R 2: Cable 2 L 2: Cable 4 R 4: Cable 4 L 4: Sl 2 st to cable needle and hold in back, k2 from left needle, k2 from cable needle Sl 2 sts to cable needle and hold in front, k2 from left needle, k2 from cable needle Sl 4 sts to cable needle and hold in back, k4 from left needle, k3from cable needle Sl 4 sts to cable needle and hold in front, k4 from left needle, k3 from cable needle
CHARTS FOR LEFT SOCK
Chart 1
CHARTS FOR RIGHT SOCK
Chart 4
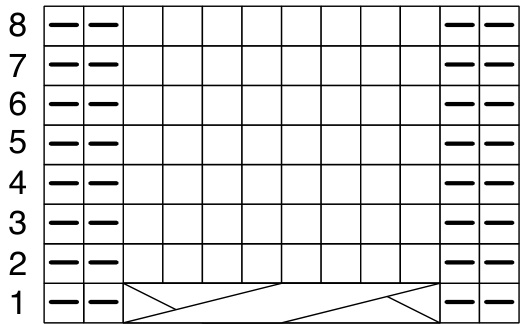
Chart 2
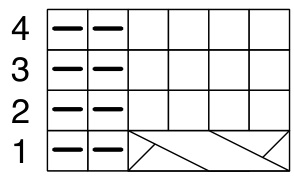
Chart 5
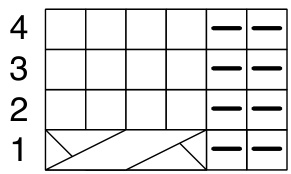
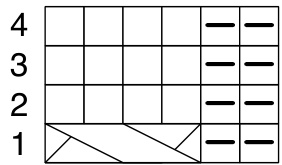
Chart 3
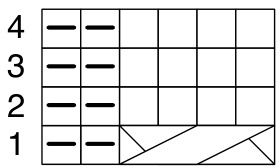
Chart 6


