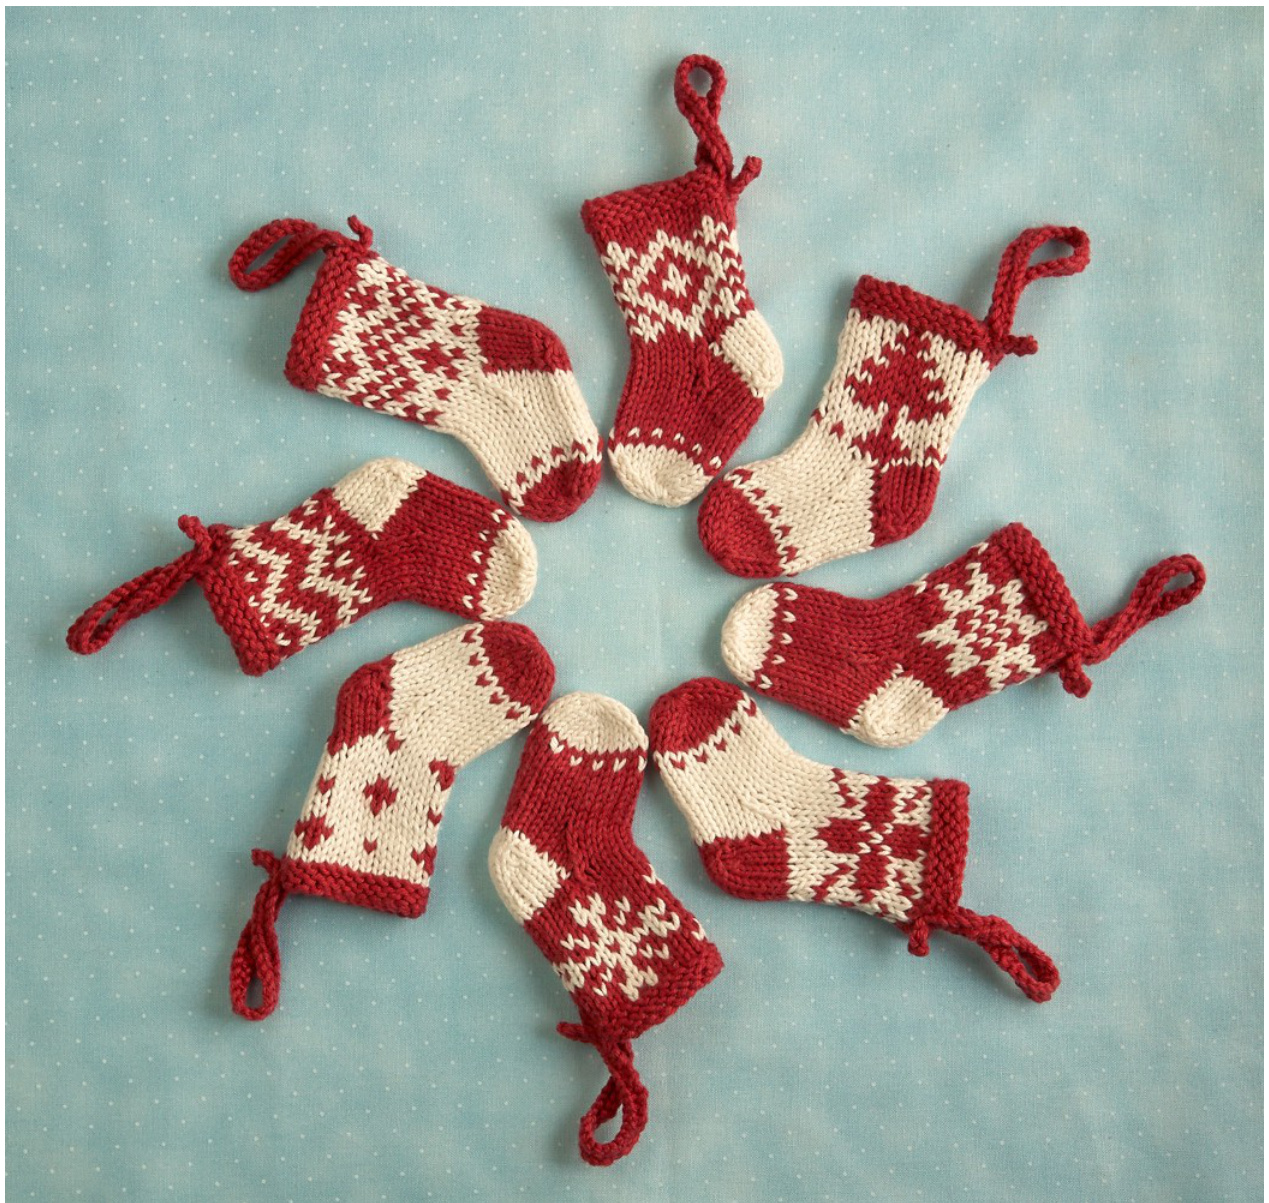
LittleCotton Rabbits mini Christmas stocking
Materia I s:
· 4 ply yarn in main colour: Yarn A · 4ply yarn in contrast colour: Yarn B · A tiny button Finished size: approx 10cm (4 inches) from top to tip of toe
Notion s:
· A pair of 2.75mm DPNS Tapestry needle aug e: 7 stitches x 10 rows to 1 inch More knitting patterns are alailable at www.litlecottonrabbits.typepad.co.uk This is a little pattern for a mini Christmas stocking. It is knitted flat and seamed afterwards mainly because I don't enjoy knitting in the round but you could convert it to be knitted in the round if you prefer. Even though it is worked flat I use double pointed needles because during heel shaping you need to switch from working one side to the other. If you don't have double pointed needles you can knit it on single points and slide the work from one needle to the other when it's time to work on the second heel half. There are lots of ideas for adapting the design of this pattern (for instance adding numbers to make an advent calendar or initials to personalise the stocking) over on Ravelry: www.ravelry.com/patterns/library/mini-christmas-stocking-ornaments I prefer to knit the stocking on 2.75 mm needles with 4ply yarn but the pattern will knit up with whatever you prefer. Note, obviously the larger the needle size and thicker the yarn, the larger the finished stocking. Apart from the garter stitch top it is worked in stocking stitch (Knit on right side and Purl on reverse). I hope you have fun with the pattern, if you'd like to show us what you've made please come and join the Little cotton rabbits group over on Ravelry: www.ravelry.com/ groups/little-cotton-rabbits
Abbreiations:
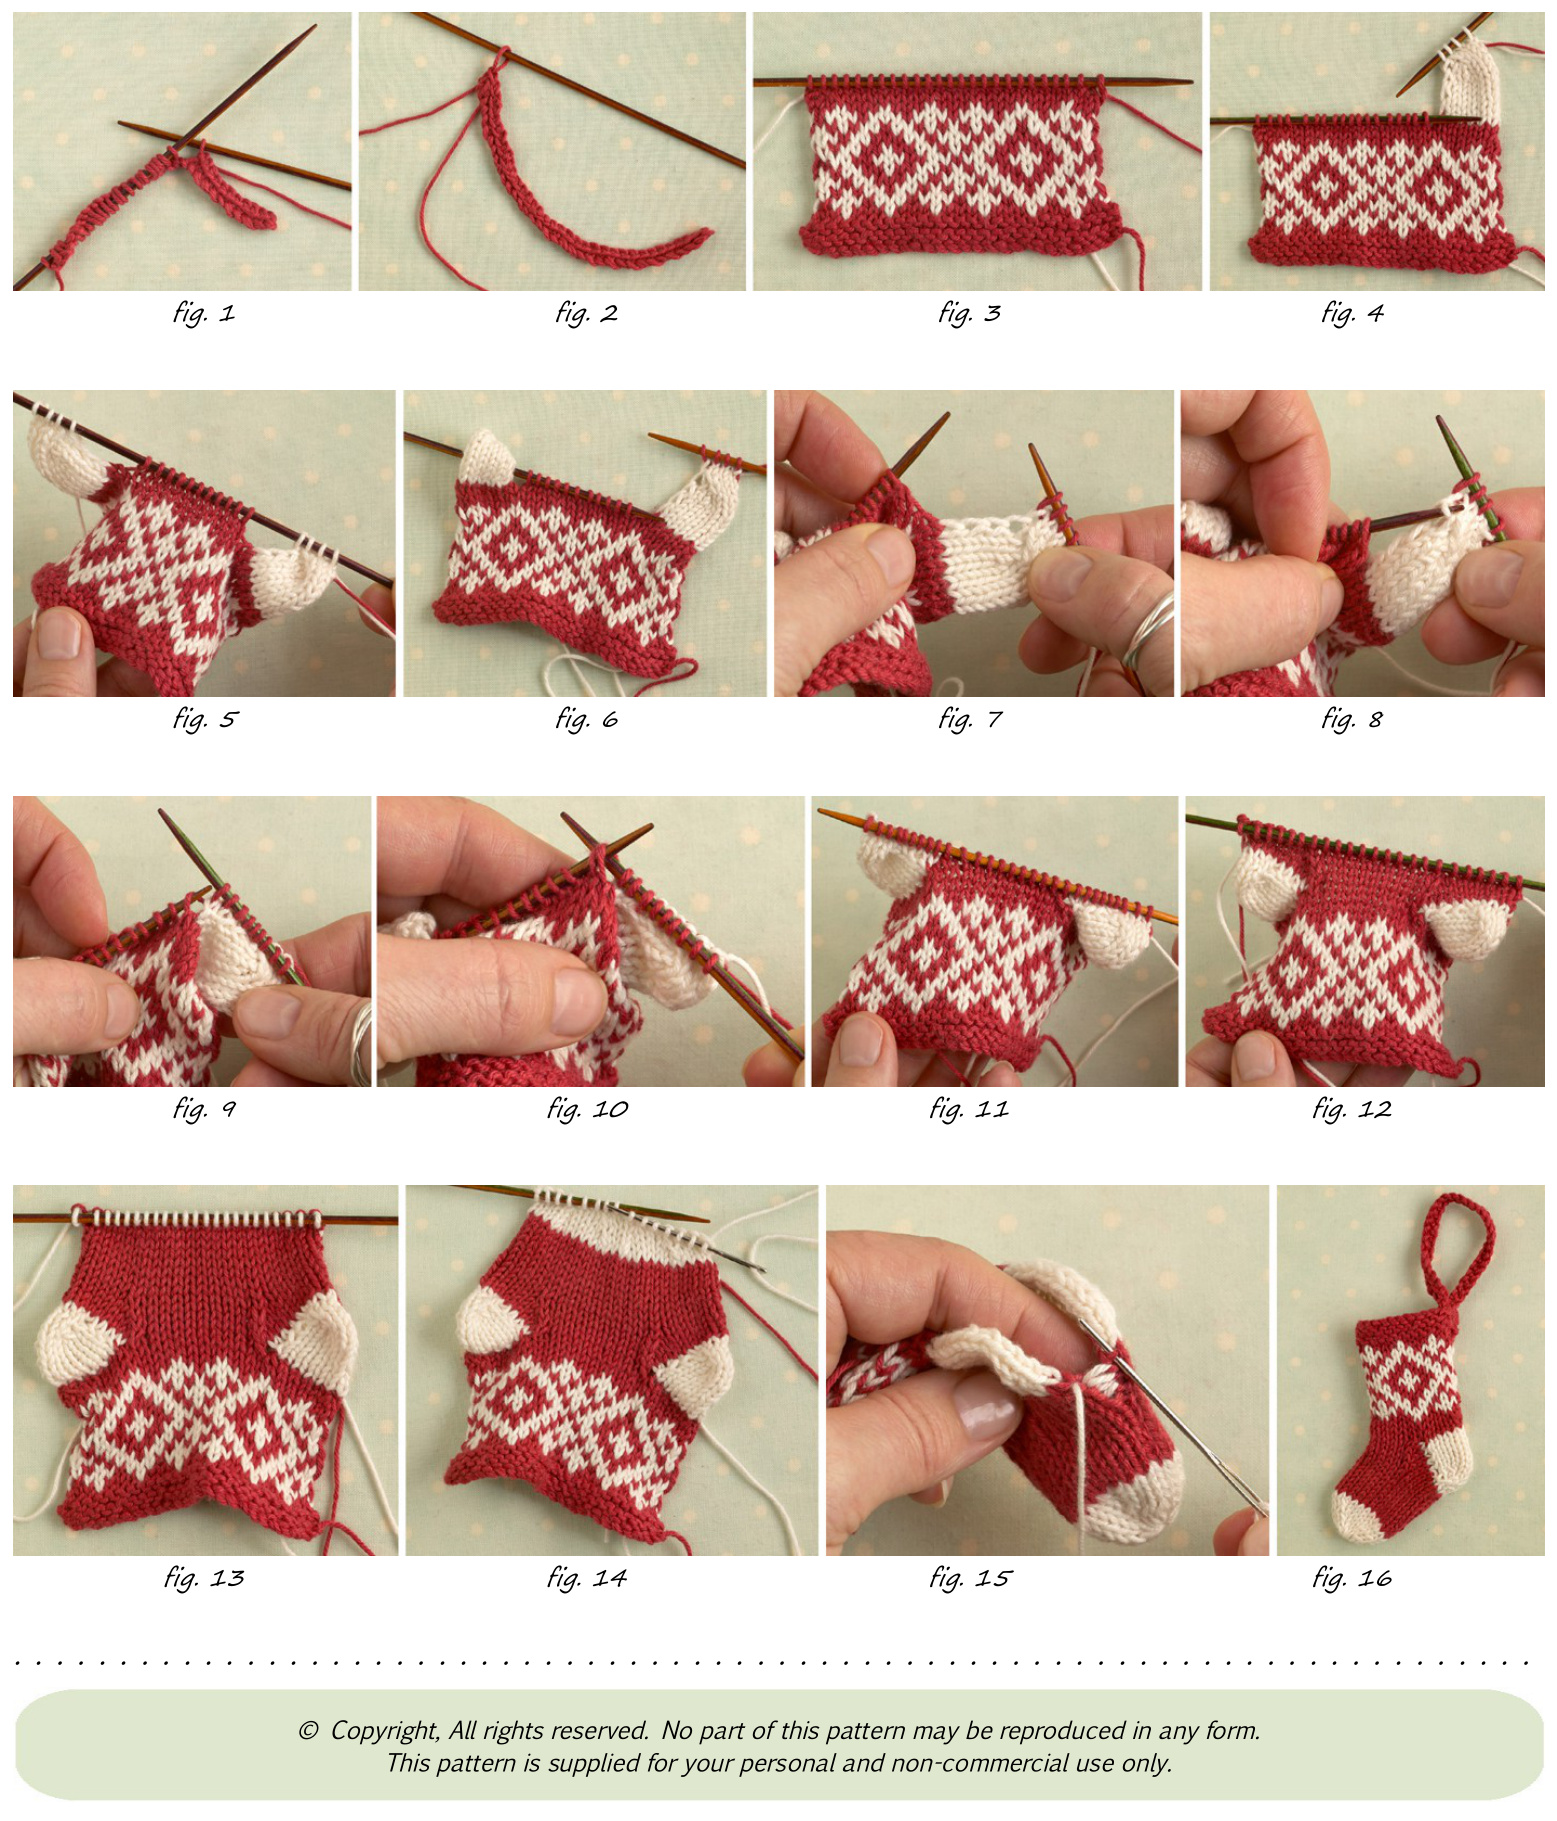
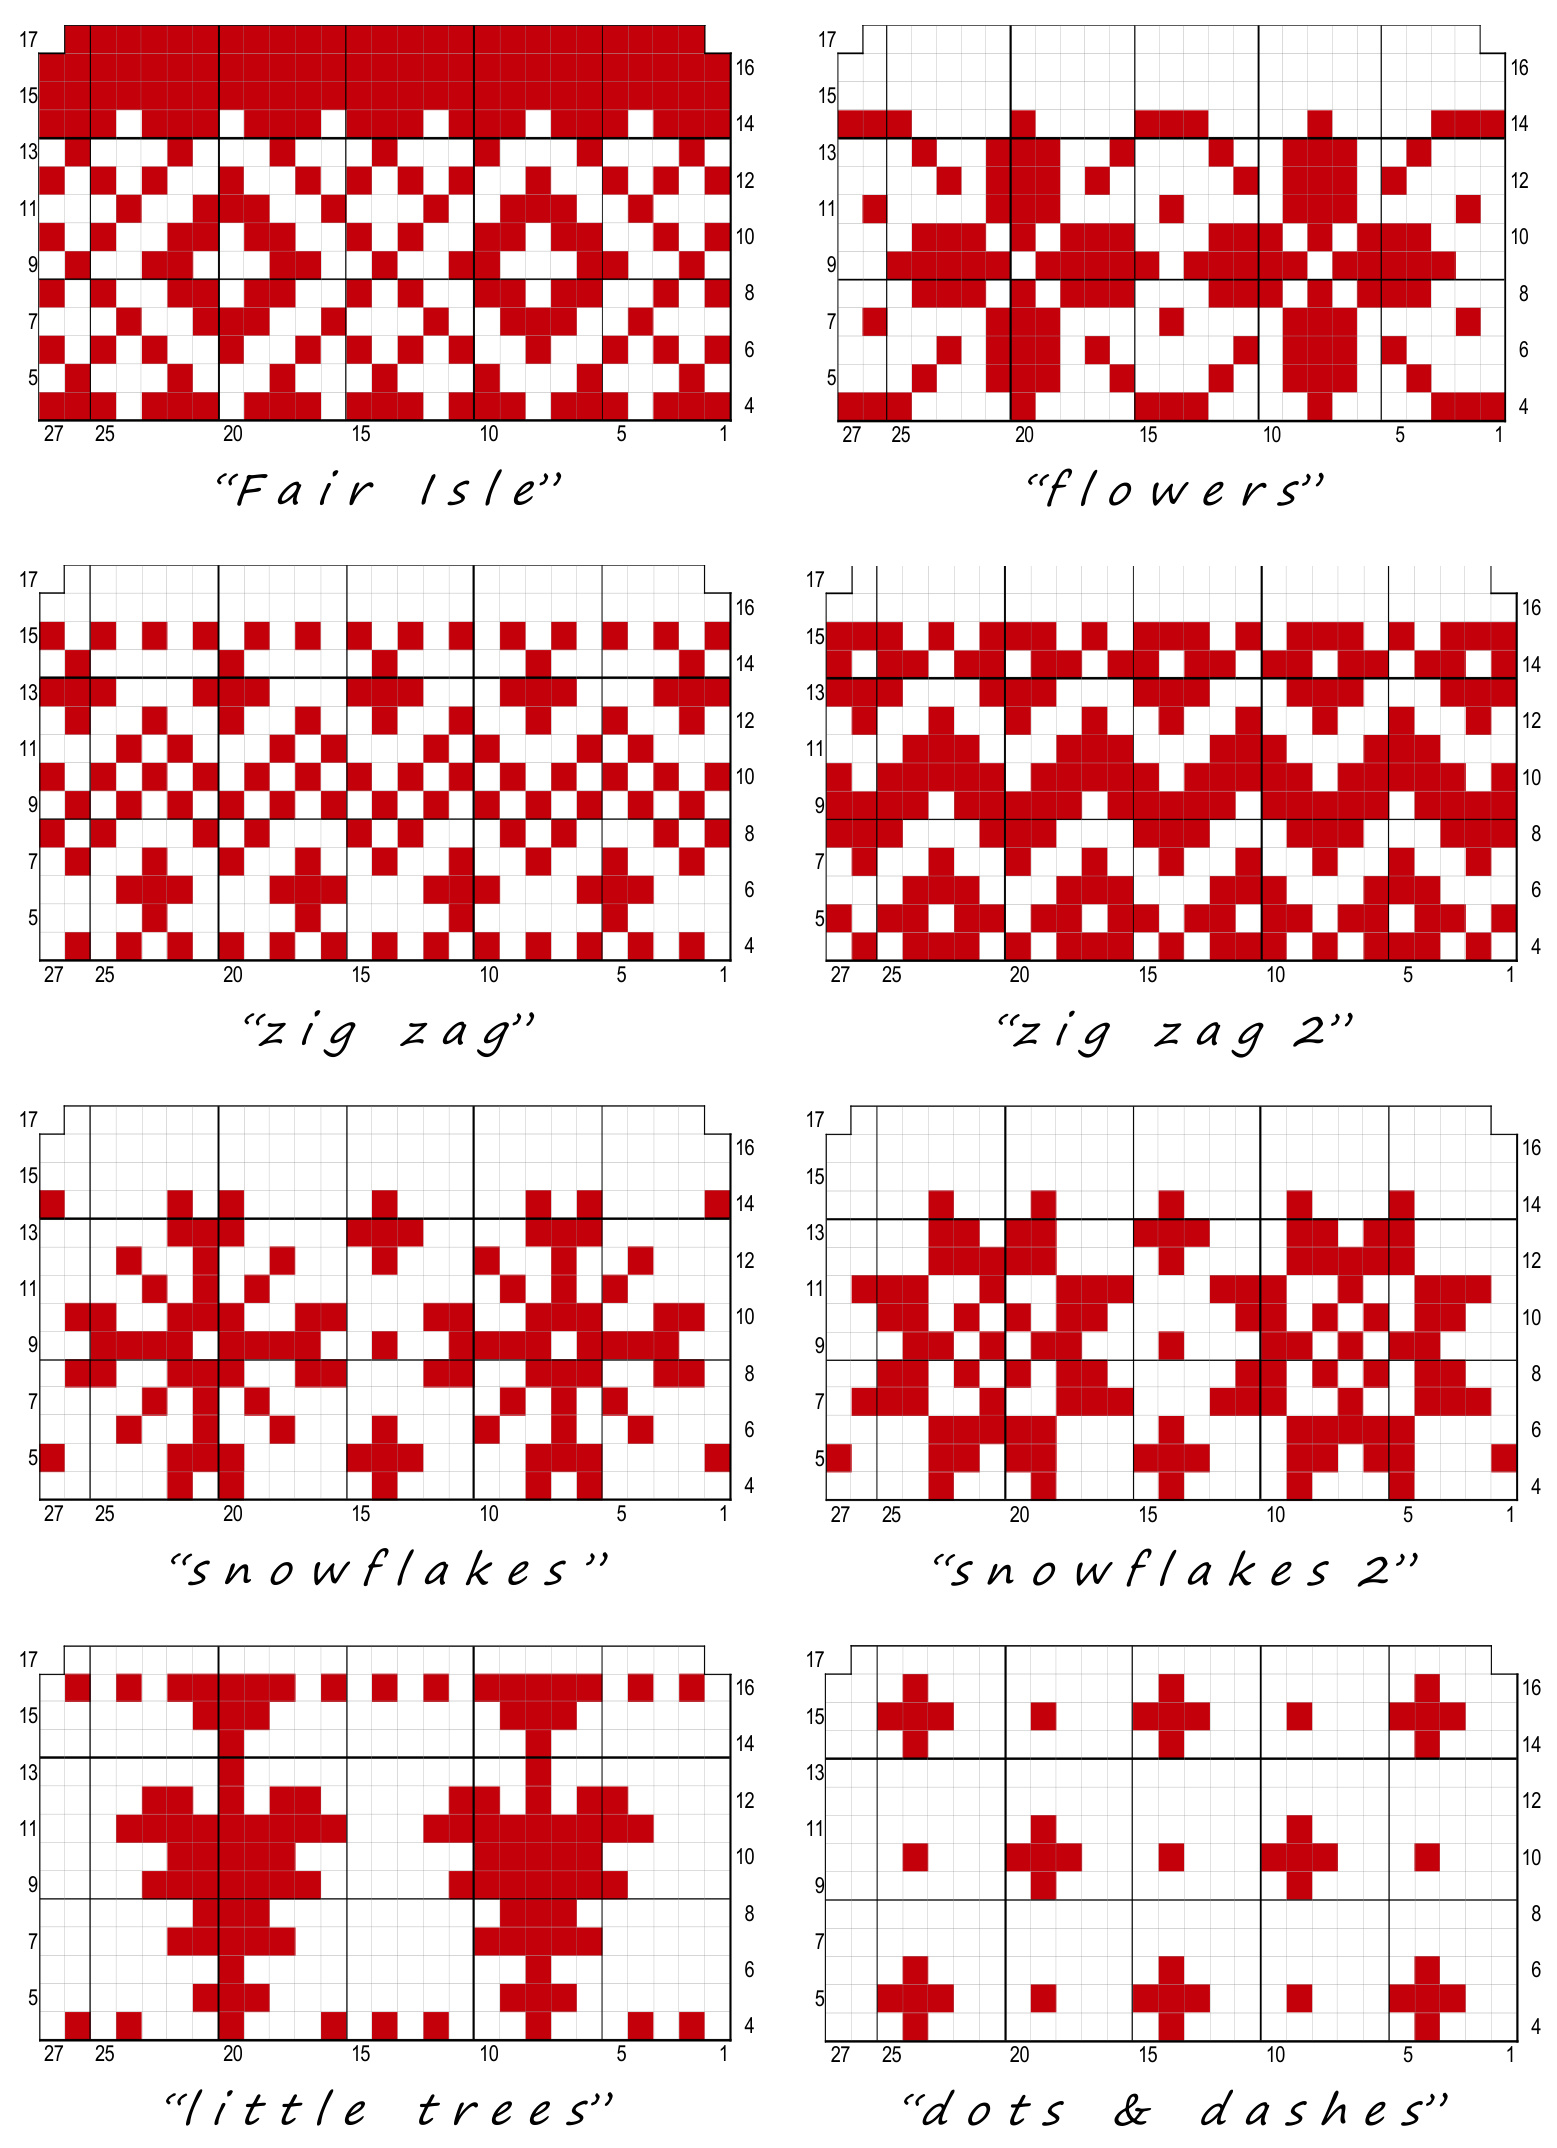
These decrease methods are described in detail on the excellent knitting help website: http://www.knittinghelp.com/videos/decreases SSK (SLIP, SLIP, KNIT) : Slip a stitch (as if to knit it) to the right-hand needle, slip a second stitch in the same way, slip both stitches together back to the left-hand needle and knit together through the back loops. K2TOG : Knit 2 stitches together P2TOG : Purl 2 stitches together P2TOG TBL: Purl 2 stitches together through back loops Please note: Iuse a cable cast on. If you use a different cast on method you may need to adapt the pattern. Note: If you want to be clever and minimise the amount of ends to sew in, work the hanging loop first. To do this cast on 35 stitches and then cast them off again (fig. 1) and then use the last cast off stitch as the start point to cast on the stitches for the stocking (fig. 2). Before you start, decide which colour you are going to knit the heel in and cut a length at least 110cm (44") to keep for working the second side of the heel\*. Please note that even numbered rows are the right side of the work and odd numbered are the reverse. To make a plain coloured or striped stocking cast on 25 stitches using 2.75mm needles and Yarn A. If knitting one of the charted designs on page 3 please cast on 27 stitches. rows 1-3: Knit every row to give a garter stitch top to the stor rows 4-16: Beginning and ending with a Knit row, work 13 rows in stocking stitch either in Yarn A, or Yarn B if you want to work 2 colour stripes (changing colour every 2 rows), or follow the colour designs from one of the pattern charts on page 3. row 17: Purl, and if working one of the pattern designs on page 3 decrease 1 stitch at either end of row to give a total of 25 stitches. Now you are ready to start working the heel (fig. 3) The instructions for the heel start on page 4. On the next page are charts for optional colour-work designs.
Heel shaping:
The heel is worked in 2 halves. If you like you can use different coloured yarn for contrast. First half: row 18: With right side facing join contrast Yarn, K7 and turn leaving the remaining 18 stitches on the needle row 19: Slip 1, P6 rows 20-25: Repeat rows 18 & 19 three more times until 8 rows of heel have been worked row 26: K3, K2tog, K1, turn leaving 1 remaining stitch of heel on needle row 27: Slip 1, P4 row 28: K2, SSK, turn leaving 2 stitches on needle row 29: Slip 1, P2 row 30: K2, SSK, K1, turn row 31: Slip 1, P3 Leaving these 4 stitches on the needle with the main part of the stocking (fig. 4), turn the work so that the wrong side is facing and resume working the other side of the heel. Second half reverse row 18: With wrong side facing and using the 110cm length of contrast Yarn cut earlier\*, P7 and turn, leaving remaining stitches on the needle reverse row 19: Slip 1, K6 reverse rows 20-25: Repeat rows 18 & 19 three more times until 8 rows of heel have been worked reverse row 26: P3, P2tog tbl, P1, turn leaving 1 remaining stitch of heel on needle reverse row 27: Slip 1, K4 reverse row 28: P2, P2tog, turn leaving 2 stitches on needle reverse row 29: Slip 1, K2 reverse row 30: P2, P2tog, P1, turn reverse row 31: Slip 1, K3 Now you have worked both sides of the heel (fig. 5). The next row is slightly complicated so I've broken it down into steps: row 32: With right side facing rejoin Yarn A and begin knitting across the 4 stitches of the heel (fig. 6), pick up and knit 5 stitches from the inside edge of heel (figs. 7 & 8) Before knitting across the main part of the stocking pick up the left loop of the stitch below the first row of the heel (fig. 9) and knit this loop together with the first stitch from the left needle (fig. 10). This will help to ensure that you don't get a hole in the work at the point of the heel join. Knit 9 stitches across main part of stocking (leaving 1 stitch un-worked). Slip the next stitch across to the right needle. Pick up the right leg of the stitch below the first row of the heel, pass this and the slipped stitch back to the left needle and knit them together. Pick up and knit 5 stitches from the inside edge of the heel and Knit the final 4 heel stitches (fig. 11) (29 stitches) row 33: Purl row 34: K8, K2tog, K9, SSK, K8 (27 stitches) row 35: P7, P2tog tbl, P9, P2tog, P7 (25 stitches) row 36: K6, K2tog, K9, SSK, K6 (23 stitches) row 37: Purl You've now completed the shaping for the sides of the foot (fig. 12) rows 38-43: Beginning with a Knit row and ending with a Purl, work 6 rows of stocking stitch row 44: Change colour for toe cap and Knit (fig. 13) Cut Yarn A from the work as it is no longer needed. row 45: Purl row 46: K3, SSK, K4, K2tog, K1, SSK, K4, K2tog, K3 (19 stitches) row 47: Purl row 48: K3, SSK, K2, K2tog, K1, SSK, K2, K2tog, K3 (15 stitches) row 49: Purl
Making up:
Cut the work from the ball leaving a tail of around 9 inches for sewing up. Thread a tapestry needle with this end, sew through the 15 stitches on needle (fig. 14) and pull up tight. Close the seam running up bottom and back of stocking using mattress stitch (fig. 15) Turn the stocking in-side-out and tie up all ends securely, weave them in if you desire though it's not essential and trim. Turn right side out.
Hanging I o o p:
If you didn't make the loop at the beginning then use 2.75mm needles to cast on 35 stitches. Cast off again knit-wise. Double this strip over to make a loop and sew to the back of the stocking. Secure with a little button. Then your stocking is finished and ready to hang (fig. 16)
Photo steps:
Please note that you can zoom into these pictures on your computer/device in order to see more detail