Isadora Beaded Choker By: Robyn Krause
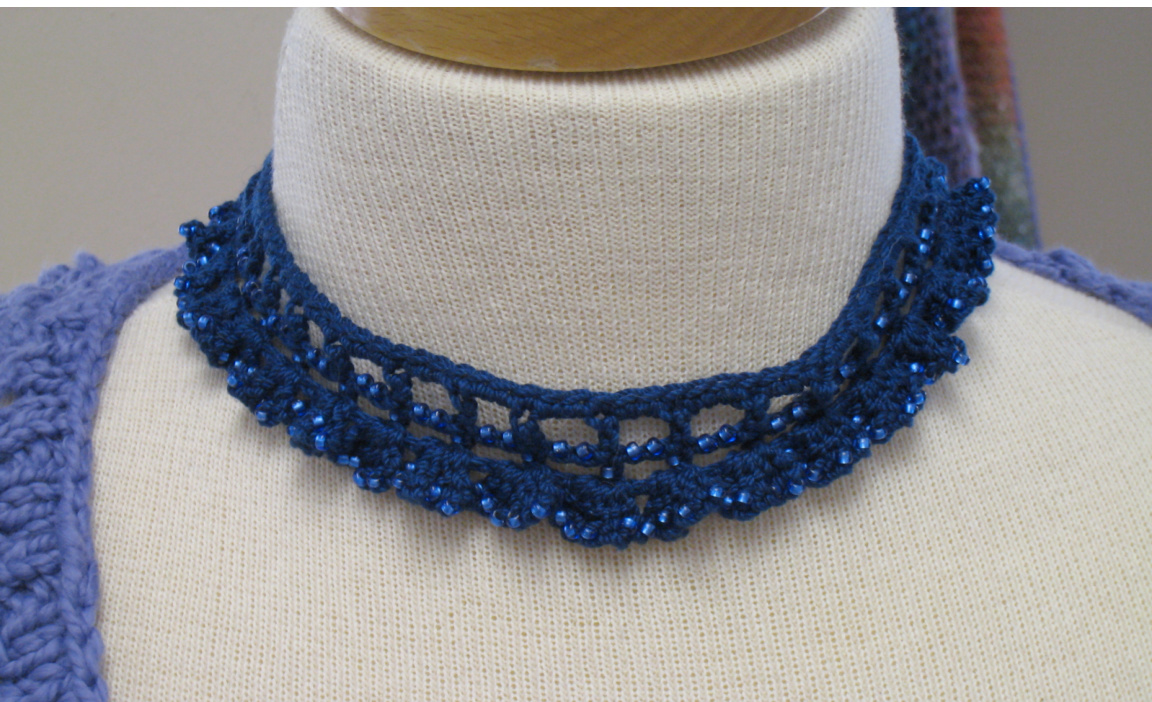
Materials: Size 3 crochet thread 270 coordinating size 6 seed beads 2.75mm steel hook, generally size 1 Beading needle to string beads Tapestry needle to weave in ends Coordinating button or ribbon, depending on desired closure Abbreviations: bch $=$ beaded chain bdc $=$ beaded double crochet $\mathbf{ch}=$ chain dc $=$ double crochet rs $=$ right side sc $=$ single crochet tc $=$ turning chain WS $=$ wrong side yo $=$ yarn over Special Stitches: Beaded chain (bch) - These are worked on a wrong side row: the bead will end up on the opposite side of the work. Pull a bead down next to the hook; yarn over; pull through Beaded double crochet (bdc) - The bead is worked in the middle of the double crochet stitch on a right side row, and will end up facing you as you work row. Yarn over; pull a bead down next to the hook; holding the bead with your index finger, insert the hook into the next stitch; pull up a loop; yarn over and pull through 2 loops; slide the bead to the front; yarn over; pullthrough 2 remaining loops Shell - (dc, bch, dc, bch, dc, bch, dc, bch, dc) all in the same stitch. Beads need to be strung before beginning to crochet. It is always preferable to string more beads than needed than running out of beads before you finish the project. If you lose count of how many chains you have in your starting chain, it's better to have to many than too few - you can always pick out the extra ones when you're finished crocheting the first row. The pattern, as written, is for a 16.5" choker. If you'd like to make the necklace longer, easy peasy. All you need is 3 additional chains in the starting chain and 8 additional beads for each stitch repeat. To lengthen without counting, just prestring a lot more beads, make the starting chain as long as you want the choker to be, and then pick out any unused chains. I prefer to work into the "back bump" of the starting chain; I think it makes the chain stitches are easier to see because they don't seem to get quite as distorted. Instructions for 16.5" necklace:
Ch 107
Row 1 (WS): Dc in the 8th ch from the hook (counts as ch-2, dc, ch-2) \* bch, bch, skip next 2 ch, dc in the next ch, repeat from \* across, ending with ch 2, skip 2 ch, dc in the next ch. (Total of 34 ch-2 spaces - 32 bch-2 spaces - 64 beads) Row 2 (RS): Ch-1, bch, ch 3, skip ch-2 space, \* bdc in next dc, ch 2, repeat from \* across, ending with a bdc in the 3rd ch of t-ch from previous row. (Total of 35 bdc - 35 beads) Row 3 (Ws): Ch 3 (counts as dc), bch, (dc, bch) twice in the 1st dc, \* skip ch-2 space, shell in next dc, bch, repeat from \* across, ending with (dc, bch, dc, bch, dc) in the 3rd ch of the t-ch from previous row. (175 beads) Fasten off. Row 4, choker edging (RS): With RS facing, join thread in the 3rd ch of starting chain, ch-1, sc in same space as where joined, 2sc in the next ch-2 space, \* sc in the same chain as the base of the dc, 2sc in the next ch-2 space, repeat from \* across, ending with sc in the last dc. Before weaving in the ends, you may want to use one of them to attach a button if that's how you plan on closing the necklace. If you intend to use ribbon, weave in the ends, and then string the ribbon through the dc and ch-2 spaces of row 1 after blocking. Block necklace by pinning down and spritzing with water. Let air dry.


