Mr. Fluffs
Amigurumi printer-friendly pdf
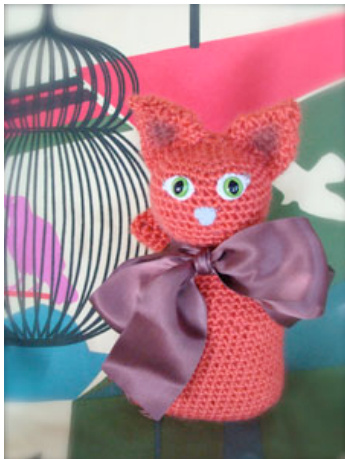
Click to Enlarge

MATERIALS:
Shop Online
Stitch.Rock.Love. Sheep(ish) from Caron (70% Acrylic/30% Wool; 3oz/85g, 167yds/153m): #0014 Coral(ish): 1 skein
Shop Online
One size US H-8 (5mm), or size to obtain gauge Stitch markers Stuffing Handful of dried beans (to weight bottom of cat) Silk orvelvet ribbon (optional-for bow at neck) Onepaircatsafetyeyes—12mmdiameter Small pieces of white felt (for eyes) Small piece of grey felt (for nose) Sewing thread andneedle Brown eye shadow (optional -for shading inside of ears) Grey embroidery thread (optional -for eyelashes) Yarnneedle GAUGE Gauge is not critical for this project. STITCHESUSED Chain (ch), single crochet (sc), slip stitch (sl st) SPECIAL STITCH sc2tog: Single crochet 2 together—Insert hook in next stitch, yarn over and draw up a loop, (2 loops on hook), insert hook in next stitch, yarn over and draw up a loop, yarn over and draw through all 3 loops on hook.
NOTE
Gauge is not critical for this project.Work tightly to ensure that stuffing does notshowthroughstitches.
BODY
Beginning at bottom of body, ch 16. Round 1: Sc in 2nd ch from hook and in each remaining ch across to last ch, 3 sc in last ch,place marker in center sc of 3-sc group just made; working across opposite side of foundation ch, sc in next ch and each remaining ch across to last ch (ch at base of first sc), 2 sc in last ch, place marker in last sc made;join with sl st in first sc—32 sc.Move markers up as work continues. Rounds 2-5: Ch 1, [sc in each sc across to marker, 3 sc in marked sc] 2 times, scineachsctoendofround;joinwithslstinfirstsc—48sc.Removemarkers Rounds 6-19: Ch 1, sc in each sc around; join with sl st in first sc. Shape Body Flatten piece to find side edges, place a marker in each side edge ensuring that there are the same number of stitches between the markers on front and back. Movemarkersup asworkprogresses. Rounds 20-26: Ch 1, \*sc in each sc to 1 st before marker, sc2tog; repeat from \* once more, sc in each sc to end of round; join with sl st in first sc—34 sts. Neck Rounds 27-31: Ch 1, sc in each sc around; join with sl st in first sc. Fasten off, leaving a long tail for sewing. Place a handful of beans in lower portion of body. Then stuff body firmly. HEAD Beginning at top of head, ch 4, join with sl st in first ch to form a ring. Round 1: Work 6 sc in ring; join with sl st in first sc—6 sc. Round 2: Ch 1, 2 sc in each sc around; join with sl st in first sc—12 sc. Round 3: Ch 1, [sc in next sc, 2 sc in next sc] 6 times; join with sl st in first sc— 18scC. Round 4: Ch 1, [sc in next 2 sc, 2 sc in next sc] 6 times; join with sl st in first sc —24sc. Round 5: Ch 1, [sc in next 3 sc, 2 sc in next sc] 6 times; join with sl st in first sc -30 sc. Round 6: Ch 1, [sc in next 4 sc, 2 sc in next sc] 6 times; join with sl st in first sc -36 sc. Round 7: Ch 1, [sc in next 5 sc, 2 sc in next sc] 6 times; join with sl st in first sc -42 scC. Rounds 8-1o: Ch 1, sc in each sc around; join with sl st in first sc. Round 11: Ch 1, [sc in next 5 sc, sc2tog] 6 times; join with sl st in first sc—36 Sts. Round 12: Ch 1, [sc in next 4 sc, sc2tog] 6 times; join with sl st in first sc—30 Sts. Round 13:Ch 1,[scin next 3 sc,sc2tog] 6 times; join with sl st in first sc—24 Sts. Round 14: Ch 1, [sc in next 2 sc, sc2tog] 6 times; join with sl st in first sc—18 Sts. Round 15: Ch 1, [sc in next sc, sc2tog] 6 times; join with sl st in first sc—12 Sts. Round 16: Ch 1, [sc2tog] 6 times; join with sl st in first sc—6 sts. Fasten off,leaving a long tail for sewing.Stuff head firmly.Note:The small openingatthebottomoftheheadwillbecoveredwhentheheadissewnto the body. EARS (make 2) Beginning at bottom of each, ch 16; join with sl st in first ch to form a ring. id 1: Ch 1, sc in each ch around; join with sl st in first Round 2: Ch 1, sc in each sc around; join with sl st in first sc. Round 3: Ch 1, [sc2tog, sc in next sc] 5 times,sc in last sc; join with sl st in firstsc-11sts. Round 4: Ch 1, sc in each sc around; join with sl st in first sc. first sc—8 sc. Round 6: Ch 1, sc in each sc around; join with sl st in first sc. Round 7: Ch 1, [sc2tog] 4 times; join with sl st in first sc—4 sc. Fasten off, leaving a long tail. Thread tail through stitches of last round and pull tight to close opening. Do not stuff ears. TAIL Beginning at base of tail, ch 12; join with sl st in first ch to form a ring. Round 1: Ch 1, sc in each ch around; join with sl st in first sc—12 sc. Rounds 2-13: Ch 1, sc in each sc around; join with sl st in first sc. Shape Tail Tail shaping is worked back and forth in rows.Turn piece to work back in oppositedirection. Row 1: Ch 1, sc in next 5 sc, turn to work in original direction. Continue Tail Next Round: Ch 1, sc in each sc of Row 1, continuing in same direction, sc in each sc all the way around; join with sl st in first sc—12 sc. Rounds 15 and 16: Ch 1, sc in each sc around; join with sl st in first sc. Rounds 17 and 18: Ch 1, [sc2tog] 6 times; join with sl st in first sc—6 sc. Fasten off, leaving along tail. Thread tail through stitches of last round and pull tocloseopening.Stuff tail.
FINISHING
Eyes:Cut two almond shaped pieces of white feltforeyes.Makesmallslitsin felt. Insert post of one safety eye through slit in one piece of felt then into head. Secure safety eye with washer. Hand sew felt piece to head. Repeat for other eye and felt piece.With grey embroidery floss,and using photo as a guide, embroiderstraight stitch eyelashesatcorners ofeyes(optional). Nose: Cut triangular piece of grey felt, round the corners of the triangle. Sew to face. Assemble: Flatten ears and sew to head. Brush a little brown eye shadow onto inside of each ear (optional). Sew head to body. Sew tail to body. Using yarn needle, weave in all ends. Tie a silk or velvet bow around Mr. Fluff's neck (optional).


