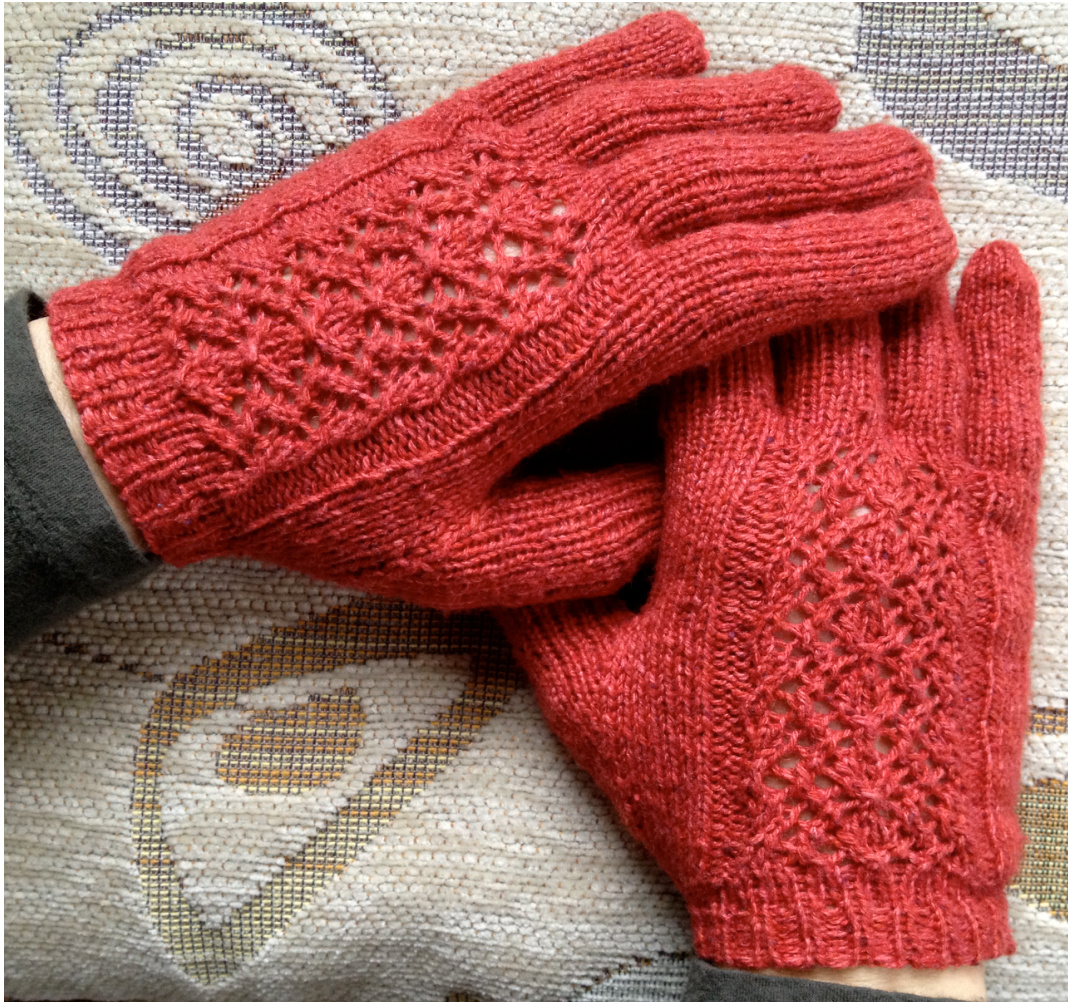
Diamond Lace Panel Top Down Gloves
Knit from fingertip to wrist in the round Skill Level: Intermediate Designed by Cam Narayan camblog on Ravelry December 2012
Size:
Glove will fit a medium size hand, palm measures about 7 %" around (as measured without thumb).
Materials:
170 yards or approximately 30 grams of fingering weight yarn, 4 ply, 280 yards/50 grams. The sample was knit in Ambrosia, a recycled yarn, 35% wool, 15% Nylon, 10% silk, 5% Cashmere. Needles: #1 (2.25 mm) set of 5 double pointed, plus 4 double pointed needles in same or smaller size to use for stitch holders One locking stitch marker Two stitch markers Tapestry needle
Gauge:
28 stitches & 36 rows/ 4" in stockinette stitch, adjust needle size to achieve gauge for your knitting tension and yarn choice.
Abbreviations:
dpn - double pointed needle CO - cast on using long tail method kfb - increase one stitch by knitting into the front and back of the stitch k2tog - right leaning decrease of one stitch by knitting two stitches together m - stitch marker pm - place stitch marker sk2togpss0 - slip one stitch knit wise, k2tog, pass slipped stitch over ssk - left leaning decrease of one stitch by slipping one stitch, then another stitch as if to knit, returning both stitches to left needle and knitting these two stitches together yo-yarnover
Notes:
Both gloves start the same, knitting each finger then joining them all together, until the lace panel begins on the back of the hand. When knitting fingertips, stitches are divided on three double pointed needles unevenly so that the smaller number of stitches on the third needle marks the end of the round to avoid the use of a stitch marker. For a custom fit try, the knitting in-progress on fingers and hand often. Weave in yarn ends after knitting approximately 3/4" of each fingertip to close the hole at the tip. Trim yarn tail to %2".
Pattern:
1) CO 4 2) (Kfb) 4 times - 8 stitches. Divide the stitches unevenly onto three needles by transferring 3 stitches per needle twice, leaving the last 2 on the CO needle. Join for circular knitting, being careful not twist to stitches. 3) (Kfb) 4 times - 16 stitches. 4) (Kfb, k3) 3 times, k4 - 19 stitches. Knit every round until 2 3/8"long, or desired length, break yarn with 6" tail. Place these 19 stitches on two double pointed holder needles with 9 stitches in front and 10 stitches in back, yarn end on the back needle and to the right.
Little Finger
1) CO 4 2) (Kfb) 4 times - 8 stitches. Divide the stitches onto three double pointed needles as for the thumb. 3) (Kfb) 7 times, k1 - 15 stitches. Knit every round until 2 1/4" long, or desired length, break yarn with 6" tail. Place these 15 stitches on the same holder needles as the thumb, to the right of the thumb with 8 stitches in front and 7 stitches in back, yarn end on the back and to the right.
Index Finger
1) CO 4 2) (Kfb) 4 times - 8 stitches. Divide the stitches onto three double pointed needles as for the thumb. 3) (Kfb) 4 times - 16 stitches. 4) Kfb, k15 - 17 stitches. Knit every round until 2 7/8" long, or desired length, break yarn with 6" tail. Place these 17 stitches on two new double pointed holder needles with 8 stitches in front and 9 stitches in back, yarn end on the back needle and to the right.
Middle Finger
1) CO 4 2) (Kfb) 4 times - 8 stitches. Divide the stitches onto three double pointed needles as for the thumb. 3) (Kfb) 4 times - 16 stitches. 4) Kfb, k15 - 17 stitches. Knit every round until 3 1/8" long, or desired length, break yarn with 6" tail. Place these 17 stitches on the same double pointed holder needles as the index finger, to the left of the index finger, with 9 stitches in front and 8 stitches in back, yarn end on the back needle and to the right.
Ring Finger
1) CO 4 2) (Kfb) 4 times - 8 stitches. Divide the stitches onto three double pointed needles as for the thumb. 3) (Kfb) 4 times - 16 stitches. 4) Kfb, k15 - 17 stitches. Knit every round until 2 3/4" long or desired length. Do not break yarn. Arrange these 17 stitches so that there are 8 stitches on the front needle and 9 stitches on the back needle, have the ball end of yarn on the back needle and to the right. loin tirst tnree fingers Notes: When joining fingers, the first few rounds may feel awkward as the finger openings are close together. When joining fingers, the middle and ring finger joins have a total of 4 decreases. Index and little fingers and thumb joins have only two decreases. Join first three fingers by transferring the held index and middle finger stitches to the left of the ring finger. - 26 stitches on front needle, 25 stitches on back needle, total of 51 stitches.

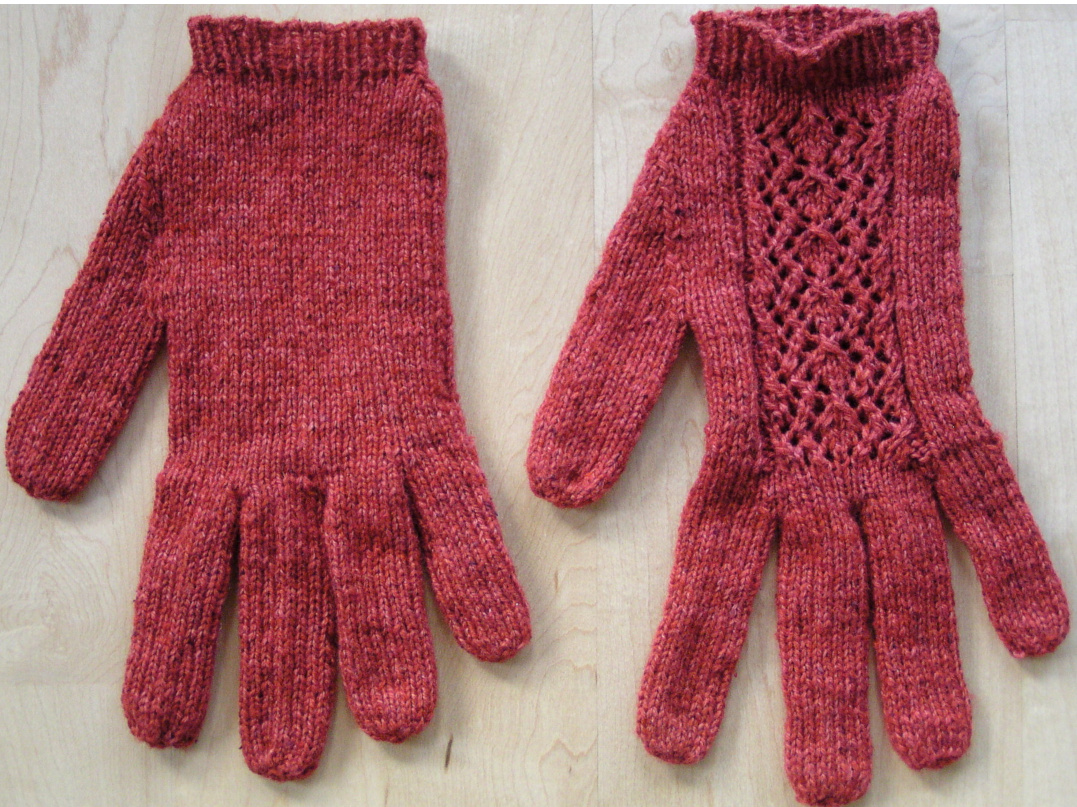
Divide the stitches onto four needles by moving 12 stitches from the front needle to a third needle. Move 13 stitches from the back needle to a fourth needle. Note: Working yarn from ball is attached to ring finger. The join round begins at the front of the ring finger and proceeds around the fingers. Be sure fingers are orientated so that the knitting continues correctly: (K6, k2tog)r, (ssk, k5, k2tog)m, (ssk, k6), (k7, k2tog)i, (ssk, k4, k2tog)m, (ssk, k7)r. - 43 stitches. Knit 2 rounds Back ring finger decrease: K to 2 stitches before m, k2tog - 42 sts. Join little finger Knit (back) held little finger stitches (with yarn tail to right) onto the end of the previous round to connect with fingers as follows: Ssk, k5 With fifth dpn knit (front) held little finger stitches: k6, k2tog, ssk, (front ring finger decrease), move locking stitch marker to middle of little finger, k to end. - 54 stitches. Distribute stitches evenly on the four needles. Begin lace panel on back of hand Left hand: k6, 15 stitches of lace chart, k33. k33, 15 stitches of lace chart, k6.
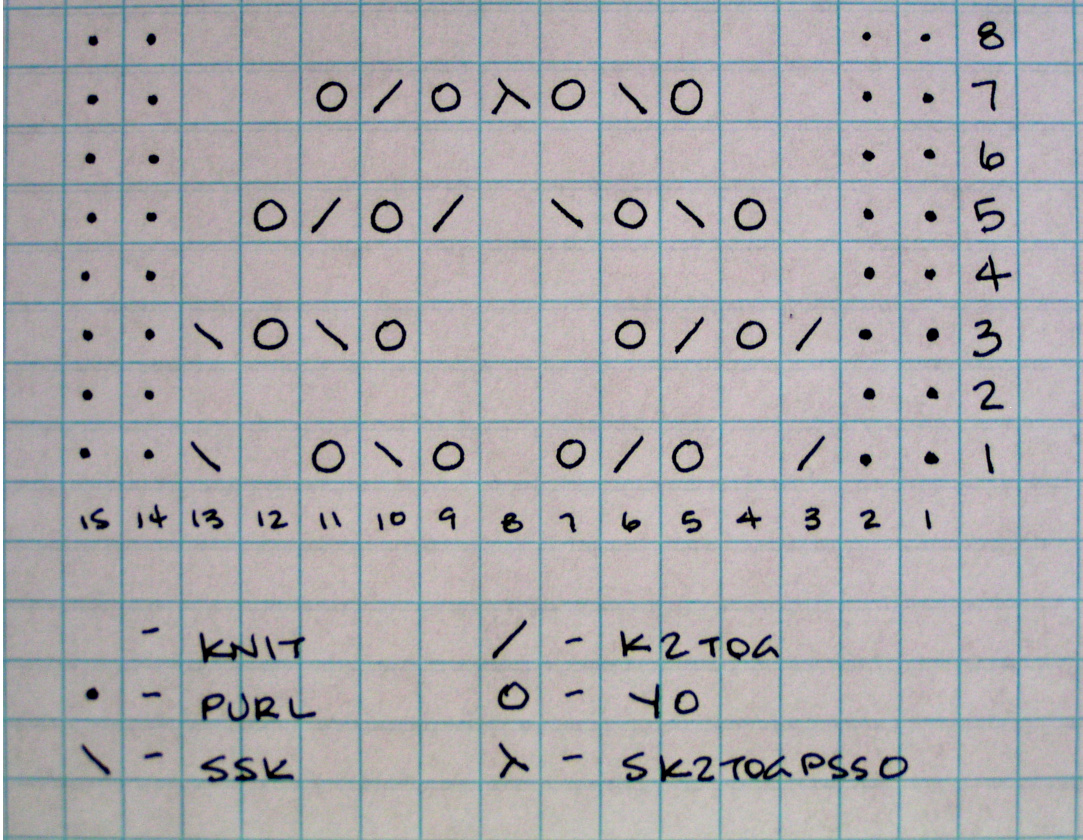
the three yarn ends and close holes at joins around row 5 of lace char Knit lace chart for 2 complete 8 row repeats and 5 rows of 3'd repeat (21 rounds) or desired length. (If row/round count differs from below, please make appropriate changes to keep lace chart in sequence.) Join thumb and begin thumb shaping RIGHTThe palm of hand with stockinette stitches face knitter at beginning of round.
LEFT The back of hand with lace stitches face knitter at beginning of round. Right hand has palm and stockinette stitches facing knitter. On row 6 of lace chart, K27, pm, knit (front) held thumb stitches onto end of previous round (with yarn tail to right): (ssk, k7). With fifth dpn knit (back) held thumb stitches and finish round: k8, k2tog, pm, k6, p2, k11, p2, k6.-71 stitches Left hand has back of hand and lace panel facing knitter. On row 6 of lace chart, k6, p2, k11, p2, k6, pm, knit (front) held thumb stitches onto end of previous round (with yarn tail to right): (ssk, k7). With fifth dpn knit (back) held thumb stitches and finish round: k8, k2tog, pm, k27. - 71 stitches Divide stitches evenly onto the 4 - #1 double pointed needles. Knit 2 rounds in pattern (rows 7 & 8 of lace chart) even on thumb. Righthand: K to marker, slip m, ssk, k to 2 stitches before next m, k2tog, k6, k15 stitches of row 1 of lace chart, k6. - 69 stitches Left hand: K6, k11 stitches of row 1 of lace chart, k6, slip m, ssk, k to 2 stitches before next m, k2tog, k to end. - 69 stitches Weave in thumb yarn end and close hole at join. All the thumb stitches will be decreased away in a 3-row sequence as detailed below. - 55 stitches when completed Lace rows (2 & 3 knit even) on lace row 4, decrease two stitches at thumb markers as above. Lace rows (5 & 6 knit even) on lace row 7 decrease two stitches at thumb markers as above. Lace rows (8 & 1 knit even) on lace row 2 decrease two stitches at thumb markers as above. Lace rows (3 & 4 knit even) on lace row 5 decrease two stitches at thumb markers as above. Lace rows (6 & 7 knit even) on lace row 8 decrease two stitches at thumb markers as above. Lace rows (1 & 2 knit even) on lace row 3 decrease two stitches at thumb markers as above. Lace rows (4 & 5 knit even) on lace row 6 decrease two stitches at thumb as follows, slip m, ssk, slip next stitch, remove m, replace stitch and k2tog. Knit rows 7 & 8 of lace chart even. arker, slip this stitch, remove marker and ssk, knit to end. - 54 stitches Reduce 4 stitches per round 3 times at sides of hand as follows With stitches divided evenly between front and back of hand, repeat for 3 rounds; Knit first 2 stitches together in ssk, knit to last 2 stitches before end of front half of stitches, k2tog. Knit first two stitches on back of hand together in ssk, knit to 2 stitches before end of round, k2tog - 42 stitches. Knit cuff in 1 x 1 rib for %2" or desired length. Break yarn with 18" tail Tubular bind off: Transfer front half of the cuff knit stitches to one double pointed needle. Transfer front half of the cuff purl stitches to second double pointed needle. Repeat with remaining stitches to two more double pointed needles held in back. stitch (see below) around cuff as if to graft a seam. Weave in yarn enc Kitchener stitch - Leave a tail from ball end of yarn 18" inches long. Thread a tapestry needle and enter first knit stitch on the front needle as if to purl and leave stitch on needle. Enter the first purl stitch on the back needle as if to knit and leave stitch on needle. \*Enter the same knit stitch on the front needle as if to knit and sew off, enter the next knit stitch as if to purl, leave on. Enter the same purl stitch on the back needle as if to purl and sew off, enter the next purl stitch as if to knit, leave on.\* Repeat \* to \* "ip to remember this sewing sequence: Knit off, purl on, purl off, knit or About thedesigner: Cam Narayan has been kniting since 2001, her interests also include machine sewing, crewel embroidery making hand bound books and dyeing. Her blog is Anecdotal Knitting. Pattern, design, images, chart and sketch Copyright 2012 Cam Narayan. All rights reserved. Thank you for purchasing this pattern. In purchasing this pattern you may electronically store or print a copy for personal, non-profit use. Pattern is not to be sold, shared, reprinted, reproduced, or distributed in printed or electronic form or in any other way without the author's permission.


