Terry L. Ross
@2008 Terry Ross Designs
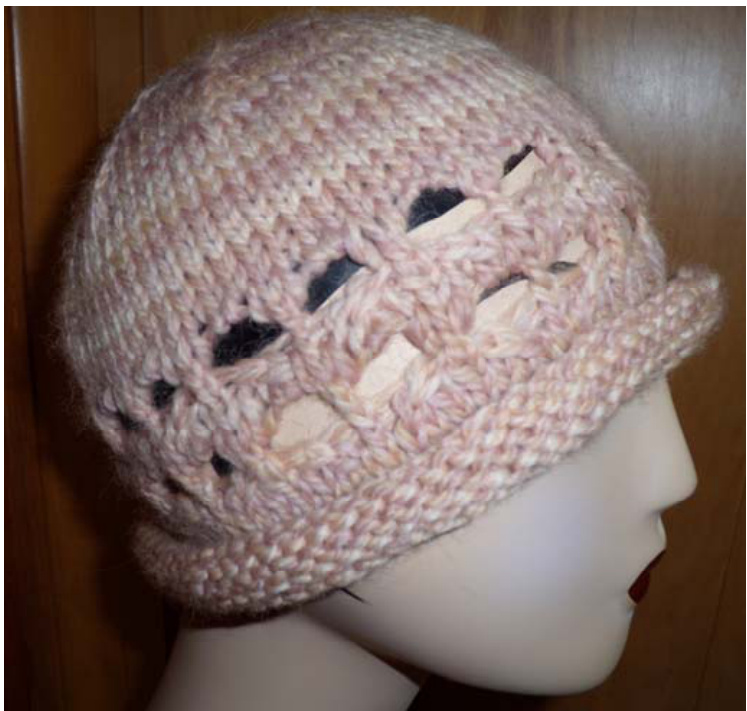
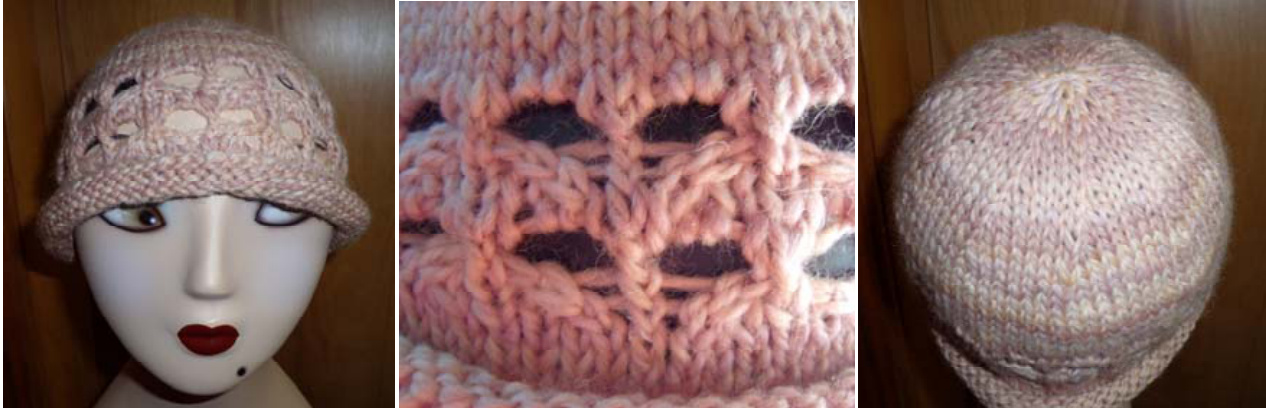
If you've seen the Christmas time commercials advertising Michigan Lottery scratch and win tickets, you may have noticed a cute knit hat in one of them. After many hours of clicking through the recorded commercial frame by frame, knitting up four different attempts, and countless swatches, this is my best effort to recreate the stitch pattern which graces the band of that hat. The lacy portion of the hat is a 5-round repeat, worked twice, and the number of stitches varies with each round to produce the desired pattern. I think this design captures the look of the hat, if not the actual stitch-by-stitch construction.
Materials:
2 balls Crystal Palace Yarns Kaya , Color #0112, or about 100 to 150 yards of a similar bulky weight yarn 1 US size $\#10\%$ $(6.50\;\mathsf{m m})$ ) circular needle 1 set US size $\#10\%$ $(6.50\;\mathsf{m m})$ I double pointed needles (or another circular for magic loop or working in the round on 2 needles) 1 stitch marker
Gauge and Measurements:
Designed to fit a ladies M (L) head circumference 4 stitches and 5 rounds per $1^{\prime\prime}$ in stockinette stitch in the round The Size M hat pictured is blocked to $21^{\prime\prime}$ head circumference. To achieve this look, it is critical to sufficiently block the hat to open up the lace band
Abbreviations and Technique:
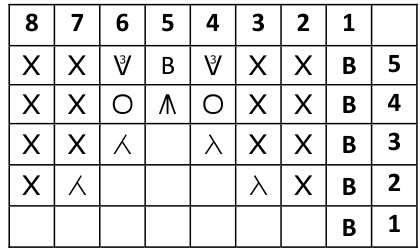
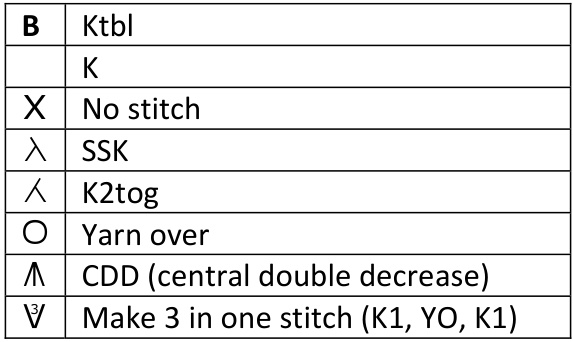
K Knit Ktbl Knit through the back loop YO Yarn over - Yarn over the top of the right needle from front to back. K2tog Knit 2 together SSK Slip, slip knit - Slip the first stitch as if to knit, slip the $2^{\mathsf{n d}}$ stitch as if to knit, then insert the left needle in the front loops of both from left to right and knit them together CDD Central Double Decrease - Slip two stitches together as if to knit, knit the $3^{\mathsf{r d}}$ stitch, then pass the 2 slipped stitches over the knitted stitch Cast on and work rolled brim- Cast on 80 (88) stitches to the circular needle. Place a marker,join without twisting, and work 10 rounds in stockinette stitch. Lace Band - Work the following 5 rounds twice. Do not count stitches after Rounds 2, 3, or4. Stitches willonly equal the number cast on after rounds 1 and 5. Round 1 \*K1tbl, $\mathsf{K}7^{*}$ to the end of the round Round 2 \*K1tbl, SSK, K3, K2tog\* to the end ofthe round Round 3 \*K1tbl, SSK, K1, ${\mathsf{K}}2{\mathsf{t o g}}^{*}$ to the end of the round Round 4 \*K1tbl, YO, CDD, $\mathsf{Y O}^{\ast}$ to the end of the round Round 5 \*K1tbl, (K1, YO, K) into the $\mathsf{Y O}^{\ast}$ to the end of the round After completing the lace band, knit 10 more rounds in stockinette stitch before beginning crown decreases. Charted instructions -
Crown decreases- Work the crown decreases according to the rounds below. Repeat between the asterisks to the end of the round. Switch to double pointed needles or additional circular needles when necessary. Round 1 \*K6, K2tog\* (70/77 stitches) Round 2 K Round 3 \*K5, K2tog\* (60/66 stitches) Round 4 K Round 5 \*K4, K2tog\* (50/55 stitches) Round 6 K Round 7 \*K3, K2tog\* (40/44 stitches) Round 8 K Round 9 \*K2, K2tog\* (30/33 stitches) Round 10 K Round 11 \*K1, K2tog\* (20/22 stitches) Round 12 \*K2tog\* (10/11 stitches) Cut the yarn, run it through the remaining 10(11) stitches on the needles twice and cinch it tightly. Weave the endsto the inside. Blocking-Blockthe hat intoshape,being sureto open the band of lace,using a cylindrical object the size ofthe desired head circumference. The hat shown here was knitted to gauge for size M and blocked to a circumference of $21^{\prime\prime}$ Modifications - You may wish to make modifications for yarn size, needle size, and/or stitch gauge. If so, the following chart can help you decide how many stitches to cast on. Once you do that, simply knit the rolled brim to your preferred height, work the lace section as many times as you wish, and then work even in stockinette stitch until you are ready to begin decreasing for the crown. You can use the crown decrease section given here, or recalculate your own decreases as desired.
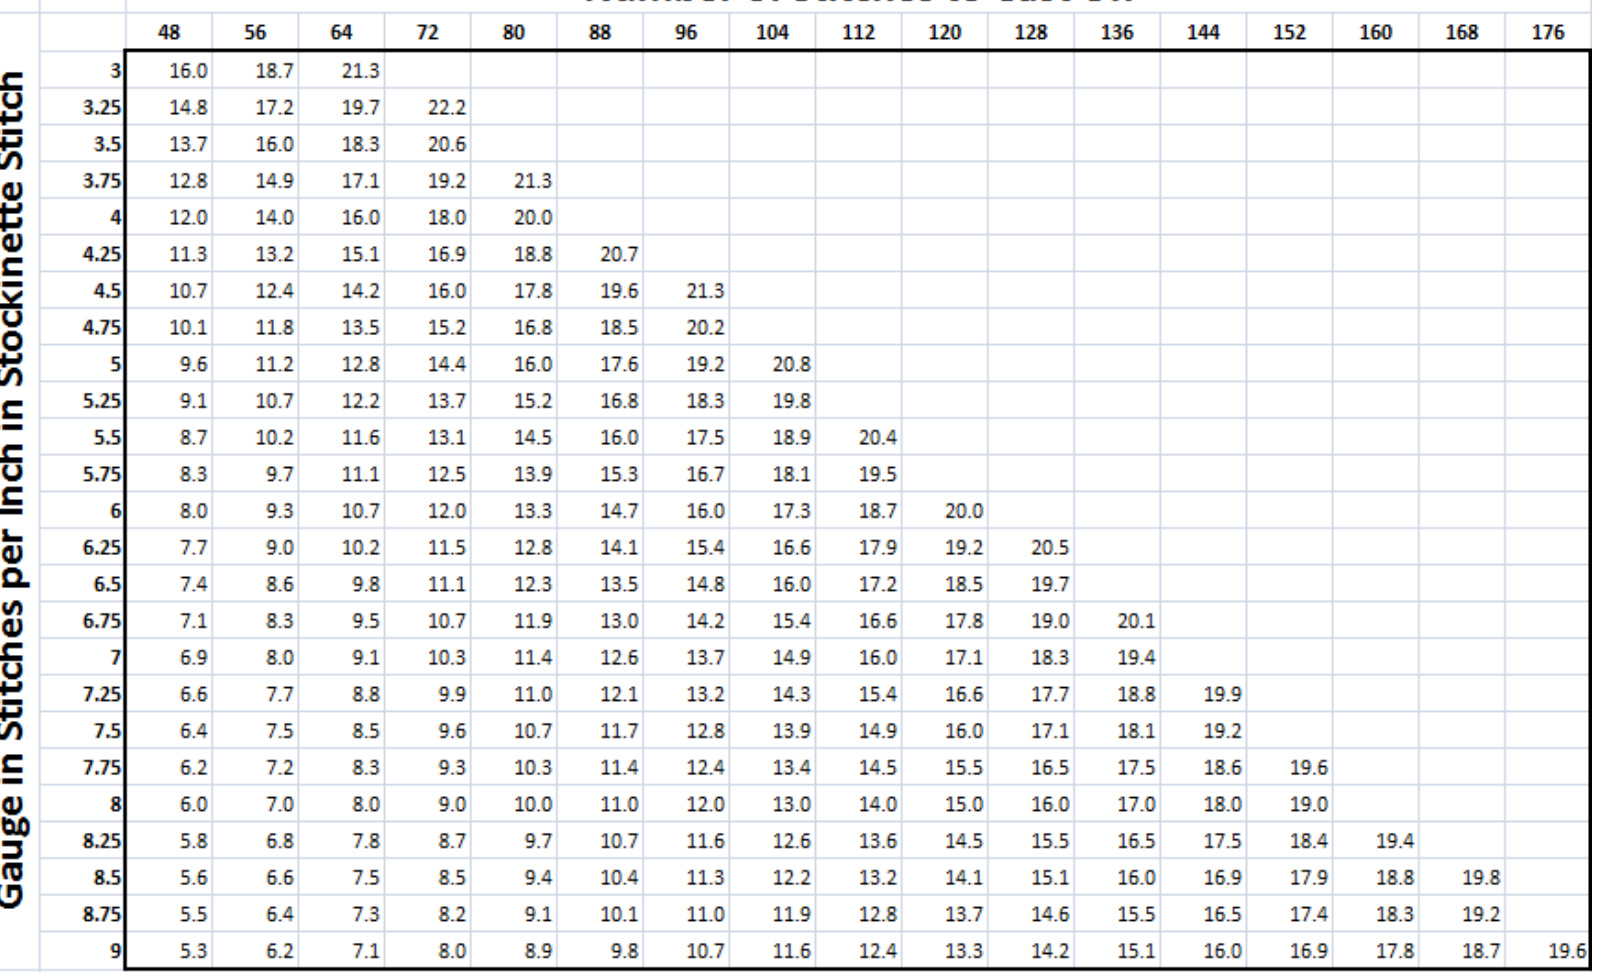
Finished Hat Band Circumference (relaxed)
1. Produce a swatch with your desired yarn and needles to determine your stitch gauge 2. Find your desired finished hat circumference (without stretching) from the chart above. 3. The number at the top of that column is the number of stitches you will cast on. Example: At 6 stitches per inch, a cast on of 96 stitches will produce a rolled-brim hat that measures $16"$ in circumference without stretching.
About the Designer -
Terry Rossis the self-published author of Twelve Bags Fulled, a collection of knitted and felted handbags. Her book is available at her website, on Amazon.com, and in many online and local yarn shops. She has designed dozens of free, downloadable felted projects for Crystal Palace Yarns. Terry also has a passion for designing and knitting socks. Look her up on Ravelry (username: TerryRoss) to see her other patterns available for sale on Ravelry and be sure to check out her website and blog. $\odot2008$ Terry Ross Designs (All rights reserved.)


