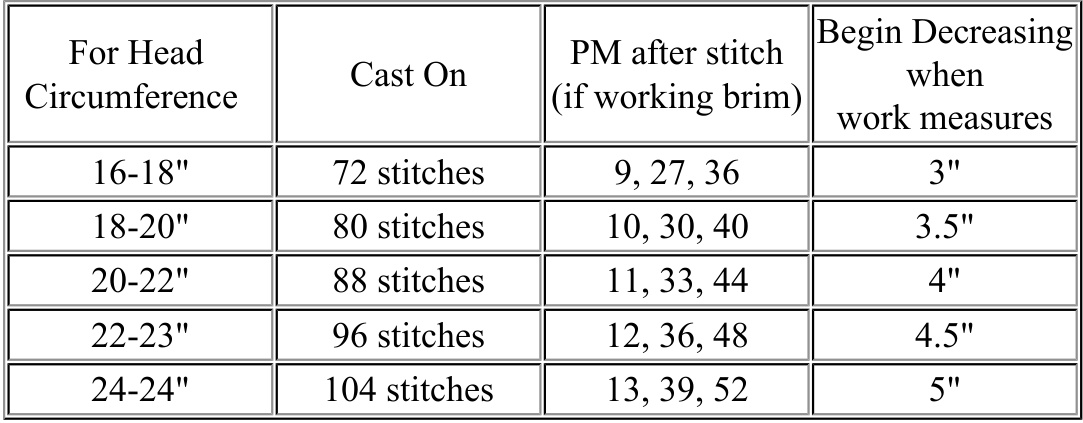
Zinnia Dahlia .2)
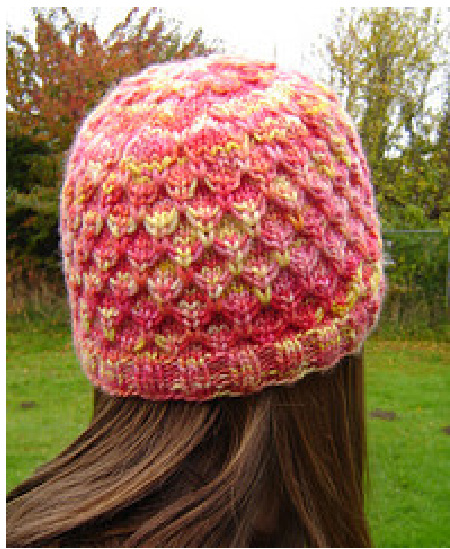
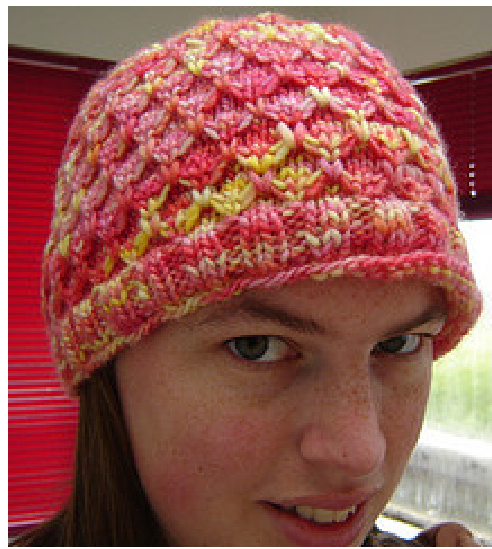
by Petra S. Hoy Zinnia Dahlia is based on the Mock Honeycomb stitch pattern available at Knitting on the Net, which when knit in the round looks alarmingly like the zinnia and dahlia blooms in my mother's garden. Knit from the bottom up in one piece, this almost newsboy cap starts with an optional rolled brim using a holeless short row technique, and moves on to a stitch pattern that looks complicated, but isn't. Don't let the brim instructions scare you - take them step-by-step and you'll be fine! Materials: 1 skein Malabrigo Merino Worsted $5\mathrm{mm}/\mathrm{US}\,8$ circular needles (or size to get gauge) in appropriate length for selected size $4\mathrm{mm}/\mathrm{US}\,6$ circular needles in same length 1 set 5mm double pointed needles stitch marker/row counter to mark join 3 additional stitch markers (for brim only) tapestry needle to weave in ends
Gauge: $4.5\mathrm{st}/1"$ in pattern (this is my usual gauge for stockingette in this yarn as well) Sizes: Zinnia Dahlia is not meant to be snug, so if you want a more snug hat, size down. Alternately, if you would like a for a more snug band, you can CO 8 fewer stitches for the brim and band, and increase by 8st during the first knit row to get a more beret-like toque. Given in inches, sizes are approximate and are based on my gauge $\sim$ check your gauge!
Stitch Abbreviations: $\begin{array}{l}{\mathrm{k}\sim\mathrm{knit}}\\ {\mathrm{p}\sim\mathrm{purl}}\end{array}$ s3yif $\sim$ bring yarn in front, slip next three stitches from left to right needle $\mathrm{klu\sim}$ insert the left needle under both slipped stitch strands from rows 2 & 4 (from the yarn held in front during s3yif), then knit the next stitch. The slipped strands will create an upside-down V behind the new stitch. ssk $\sim$ slip two stitches as if to knit, insert right needle through slipped stitches and knit together $\mathrm{k}2\mathrm{tog}\sim\mathrm{knit}$ two stitches together
Cast-On
· Using the long tail method and the larger diameter circular needles, CO desired number of stitches (a multiple of 8 as listed above); join and place marker · Knit one complete round, placing markers according to the table · Begin working the brim (if desired). If no brim is desired, proced to step 15 Brim (optional): instructions begin after slipping marker at join 1. K to one stitch before second marker; turn work 2. Slip 1st stitch purlwise, and purl back to first stitch before marker; turn work 3. Slip Ist stitch purlwise, knit to second stitch before next marker 4. Slip next stitch purlwise onto right needle, pick up stitch below slipped stitch with left needle 5. Pass the slipped stitch onto left needle, and knit as usual 6. Knit the picked up stitch together with the next stitch (knitting across the gap created when you turned the first time); remove marker 7. Knit to first stitch before next marker; turn and slip the first stitch purlwise 8. Purl to two stitches before the next marker; slip next stitch purlwise onto right needle, pick up stitch below slipped stitch with left needle 9. Pass the slipped stitch onto left needle, and purl 10. Pass the picked up stitch back to the right needle; purl the next stitch, pass slipped stitch over; remove marker 11. Purl to first stitch before initial marker (there are only two markers on the needles at this point, marking the join, and marking the halfway point) 12. Turn work, slip the next stitch purlwise, and knit back to two stitches before the next marker 13. Slip the next stitch purlwise onto the right needle, pick up the stitch below the slipped stitch with the left needle, and pass the slipped stitch onto the left needle 14. Knit the slipped stitch, then knit the picked up stitch together with the next stitch; remove marker 15. Switch to smaller diameter circular needle 16. ${\tt k}2{\tt p}2$ around, ending with p2 before marker at join 17. Slip the first stitch after marker knitwise onto the right needle, reversing its mount 18. Pick up the stitch below next stich on the left needle, and place it on the left needle 19. Pass the slipped stitch back to the left needle, and knit together with the picked up stitch throughback loop 20. Knit the next stitch as usual Hatband: ·Resume ${\tt k}2{\tt p}2$ ribbing for the next 5 rounds (approximately 1"); switch back to larger circular needle at join. Begin working stitch pattern: · Round 1 (and all odd rows): knit · Round 2 & 4: k1 \*sl 3wyif, kl; repeat from \* · Round 6: k2, \*k1u, k3; repeat from \* ; move stitch marker two stitches left at end of round
Work the stitch pattern until the body is the required length for the hat size you are making (refer to the chart), ending after row 6. Then begin decrease rounds as follows, switching to dpns when necessary: · Round 4: \*(k1, s3yif, k3); repeat from \* · Round 6: k2, $^{*}(\mathrm{klu},\mathrm{k}6)$ ; repeat from \* (move marker 2st left at end of round) . Round 8: k3, \*(k2tog, k5); repeat from \* around, finish with k2 · Round 10: \*(k2tog, k4); repeat from \* · Round 12: k2, \*(ssk, k3); repeat from \* around, finish with k1 · Round 14: \*(s3yif, k1); repeat from \* · Round 16: \*(s3yif, k1); repeat from \* · Round 18: \*(k1, klu, k2tog); repeat from \* · Round 20: \*(k2tog, k1)1 repeat from \* · Round 21: \*k2tog; repeat from \* · Use tapestry needle to run tail of yarn through remaining stitches Weave in ends and finis!


