Medieval Child's Vest
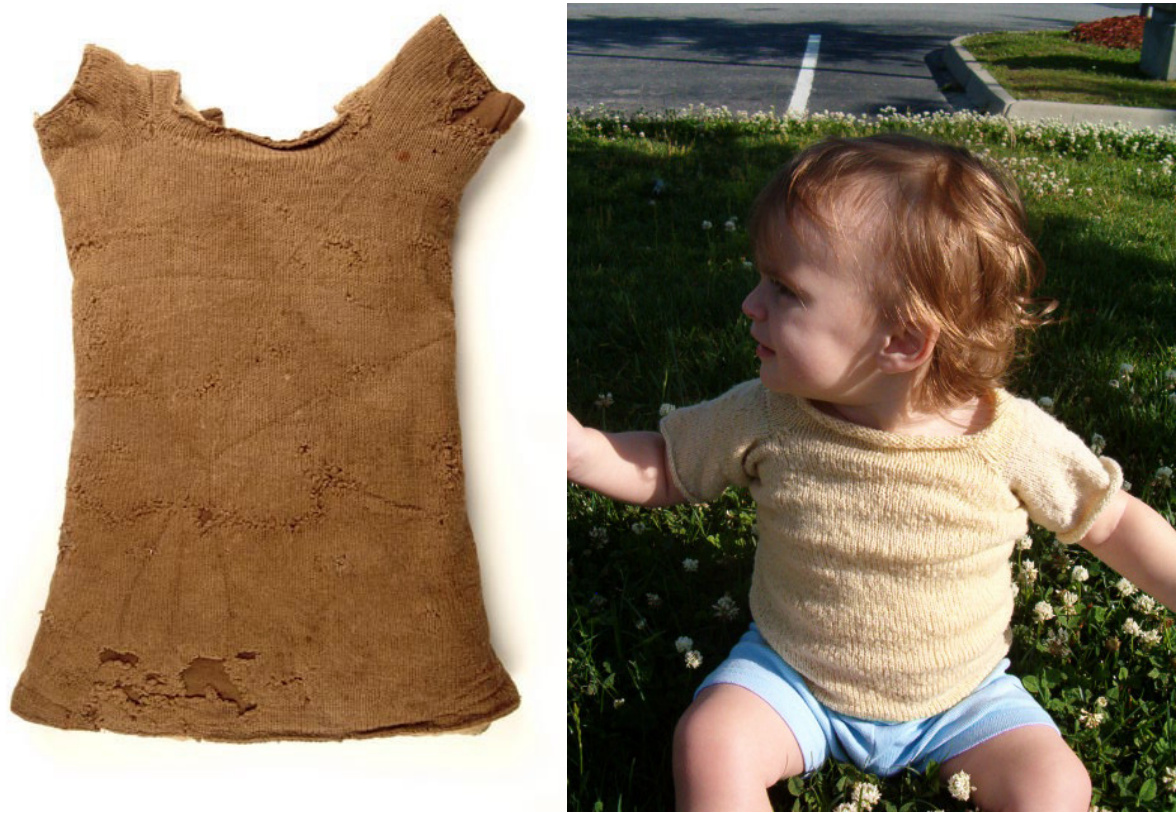
The inspiration for this pattern came from a Child's Vest currently held by the Museum of London. For more details, visit http://www.museumoflondon.org.uk/LondonWall/Whats-on/Galleries/medieval/objects/record.htm?type=object&id=90611 .The construction techniques I used to recreate this small sweater type garment are the ones that would have been known and used by the original maker. Of course, I wasn't there, but I'm fairly sure the person who knitted this small garment would recognize it. I hope the child who wore it grew to be healthy and strong, the same hope I hold for the small grandchild who wears it in this picture.
Materials:
For the model I used densely spun 2-ply wool with 12-13 wraps per inch. A thick sport weight or light DK would probably be appropriate. This model used 3 ounces of handspun wool, approximately 400-450 yards. Size 2 (2.75 mm) needles, either very long double points (at least 5) or a long circular needle for MagicLoop method; an extra circular needle to hold stitches, or a couple of yards of smooth cord Skills needed: Provisional (e-wrap) cast on, knit, knit 2 together, cast off, knitting in the round, pick up and knit.
Body:
Beginning at the lower edge of the garment cast on 144 stitches, distributing the stitches evenly across your needle(s). For MagicLoop method, there will be 72 stitches for the front, and 72 stitches for the back. For double points, there will be 36 stitches on each of four needles. Join to work in the round. Note: Since you have used the e-wrap method for your cast on, be careful to work close to the tips of your needle to minimize gaps between the stitches. This only applies to the first row. Knit every row. Use a marker to remember the beginning of your row, if desired. Continue knitting every row until the body of the shirt is about 12 inches from beginning. If you don't have a ruler handy, you should be able to lay the work flat and fold the bottom right corner to meet the top left corner of the work and form a lovely triangle with no wrinkles. The sleeves take up 50% of the total number of body stitches, and are centered on the sides of the long tube you have just completed. They need to be centered. To do this:
Sleeve:
Knit 20, place marker, knit 32, place marker, knit 40, place marker, knit 32. You are 20 stitches shy of the end of the row. These remaining 20 stitches plus the first 20 stitches before the next marker will help form the sleeve.
Next Row:
Knit to first marker. Put the next 104 stitches on a spare circular or holding thread. Using the e-wrap cast on,\*\*\* cast on 20 stitches, knit remaining 20 stitches (60 stitches total for sleeve). If you are using MagicLoop, 30 front, 30 back; double points 20 on each of three needles. You are working in the round, making a simple tube for the sleeve. Don't over-think this part. It is a simple tube worked from a portion of a simple tube. Place a marker at the underarm (which is directly opposite of the cast-on \*shoulder' stitches) for the beginning of the round. Knit this tube until it measures 3.5 to 4 inches. Again, if you don't have a ruler or measuring tape, you should be able to lay the little tube flat and make a triangle of it just as you did the body tube. Make sure you are at the beginning of the round and bind off. Sleeve number one is finished. Slip the next 32 stitches (first marker) onto the free end of the spare circular holding the body stitches, or slip the next 32 stitches onto another spare length of smooth yarn. You no longer need this marker. Using your working needle(s), knit the next 40 stitches (for the base of the second sleeve). Drop the second marker. Repeat from \*\*\* to make the second sleeve.
Neck:
You now have 32 unworked stitches on the front and back of the body tube (64 unworked stitches total). Attach yarn and knit across one of these sets of stitches, place marker. Pick up and knit 20 stitches along the cast-on edge of the shoulder of the sleeve, place marker. Knit the last 32 unworked stitches of the body tube, place marker. Pick up and knit 20 stitches along the second shoulder (104 stitches total). Place marker here for the beginning of the round. Round 1: \*Knit 2 together, knit to within two stitches of marker, knit two together, slip marker. Repeat from \* around (8 stitches decreased). Round 2: Knit. Repeat these two rows twice more. Knit eight rows even. Bind off. Weave in your ends, and block your edges as flat as possible. I don't mind the ^curl’ the stockinette has on the edges, but I would imagine the garment would have been at least lightly fulled, as most other knitted items of the time would have been. The fulling would have kept the ^curling' to a minimum and made the little shirt more warm and durable. I have found no evidence for garter stitch or any other stitch used to form a border around the edges, so I included none in my pattern.
The formula for this shirt is really simple. After casting on a number of stitches sufficient to make a tube wide enough to cover the body, one would simply knit the tube until it would form a square when laid flat. One fourth of the body stitches would be worked for the sleeve, with half the number of the stitches used for the sleeve cast on to form the shoulder. The sleeve stitches would then be worked as a tube to the desired length, while the rest of the stitches rested. Repeat the process for the other side. When both sleeves were finished, the resting stitches would be picked up, also picking up stitches along the cast on edges of the shoulders. The neckline is only slightly shaped, and only deep enough to stabilize the shoulders and provide a small amount of depth at thechest. The shirt looks awkward until the body tube is opened out; the sleeves will drop to a more normal position and there is a surprising amount of room at the underarm. When laid flat, it looks less than promising for fit, but my small model didn't seem to mind at all.


