Designed by Zhenya Lavy

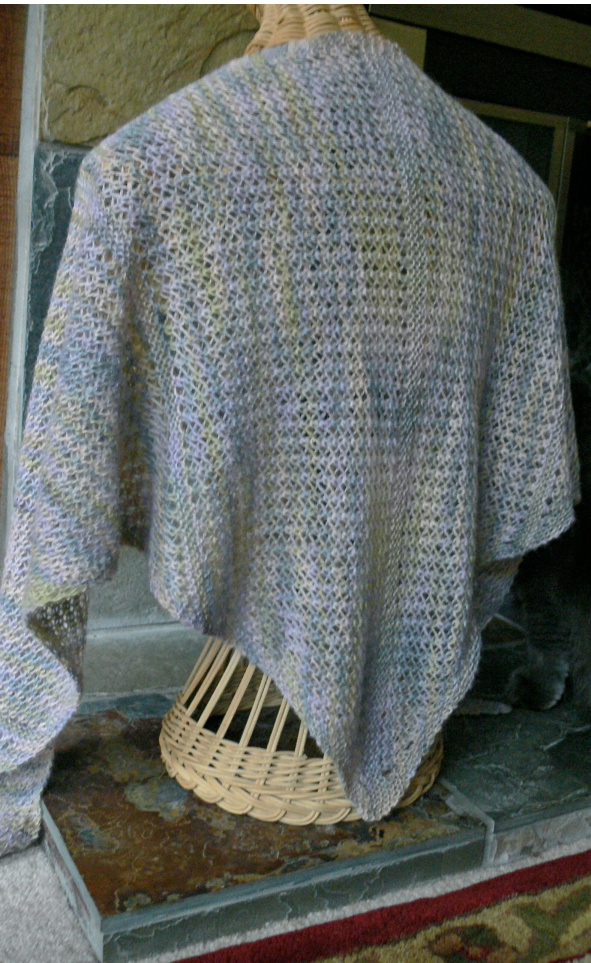
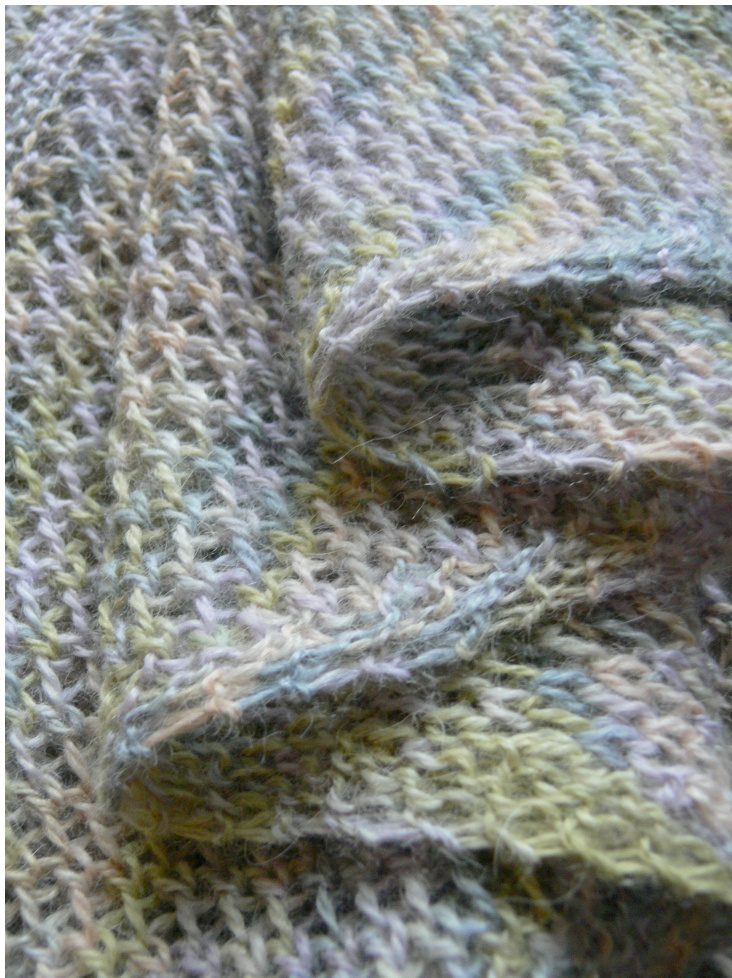
A reversible triangle shawl knit side-to-side with simple techniques designed to maximize small quantities of yarn. Pattern is easily adjustable for whatever amount of yarn you want to use. An airy faggot stitch worked on larger needles than normally called for by fingering-weight yarn makes this shawl light as a whisper. Vertical bands of garter stitch form pretty vertical lines and add textural and visual interest. And because of the sideways construction, any striping effects in the yarn are oriented vertically for a more slimming look, overall. Especially lovely in yarn with a light halo or glammed out in a silky yarn with a bit of sparkle, the shawl can be worn draped over the shoulders as an elegant wrap or coiled around the neck as a luxurious cowl.
ITEMS NEEDED
Fingering weight yarn, 430 yards for size pictured (Cherry Tree Hil's Fingering Alpaca, Spring Frost, 2 50g skeins). Wind yarn into 2 equal center-pull balls. us 6 - 4.0 mm needle. Tapestryneedle
STITCHES USED
Knit, Purl, K2tog, YO, Ktbl (through back loop) SSK: Slip 1 as if to knit, slip the next as if to purl, knit these together through back loop. M1L (Make 1 Left): Insert the left needle, front to back, under the horizontal strand between last stitch worked and first stitch on left needle. Knit through back loop. Faggot stitch: \*YO, K2tog\* (repeat)
ORIENTATION
Don't let these instructions fool you: The shawl is essentially a 2-row pattern with alternating increases or decreases. Adjusting for the rows with an uneven stitch count is what complicates the writing. The finished shawl is a large triangle, with all increases and decreases made along the same edge (angled edge). The opposite edge is straight. Increasing rows start from the angled edge. Decreasing rows start from the angled edge. Maintaining rows start from the straight edge. Five bands of garter stitch divide the shawl into six sections: 3 increasing, 3 decreasing. In the sample, the garter bands are placed as follows: one at center back, one at each shoulder, and one to be visible near each corner in the front. If you experiment with the placement or number of garter bands, maintain symmetry by using an odd number of no fewer than 3 and leave enough space for the faggot stitch to breathe. After working a garteband, simlify the task of lning upthefagot stitch properlybyalways planing fo th final garterrow tobe an Increasing orDecreasing row and for th first rowre-establishing thefagot stitchto be a Maintaining Row. The faggot stitches naturally fall into pairs on the needles, making them easy to count by twos. This pattern refers to them as YO K2tog pairs and uses them for counting. (9 YO K2tog pairs = 18 stitches) Reading your stitches: The faggot stitch is comprised of a YO followed by a K2tog (i.e. The YO sits to the right of the K2tog on the needle). Because you are working flat and knitting back in the opposite direction over the previous row, each YO K2tog pair will be knit on top of another YO K2tog pair, but the previous pair will appear in reversed order. About those even/odd designations: After some row names in the instructions, you will see an even or odd designation. This refers to the total number of stitches on the needle once you have completed that particular row. The even/odd designation will not generally be meaningful unless you decide to alter the placement or width of the garter band. Feel free to ignore the even/odd designations or use them as tools to help you in your own modifications! Dividing the yarn ball: To ensure equal sides on this shawl, either use a scale to divide total yarn weight in half and wind into two equal cakes or select yarn put up in 50g skeins. Knit increasing rows until the first skein runs out; switch to the second skein for the decreasing rows. Remember to switch to garter stitch 4 rows before the first skein runs out.
CAST ON AND SET-UP ROWS
Using your favorite method, cast on 4 stitches. R1 Set-Up row: K1, M1L, K to end R2 Set-Up row: K Work these two rows until you have 9 stitches on the needle at the conclusion of a Set-Up R2 row.
INCREASING SECTIONS
R1 Increasing row (even): K1, M1L, K2, \*YO, K2tog\* (repeat to last 4 stitches), K4 R2 Maintaining row (even): K4, \*YO, K2tog\* (repeat to last 4 stitches), K4 R3 Increasing row (odd): K1, M1L, K3, \*YO, K2tog\* (repeat to last 4 stitches), K4 R4 Maintaining row (odd): K4, \*YO, K2tog\* (repeat to last 5 stitches), K5 For Increasing Section 1: Work the above 4 rounds until there are 11 YO K2tog pairs (i.e. 22 stitches) between your edging stitches, ending having just completed an R1. Starting from the straight edge of the shawl, work 6 rows of garter stitch (3 ridges) - remember to continue making the K1 M1L increase on the angled edge of the shawl. End the garter band having just completed an Increasing row. (Had you continued the faggot stitch instead of switching to garter, this sixth row would be an Increasing (R3) row. For Increasing Section 2: Starting with a Maintaining (R4) row, work the above 4 rounds until there are 33 YO K2tog pairs between your edging stitches. End having just completed an R1. Starting from the straight edge of the shawl, work 6 rows of garter stitch (3 ridges) - remember to continue the K1 M1L increase on the angled edge of the shawl. End the garter band having just completed with an Increasing (R1) Row. (Had you continued the faggot stitch instead of switching to garter, this sixth row would be an Increasing (R3) row. For Increasing Section 3: Starting with a Maintaining (R4) row, work the above 4 rounds until there are 47 YO K2tog pairs between your edging stitches. End having just worked an Increasing (R1) row.
CENTER GARTER BAND
g from the straight edge of the shawl, work 8 rows of garter stitch (4 ridges) as follows O For rows 2 and 4 of the garter band, continue the K1 M1L increase on the angled edge of the shawl. O For rows 6 and 8 of the garter band, switch to the SSK decrease on the angled edge of the shawl (i.e. SSK, K to end). End having just completed a Decreasing row.
DECREASING SECTIONS
R1 Decreasing row (even): R2 Maintaining row (even): R3 Decreasing row (odd): SSK, K3, \*YO, K2tog\* (repeat to last 4 stitches), K4 K4, \*YO, K2tog\* (repeat to last 4 stitches), K4 SSK, K3, Ktbl the YO from previous row, \*YO, K2tog\* (repeat to last 4 stitches), K4 NOTE: If you don't knit the YO through the back loop, you will create an eyelet and the two sides of your shawl will not match. K4, \*YO, K2tog\* (repeat to last 5 stitches), K5 R4 Maintaining row (odd):
For Decreasing Section 1:
Starting with a Maintaining (R2) row, work the above 4 rounds until there are 35 YO K2tog pairs between your edging stitches, ending having just completed a Decreasing R1 row. Starting from the straight edge of the shawl, work 6 rows of garter stitch (3 ridges) - remember to continue making the SSK K3 decrease on the angled edge of the shawl. End the garter band having just completed a Decreasing row. (Had you continued the faggot stitch instead of switching to garter, this sixth row would be a Decreasing (R3) row. For Decreasing Section 2: Starting with a Maintaining (R4) row, work the above 4 rounds until there are 13 YO K2tog pairs between your edging stitches. End having just completed a Decreasing (R1) row. Starting from the straight edge of the shawl, work 6 rows of garter stitch (3 ridges) - remember to continue the SSK K3 decrease on the angled edge of the shawl. End the garter band having just completed a Decreasing row. (Had you continued the faggot stitch instead of switching to garter, this sixth row would be a Decreasing (R3) row. For Decreasing Section 3: Starting with a Maintaining (R4) row, work the above 4 rounds until only 9 stitches remain on the needle.
COMPLETION ROWS AND BIND-OFF
R1 Completion row: K R2 Completion row: SSK, K Work these two rows until only 4 stitches remain. Bind off.
FINISHING
Weave in all ends. Soak finished shawl in warm water for about 15 minutes. Do not agitate. Gently press out excess water. Block to desired size. Let dry. This pattern is copyright-protected. ZhenyaLavy,February2011 www.aestheticentanglementz.blogspot.com. All rights reserved. This pattern is made available for personal, non-commercial use only. Permission is not granted for you to make garments from this pattern for sale anywhere or to mass-produce this pattern or garments made from it.