Desperado Mitty by Angela Myery
These mitts are knit from the fingers to the cuff. They work great with a Self-Striping or Variegated yarn. Of course, they'll still be pretty in a solid or tonal as well. Yarn: Fingering Weight Yarn. Sample used Biscotte & Cie Felix Self-Striping. Needles: Circular or double pointed needles required for your preferred method of smallcircumference knitting in the round, US 1.5 (2.5 mm) or size needed to obtain gauge. Gauge: 8 stitches per inch, 10 rows per inch in stockinette stitch. Other materials needed: Waste yarn or stitch holders, darning needle, stitch markers Finished size will fit hands from 6.5-7.5 (7.5-8.5) inches in circumference. Thumb: Make 2 Cast on 20\* stitches. Join to work in the round. Knit 4 rounds. (YO, K2tog) around. Knit 4 rounds. Knit 1 round, knitting each stitch together with stitch from the cast on. This can also be done using a provisional cast on. Then you would carefully knit one live stitch together with one provisional cast on stitch. Knit until the thumb is 1.5 inches (3.8 cm) or desired length. Place all thumb stitches on waste yarn or spare needles until needed later. Break yarn, leaving enough of a tail to graft 4 stitches and weave in ends. \* If you need your thumb to be larger than 2.5 inches (about 6 cm), add stitches in increments of 2. This ensures continuity of the picot edging.
Hand:
BothMitts: Cast on 52 (60) stitches\*. Place beginning of round marker if desired (slip this marker each time you come to it), and join to work in the round. (Again, this can be done using a provisional cast on) Knit 5 rounds. (YO, K2tog) around. Knit 5 rounds. Knit 1 round, knitting each stitch together with one stitch from the cast on. Knit 2 rounds. \*If you need your hand circumference to be larger than 6.5-7 inches (16.5-17.8 cm), then add stitches in increments of 2. This ensures continuity of the picot edging. These stitches will become additional stockinette stitches in the hand. For example, if you need an 8 inch (20 cm) circumference mitt, cast on 64 stitches. The lace panel consumes 15 stitches, so the remaining 49 stitches will be stockinette, rather than the 37 stitches with a 52 stitch cast on. This pattern is for personal use. Please do not reproduce or distribute or sell it without the permission of the author. Begin working chart as follows. Knit 11 (15) stitches, Place Marker, work appropriate row of chart, Knit to end of round. Continue in this manner until hand reaches desired length to thumb joint. (lf working mitts seperately, make a note of the chart row for ease of completing Mitt 2) Mitt 2: Work appropriate row of chart, Knit to end of round. Continue in this manner until hand reaches desired length to thumb joint. (if working mitts sepeprately, this would be the chart row noted during Mitt 1) Join thumb: \*Important note\* If you are working mitts 2 at a time, make sure that the thumb is added on the outside edge of each needle. If you worked Mitt1, then Mitt 2, your mitts will be in the correct position. Mitt 1: At end of the round, place last 2 stitches, and first two stitches of next round on waste yarn. Place 4 stitches of thumb on waste yarn. These stitches will be grafted together later. Place Marker, M1, Knit 8 thumb stitches (half the remaining thumb stitches), Place beginning of round marker if desired, Knit remaining 8 thumb stitches, M1, Place Marker. Knit to next marker, Work appropriate row of chart, Knit to end of round. Mitt 2: Work appropriate row of chart, Knit 9 (13) stitches. Place next 4 stitches on waste yarn. Place 4 stitches of thumb on waste yarn. These stitches will be grafted together later. Place Marker, M1, Knit remaining 16 thumb stitches, M1, Place Marker. Knit to end of round. Knit one round in established pattern: Working appropriate row of chart, in the established location for each mitt, and Knitting all other stitches, slipping markers as you come to them. Decrease Setup round: Mitt 1: Knit to 2 stitches before first marker, K2tog, SM, Knit 9 (13) stitches, work appropriate row of chart, Knit to next marker, SM, SSK, Knit to end of round Mitt 2: Work appropriate round of chart, Knit to next marker, SM, SSK, Knit to 2 stitches before next marker, K2tog, SM, Knit to end of round. Knit one round even as follows: Mitt 1: Knit to first marker, SM, P2, K1, SKYP, K1, P2, K1 (5), Work appropriate round of chart, Knit to last 8 stitches before marker, P2, K1, SKYP, K1, P2, SM, knit to end of round. Mitt 2: Work appropriate round of chart, K1 (5), P2, K1, SKYP, K1, P2, SM, Knit to next marker, SM, P2, K1, SKYP, K1, P2, Knit to end of round This pattern is for personal use. Please do not reproduce or distribute or sell it without the permission of the author. Decrease Round: Mitt 1: Knit to 2 stitches before first marker, K2tog, SM, P2, K4, P2, K1 (5), work appropriate row of chart, Knit to 8 stitches before next marker, P2, K4, P2, SM, SSK, Knit to end of round Mitt 2: Work appropriate round of chart, K1 (5), P2, K4, P2, SM, SSK, Knit to 2 stitches before next marker, K2tog, SM, P2, K4, P2, Knit to end of round. Continue alternating one even round with one Decrease round 4 times. After 4 Decrease Rounds (8 rounds total), add another column of patterned ribbing as follows: Knit one round even as follows: Mitt 1: Knit to first marker, SM, P2, K1, SKYP, K1, P2, K1, (K1, SKYP, K1, P2), Work appropriate round of chart, Knit to 14 stitches before marker, P2, K1, SKYP, K1, P2, K1, SKYP, K1, P2, SM, knit to end of round. Mitt 2: Work appropriate round of chart, K1, (P2, K1,SKYP, K1), P2, K1, SKYP, K1, P2, SM, Knit to next marker, SM, P2, K1, SKYP, K1, P2, K1, SKYP, K1, P2, Knit to end of round Mitt 1: Knit to 2 stitches before first marker, K2tog, SM, P2, K4, P2, K1, work appropriate row of chart, Knit to 14 stitches before marker, P2, K4, P2, K4, P2, SM, SSK, Knit to end of round Mitt 2: Work appropriate round of chart, K1, P2, K4, P2, SM, SSK, Knit to 2 stitches before next marker, K2tog, SM, P2, K4, P2, K4, P2, Knit to end of round. Continue alternating one even round with one Decrease round, adding additional columns of ribbing in a similar manner after every 8 rounds, until 4 stitches remain between markers. Remove Markers. Incorporate the 4 stitches between markers into the ribbing pattern by K1, SKYP, K1. Begin working all rounds even, in established pattern, adding an additional column of ribbing to "palm" side after every 8 rounds until stitches are “used up" in the pattern. (Large size will have 2 additional K stitches, which should nestle between columns of P stitches at the outside of the hand.) Continue in this manner until arm is desired length.
Cuff
Knit 6 rounds. (YO, K2tog) around. Knit 5 rounds. Complete Bind off using your favorite folded hem. Kristi at Fiber Fool blog has a great discussion of several folded picot bind offs. Weave in ends. This pattern is for personal use. Please do not reproduce or distribute or sell it without the permission of the author.
Stitch Glossary:
K: Knit. P: Purl. SSK: Slip one stitch as if to Knit, Slip one stitch as if to Purl, Knit these two stitches together through the back leg. K2tog: Knit 2 stitches together. YO: Yarn Over S: Slip one stitch as if to Purl S2tog-K1-P2SSO: Slip 2 sts as if to Knit, Knit 1, Pass 2 slipped stitches over SKYP: Slip 1, Knit 1, YO, Pass Slipped Stitch Over 2 stitches. SM: Slip Marker
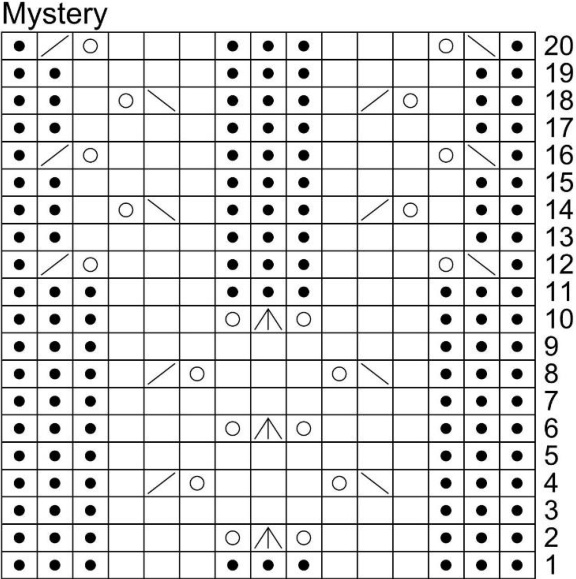
Stitches k p yo k2tog ssk s2tog-k1-p2sso Round 1:P3,[k3,p3] twice. Round 2:P3,k3,yo,s2tog-k1-p2sso,yo,k3,p3. Round 3:P3,k9,p3. Round 4: P3,k1, ssk, yo,k3, yo,k2tog,k1, p3. Round 5: P3,k9, p3. Rounds 6-9:Repeat rows 2-5. Round 10:P3,k3,yo,s2tog-k1-p2ss0,yo,k3,p3. Round 11:P3,[k3,p3] twice. Round 12:P1,ssk,yo,k3,p3,k3,yo,k2tog,p1. Round 13:[P2,k4,p1] twice,p1. Round14:P2,k1,yo,k2tog,k1,p3,k1,ssk,yo,k1,p2. Round 15:[P2,k4,p1] twice,p1. Rounds16-19:Repeatrows12-15. Round 20:P1,ssk,yo,k3,p3,k3,yo,k2tog,p1. This patern is for personal use. Please do not reproduce or distribute or sellit without the permission of the author.


