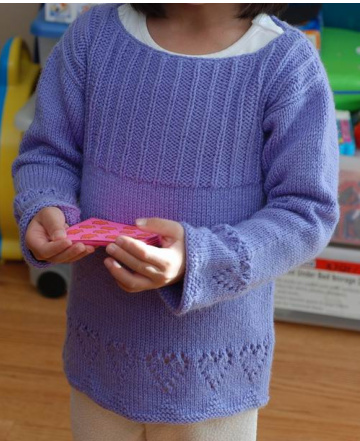
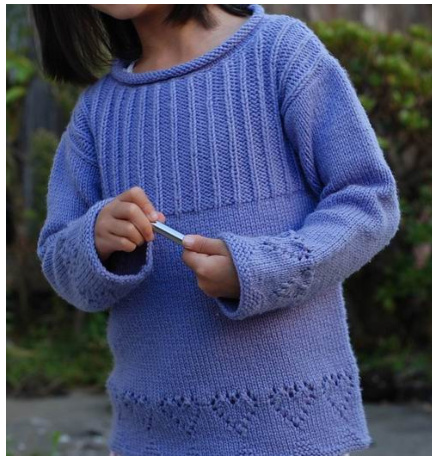
Valentine
A sweet sweater for multiple seasons and occasionswear it with just a camisole or a thin T-shirt underneath during spring or fall when the weather is just a bit chilly but too warm for a sweater with a tighter neck opening, or wear it with a turtleneck underneath during winter and the soft merino wool would sure keep your little girl toasty and warm. The ribbing on top and the heart shape lace pattern lining the bottom edges give it the dress-up feel while the simple shape of the garment keeps it casual. Pattern offers 2 styles for the neck opening - crocheted collarless edges, or knit rolled edge.
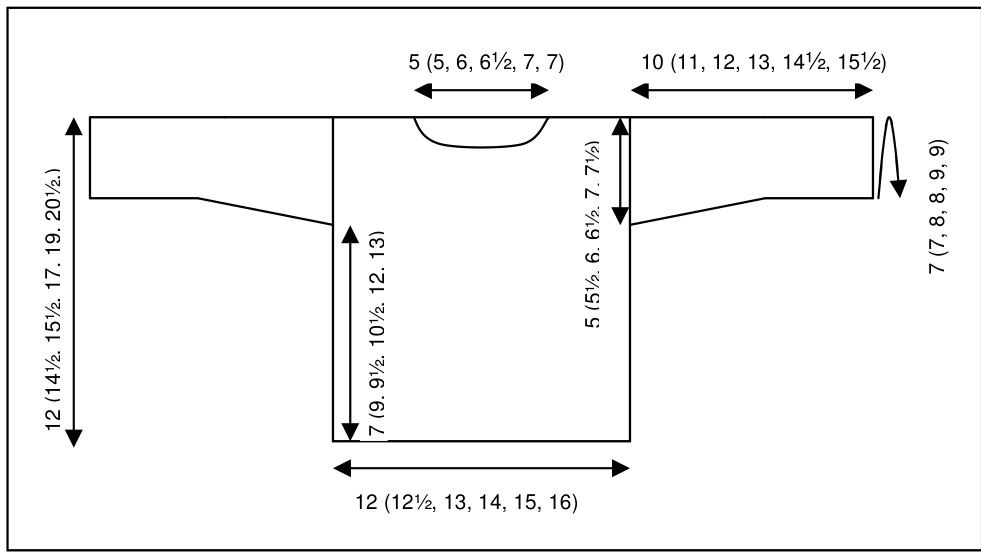
Finished chest size: 23.5 (25, 26, 28, 30, 32) inches for sizes 2 (4, 6, 8, 10, 12) Yarn: 4 (5, 6, 7, 8, 9) skeins of Knit Picks Superwash Swish DK weight (123 yards/50g), or equivalent; colorway Cornflower. Needle size: 6; circular needles and double point needles. Gauge: 23 sts x 31 rows = 4 inches. Notions: Size D (3.25mm) crochet hook, stitch markers, stitch holders, and tapestry needle
Pattern:
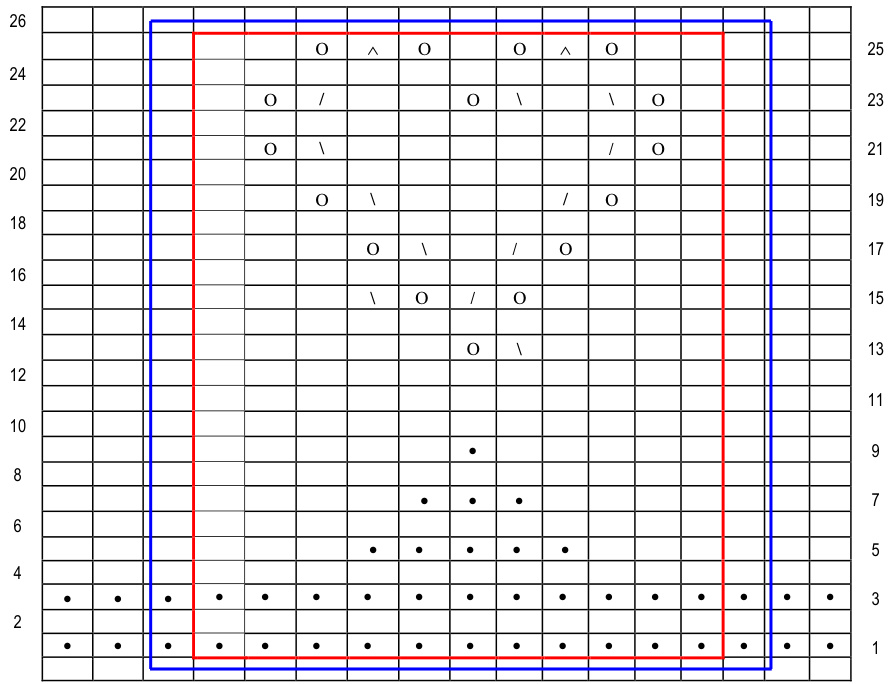
CO 69 (73, 77, 80, 86, 93) sts; place a marker (pm #1); continue c0 another 69 (73, 77, 80, 86, 93) - front side and back side of the sweater; pm (#2) to mark the beginning of round and join to knit in the round. \* Start following the chart pattern; knit 1 (3, 5, 1, 4, 2) edge sts, and then knit and repeat the stitch instructions within the red box in the chart until 2 (4, 6, 2, 5, 3) sts before the marker. Knit 1 (3, 5, 1, 4, 2) sts and purl 1 sts as faux seam\*. Slip marker (#1) and repeat from \* to \* again for the back side of the sweater, finishing with marker #2- round 1 completed. Continue following the chart in the same manner until the end of round 25. Knit in st sts (continue to purl the faux seams) until the body of the sweater measures about 5 (7, 7/2, 81/2, 10, 11) inches. Continue on to ribbing pattern.
Ribbing pattern:
Round 1- p0 (0, 0, 2, 1, 0), \* k1, p3, repeat from \* to 1 st (1, 1, 2, 1, 1) before marker #1, k1 (k1, k1, klpl, k1, k1). Slip marker #1 and repeat round 1 for the back side of the sweater. Continue until the ribbing pattern measures about 2 inches. End on marker #1 (front side completed). Armhole: Start separating the front and back for the armholes by placing the first half of the sts up to marker #1 (the front side sts just completed) on a sts holder or waste yarn. Continue knitting the ribbing pattern on the second half of the sts (back side) in the flat. At the end of the row (at marker #2), turn the work and knit on the WS (knit the k sts; purl the p sts). Keep knitting the back side in the flat until armholes measure about 5 (5.5, 6, 6.5, 7, 7.5) inches. B0 in pattern. Place the front sts back on the needles and knit the ribbing pattern in the flat until armholes measure about 3 (3.5,4,4.5,5,5.5) inches. End on WS. Cont on to neck shaping. Neck and Shoulders: Cont with ribbing pattern, knit 19 (20, 21, 21, 23, 25) sts. B0 31 (33, 35, 38, 40, 43) sts for neck opening. Use another ball of yarn and knit the remaining sts. Working both sides of the neck opening at the same time, knit the next row (WS) - knit the k sts; purl the p sts. Start decreasing 1 st at each of the 2 neck edges 4 times every other row. Work even until the shoulders reach the same length as the back. BO the shoulders in pattern. DIcCvEs. (IIaKC L) Using double point needles, CO 40 (40, 45, 45, 53, 53) sts, and then pm and join to knit in the round. \*Purl first st of every round as faux seam. Start knitting the repeat pattern (within the red box for sizes 6 and 8, blue box for all other sizes) in the chart to the end of the round. Repeat from \* for every round until the end of row 25. Knit in st sts (purl the faux seam) until sleeve measures about 5 (5, 6, 6, 7, 7.5) inches from the beginning. Start increasing a stitch on either side of the seam every 4 rows 9 (12, 12, 13, 14, 15) times (2 sts increased for each round. Knit 3 (0, 0, 2, 2, 2) more rounds and BO.
Finishing:
Sew shoulder seams. Neck edging: Working on the RS starting from the back center stitch, with crochet hook, pick up and \*sc 3 stitches (more if larger opening is desired), sc 2 sts together. Repeat from \* all the way around the neck opening. Fasten off. (Optional) Rolled edge collar for a smaller neck opening: Start from the middle of the back of neck edge, pick up and knit around the neck for 7 rows. BO loosely. Sew in sleeves.
purl 口knit ssk /k2tog sk2p 0 YO 13-stitch repeat pattern for sizes 2,4, 10, 12 sleeves
Abbreviations: pm place marker sm slip marker co cast on st(s) stitches ppurl kknit WS wrong side RS right side BO bind off cont continue ssk slip one stitch as if to knit from left needle onto right needle, repeat the slip for another stitch, then knit the two together by inserting left needle into the front “legs"’ of the two slipped stitches and proceed to complete the knit stitch by pulling the working yarn loop through with the right needle k2tog knit 2 stitches together the same way 1 stitch is knit yo yarn over sk2p slip one stitch as if to knit, knit the next 2 stitches together (k2tog), then pass the slipped stitch over the k2tog stitch and off the right needle SC single crochet. Start with slip knot on the hook (1 loop on hook), \*insert hook into a stitch, yo (wrap the working yarn around the hook moving from front to back - or clockwise), pull the yarn through the stitch (2 loops on hook), yo, pull yarn through both loops. 1 sc formed. Repeat from \*. sc2tog Insert hook into a stitch, yo, pull yarn through to form a loop; insert hook into next stitch, yo, pull yarn through to form another loop; yo, draw through all 3 loops on hook.


