Valentine Mailmonster
An original knit toy design by Becca Brody
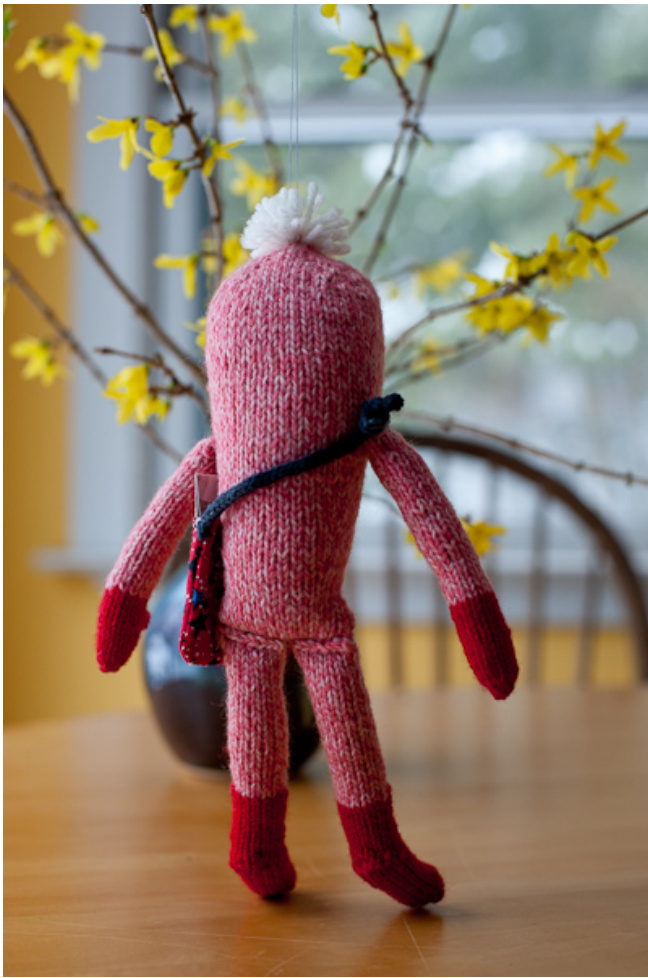
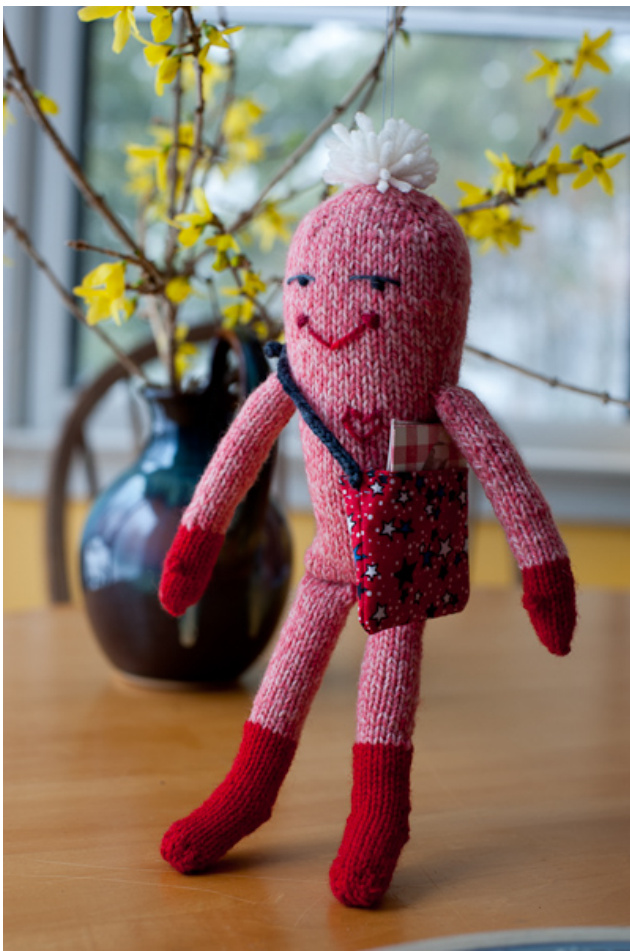
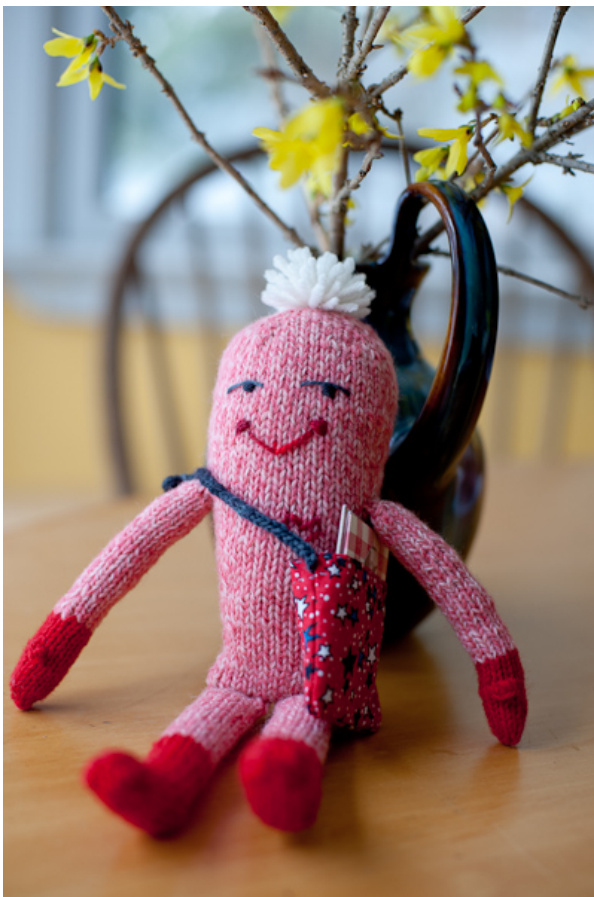
Who better to deliver your valentines (or any tiny treat) than a friendly knitted monster? He is tightly knit in the round using worsted weight yarn. Limbs are knit separately and then attached, and the final size is approx. 11 inches tall. Explicit directions are not given for the monster's messenger bag. It is a hand-sewed a bag approx. 3 inches by 2.25 inches with an i-cord strap. The valentines are made of scrapbooking paper.
Yarn: Scrap fingering weight yarn or embroidery floss for face and heart (I used black and red) Cascade 220 or other worsted weight yarn for body Main color (MC): pink, half of one 100g skein Contrasting Color (CC): red, approx. 25 yards Pompom: white, 1-2 yards Needles: Size 3 circular needles (two 16- or 24-inch) or a set of size 3 DPNs. I find circular needles much easier to work with when using Judy's Magic Cast-On . Tapestry needle for finishing. Other notions: Wool or poly stuffing; 6"x7" fabric for bag. Gauge: 6.75 stitches/ 1 inch (2.5 cm) in stockinette stitch. This is tighter than a typical gauge for worsted weight yarn so that the stuffing does not show through the fabric. Glossary: This design uses Judy's Magic Cast-On to begin. Please see Judy Becker's explanation on Knitty if you are unfamiliar with it: http:/knitty.com/ISSUEspring06/FEATmagiccaston.html p: purl M1L (Make 1 Left): insert left-hand needle from front to back into the strand lying between two stitches, and knit into this stitch through back loop M1R (Make 1 Right): insert left-hand needle from back to front into the strand lying between two stitches and knit into this stitch in the regular way ssk: slip 2 stitches as if to knit. Insert the left needles into the front of these two stitches and knit them together from this position. k2tog: knit two stitches together as if they are one stitch sl1: slip one stitch from left to right hand needle as if to knit w&t (wrap & turn): with yarn held to front, slip one stitch, then turn work (to knit back the way you came). Bring yarn forward so that it wraps around the slipped stitch.
Body Instructions:
Using Judy's Magic Cast-on and MC, cast on 6 stitches and knit one round. Row 1: \*k1, M1R, \* to end of row (12sts) Rows 2, 4, 6, 8, 10: knit Row 3: k1, \* M1L,k1, M1R, k2, repeat from \* on last repeat end k1 (20 sts) Valentine Mailmonster Pattern Copyright 2013 Becca Brody Row 5: k2, \* M1L, k1, M1R, k4 repeat from \* on last repeat end k2 (28 sts) Row 7: k3 \* M1L, k1, M1R, k6 repeat from \* on last repeat end k3 (36 sts) Row 9: k4 \* M1L, k1, M1R, k8 repeat from \* on last repeat end k4 (44 sts) Row 11: k5 \* M1L, k1, M1R, k10 repeat from \* on last repeat end k5 (52 sts) Rows 12-20: knit Body shaping: Decrease Row 1: \*k1, ssk, k16, k2tog, k1, repeat from \* to end Knit 5 rounds plain between each decrease row. Decrease row 2: \*k1, ssk, k14, k2tog, k1, repeat from \* to end Decrease row 3: \*k1, ssk, k12, k2tog, k1, repeat from \* to end - you might want to place a safety pin or other removable marker on this row, as it is where you will attach the arms. Decrease row 4: \*k1, ssk, k10, k2tog, k1, repeat from \* to end Decrease row 5: \*k1, ssk, k8, k2tog, k1, repeat from \* to end Knit 8 rows plain. Bind off leaving a 10" tail and stuff with stuffing of your choice. Using tail of yarn, sew bottom seam closed. You can choose to embroider the face now or wait until the doll is assembled. To anchor yarn inside the doll, knot it at one end and pull the yarn through the back of the doll, emerging at the point you want to embroider. The knot should disappear into the body and catch in the stuffing enough to anchor it. You could also choose to use button eyes or other decorations. Experiment until you find an expression that you like. To fasten off, just knot the yarn and pull to the inside of the doll, cutting the yarn so that the end disappears into the body.
Legs (make 2):
Using CC and Judy's Magic Cast-On, cast on 6 stitches and knit one round. Row 1: (k1, M1L,k1,M1R,k1) twice (10 stitches) Rows 2, 3: knit Row 4: (k1, M1L,k3, M1R,k1) twice (14 stitches) Knit eleven rows plain. Heel: Turn work and work back and forth on the last 7 stitches you knit as follows. Row 1: sl1, p5, w&t Row 2: sl1,k4, w&t Row 3: sl1, p3, w&t Row 4: sl1, k2, w&t Row 5: sl1, p1, w&t, knit to end of round Knit 8 rows plain. Cut CC yarn, leaving 6 inch tail, and join MC. Knit plain for 30 rows, or until MC measures approx. 30 inches. Bind off, weave in ends, stuff, and sew seam closed (you could also stuff and then use a 3-needle bind-off).
Arms (Make 2):
Using MC and Judy's Magic Cast-On, cast on 12 stitches. Leave a 10-12 inch tail, as you will use this tail to attach the arm to the body. Knit 30 rows (until piece measures approximately 3 inches). Switch to CC and knit 5 rows plain. Thumb row: k6, cast on 3 with a regular “backwards loop" cast on. Turn and purl 4 while casting off the 3 new stitches. Turn again and knit 6 stitches to the end of round (12 stitches remain). Knit 8 rounds plain. Make sure to pull the cast-on yarn tail to the outside of the work, then stuff the arm. Decrease row: k2tog, repeat from \* to end of round. (6 stitches) Cut yarn, leaving a 6-8 inch tail. Thread yarn through a tapestry needle and pass through the live stitches on the knitting needles, removing knitting needles as you do so. Pull the stitches tight, fasten off, and pull the yarn through to the inside of the arm. Pompom: Use your favorite method to make a 1.5 inch pompom, or use my cheater's method: Cut 12-24 three-inch lengths of white yarn. More yarn = fluffier pompom. Fold in half and tie bundle tightly around the middle with a 12 inch length of MC yarn. Cut the folded ends of yarn open and trim to shape. Use the ends of the MC yarn to attach pompom to the top of the dol's head and pull ends to the inside of doll body.
Making up:
Sew the top of the legs to the bottom seam of the body. I find it looks best if you follow the knitting stitches as you would when grafting two pieces of knitting together. The arms should be attached at the level of the third body decrease row as mentioned above. Make sure that the thumbs point forward. If you have knit tightly, you should be able to shape the arms slightly by bending them at the elbow. If you have made a messenger bag, just put it around the monster and he is ready to go!