A felted bag for the younger set! The handles, sides and base of the Little Miss Bag are knit in one piece. Front and back panels are worked directly onto the base and side sections. There are no seams and only a few tails to weave in when completed. Bags made with a single strand of yarn felt to approx 51/2" h x 612"w x 21/2" at base with a 12" x 3%" handle. Bags made with a double strand of yarn felt to approx 6" h x 7" w x 31/2" at base with a 12" x 11/4" handle. Pattern is written for single strand with changes for double strand in parentheses ().
Materials
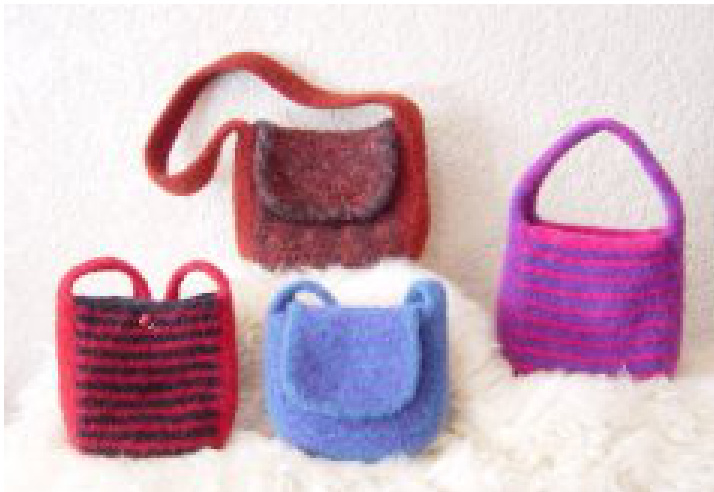
100% wool or wool/mohair blend worsted weight, 100 yds Main Color A, 50 yds Contrast Color B (200 yds A, 100 yds B) (yarns pictured: single strand Brown Sheep NatureSpun Red Fox & Pepper, Blue Boy & Sapphire, double strand Cherry Delight & Sapphire, Burnt Sienna & Tahki Shannon) US Size 11 single & double pointed needles, 24" circular, two smaller circulars to pick up sts, spare needle (sz 15-17) for cast on/bind off Locking stitch markers (4), ring markers (3) Large tapestry needle Optional: magnetic closure, snap, button
Gauge: 3 sts/inch
Tips & Techniques
Double Yarn/One Skein: To get a double strand of yarn from one skein, pull yarn from both inside and outside of ball. ssk: Slip the next two sts knitwise, one at a time. Insert the left needle from left to right through the slipped sts and knit. w&t - Wrap & Turn: On right side (RS) - bring yarn forward, slip the next st as if to p, take yarn to the back of the work, slip the slipped st back onto the left needle, turn and begin to purl. On wrong side (ws) - take yarn to back of work, slip the next st as if to p, bring yarn forward, slip the slipped st back onto left needle, turn work and begin to k. W&T can produce small holes around the slipped st. This problem can be avoided by picking up the wraps, and working them with the corresponding st when they are encountered. Pick Up and Knit: Holding yarn on WS, insert knitting needle under st on outer edge of RS and wrap yarn knitwise around the needle. Draw the yarn (the stitch) through and leave it on the needle. I-Cord Bind Off: With each step of I-Cord Bind Off, three things are accomplished: I-cord is produced and attached to an edge and one st of the bag is bound off. After the I-cord sts are cast on, work as follows unless otherwise noted: with dpn, \*k2, k2tog tbl (through the back loop). Slide these 3 sts back to the left needle, pull yarn across back\*. Repeat\*\* until all sts have been bound off.
Handles, Sides & Base
With A (A & B) and circular, very loosely cast on 86 sts, placing a locking stitch marker in st 35 and st 52. Use larger needle if necessary to achieve loose cast on. Join in round, being careful not to twist sts. Place ring marker at beg of rnd. Beg of rnd is center top of handle. Rnd 1: K, placing different colored ring markers (m) after st 18 and st 68. Rnd 2: (RS) P to first marker, slip m, k31, w&t, p12, w&t, k22, w&t, p32, w&t, k to next m, slip m, p to end of rnd. Rnd 3: K to first m, slip m, p to next m, slip m, k to end of rnd. Rnd 4: P to first m, slip m, k to 1 st before next m, w&t, p to 1 st before next m, w&t, k to next m, slip m, p to end of rnd. Rnd 5: Repeat Rnd 3. Rnd 6: P to first m, slip m, k41, w&t, p32, w&t, k22, w&t, p12, w&t, k to next m, slip m, p to end of rnd. Rnd 7: K, placing locking stitch markers in st 35 and st 52 and removing ring markers at sts 18 & 68. Bind off very loosely, maintaining similar tension as that in cast on. Use larger needle if necessary.
Front & Back Panels
Panels are worked back and forth in garter st with a single strand (double strand) of one color. With RS of either cast on or bind off edge facing, begin at right locking stitch marker. This marker is the lower right hand corner of panel. Attach A (double strand of A) at back. With straight needle, pick up and knit 18 sts along base, ending at second locking stitch marker (lower left corner of panel). Panel is 18 sts across. With each row, one st from a side panel is worked into the last st of the row. To make this process easier, pick up the outside (RS) loop o1 the cast on/bind off sts with a smaller circular needle (18- 20 sts), beginning with first st after locking stitch markers. Transfer sts from spare circulars as needed.
Front
Row 1: (WS) K to last st. Holding the spare circular behind the straight needle, knit the last st on needle and the first st on circular together through the back loop. Turn. Row 5: K to last st, k2tog tbl as in Row 1. Turn. Repeat Rows 4 & 5 until 18 garter stitch ridges have been completed. Break B, leaving 6" tail. Begin I-Cord Bind Off: (RS) Using knitted cast-on and A, CO 2 sts to left hand needle. Keeping working yarn to back, pick up back loop of next base st on spare circular. (21 sts). Work first rnd as follows: with dpn, k1 tbl, k1, k2tog tbl. Slide the 3 sts back to left hand needle and continue to work across remaining sts as in Tips & Techniques section. Next Row: No sts remain on straight needle and there are 3 sts on dpn. Pick up next st on spare circular. Slide the 4 sts to opposite end of needle. Pull yarn across back and work in I-cord. Slide the 3 rem sts to opposite end of needle. Pull yarn across back, k1, k2tog tbl. Bring first st over last st, break yarn and bring tail through last st. Use tail to secure I-cord smoothly to edge. Secure I-cord to opposite edge as well, using tails from alternate color.
Back
Repeat for back panel. If flap is desired, work panel to I-cord bind off section, mark 18tn ridge and work Flap.
Flap (optional)
Work the 18 sts of back panel only, no longer joining it to sides. Work 14 ridges from marked ridge, continuing to alternate A & B every 2 rows. Next Row: K1, ssk, k to last 3 sts, k2tog, k1. Repeat last two rows once. Leave sts on needle. (14 sts) BreakA&B. I-Cord Bind Off: With RS facing and spare circular, pick up 16 sts. Begin at marked ridge and insert needle into "bump" on outer edge of ridges. Slip the next 14 sts of flap onto circular. Pick up 16 sts on outer edge. (46 sts) With dpn and A (double strand A) CO 3 sts. Slide to opposite end of needle and k3. Slip these sts onto spare circular at marked ridge and work I-Cord around flap edge. When all sts have been worked, slide rem 3 sts to opposite end of needle andk3. Next Row: K1, k2tog tbl. Bring first st over last st, break yarn and bring tail through last st. Use tails to secure I-cord smoothly to both edges. Weave in all tails.
Felting
Set washer for heavy-duty cycle, low water level and hot water. Add a few drops of liquid laundry soap to the water. Place Little Miss bag in a zippered bag and drop in the washer. Agitate. Check on bag after 10 minutes of agitation, then, every 3 minutes until it is the desired size. Reset the agitation cycle if more agitation is needed. Continue with either method listed below to finish the felting process. "Faint of Heart Method": Remove bag from washer and squeeze out excess water - do not wring. Rinse in sink with cool water. Squeeze out excess water, blot with large towel, shape and let dry. "Living Dangerously in the Spin Cycle Method": (Disclaimer: Do not attempt this method while talking on the phone, polishing your nails or disciplining children. Undivided attention is an absolute necessity!) Remove bag and let washer proceed to rinse cycle. Agitate bag briefly (5-10 seconds). Stop washer. Reset washer to pump out water and spin. Remove Little Miss bag from zippered bag, shape and place against washer tub. Once spinning begins, spin for about 20 seconds. Stop washer. Re-position bag in tub against tub wall. Spin for another 20-30 seconds. Most of the water will be spun out and there should be no unsightly creases. Shape and let dry.
Finishing
Sew a snap or attach a magnetic clasp to inside top edge of bag or under lower edge of flap. A button or applique can be added on RS over snap/clasp for decoration.


