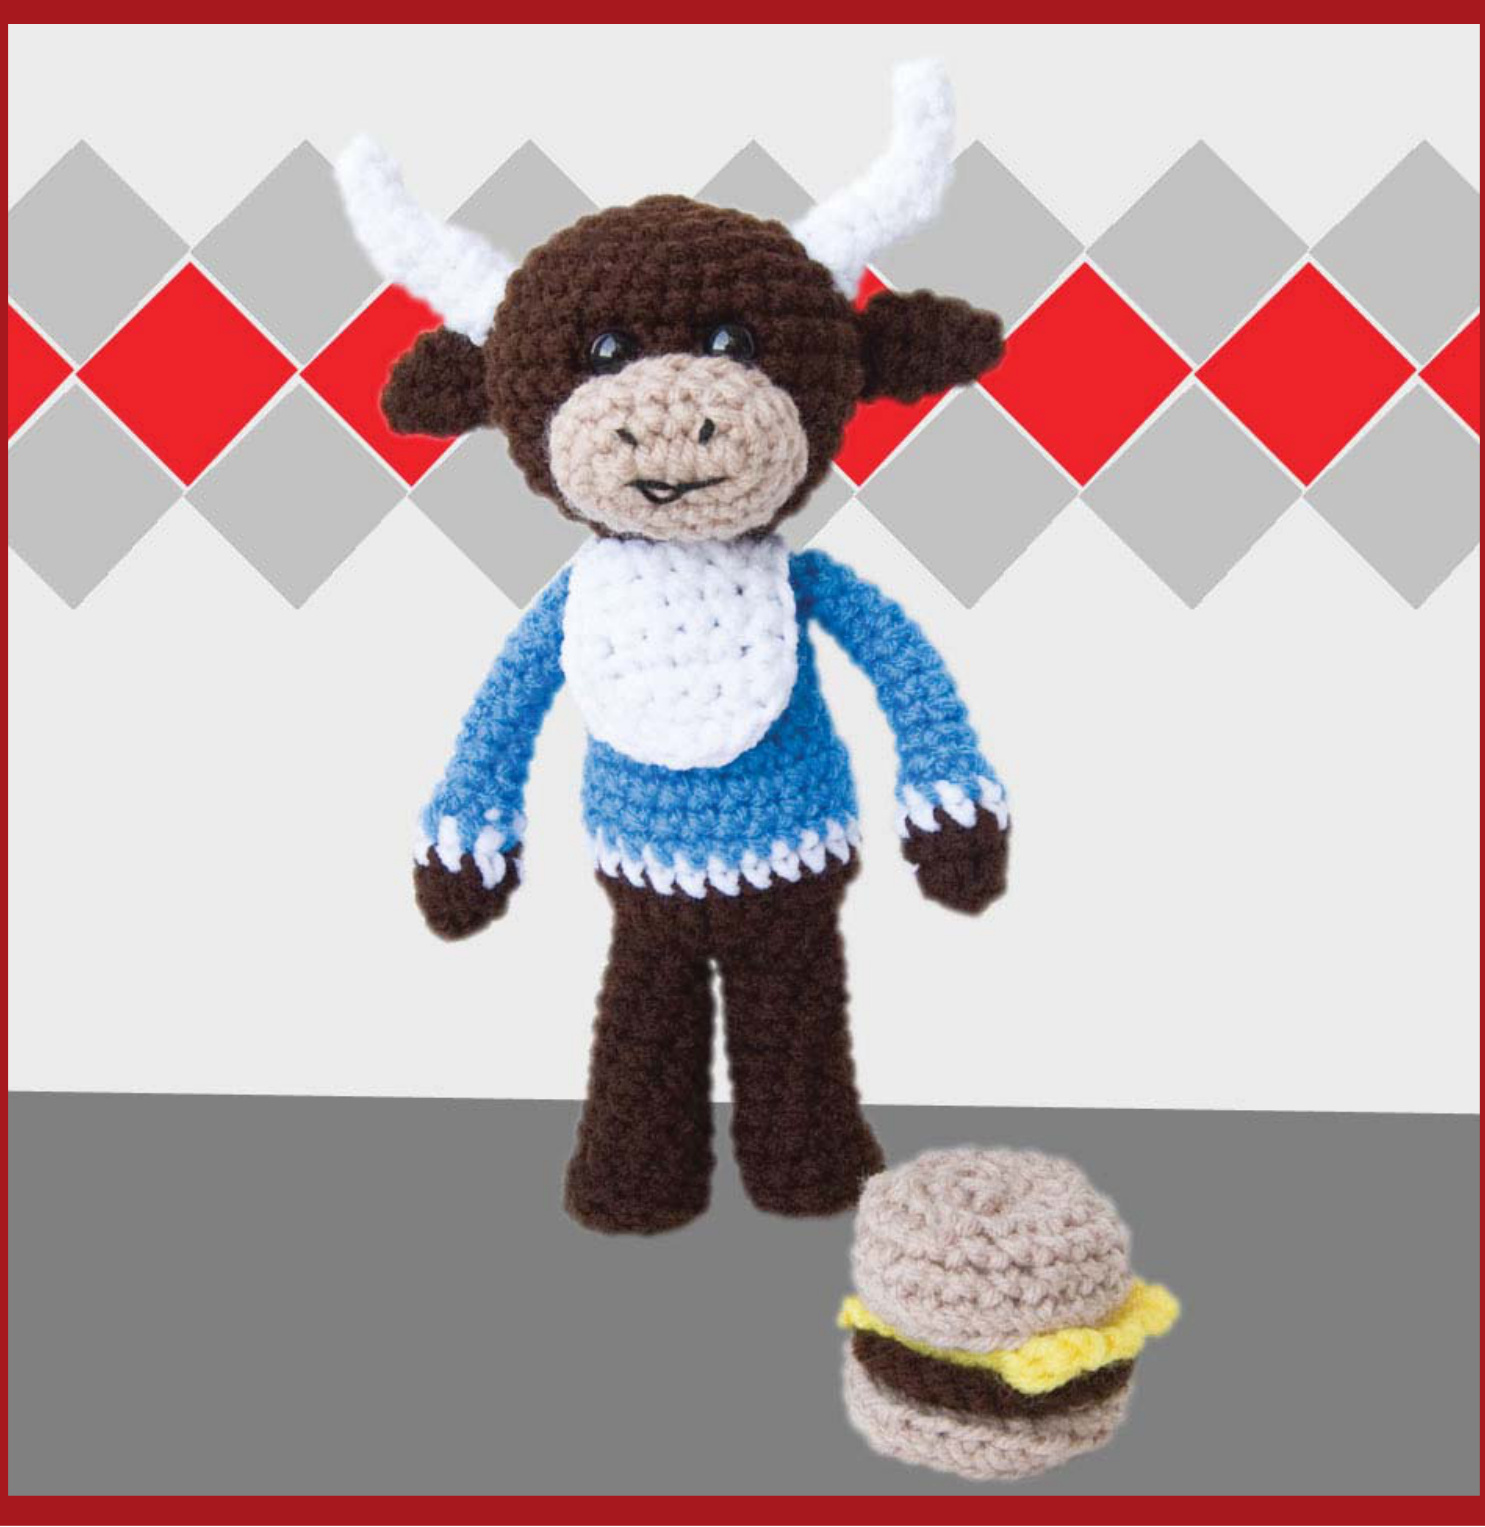
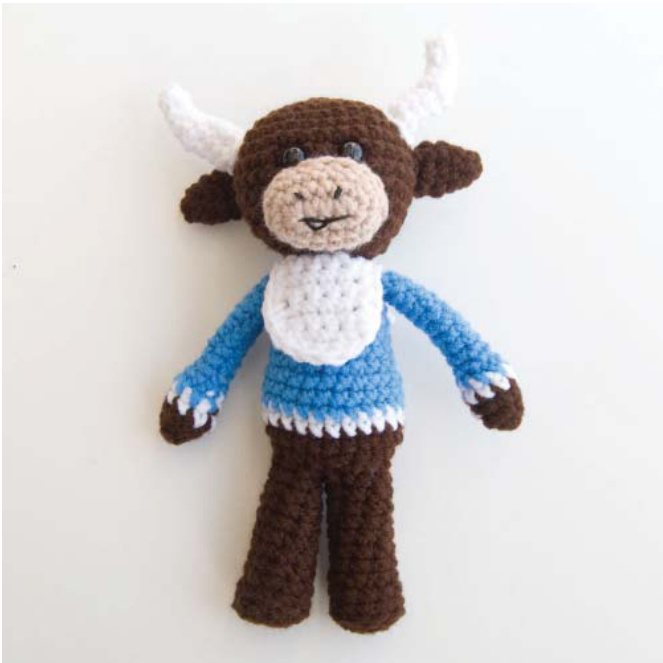
Clem's Little Secret
Find More Patterns Online:
Etsy: http://theitsybitsyspider.etsy.com Blog: http://itsybitsyspidercrochet.blogspot.com
Clem's Little Secret
Many would argue that Clem is sick. But Clem maintains that it really was just a big misunderstanding. After all, the menu he found in that diner last summer clearly read \*ham\*burger — and ham is supposed to be pork... Right?
He fell in love at first bite. Who could resist? And now — when he thinks the rest of the herd isn't looking - Clem puts on his little bib and slips off to that fateful diner. Oh, Clem.
MATERIALS
Worsted weight acrylic yarn in dark brown, tan, blue, white, and yellow (see pattern notes for specific colors used) Fiber fill 9mm black safety eyes Black embroidery floss G Hook (4.25mm) Yarn Needle Embroidery needle Stitch Marker
STITCHES&ABBREVIATIONS
CH Chain Stitch SC Single Crochet HDC Half Double Crochet DC Double Crochet TC Treble (Triple) Crochet DECR Single Crochet Decrease SL Slip Stitch ST/S Stitch/Stitches MM Move Marker FO Finish Off
PATTERN NOTES
For the project used in the photos, I used Red Heart Super Saver yarn in the following colors: 0365 Coffee 0360 Cafe 0311 White 0885 Delft Blue 0324 Bright Yellow Plastic safety eyes like those used in the pattern photos are readily available at some craft stores and through online sellers. My favorite supplier for quality safety eyes and noses is 6060 Eyes. You can purchase online through: Etsy (http://6060.etsy.com) Artfire (http://6060eyes.artifre.com) Web Site (http://www.6060eyes.com)
6060eyes.com
Safety Warning: When determining whether to use buttons or other small embellishments, keep in mind the age of the intended recipient. Doll eyes and other decorations may pose a choking hazard for children under three. A safer alternative for the very young is to sew eyes and any other decorations using embroidery thread or yarn.
COPYRIGHT
Copyright 2011 by Karla Fitch. No part of this pattern may be reproduced or disseminated in any other way without express written consent from the author.
PART 1: LEG 1 (MAKE 1)
The legs are made separately using dark brown yarn and then joined together to work up the body in a single piece. Because this piece is made in a spiral, you may want to use a stitch marker to keep track of your rounds.
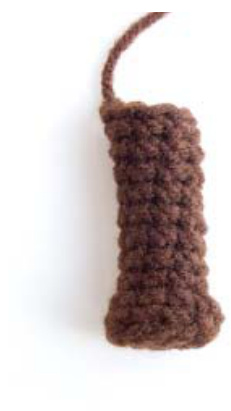
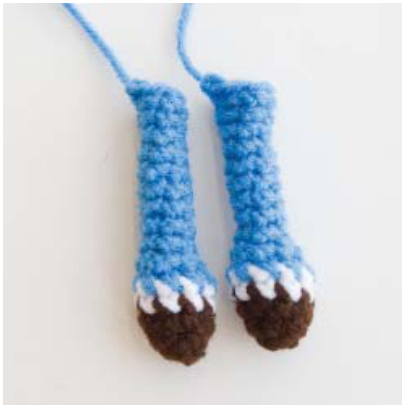
Round 1: CH 2. 6 SC in second chain from hook. Place stitch marker in the last SC to mark the end of the round. Round 2: \*2 SC in first ST. SC in each of the next two STS. Repeat once from \* (8 SC). MM. Round 3: \*2 SC in first ST. SC in each of the next three STS. Repeat once from \* (10 SC). MM. Round 4: Working in back loops only, SC in each ST around (10 sC). MM. Note: The remaining rounds are worked in both loops. Round 5: SC in each ST around (10 SC). MM. Round 6: \*DECR across first two STS. SC in each of the next two STS. Repeat once from \* (8 SC). MM. Rounds 7-13: SC in each ST around (8 SC). Note: FO after round 13 and tuck end inside piece. Stuff thoroughly.
PART 2: LEG 2 AND JOINING
To make the second leg, follow the instructions from Part 1: Leg 1 through round 13. Stuff the leg, but do not finish off. After stuffing leg 2, hold the two legs together (as shown below) and SC through both pieces:
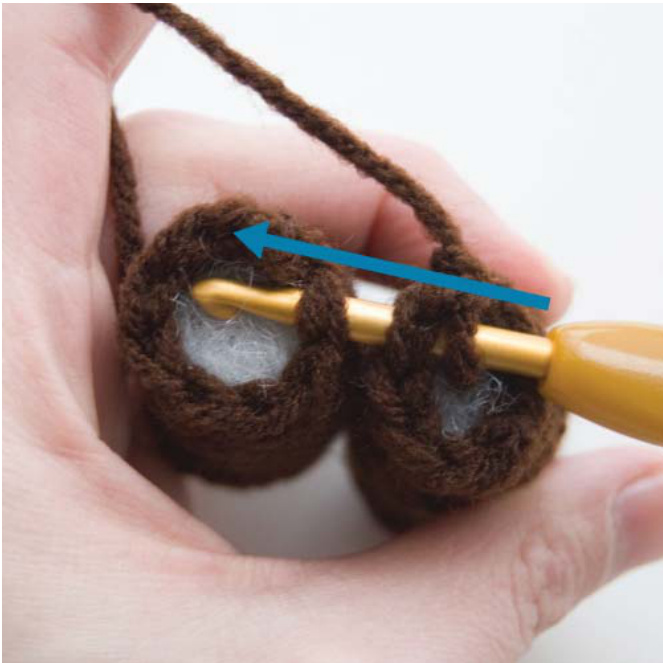
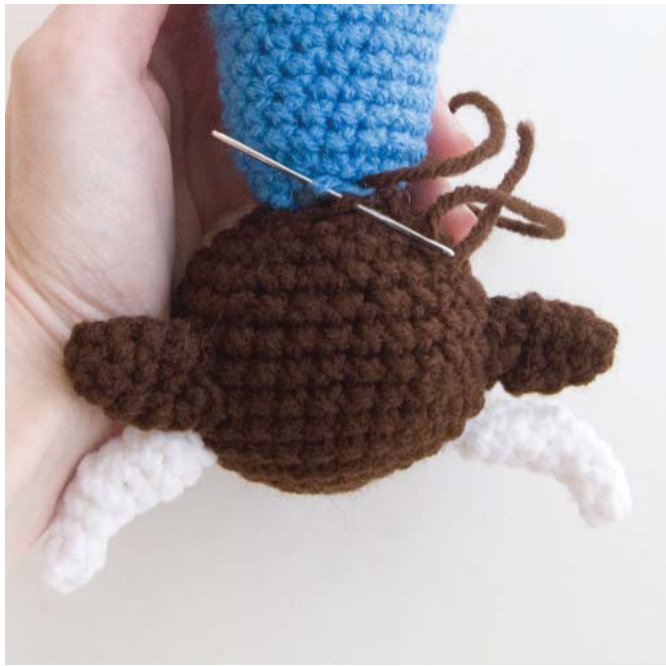
Work a second stitch through both legs to fasten them together. Your piece will appear as shown below: Beginning with the next stitch in the leg on the left
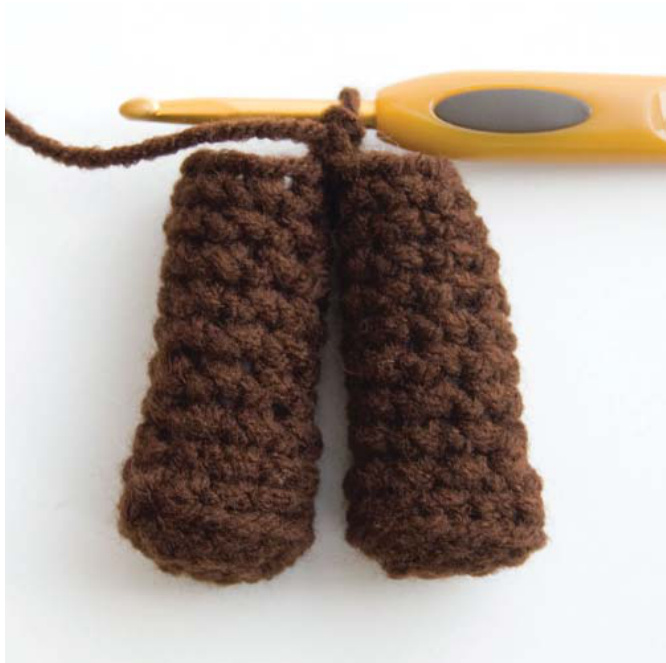
SC evenly around the outside of both legs to create a single round with 12 STS. Continue with Part 3: Body.
PART 3: BODY
The body is made with three different colors: dark brown, white, and blue. To make the color changes, break your working yarn and join the next color. Because this piece is made in a spiral, you may want to use a stitch marker to keep track of your rounds.

Note: Round numbering starts with #1, however; this piece is continued from Part 2: Leg 2 and Joining. Round 1: (with dark brown) \*2 SC in first ST and SC next. Repeat from \* around (18 SC). MM. Round 2: \*2 SC in first ST and SC in each of the next two STS. Repeat from \* around (24 SC). MM. Note: Break dark brown. Join white. Round 3: SC in each ST around (24 SC). MM. Note: Break white. Join blue. Rounds 4-5: SC in each ST around (24 SC). MM Round 6: \*DECR across first two STS, SCin each of the next two STS. Repeat from \* around (18 SC). MM. Rounds 7-11: SC in each ST around (10 SC). MM. Round 12: \*DECR across first two STS, SC in next. Repeat from \* around (12 SC). FO and stuff.
PART 4: MUZZLE
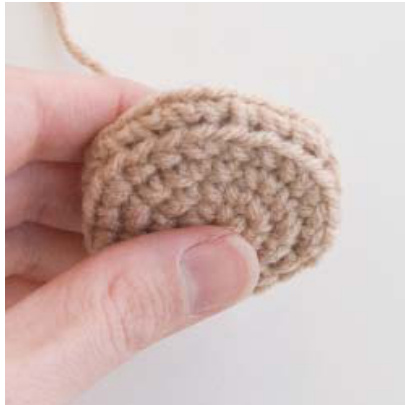
To make the muzzle, we will start with an oval shape and increase in a spiral. Use tan yarn for this piece. Round 1: CH 5. 2 SC in second CH from hook and 1 SC in each of the next 2 STS. Work 4 SC in last CH and then rotate piece 180 degrees so the bottom loops from the foundation chain are facing up. SC in each of the next 2 STS and work 2 SC in remaining ST (12 SC). Place stitch marker in the last SC to mark the end of the round.
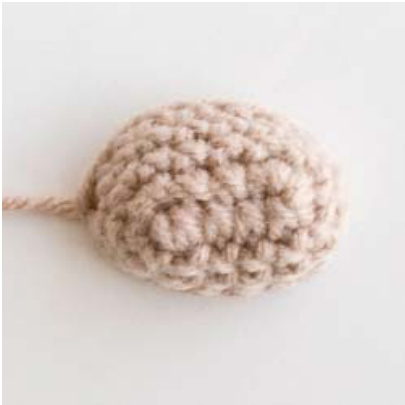
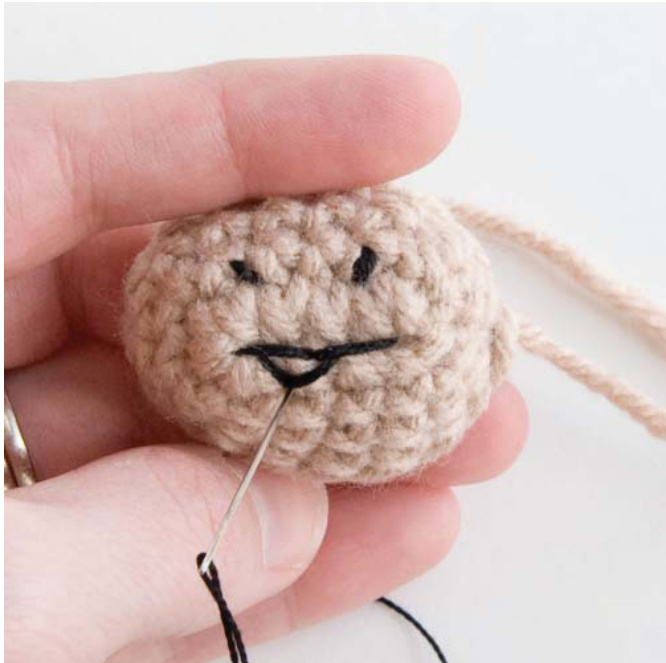
Round 2: 2 SC in first ST and SC in each of the next four STS. 2 SC in each of the next two STS, then SC in each of the next four STS. Work 2 SC in the last ST (16 SC). MM. Rounds 3-4: SC in each ST around (16 SC). Note: FO after round 4, leaving a tail for sewing. Then, using black embroidery thread, stitch nostrils and mouth as shown below.
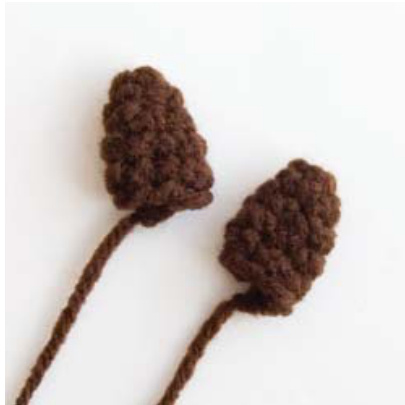
PART 5: HORNS (MAKE 2)
The horns are made in a spiral, using white yarn. Because the spiral is rather tight, there should be no need to stuff the horns.

Round 1: CH 2. 4 SC in second chain from hook. Place stitch marker in the last SC to mark the end of the round. Rounds 2-3: SC in each ST around (4 SC). MM. Round 4: \*Work 2 SC in first ST and 1 SC in next. Repeat once from \* (6 SC). MM. Rounds 5-6: 2 SC in first ST and SC in next. DECR across next 2 STS, then SC in each of the remaining 2 STS (6 SC). MM. Rounds 7-8: SC in each ST around (6 SC). MM. Note: FO after round 8, leaving a tail for sewing.
PART 6: EARS (MAKE 2)
The ears are made in a spiral, using dark brown yarn. Round 1: CH 2. 4 SC in second chain from hook. Place stitch marker in the last SC to mark the end of the round.
Round 2: \*Work 2 SC in first ST and 1 SC in next. Repeat once from \* (6 SC). MM. Round 3: SC in each ST around (6 SC). MM. Round 4: \*Work 2 SC in first ST and 1 SC in each of the next two STS. Repeat once from \* (8 SC). MM. Round 5: \*DECR across first two STS and SC in each of the next two STs. Repeat from \* once more (6 SC). Note: FO after round 5, leaving a tail for sewing. Pinch ears flat.
PART 7: UPPER HEAD
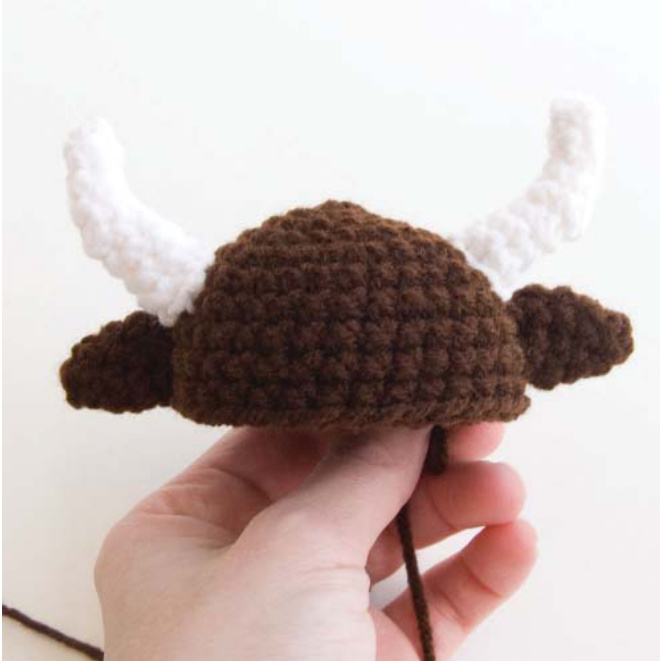
Construction of the head is divided into two parts, with separate assembly instructions at the end of each part. The upper head portion creates the top of the head and takes you through attachment of the horns and ears. Use dark brown yarn. Round 1: CH 2. 6 SC in second chain from hook. Place stitch marker in the last SC to mark the end of the round. Round 2: 2 SC in each ST around (12 SC). MM. Round 3: \*2 SC in first ST and 1 SC in next. Repeat from \* around (18 SC). MM. Round 4: \*2 SCin first ST and 1 SCin each of the next two STS. Repeat from \* around (24 SC). MM. Round 5: \*2 SC in first ST and 1 SC in each of the next three STS. Repeat from \* around (30 SC). MM. Rounds 6-10: SC in each ST around (30 SC). MM. Note: Stitch horns in place opposite each other, just below round 4. Stitch ears slightly behind and below horns.
Continue with Part 8: Lower Head.
PART 8: LOWER HEAD
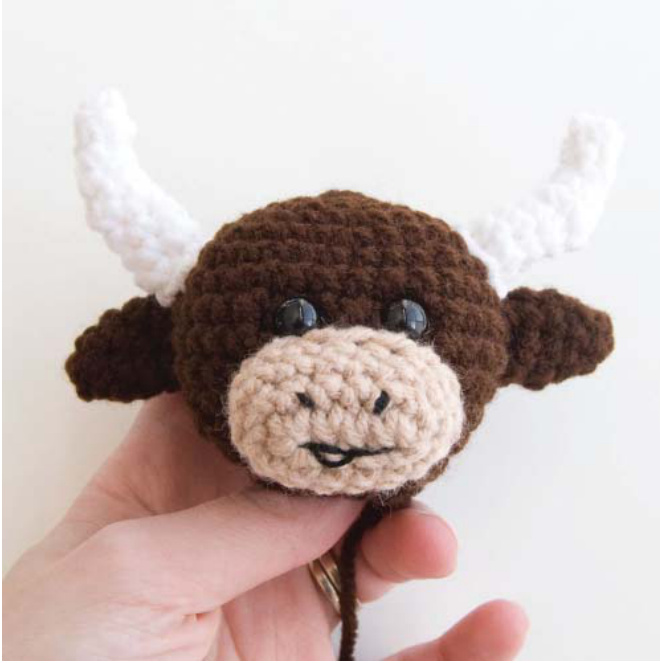
The lower portion of the head (continued from Part 7: Upper Head), adds a few more rounds so that you can sew the muzzle in place. Note: Round numbering is continued from Part 7: Upper Head. Round 11: \*DECR across first two STS and SC in each of the next three STS. Repeat from \* around (24 SC). MM. Round 12: SC in each ST around (24 SC). MM. Round 13:\*DECR across first two STS and SCin each of the next two STS. Repeat from \* around (18 SC). MM. Note: Place a small amount of stuffing in the muzzle and stitch in place just below round 8. Fasten eyes above muzzle.
Round 14: \*DECR across first two STS and SC in next. Repeat from \* around (12 SC). FO, leaving a tail for sewing.
PART 9: ARMS (MAKE 2)
Like the body, the arms are made with three different colors: dark brown, white, and blue. To make the color changes, break your working yarn and join the next color.
Round 1: CH 2. 4 SC in second chain from hook. Place stitch marker in the last SC to mark the end of the round. Round 2: \*Work 2 SC in first ST and 1 SC in next. Repeat once from \* (6 SC). MM. Round 3: \*Work 2 SC in first ST and 1 SCin each of the next two STS. Repeat once from \* (8 SC). MM. Note: Break dark brown. Join white. Round 4: SC in each ST around (8 SC). MM. Note: Break white. Join blue. Round 5: SC in each ST around (8 SC). MM. Note: Place a small amount of stuffing in the fist. Round 6: \*DECR across first two STS and SC in each of the next two STS. Repeat from \* once more (6 SC). Rounds 7-15: SC in each ST around (6 SC). MM. Note: FO after round 15, leaving a tail for sewing.
PART 10: ASSEMBLY
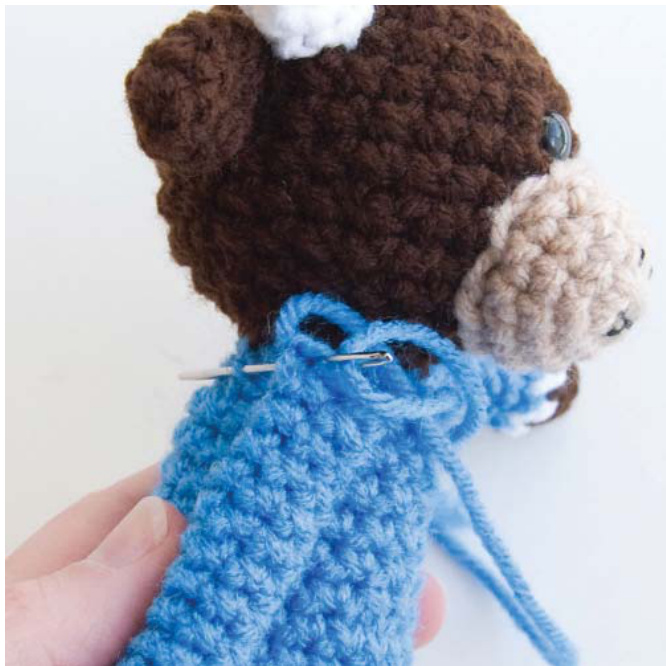
1. Begin by attaching the head to the body, using the tail left over from Part 8: Lower Head.
TIP: make sure there is enough stuffing in both the head and the body so that the neck portion is filled when you sew the body together! 2. Stitch the arms in place on opposite sides of the body.
And Clem is done! But wait... We have a problem. .Clem is getting hungry!
PART 11: BIB
Clem has to make sure the rest of his herd doesn't find out about his guilty snacking, so he keeps his sweater clean with a little bib. Work the bib in rows, using white.
Row 1: CH 6. SC in second CH from hook and in each across. CH 1 and turn. Rows 2-5: SC in each ST across (5 SC). CH 1 and turn. Row 6: SC in second CH from hook and in each of the next two STS (3 SC). FO. To make the bib ties... Round 1: CH 15. Join to bib in the side of the first ST in row 1. SC evenly around the outside of the bib until you reach the last ST in row 1, then CH 15. FO and weave in ends.
Grrrrrrumble.... Clem. Want.
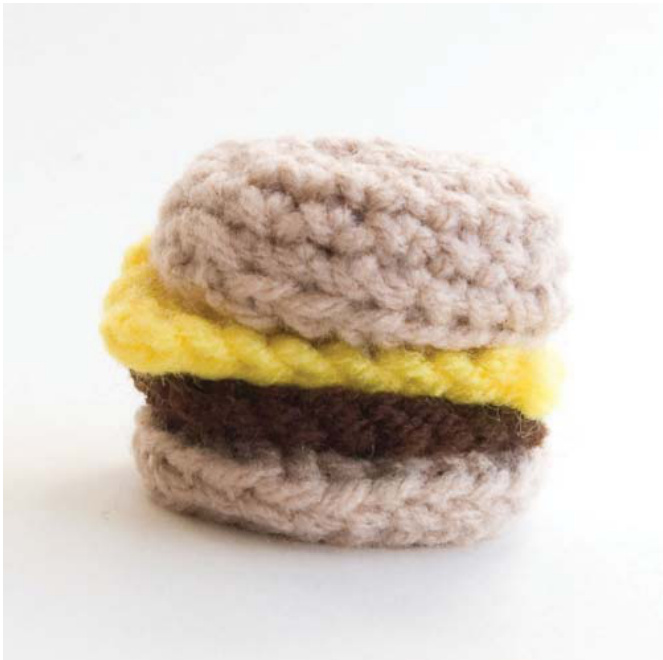
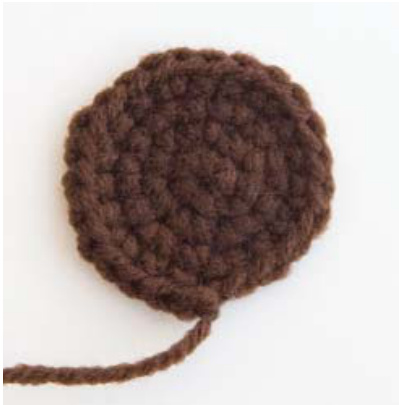
PART 12: BOTTOM BUN
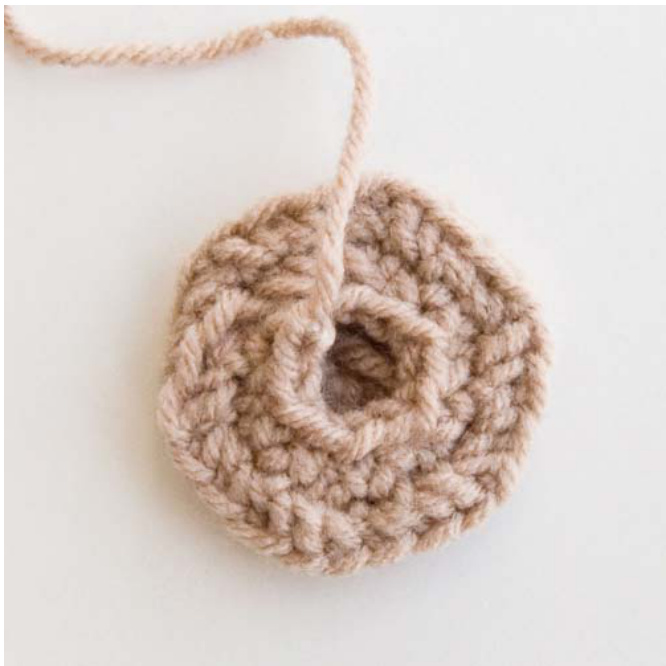
The bottom bun in made in a spiral with tan yarn. To get a nice bun shape, I worked in the back loops in round 5 and in round 6. This makes the decreases in round 6 a little difficult, but remember that this part will be partially hidden by the beef patty.
Round 1: CH 2. 6 SC in second chain from hook. Place stitch marker in the last SC to mark the end of the round. Round 2: 2 SC in each ST around (12 SC). MM. Round 3: \*2 SC in first ST and 1 SC in next. Repeat from \* around (18 SC). MM. Round 4: \*2 SCin first ST and 1 SC in each of the next two STS. Repeat from \* around (24 SC). MM. Round 5: (Working in back loops only) SC in each ST around (24 SC). MM. Round 6: (Working in back loops only) \*DECR across first two STS and SC in each of the next two. Repeat from \* around (18 SC). MM. Round 7: (Working in both loops) \*DECR across first two STS and SC in next. Repeat from \* around (12 SC). FO, leaving a tail for sewing. Note: your finished bun will have a hole in it, but this side will be covered by the beef patty.
PART 13: BEEF PATTY
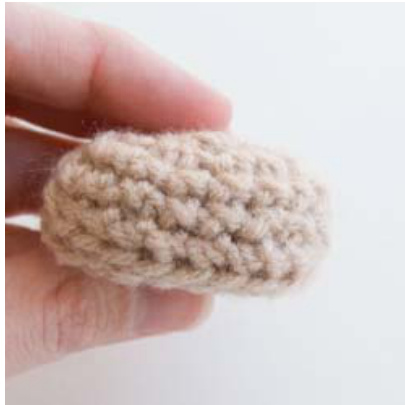
Use dark brown yarn to make this simple fourround spiral. Round 1: CH 2. 6 SC in second chain from hook. Place stitch marker in the last SC to mark the end of the round. Round 2: 2 SC in each ST around (12 SC). MM. Round 3: \*2 SC in first ST and 1 SC in next. Repeat from \* around (18 SC). MM. Round 4: \*2 SC in first ST and 1 SC in each of the next two STS. Repeat from \* around (24 SC). FO and weave in tail.
PART 14: CHEESE
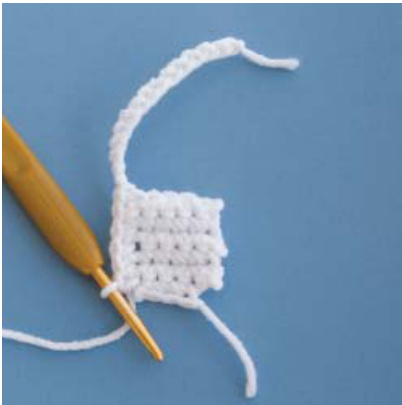
The cheese is worked in rows using yellow yarn. Row 1: CH 9. SC in second CH from hook and in each across (8 SC). CH 1 and turn.
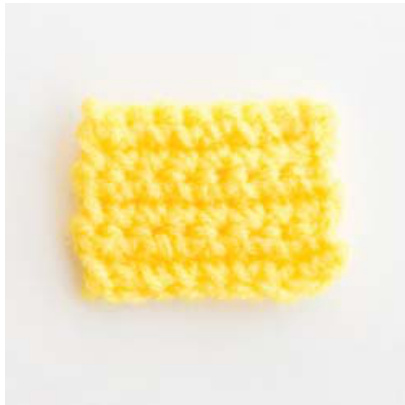
Rows 2-5: SCin each ST across (8 SC). CH 1 and turn. Row 6: SC in each ST across (8 SC). FO and weave in ends.
PART 15: TOP BUN
The top bun starts the same way as the bottom, but decreases more slowly to get a puffed top. Use tan yarn.
Round 1: CH 2. 6 SC in second chain from hook. Place stitch marker in the last SC to mark the end of the round. Round 2: 2 SC in each ST around (12 SC). MM. Round 3: \*2 SC in first ST and 1 SC in next. Repeat from \* around (18 SC). MM. Round 4: \*2 SCin first ST and 1 SC in each of the next two STS. Repeat from \* around (24 SC). MM. Round 5: (Working in back loops only) SC in each ST around (24 SC). MM. Round 6: \*DECR across first two STS and SC in each of the next two. Repeat from \* around (18 SC). MM. Round 7: SC in each ST around (18 SC). MM. Round 8: \*DECR across first two STS and SC in next. Repeat from \* around (12 SC). FO, leaving a tail for sewing. Note: Stuff the top bun thoroughly. Round 9: DECR around (6 SC). FO, leaving tail fon sewing. Note: Gather remaining STS on the top of the bun using the leftover tail, then sew through the bun to close up the top.
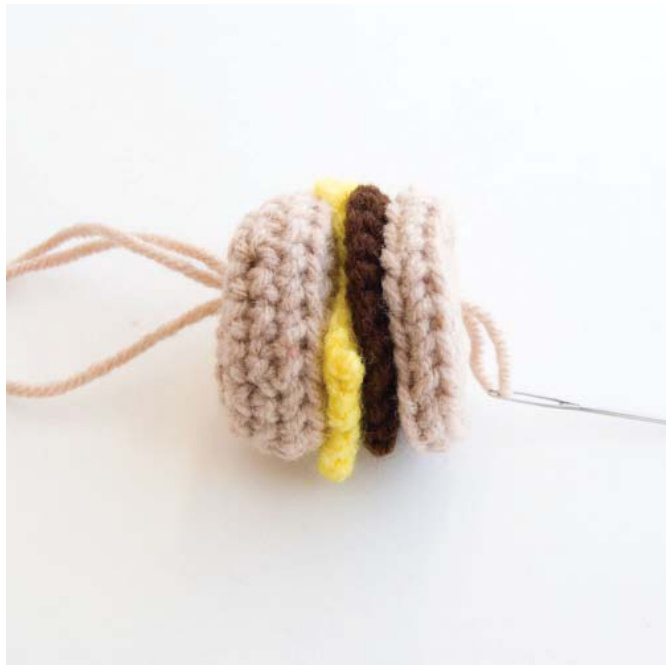
PART 16: ASSEMBLY
1. Thread tail from bottom bun onto your yarn needle, then sew through the middle of each piece in this order: Bottom Bun Beef patty Cheese Top Bun 2. Return back through the burger (as shown below) and knot off. Weave in end.
Just in time... I think Clem is ready to eat!