Crocheted Ropes
Just For Fun Designs and Ideas To Play with Assembled By Kathryn A White
Crocheted Ropes This set of patterns and ideas are for your crocheted ropes. There are two methods of doing the rope both are called a crocheted rope. Confusing Right? But both are valid and have their own uses. I am not going to claim these are original designs. Some of the ideas are but as far as the patterns for the ropes go they are so basic I can not believe that they have not been done before. I worked out the patterns myself and did not use anyone's else's patterns. But I still don't consider them original, Just figured I took my own path to get to a known place. The first is the Slip Stitch method. Gives a nice tight stitch great for the more intricate designs. A little over whelming to learn for some people but worth it in the long run. I have tried to give a set of directions that explains it a little differently than I have found. But what made it work for me. Done normally with. larger beads and thread than I am used to using. Though I still gravitate to the smaller beads. Just takes me longer to get where I want to go. The second method is the Single Crochet Rope. I use this one a lot for my handles on my purses. Since I do not want the handle to overshadow the design of the purse and I keep them fairly simple. The advantage of this method is it does work up faster. I can use the smaller beads and thread with this method and still get done in a reasonable amount of time. That way I can use the same size beads and thread for the handle as I used in the purse. Ties it all together better.I also like it for some of the simpler necklaces and ropes. It does seem to be more flexible than the slip stitch ropes and makes the piece seem more fluid.
Materials:
I am not going to lock you into using a certain type or size of either thread or beads. That is what makes these so much fun as you can do them with any color or size of beads and any type of thread.
Threads
Ihave heard a lot of arguments for the nylon threads. Strength, no stretching, colorfast. Allare good reason to use them.lam not comfortable working with them though, they feel stiff and slippery to me. But that is my own personal preference and Please judge for your self. Pearl cotton thread, I know a lot of people use this thread with a size 11 bead or larger. I like the cotton threads. Just a old fashioned lady I guess. I like the feel in my hands and I don't feell am sacrificing to much by sticking to them. Just try and use the best quality possible. Most of the pieces I have done are with a size 30 thread or a size 50 thread. But please use what you are comfortable with. Itis your creation and you should enjoy making it BeadsYou can use almost any size bead you care to. I have seen some ropes done in what must be 8mm garnets that were really beautiful. Beads, stone chips. Though Size 11 seed beads with about a size thirty thread seems to be about the most common sizes I have seen used. Single Crochet rope Also know as Crocheted rope String the number of beads called for in the pattern or suffiencient mixed or plain to get you a fair distance into your piece. I normally string about 1500 beads at a time. If there is a pattern to the handle than you must string the beads in a certain order. There should be one more bead to your first pattern than you will crochet in each row. Example a pattern of 9 beads (4 black, 1 red, 4 black )would be worked on a round of 9 beads Per row. Do ( 5 black, 1 red, 4 black.) This will make your pattern spiral around your handle. In other words you want to be offset by one bead each rnd. Once you have strung all the beads on the thread, then ch. 4 sl. st. to form ring. work eight sc in ring. Or the desired number of stitches you want in a round. do not join when you come back around but start adding beads Begin a sc. stitch, when you have the loop caught up and through. (Two loops on hook.) Move a bead behind stitch before finishing your stitch. Continue working one bead per stitch in this manner around. continue around in one big long loop tillyou run out of beads or reach the length you so desire. Be careful not to drop or add any stitches or you willose your pattern and the rope will vary in thickness. Check your pattern and number frequently. End off and work tail into the rope.
Slip stitch rope Also known as a Crocheted rope.
To begin a slipstitch rope you willsring your beads as needed. either in a patern or solid. decide how many stitches you want on a round and do a chain with a bead in each stitch for the desired number. Join at the beginning of the row by sliding the hook under the first bead of your chain. rollthat bead behind your hook, away from you. This is the key to making this work. If the bead is in front of your stitch the thread crosses over it and pushes it into the middle of your rope on the inside. Be sure that your thread lays over the bead and not under it or it will undo the purpose of moving the bead in the first place. Bring the next bead up next to your work and finish a slip stitch. slide the hook under the next bead, again be sure that the bead is pushed over the hook and is behind it, bring the next bead up behind and finish your slip stitch. continue on in this manner until the length you so desire. This works for either left or right handers. The right hander pushes the bead to the right and the left hander pushes it to the left.
Joining in a new thread
The way you add a new thread when you need to is, When you get to the end of your beads on the first section you pullup your loop, but not through and cut off thread leaving about a 4 inch tail Bring your freshly strung bead thread up next to your first section With your hook through the loop on the first section tighten loop to a normal tension and hold tail next to rope with middle finger of the thread hand ( the one that holds and feeds your thread to your work. ), add end of new thread to the same place side by side. Keeping the tension as normal as possible draw a loop through your loop with the new thread. Now comes the tricky part stilkeeping the tension as normal as possible move your two tails across the front of your hook and across your rope and hold behind the rope again with the middle finger of your thread hand. Keeping the tension right can be difficult a first but with practice you can get the technique down. Now insert your hook under the next bead and complete a slip stitch. Work a few more stitches then go back and tie a square knot in you two tails up close to the inside of your rope. Now keep working around your rope in the normal manner keeping your two tails out of the way but behind your work. when you have worked about an inch or more trim off the ends of the tails and continue on. You should have a joining that is invisible yet strong, when done in this manner. Your tail will be on the inside of rope and safe.
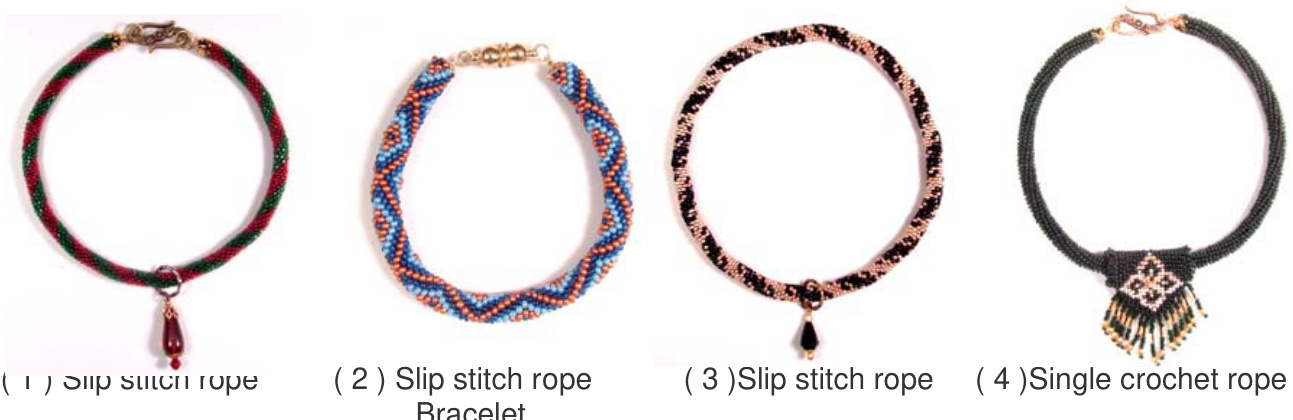
( 5 )Single Crochet rope ( 6 )Single Crochet rope (7)Slip stitch rope (8) Slip stitch rope and Bracelet
Charts and Ideas
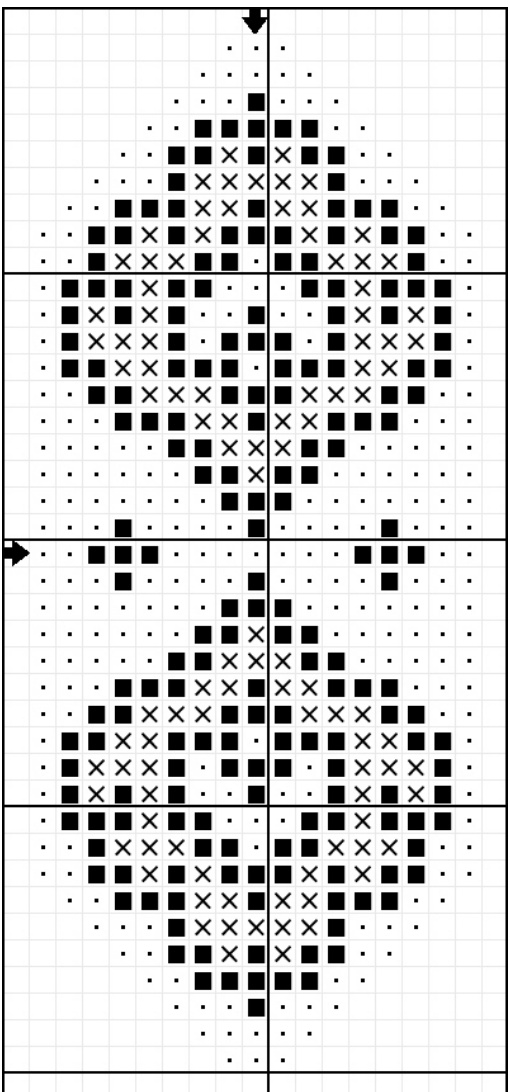
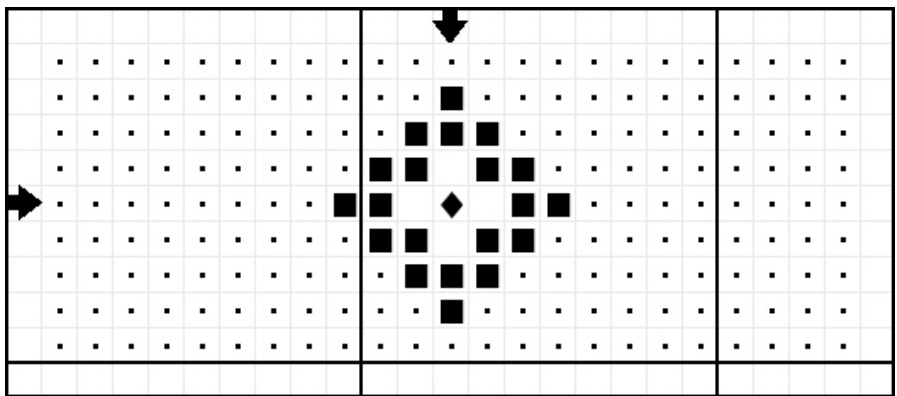
Slip Stitch Charts

Remember that if your are right handed you will be working counter clockwise and if you are left handed you willbe working clockwise. This is important when doing a pattern especially if it is an offset pattern. you must string your beads in the proper order or your patern wont work out right. All my patterns string right to left for a left hander and left to right for a right hander. I also sting from top to bottom of the chart. If uncertain do a test piece of about four patterns I certainly do not want to string several hundred beads on a thread only to find out I have them strung backwards. Slip Stitch rope ( 1 ) does not need a chart it is very simple to string. String! $^\star4$ beads of color number 1 and 4 beads of color number $z^{\star}$ Repeat from \* to \* as many times as desired. Using two different size beads can give an interesting effect.
Single Crochet Slides Charts
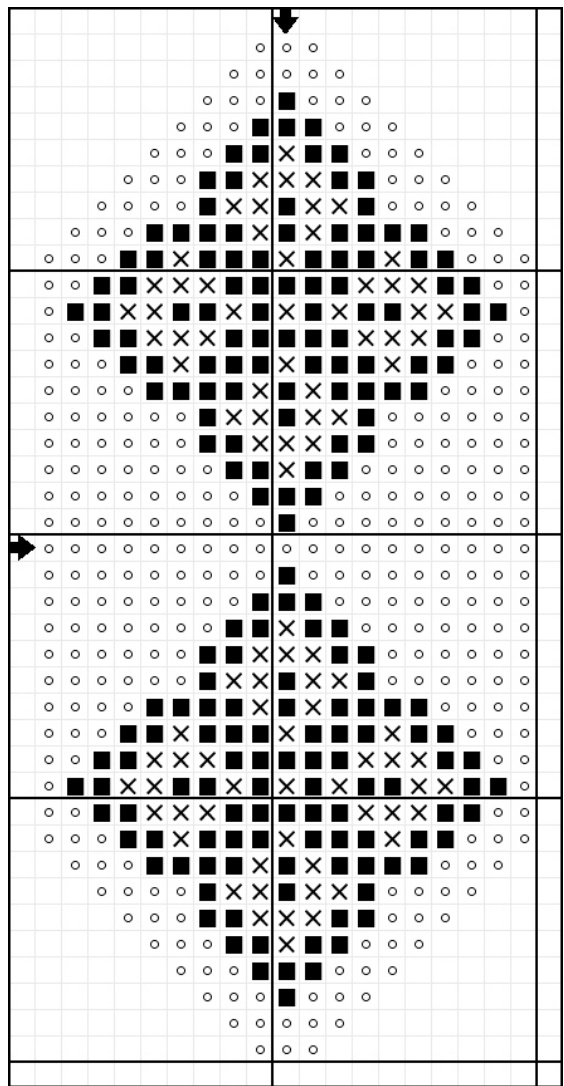
To make the slide you will crochet a strip according to the chart. Work from top to bottom of chart There are no beads where there are no symbols. This gives you room for the sew on rhinestone. I strung the rhinestone on with my beads and whenI was finished I sewed it down again with sewing thread. Sew up sides, short side to short side right sides facing.turn right side out and slide onto rope. Should be snug.
General Crochet Instructions
Once the beads have been strung, chain a chain of one stitch more than the number of beads of the first row. A row of 55 beads you would chain 56. Turn skip first chain and work a sc. in each ch. to end, ch. 1 turn. There are no beads worked onto this first row. It gives you the bottom edge to attach you fringe to. when you put your purse together. Now you will begin working the beads in as you go. Begin a sc. stitch, when you have the loop caught up and through. (Two loops on hook.) Move a bead behind stitch before finishing your stitch. Continue working one bead per stitch in this manner across row. End off with a sl. st. in the row below, Cut thread and pull thread through again at end of row. The beads will always be on the back side of your work. (Away from you.) Do not Turn. Return to the beginning of the row. With the beads facing away from you, pulla loop through the first st, chain one, pull another loop through in same stitch {two loops on hook} finish st. with a bead. Then work a sc. and a bead in each remaining stitch across again, working the beginning tail of the row you are working on under your sc. as you start across.7-12 stitches should be enough to lock your thread into place. As you approach the end of the row 7-12 stitches from the end, pick up end tail from last row and work under the remaining stitches. This will work all your ends in as you go. Trim any. excess away occasionally as you work or they can get in your way. End off as before with a sl. st. into the sl. st of the previous row, cut thread and pull through again . This will give you a clean edge to sew your piece together with. Working down to a point can be a litle tricky but can be done. Continue working in this manner. Following the chart of your choice. Twisted fringe This fringe is an easy attractive fringe. It is much easier to do this if piece is clamped to a solid surface. Attach your thread to your to the end of the rope Be sure that your thread comes out the bottom of one of your beads on the rope once you have attached. String beads according to instructions above. Once you have, your beads strung draw thread through the bead on the rope in the same place as you came out of. Pull thread through work until you have about six to eight inches remaining. Push beads up against rope. Grasping the thread, hold beads up against the rope with your right index finger and thumb, grasp thread just below with left hand in the same manner. Now you wilitwist the thread held by the right hand clockwise. Get a fresh grip with your left hand and twist again with your right hand. Keep a slight tension on the thread at all times. Repeat this procedure until you have twisted the thread the desired number of times. 12 to 18 times normally does the job. Keeping a grip on the thread with the right hand, reach up with the left and finish pulling the thread through your rope until it is almost all the way through. Be sure to keep the beads pushed up against the rope. Don't pu the thread up snug at this point. Leave just a little slack. Release the thread held by your right hand and watch them spiral into place. If they don't seem to spiral, back off your thread a tad. Once the beads have spiraled you can finish drawing the thread through. Not to tight though or you'll pull out your twist. When you have your tension adjusted, draw thread through one more time to lock it in place. Move over one bead width and repeat. By adjusting the tension, you should be able to get the same number of twists on each strand of fringe
Straight line fringe It is much easier to do this if piece is clamped to a solid surface.
To begin your fringe, you want to thread a beading needle with about three feet of thread. Too much thread will cause you to fight tangles, too little and you will be changing thread all the time. Draw thread through from front to back. What ever you chose to do be consistent Attach the thread in the corner of you work. I draw threaded, needle through the corner stitch, and tie a knot. Thread allthe beads you want for one strand of fringe on your thread in the order you so desire. Working from top to bottom. So, what ever goes up next to the purse is strung first. Run thread back up through the beads Except for the very last bead you put on. This willck your beads onto the string. If you desire the litle clover looking end to your fringe then run the thread back up through your beads Except for the last three beads you strung. Draw up snug to the piece. Not to tight or your strands will want to curl, and not to loose or you will have a gap of thread showing. Pass needle and thread through the piece at the same place as you started. Check your tension and draw through once more. This will lock your strand into place. Draw through in the next spot you want a strand of fringe. Move over about one bead width. Repeat process across the bottom of the piece. Work all thread ends into the piece.
Clasps
You can use any clasps that you so desire.like the S style as they are easy to put on by your self and are easy to use by either a right or left hander. Stone caps with loop on top and sew holes in design work well to use on the ends of your rope to attach your clasp to. Simply slide over end and sew on with matching thread. Use a jump ring to attach clasp to end and you are good to go. If your have miscalculated and your rope is a little short, just add a smalliength of chain between the jump ring and the stone cap. As seen on Design( 6) allows you to custom fit your choker or necklace. You can even use a simple sew on snap as a closure.I used a number three snap on my number three design. I also like a magnetic clasp for people that have a lot of trouble dealing with small clasps, so easy to work. Dangles My dangles are strung onto a 2 inch head pin. Stringing the beads of your choosing, add bead caps or whatever strikes your fancy. A loop is created at the top using a pair round nose pliers Snip of excess wire with a pair of side cutters. Use the ring half of a toggle clasp that is large enough you can slide on to your rope. Attach you dangle to toggle piece using ajump ring. Sometimes it is better to slide on rope before attaching a your stone caps or what ever you choose to end your rope with.
Individual Designs
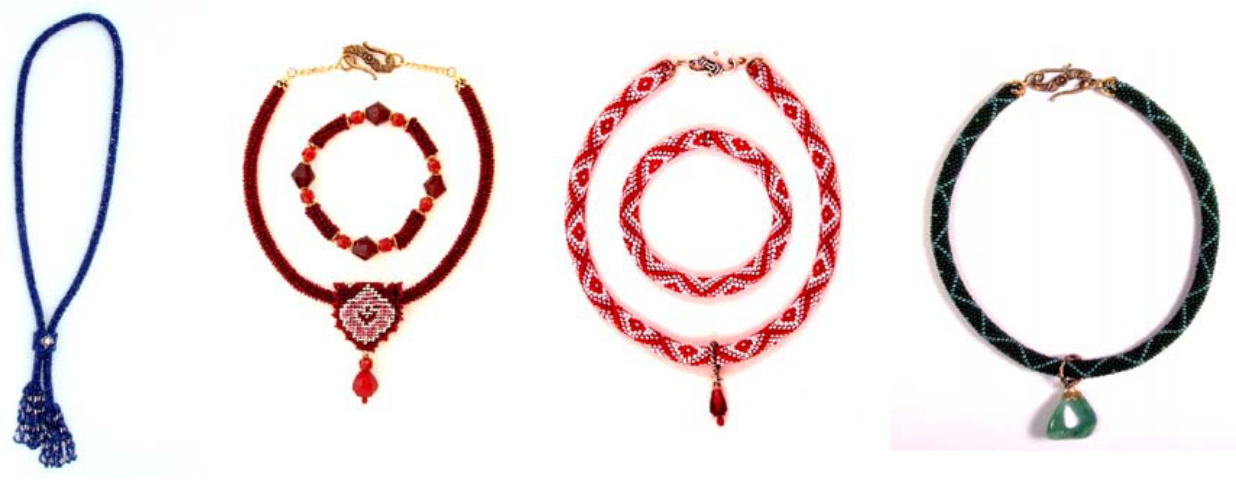
(1) Slip Stitch Design of a simple spiral of two colors.finished with stone caps and S style clasp. Simple teardrop dangle. This is good first piece for the slip stitch rope as it is easy to see the design, and know if you are correct. Slip Stitch rope ( 1) does not need a chart it is very simle to string. String $^\star4$ beads of color number 1 and 4 beads of color number $z^{\star}$ Repeat from \* to \* as many times as desired. Using two different size beads can give an interesting effect. (2) Slip Stitch Design Bracelet Diamond pattern. This is the most complicated of the diamond patterns. But oh so dramatic. Follow chart for design ( 2) I did two chart lengths to create a bracelet of 6 and $1/2$ inches including the clasp. This bracelet has a length of nylon coated beading wire worked through the rope and split rings crimped on to the ends of the wire. There is a small bead cap between the crimp and the rope. Magnetic clasp attached with the split ring. (3) Slip Stitch Design. This design makes me think of a flame. Done in two colors. Finished with a sew on snap as a closure and a simple dangle to set off the colors in the rope. Follow corresponding chart, I did 5 repeats of the chart, but this will vary depending on the size bead and thread you choose to use. (4) Single Crochet Design This Design is single color for the rope and slide done in two colors. The slide is crocheted and then edged by crocheting down the long sides of the slide. Edging String about hundred and fifty beads onto your thread With the beads facing away from you. Do a beaded sc. in the first st. \* slide four beads up next to piece and do another beaded sc in the next st. 1 beaded sc in next st. \* repeat from \* to \* until you get to the end. End off. Repeat process on the other side. The next step is to sew the piece together. With wrong sides together line up one end of slide to the. other. Sew together using a whip stitch. Do not sew up the sides. Follow instructions for the straight line fringe in the pattern of 5 main color, 1 contrasting bugle bead, 5 main color, 1 3mm crystal and 1 main color. There are about 15 strands of fringe. Slide the slide on to the rope. Attach stone caps and S clasp. ( 5) Single Crochet Design rope lariat with slide This crocheted rope necklace features a slide to help put this necklace on and off also comes in handy to adjust to different clothing. I made this one with vintage cut beads and it just sparkles in any light. Length $28"$ not including the fringe To make crochet rope necklace string a large number of beads on the thread. I strung about 2000 beads at a time. There are eight stitches per row for this pattern. Follow instructions for the single crochet rope. Check your pattern and /or number frequently. You will have to string beads several times to get the length you need. End off and work tail into the rope. Fringe For Design ( 5 ) There are seven or eight strands of Twisted fringe worked into the beginning and end stitches of the rope. The pattern for the fringe is as follows Follow instructions for the twisted fringe 15 blue, 3 crystal, 15 blue, 3 crystal, 15 blue, 3 crystal, 15 blue, 3 crystal, 7 blue. To make the slide you will crochet a strip according to the chart. Work from top to bottom of chart There are no beads where there are no symbols. This gives you room for the sew on rhinestone. I strung the rhinestone on with my beads and when I was finished I sewed it down again with sewing thread. Sew up sides, short side to short side right sides facing. turn right side out and slide onto rope. Should be snug. (6) Single Crochet rope and matching Bracelet. This Design is single color for the rope and a slide done in three colors. The slide is crocheted and then edged by crocheting around the edge of the slide. Edging String about two hundred beads onto your thread With the beads facing away from you. Do a beaded sc. in the first st. \* slide four beads up next to piece and do another beaded sc in the next st. 1 beaded sc in next st. \* repeat from \* to \* all the way around the edge of the slide. End off. The next step is to sew the piece together. With wrong sides together line up one end of slide to the other. Sew together using a whip stitch positioning the dangle at the point and sewing it in to place at the same time.. Do not sew up the sides Slide the slide on to the rope. Attach stone caps, chain and S clasp. Bracelet. This was done by doing four pieces of single crochet rope each about an 1 1/4 inch. Once these are done add a section of beads in between each section. It can take some playing with to get the look you want and the correct length to be usable. I put bead caps on the end of my ropes to give it a clean look. Once you have you design worked out to your satisfaction you willstring some stretch bead cord onto a needle. Tie a large bead on the end to keep it from passing through the piece. Pass needle and cord through \* a bead cap, section of rope, bead cap, a bead group, \* repeat 3 more times. Once you have allsections strung remove your holding bead and tie a square knot to join the ends of your beading cord together adjusting to get the fit you want. Trim of excess cord and work knot into one of the rope sections to hide the knot. (7 ) Slip stitch design Choker This is a variation of the diamond pattern done in three colors. Follow the corresponding chart to string your beads, I did 5 chart repeats to get the length I desired, but this will vary depending on the size bead and thread you choose to use. I used a size 12 bead and size 30 thread. Finished with stone caps and a magnetic clasp. Add a dangle that ties in with your colors. (8) Slip stitch design Choker This is the simplest of the diamond patterns, done in two colors. . Follow the corresponding chart to string your beads, I did 5 chart repeats to get the length I desired, but this will vary depending on the size bead and thread you choose to use. Finished with stone caps and S style clasp. Add the dangle of your choice. I have not given you a detailed materials list for each design. As I stated earlier I do not want to tie you into any one size bead, thread, or clasps. Most designs will use about one hank of beads for the main color or Approximately 30 -35 grams of beads, and 5 to 15 grams of the other colors depending on the design you choose. Use the colors that appeal to you and the size beads and thread you are comfortable with and havefun.


