Victorian Lace Poncho
Yarn: 8 balls Elann.com Sonata
color, light (Lilac), 2 balls Main Color, dark (African Violet), Edging: 3 balls Edge Color (Natural
Needles:
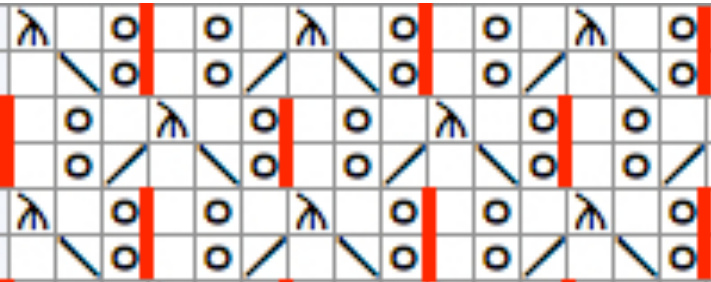
Start with 3.5mm (US 4) circular needle for first ball of yarn (Natural color), at each new ball of yarn, change needle to one size larger - Lace Stitches Used (All except Primrose Edging have been re-written for circular knitting.) English Mesh Lace (Multiple of 6) R1 (and all odd rnds): knit (When knitting back & forth in rows, odds will be WS rows and should be purled) R2: yo, sk, K1, K2tog, yo, K, rep around R4: yo, K1, SK2P, K1, yo, K1, rep around Next R1: knit around, moving all Lace Markers ahead 3 sts.
Horseshoe Lace (Multipleof 10) R1 & 3: Knit R2: yo, K3, SK2P, K3, yo, K1, rep. R4: K1, yo, K2, SK2P, K2, yo, K1, P1, rep. R5 & 7: K9, P1, rep. R6: K2, yo, K1, SK2P, K1, yo, K2, P1, rep. R8: K3, yo, SK2P, yo, K3, P1, rep. <no chart for Horseshoe at this time> Vine Lace (Mltpl of 9) R1 (and all wS rows): Purl. R2: k2tog, k2, yo, k1, yo, k2, ssk R4: k2, yo, k1, yo, k2, ssk, k2tog
| o | o | ||||||||
| o | o |
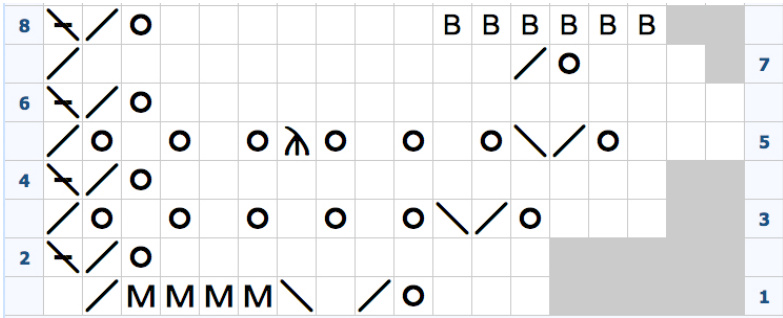
Primrose Edging _length 18 sts (Based on R1: K3, yo, k2tog, k1, ssk, CO 4 sts, k2tog, k1 (13sts) Rows 2, 4, 6: k across to last 3, yo, k2tog, k1toE-tbl R3: k3, yo, k2tog, ssk, (yo, k1) x4, yo, k2tog (16 sts) R5: k3, yo, k2tog, ssk, (yo, K1)x2, yo, SK2P, (yo, k1)x2, yo, k2tog (18) R7: k3, yo, k2tog, k11, k2tog (17 sts) R8: Bind Off 6, k7, yo, k2tog, k1toE-tbl (11sts) · Pattern reaches max length (18sts) on row 5, and 1 st of shawl = 2 rows of edging (odd rows work out away from shawl, evens work back toward shawl's edge). · Cast on 11 stitches using cable cast-on. This creates fundation R1 and works out away from edge. · Foundation R2 works back towards shawl as follows: K8, yo, K2tog, K last st together with 1 st from garment's edge, knitting through the back loops, to make a k1toE-tbl (Knit 1 to Edge - through back loops).
NOTE ON ABSORBING INCREASESINTO A LACE STITCH PATTERN
Knit around in the lace pattern until you are approaching an increase marker. When you get to a point where you do not have enough sts left for one more repeat of the stitch pattern, place another marker. All the sts between here and the increase marker are in queue, to be knitted plain, except for the last one, which will be an increase (K front and back into that st). Now count how many sts between the queue marker and the increase marker. Begin knitting after the increase marker with a K into front and back of stitch, then knit plain until you have that same amount of sts as were in queue before the increase marker. Place a marker. When you have increased enough times so that the stitches in queue equal another repeat of the stitch pattern, remove the extra markers and knit the sts in pattern. Repeat this cycle.
PONCHO DIRECTIONS
Start with 1 ball of Sonata (Natural color) and 3.5mm (US 4) circular needle. CO 44 sts, knit across in K2, P2. Work back and forth in moss stitchfor6-8rows.
Neck
Divide into quarters: \*K11, place increase marker\*, repeat from \* to \* all the way across. Work back and forth in English Mesh Lace. Beginning with row 3, work all odd-numbered rows as inc rows: Knit into front and back of stitches at beginning and end of row, and before & after each increase marker.\*\* Knit for about 3 inches (or longer,if longer neck opening desired), then join, and knit in rounds. Continue to the end of the ball of yarn.
Yoke & Shoulder Shaping
\*\* The frst time you do this, you will need to place a marker, different color or style from the increase markers,to designate this new increased stitch as one that is waiting in queue and not part of the lace pattern just yet. When this queue area has grown to 6 sts, the amount needed for another repeat of the stitch pattern, then you can remove this marker and incorporate these stitches into the lace pattern. This cycle will repeat itself every 16 rows, because English mesh is an 8-row pattern and every second row is an increase row. Drop the shoulder increases at about 7 or 8 inches, no need to be exceedingly precise. (To adjust the size for children or others, measure from neck to tip of shoulder, and use this length instead.) This willhappen just before you begin the horseshoe pattern. Begin Horseshoe Lace pattern with the second ball of yarn (Lilac). Knit a total of 3 pattern repeats (24 rounds). Begin Mini Vine Lace pattern. Use both balls of light yarn (Lilac), then both balls of dark yarn (African Violet). Continue until you have used up all of the yarn. If you are not going to use the optional knitted edging, just BO very loosely at this point, and you are all done.
Main Body to Bottom Edge
Drop the shoulder increases at about 7 or 8 inches, no need to be exceedingly precise. (To adjust the size for children or others, measure from neck to tip of shoulder, and use this length instead.) This will happen about halfway through the horseshoe lace section. Begin Horseshoe Lace pattern with the second ball of yarn Knit a total of 3 pattern repeats (24 rounds). Begin Vine Lace pattern. Continue until you have used up all of the dark yarn. If you are not going to use the optional knitted edging, just bind off very loosely at this point, and you are all done. You can add fringe or crochet edgings if you want, but the vine pattern has a natural scallop to the edge, so no edging is needed. Block well! All lace ponchos look "too small" before they have been blocked.
Optional Knitted-On Edging
For the knitted-on edging, you'll need 3 extra balls of yarn. You'll be knitting perpendicular to the direction in which you have been knitting. To speed things up, put the whole poncho into a big bowl with the last round of kniting sticking out the top. Move about 30 stitches onto a 16" circ or double-pointed sock needles (you will want to use a smaller size, too, about the size you used on the second ball of yarn), and let the rest of the stitches wait while you work with just a handful at a time, turning the bowl back and forth for each row. Abbreviations: Approx - approximately, beg - begin(ning), BO - bind off, CC - contrast color, cm - centimeter, cn - cable needle, CO - cast on, cont - continue(ing), dec - decrease, EOR - every other row, ER - every row, es - edge stitch, inc - increase, k - knit, L - left, MC - main color, meas - measures, mm - millimeters, P - purl, patt - pattern, pm - place marker, psso - pass slip st over, rem - remain, rep - repeat, Rev - reverse, R - right, rnd - round, RS(R) - right side (row), sc - single crochet, SKP - slip 1, knit 1, pso, s - slip, SSK - slip, slip, knit - slip next two stitches knitwise, one at a time, to right-hand needle. Insert tip of left-hand needle into fronts of these stitches, from left to right. Knit them together. One stitch has been decreased, st st - stocking stitch, st(s) - stitch(es), tbl - through back loop, tog - together, WS(R) - wrong side (row), wyib - with yarn in back, wyif - with yarn in front, yb - yarn back, yf - yarn forward, yo - yarn over. Please note this pattern is copyrighted material and the entire contents of this pattern are copyrighted as a collective work under the copyright laws of Canada and the United States. You may print a copy of this pattern for your own personal use and enjoyment, but editing, publishing,transmitting, e-mailing, posting it to a list service or database, or otherwise commercially exploiting this pattern is strictly forbidden. Copyright Michelle Ciccariello


