Jasmine Fingerless Mitts
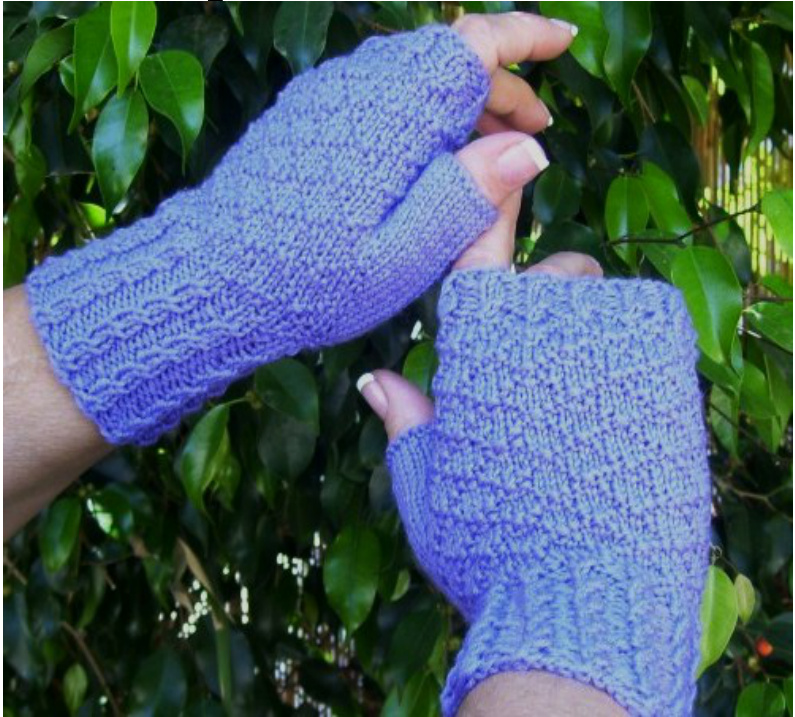
Diamond brocade texture is achieved with a simple knit and purl pattern. Mini mock cable ribbed cuff and finger band complete these mitts.
MATERIALS:
Yarn: 1 skein Dale Baby Ull, $50g$ 192 yards, color of your choice. Or any fingering weight yarn Needles: Set of Five Size #2US [2,75mm] (3US [3.25mm]) double pointed needles. Blunt needle, waste yarn or stitch holder, 1 stitch marker. Gauge: 6.5 stitches $=1^{\prime\prime}$ with size 3 needles. Size: Adult Small-Medium (Medium-Large) \*NOTE: Changing needle size to adjust sizing is preferable to increasing or decreasing stitches. Use size 2 needles for smaller size.
Abbreviations:
M1L $=$ Make 1 Left slant - With left needle tip, lift strand between sts from front to back. Knit the lifted st through the back. M1R $\underline{{\underline{{\mathbf{\Pi}}}}}$ Make 1 Right slant - With left needle tip, lift strand between sts from back to front, Knit the lifted st through the front. K2tog $\underline{{\underline{{\mathbf{\Pi}}}}}$ knit 2 stitches together $\pmb{\mathsf{K}}=$ knit $p=p_{\mathsf{U r l}}$
DIAMOND STITCH PATTERN
Rnd 1: \*k3, p1, k2; repeat from \* around. Rnd 2: $\star_{\mathsf{k}z}$ p1, k1, p1, k1; repeat from \* around. Rnd 3: $\star_{\mathsf{k l}}$ p1, k3, p1; repeat from \* around. Rnd 4: \*p1, k5; repeat from \* around. Rnd 5: Repeat round 3. Rnd 6: Repeat round 2 CUFF Cast on 48 stitches, divide the stitches evenly on 4 dp needles (12 sts per needle). Join, being careful not to twist stitches, and begin knitting the mock mini cable ribbing as follows: Rnd 1: $x k2$ P2; repeat from \* around. Rnd 2: $\star_{\mathsf{k}z}$ tog leaving loops on needle, then knit first st again, slip both sts off needle, p2: repeat from \* around. Rnd 3 & 4: Repeat Rnd 1. Repeat rnds 1-4 five more times, or to desired cuff length.
HAND
Knit rows 1-6 of Diamond Stitch Pattern one time. THUMBGUSSET Round 1: On needle #1- M1R, k1, M1l, place marker (there are 3 stitches in front of the marker). k1, m1, k1, p1, k2, cont knitting rnd 1 of pattern st from $\ast\intercal\times$ Rnd 2: Knit sts before marker, continue to knit in next round of pattern st. Rnd 3: M1R, knit to last st, Mil, sl m, (2 stitches increased), continue in next round of pattern st. (You will be increasing 2 sts for thumb gusset on each odd number round and knitting thumb gusset sts on even rounds) Repeat rnds 2& 3 until there are 19 stitches for the gusset. (A total of 3 repeats of pattern st.) FINGERAREA Place the 19 gusset stitches on waste yarn or a st holder. Remove marker. Next rnd: Join and continue to knit in stitch pattern starting with Rnd 1. Next: Repeat rnds 2-6. Repeat pattern st rnds 1-6 twice more. FINGER SPACE RIBBING Rnd 1: \*k2tog leaving loops on needle, then knit first st again, slip both sts off needle, p2: repeat from \* around. Rnds 2, 3& 4: k2,p2.Rnd 5: Repeat rnd 1. Bind off in k2, p2 rib. THUMB: Distribute the stitches from the waste yarn or holder onto 3 needles [8, 8, 3.] Round 1: Begin knitting across the needie with the first 8 sts (needle 1): knit the next 11 sts: pick up and knit 5 stitches in the thumb gap. (24 stitches total). Rnd 2: Knit 19 sts, ssk, k1, k2tog. (22 sts) Rnds 3-8: knit around. Bind off purlwise. Weave in allose ends. Fill in any gaps at the thumb base. Make second mitt as above. Contact: NanoEffects@gmail.com Blog: http://nanoeffects.blogspot.com/ and http://a-nano-knittomy.blogspot.com/ This pattern is free for unlimited personal use. You may bookmark it, print it, copy and paste it. You can even make paper airplanes from your printed copy if you like. Just let people who are interested know where you got it. This pattem iscopyright $\copyright$ 2008 to Anne Sahakian fo NanoOEffets


