Charity the Crane Amigurumi:
For more pictures, see the end of the PDF. Meet Charity the Crane! We are all devastated by the news from Japan. Large sections of the coast have been decimated, the shore line has shifted 8 feet, and damage to the nation's nuclear power plants threatens their infrastructure and health. We all want to do something. Since the events of March 11'", 2011, I've wondered what I could do to help, and I've heard many of my fellow crafters ask the same question. This is my contribution to the relief effort. In Japanese culture, cranes are considered to be a sacred animal. There is an ancient myth that promises that anyone who folds a thousand origami cranes, threaded together on a string, will be granted any one wish by a crane. The gift of a string of a thousand cranes is considered to bestow good luck, happiness and prosperity, and strings of cranes are frequently given as gifts to newly weds, newborns, and as part of coming of age activities. To help raise funds for the relief of those suffering from the effects of the earthquake and tsunami, I propose that we as crafters band together to make 1oo0 amigurumi cranes. To learn more about this effort, read this post in my blog: http://unforthccc.blogspot.com/2011/03/1000- amigurumi-crane-project.html; or, join “The 1000 Amigurumi Crane Project,”’ a group on Ravelry, at http://www.ravelry.com/groups/the-1000-amigurumi-crane-project. This will only work if we all help it go viral, so anything you can think of to spread the word, just let me know and I'll see what I can do to help. I will maintain my records publically on my blog (unforthccc.blogspot.com) and in the Ravelry Group (1000 Amigurumi Cranes Project) so that everyone can see that this is on the up and up. If 10o0 people buy this pattern, we will raise more than \$4,500 to support victims of the Tsunami. Please, join me in trying to bring hope, happiness, good luck and prosperity to the people of Japan.
Finished Size:
The finished size depends on the version you make. For example, the measurements for a crane made with an E hook are: Height: 2 1/2 inches Length: 5 1/2 inches Width: 6 1y2 inches For the basic crane made with a G hook, they are: Height: 3 1/2 inches Length: 6 1/2 inches Width: 7 inches
Materials:
Yarn (either sport weight or worsted weight): at least 25 yards, depending on the size you are making. Polyester fiber fill Yarn needle Crochet hook, Size E (if using sport-weight yarn) Crochet hook, Size G (if using worsted-weight yarn) Abbreviations: Note that this pattern uses US definitions. Ch - chain Sc - single crochet Ss - slip stitch
Tips:
1. Use a marker to keep track of where each round of stitches ends. Make sure that you move the marker when you finish each round! 2. Unless otherwise specified, this amigurumi is crocheted using both rounds and rows. When working in rounds, do not join with a slip stitch. Instead, each round starts in the first stitch of the previous round. 3. The format for these instructions is as follows: Round (or Row) #: (instructions to follow): # of Sc in the round if you have done it correctly. 4. When you are crocheting this amigurumi, make sure you keep your tension even and do not work your stitches too tightly or too loosely. This is especially critical when making the wings, which will curl if not worked with a light touch. 5. I recommend that you use the “invisible decrease” method for this project. In order to do an invisible decrease, you insert the hook through the top loop of the next two sc, draw a loop through both, then draw a loop through both loops on your crochet hook. You can find a helpful tutorial by the wonderful June Gilbank at this link: http://www.planetjune.com/blog/amigurumi-help/invisible-decrease/ The first set of instructions indicate how to make the basic-sized Charity Crane, shown in the picture above. These instructions will be followed by instructions that enable you to easily resize the pattern to make a larger or smaller crane.
Body:
Work through top/back loop only except where specified (this instruction applies to the body only). Note that the side that ends up “smooth" is the outside of the body, and the side that ends up “ridged' is the inside. Round 1: Ch 2. In second ch from hook, sc five times. Place marker, do not join: 5 sc Round 2: 3 sc in next 4 sc, sc in next sc: 13 sc Round 3: Sc in next sc, 3 sc in next sc, sc in next 2 sc, 3 sc in next sc, sc in next 2 sc, 3 sc in next sc, sc in next 2 sc, 3 sc in next sc, sc in next 2 sc: 21 sc Round 4: Sc in next 2 sc, 3 sc in next sc, sc in next 4 sc, 3 sc in next sc, sc in next 4 sc, 3 sc in next sc, sc in next 4 sc, 2 sc in next sc, sc in next 3 sc: 28 sc Round 5: Work through both loops for this round only. Sc around: 28 sc Round 6: Sc around: 28 sc Round 7: Sc in next 6 sc, decrease once, sc in next 12 sc, decrease once, sc in next 6 sc: 26 sc Round 8: Sc in next 6 sc, decrease once, sc in next 11 sc, decrease once, sc in next 5 sc: 24 sc Round 9: Sc in next 5 sc, decrease once, sc in next 10 sc, decrease once, sc in next 5 sc: 22 sc Round 10: Sc in next 5 sc, decrease once, sc in next 9 sc, decrease once, sc in next 4 sc: 20 sc Sc in next 3 sc, then stuff, being careful not to over stuff. Fold the long sides together. Sc the corners together (ignoring the first two sc when you fold it together) and sc through both sides, and then ss to join the other two corners (again, there will be two sc left.) You should have 6 stitches across the bottom. The edge with the seam will be the bottom of the body; you'll be attaching the head and tail to the narrow sides, and the wings to the long sides. For an image that helps clarify the working of the seam, see below (in the resizing instructions, page 9).
Wings (Make 2):
When you make your initial loop, leave a long end for sewing. Row 1: Ch 9 Row 2: Starting in second ch from hook, sc in next 8 ch: 8 sc Rows 3 - 5: Ch 1, turn, sc in next 8 sc: 8 sc Row 6: Ch 1, turn, sc in next 8 sc using only the lower/back loop of the previous: 8 sc Rows 7 - 8: Ch 1, turn, sc in next 8 sc (through both loops): 8 sc Row 9: Ch 3, turn, start to sc in the same place as you would have had you done a ch 1 as normal, sc in next 8 sc: 8 sc Row 10: Ch 3, turn, start in the same place as you would have had you done a ch 1 as normal, sc in next 7 sc, ss in next sc: 8 st Row 11: Turn, sc in next 6 sc (skip the ss), ss in next sc: 7 st Row 12: Turn, sc in next 5 sc (skip the ss), ss in next sc: 6 st Row 13: Turn, sc in next 4 sc (skip the ss), ss in next sc: 5 st Row 14: Turn, sc in next 3 sc (skip the ss), ss in next sc: 4 st Row 15: Turn, sc in next 2 sc (skip the ss), ss in next sc: 3 st Row 16: Turn, sc in next 1 sc (skip the ss), ss in next sc: 2 st Row 17: Turn, sc in the 1 sc: 1 st. Draw a loop through, tighten and finish off. The wings will have a natural fold that you should follow when sewing on to the body The front/top of the wing is the one that has a raised row of stitching at the fifth row. The top will be the side facing up when you attach the wing to the body; the tab that folds over will be facing the body when you sew the wing on.
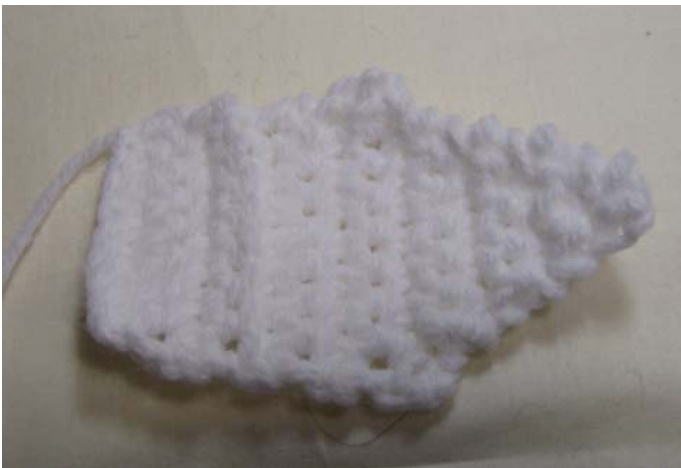
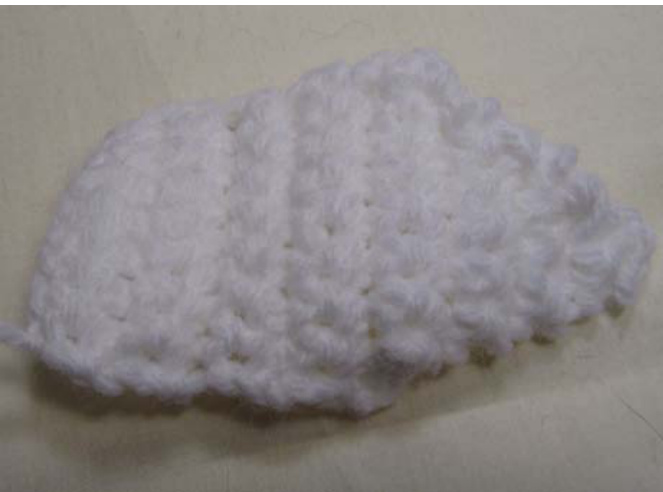
The back/bottom of the wing will be facing down when the wing is attached to the body. This part of the tab will be facing out when you sew the wing on. Sew in two places - along the bottom edge and along the folded edge - on to the long sides of the body. The bottom edge is sewn one round from the bottom of the body; the top edge of the folded part of the wing is sewn on four rounds from the bottom (three rounds over where the bottom is sewn on).
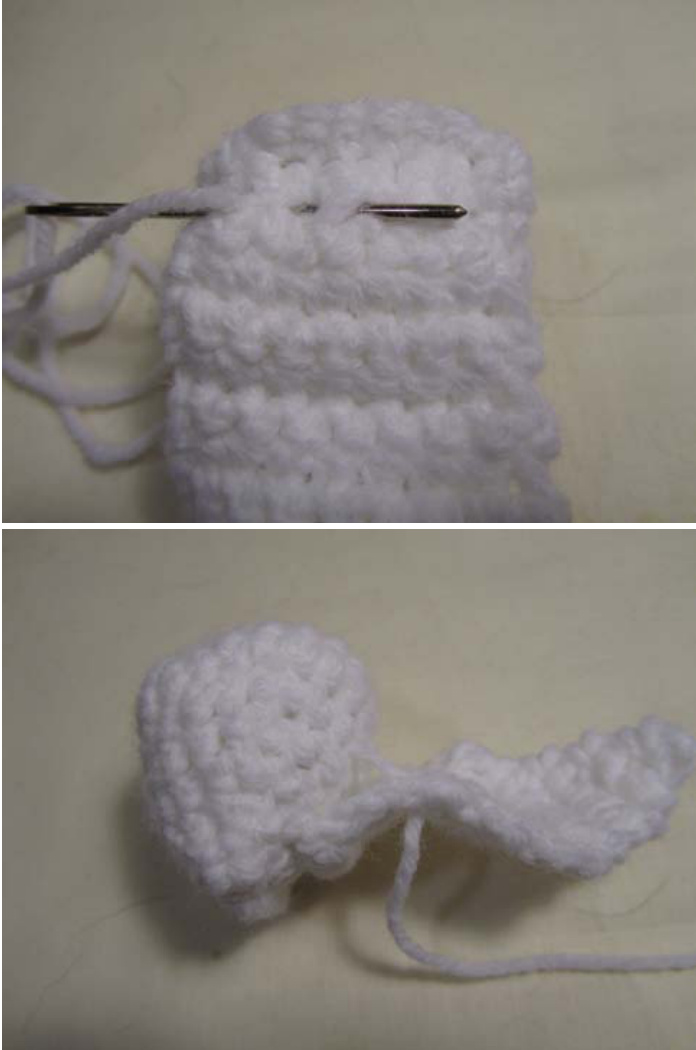
This picture shows where to sew the bottom of the wing to the body, one row down from where the body is single crocheted together. This picture shows where to do the second row of stitching to attach the wing, three rows above where you did the first round.
Tail:
The tail is worked around, but you do not need to place a marker. Instead, just work in a spiral and count the indicated number of sc. Ch 2. In second ch from hook, sc 3 times. Then, sc around, doing one sc in the next sc 9 times. Sc twice in the next sc. Sc in next 26 sc. Ss in next st, tighten and finish off, leaving a long end for sewing. Line the tail up with the bottom of the body, up the middle of one of the narrow sides, and sew up about two thirds the height of the body (to two rows from the top)
These two images show the placement of the tail
Head:
The head is worked around, but you do not need to place a marker. Instead, just work in a spiral and count the indicated number of sc. Ch 2. In second ch from hook, sc 3 times. Then, sc around, doing one sc in the next sc 9 times. Sc twice in the next sc. Sc in next 14 sc. Sc twice in next sc. Sc in next 23 sc. Sc twice in next sc. Sc in next 16 sc. Ss in next st, tighten and finish off, leaving a long end for sewing. Line the head up with the bottom of the body,and sew the bottom of the neck along the base of the body, then stitch about two thirds the height of the body (to two rows from the top). Fold Over the face, and sew a loop through to keep it folded. There are images on the next page.

These two images show the sewing and placement of the head and neck. ... And now you're done!!
Resizing instructions:
I do not recommend you try these resizing instructions unless you are an experienced crocheter and amigurumi maker. While they work and can be generalized, familiarity with how amigurumi come together will be very, very helpful. If you'd like to make a larger crane and run in to any trouble, feel free to get in touch with me! My e-mail is unforth@yahoo.com. You might find it helpful to read all of the below before proceeding and actually writing out the version of the instructions that you intend to use.
Body:
Decide how big you want the body. To make it bigger, just keep adding rows to the top. Each row you add will add about a half inch to both the size of the top of the body and the height of the body. Each Round will continue in the following pattern: Round 4: Sc in next 2 sc, 3 sc in next sc, sc in next 4 sc, 3 sc in next sc, sc in next 4 sc, 3 sc in next sc, sc in next 4 sc, 3 sc in next sc, sc in next 3 sc: 29 sc Round 5: Sc in next 3 sc, 3 sc in next sc, sc in next 6 sc, 3 sc in next sc, sc in next 6 sc, 3 sc in next sc, sc in next 6 sc, 3 sc in next sc, sc in next 4 sc: 37 sc Round 6: Sc in next 4 sc, 3 sc in next sc, sc in next 8 sc, 3 sc in next sc, sc in next 8 sc, 3 sc in next sc, sc in next 8 sc, 3 sc in next sc, sc in next 5 sc: 45 sc Round 7: Sc in next 5 sc, 3 sc in next sc, sc in next 10 sc, 3 sc in next sc, sc in next 10 sc, 3 sc in next sc, sc in next 10 sc, 3 sc in next sc, sc in next 6 sc: 53 sc Round 8: Sc in next 6 sc, 3 sc in next sc, sc in next 12 sc, 3 sc in next sc, sc in next 12 sc, 3 sc in next sc, sc in next 12 sc, 3 sc in next sc, sc in next 7 sc: 61 sc 's, where x represents whatever number was in that location in the previou round: Round x + 1: Sc in next x+1 sc, 3 sc in next sc, sc in next x+2 sc, 3 sc in next sc, sc in next x+2 sc, 3 sc in next sc, sc in next x+2 sc, 3 sc in next sc, sc in next x+1 sc: x+8 sc (so, Round 9: Sc in next 6+1 sc, 3 sc in next sc, sc in next 12+2 sc, 3 sc in next sc, sc in next 12+2 sc, 3 sc in next sc, sc in next 12+2 sc, 3 sc in next sc, sc in next 7+1 sc: 61+8 sc, or Round 9: Sc in next 7 sc, 3 sc in next sc, sc in next 14 sc, 3 sc in next sc, sc in next 14 sc, 3 sc in next sc, sc in next 14 sc, 3 sc in next sc, sc in next 8 sc: 69 sc) Whichever round you choose as your last one, replace the final "3 sc in next sc" with a "2 sc in next sc." So, let's do an example where Round 9 is our last increase round. You'd do: Round 9: Sc in next 7 sc, 3 sc in next sc, sc in next 14 sc, 3 sc in next sc, sc in next 14 sc, 3 sc in next sc, sc in next 14 sc, 2 sc in next sc, sc in next 8 sc: 68 sc Then, figure out the sides. First, calculate the number of rounds you'll do down. This is equal to the number of rounds you've already completed plus 1. So, for the 9 round top that we just demonstrated, you'd go 10 rows down. The first two rows are sc around (The first through both loops). Round 10: Work through both loops for this round only. Sc around: 68 sc Round 11: Sc around: 68 sc Then, in each subsequent row, you'll decrease once in the middle of the side. Figure out where as follows: Take a look at the last increase round. Round 9: Sc in next 7 sc, 3 sc in next sc, sc in next 14 sc, 3 sc in next sc, sc in next 14 sc, 3 sc in next sc, sc in next 14 sc, 3 sc in next sc, sc in next 8 sc: 69 sc Add together the number of sc up to half way through the 1st side. In this case, that would be 7 sc (from "sc in next 7 sc"), plus 3 sc (from "3 sc in next sc"), plus 7 sc (from 1/2 of "Sc in next 14 sc"). In this example, you'd have 17 sc. Minus one from this total - so 16 sc. This is how many sc you do before you decrease in the next sc. After that decrease, you'll then sc all the way to the opposite side of the square. To calculate this, double the number of sc you did before the decrease - in this case, 32 sc. Then you decrease again, and you'll have 16 sc left to get back to your marker. Thus, Round 12 is: Round 12: Sc in next 16 sc, decrease once, sc in next 32 sc, decrease once, sc in next 16 sc: 66 sc For the next round, you'll subtract one from the middle set of sc, and one from the last set of sc, while keeping everything else the same. This will decrease the number of sc in each round by 2 again. Round 13: Sc in next 16 sc, decrease once, sc in next 31 sc, decrease once, sc in next 15 sc: 64 sc For the next round, subtract one from the first set of sc, and one from the middle set of sc. Again, this will decrease your total by 2. xt 15 sc, decrease once, sc in next 30 sc, decrease once, sc in next 15 sc: 62 s Note the continued relationship between the first and last sets of sc and the middle: the outer two (15 and 15 in round 14, 16 and 15 in round 13) will always sum to the middle one (30 in round 14, 31 in round 13.). Continue in this pattern until you reach the number you've figured out for how many rounds you'll go down. In our example, you went 9 rows for the top, and calculated 10 rows down, so you'll be going up to Round 19. Round 15: Sc in next 15 sc, decrease once, sc in next 29 sc, decrease once, sc in next 14 sc: 60 sc Round 16: Sc in next 14 sc, decrease once, sc in next 28 sc, decrease once, sc in next 14 sc: 58 sc Round 17: Sc in next 14 sc, decrease once, sc in next 27 sc, decrease once, sc in next 13 sc: 56 sc Round 19: Sc in next 13 sc, decrease once, sc in next 25 sc, decrease once, sc in next 12 sc: 52 sc Then, sc the bottom together from corner to corner as described for the regular crane pattern. The number of sc across the bottom should equal the length of the side of body that you haven't been decreasing - in the case of our example, that'll be 18. Below are a few images to help you figure out how to close the bottom seam.
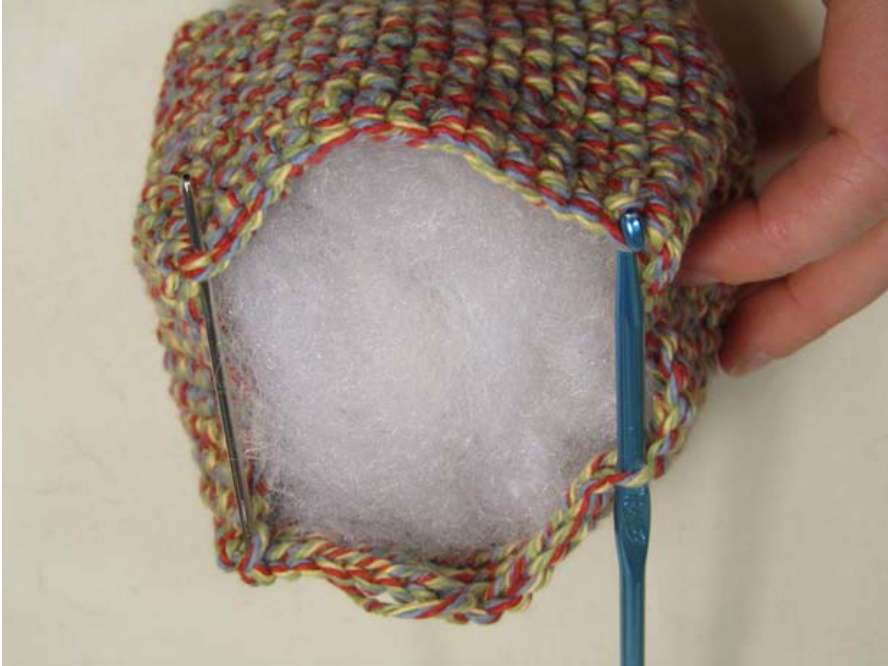
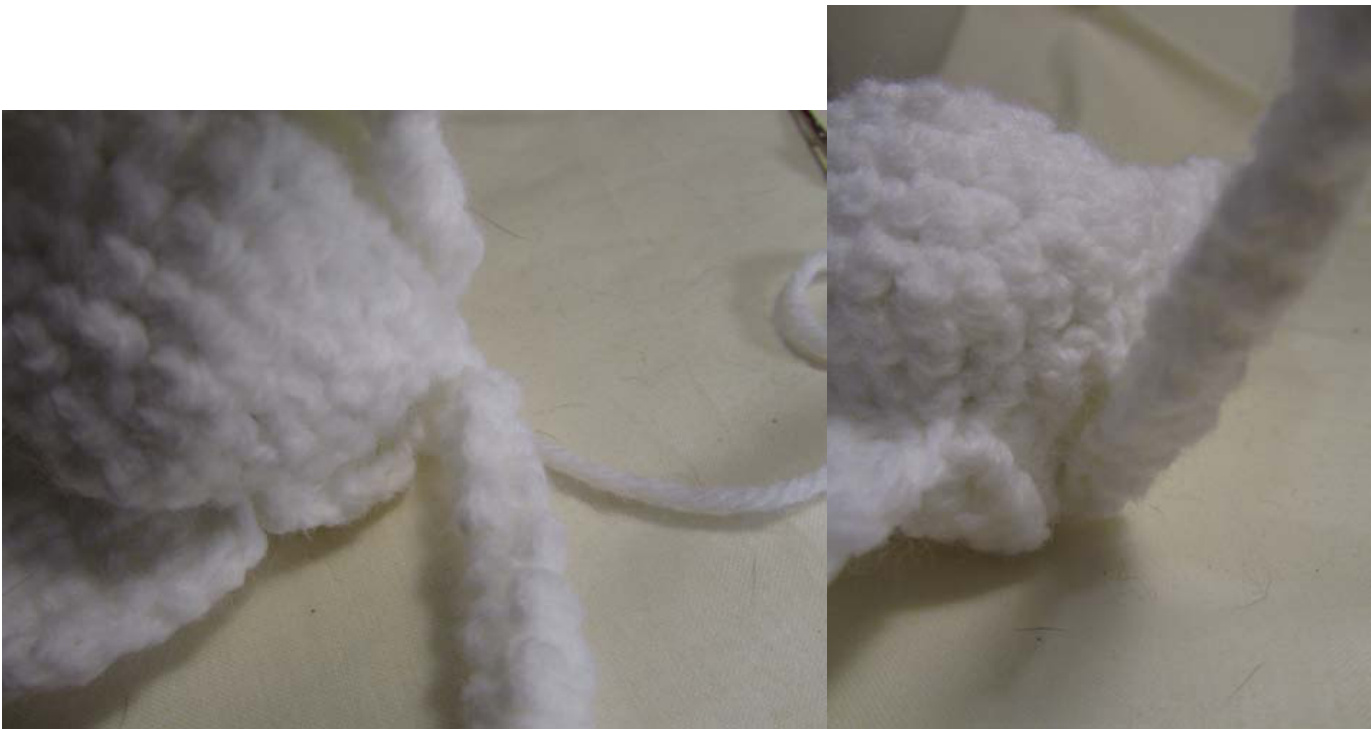
This image shows the identification and the connection of the corners - rather than simply flattening the bottom edge and then crocheting it shut.
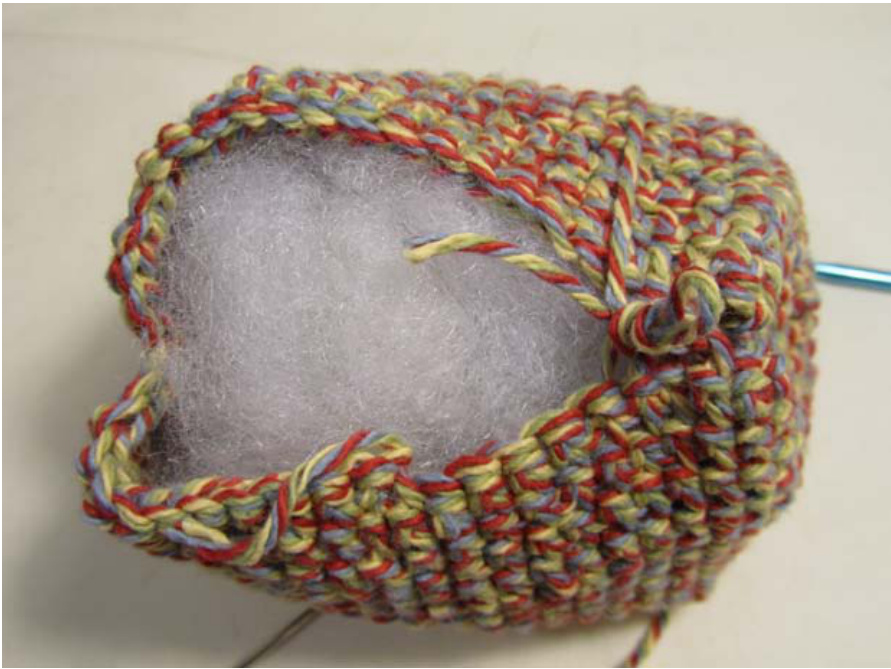
This image shows the first few sc of the bottom seam completed - note the pucker along the side. If you're worried that your stuff will show through, you'll have the opportunity to sew the sides of the pucker nice and snuggly when you attach the head and the tail.
Wings (make 2):
The base length of the wings is equal to the number of stitches, from corner to corner, of one side of the body. This should be the same length as the number of sc that you did across the bottom. Thus, in our example, it's 18. If you end up with a fraction, round up. For the "tab" part of the wing (that bends down), do half the number of rows you did down - so 5 Row 1: Ch 19 Row 2: Starting in second ch from hook, sc in each of the next 18 ch: 18 sc Rows 3 - 7: Ch 1, turn, sc in the next 18 sc: 18 sc ing" row - this one marks the transition between the two parts of the wing turn, sc in next 18 sc using only the top/back loop of the previous round: 18 s Next, do the number of rows you just did, minus 4: Rows 9 - 11: Ch 1, turn, sc in next 18 sc: 18 sc Do the two rows that start with the ch 3. The first of these is the same as above, just with a ch 3. The second of these, you'll ss in the last sc instead of sc, starting the decrease in the size of the Wing. Row 12: Ch 3, turn, sc in next 18 sc: 18 sc Row 13: Ch 3, turn, sc in next 17 sc, ss in next ss: 18 st Finally, make each row 1 sc shorter, and end each with a ss, until you have a row with 1 sc and 1 ss. That's the second to last row. In the last row, sc in that last sc, then tighten and finish off. Now that the decrease rows don't start with a ch! Row 14: Turn, sc in next 16 sc, ss in next ss: 17 st Row 15: Turn, sc in next 15 sc, ss in next ss: 16 st Row 16: Turn, sc in next 14 sc, ss in next ss: 15 st Row 17: Turn, sc in next 13 sc, ss in next ss: 14 st Row 18: Turn, sc in next 12 sc, ss in next ss: 13 st Row 19: Turn, sc in next 11 sc, ss in next ss: 12 st Row 20: Turn, sc in next 10 sc, ss in next ss: 11 st Row 21: Turn, sc in next 9 sc, ss in next ss: 10 st Row 22: Turn, sc in next 8 sc, ss in next ss: 9 st Row 23: Turn, sc in next 7 sc, ss in next ss: 8 st Row 24: Turn, sc in next 6 sc, ss in next ss: 7 st Row 25: Turn, sc in next 5 sc, ss in next ss: 6 st Row 26: Turn, sc in next 4 sc, ss in next ss: 5 st Row 27: Turn, sc in next 3 sc, ss in next ss: 4 st Row 28: Turn, sc in next 2 sc, ss in next ss: 3 st Row 29: Turn, sc in next 1 sc, ss in next ss: 2 st Row 30: Turn, sc in next 1 sc, draw a loop through, tighten and finish off: When you sew the wings on, always sew the bottom one row up from the base of the body, and then just at the fold in the wing, the number of rows above the 1st row equal to the number of sc rows you did for the fold (in our example, 6 rows)
Tail and the Head:
The tail and the head are both more of an art form than a specific set of instructions. Decide what length and initial width you want each to be, and then do a tube that length. Start with a ch 2, and in the second ch from the hook, however many sc you want your tube to start at. In a smaller crane, this will probably be three, but for a larger crane, I'd suggest four or five or even more. Then, periodically do an increase. I'd recommend a progression along these lines: 3 sc around: increase after 15 sc 4 sc around: increase after 20 sc 5 sc around: increase after 25 sc 6 sc around: increase after 30 sc The head and neck should be about an inch and a half longer than the tail. If you want a longer and thinner tube, increase less often. If you want a wider and fatter tube, increase more often. I suggest that you aim to have the tail be about the same length as the wing is, in inches, and the head about an inch and a half longer than that. Thus, in our example, on the 9-round body base, the wing is just over 5 inches long, so Ill do a 6 inch tail and a 8 inch head (since I'll have to be able to bend the head over). For my tail, I'll start by doing a ch 2, and 3 sc in the second ch from the hook. Then, I'll sc in the next 15 sc. In the next sc, sc twice. Then, sc in the next 20 sc. Sc twice in the next sc. Sc in the next 20 sc. Sc twice in the next sc, then sc in the next 30 sc. Attach the tail same as described above. For my head, I started exactly the same: ch 2, and 3 sc in the second ch from the hook. Then, I sc in the next 15 sc. In the next sc, sc twice. Then, sc in the next 20 sc. Sc twice in the next sc. Sc in the next 20 sc. Sc twice in the next sc, then sc in the next 30 sc. Sc twice in the next sc. Sc in the next 40sc. However, these ended up thin, as you can see in my picture - don't be afraid to start with a tube bigger than 3 sc around, and to experiment a bit to get the look you want! Like, I like my big crane with his silly little tail and neck but you might want yours to look chunkier. ?
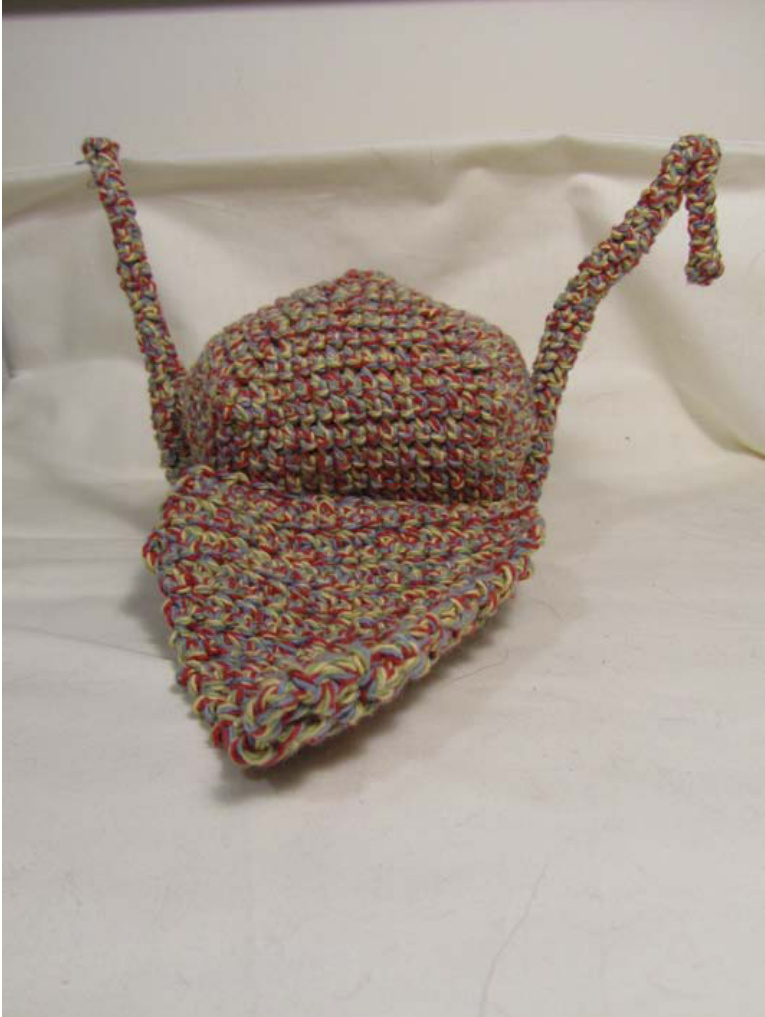
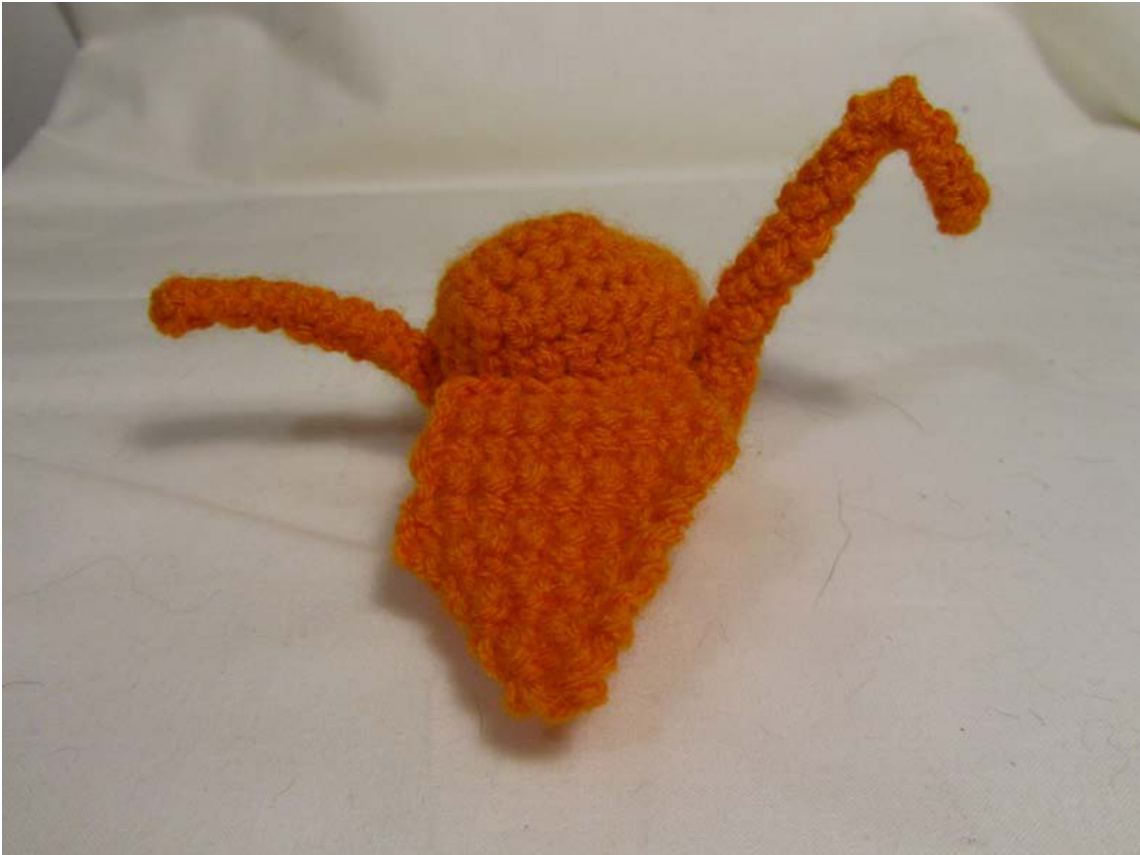
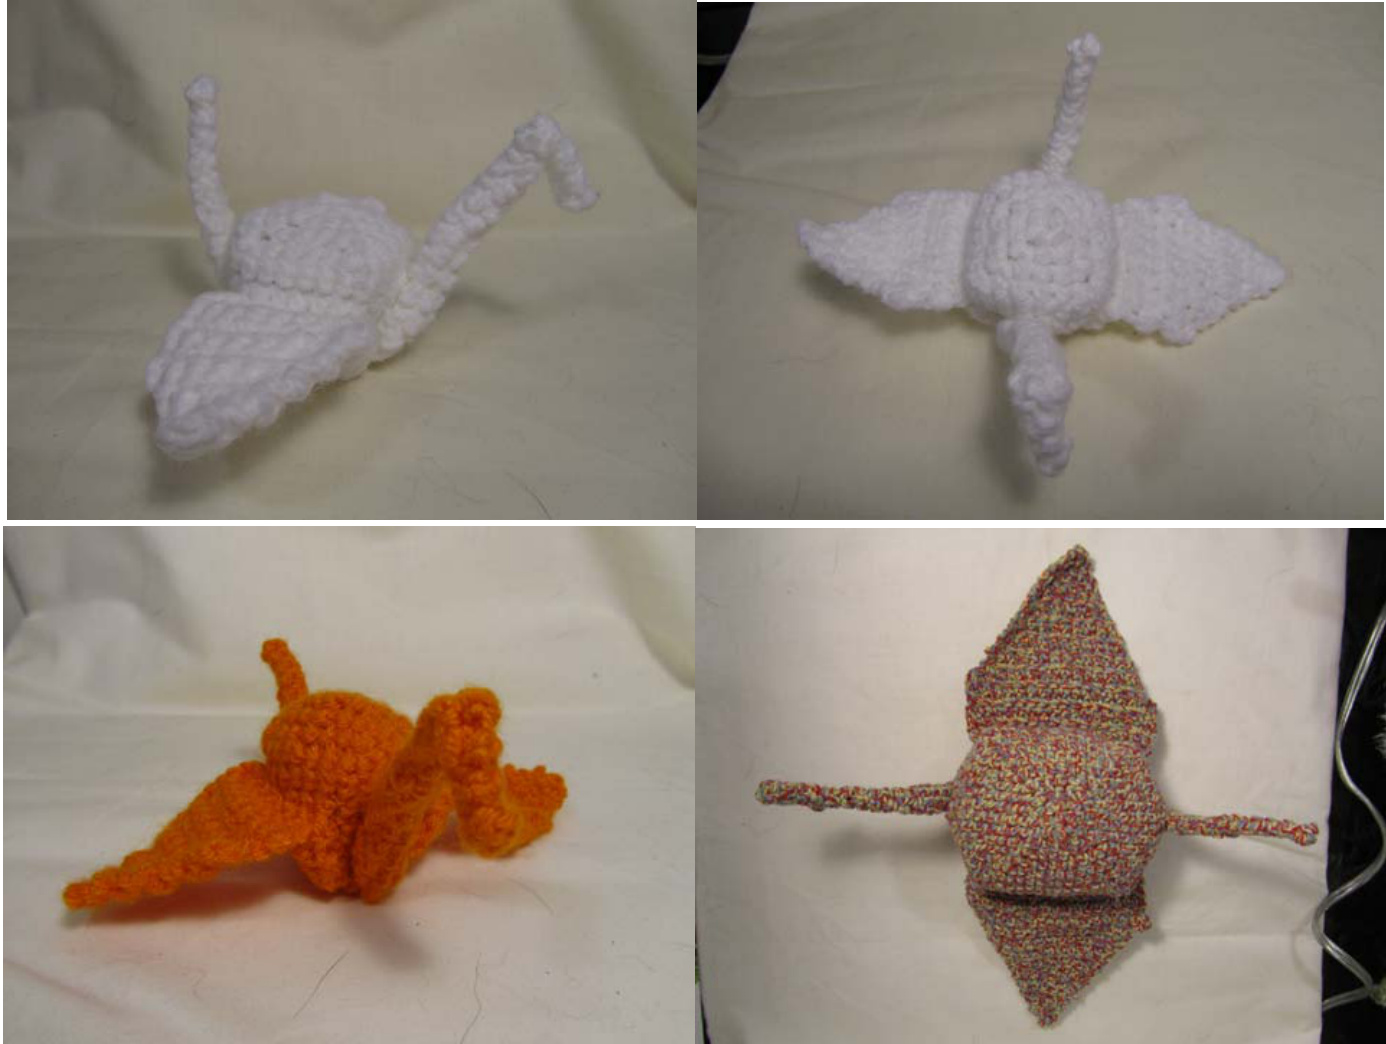
This is an image of the larger crane, used as the demonstration for the resizing instructions. Note the spindly head and tail - you should make your tubes bigger around if you want more bulky head and tail - but only if you want - personally, I like mine this way. @ ...and now you're done! If you have any comments, questions, advice, stories, or what not, related to my pattern, please feel free to contact me at any time at unforth @yahoo.com!! Check out my etsy shop at http://www.etsy.com/shop/unforth. Visit me on Ravelry at http://www.ravelry.com/projects/unforth Curiously Crafted Creations, my blog about crafts, can be read at http://unforthccc.blogspot.com/.
Additional Images:
① Claire Houck, 2011


