Corinthian Order MKAL by DeviousRose
Corinthian Order is a lace shawl/stole inspired by Greek architecture. This is the crescent file. If you want ALL the shapes or the triangular or stole, please download the master fle or that respective shape's pdf file. Happy yarning!

Table of contents:
Prologue: Yardage, bead counts, design choices, and some basics on shawl structure...Page 1 Clue 1: Chart key & special abbreviations, main body chart (Colour A if 2 colours)...Page 3 (midway)
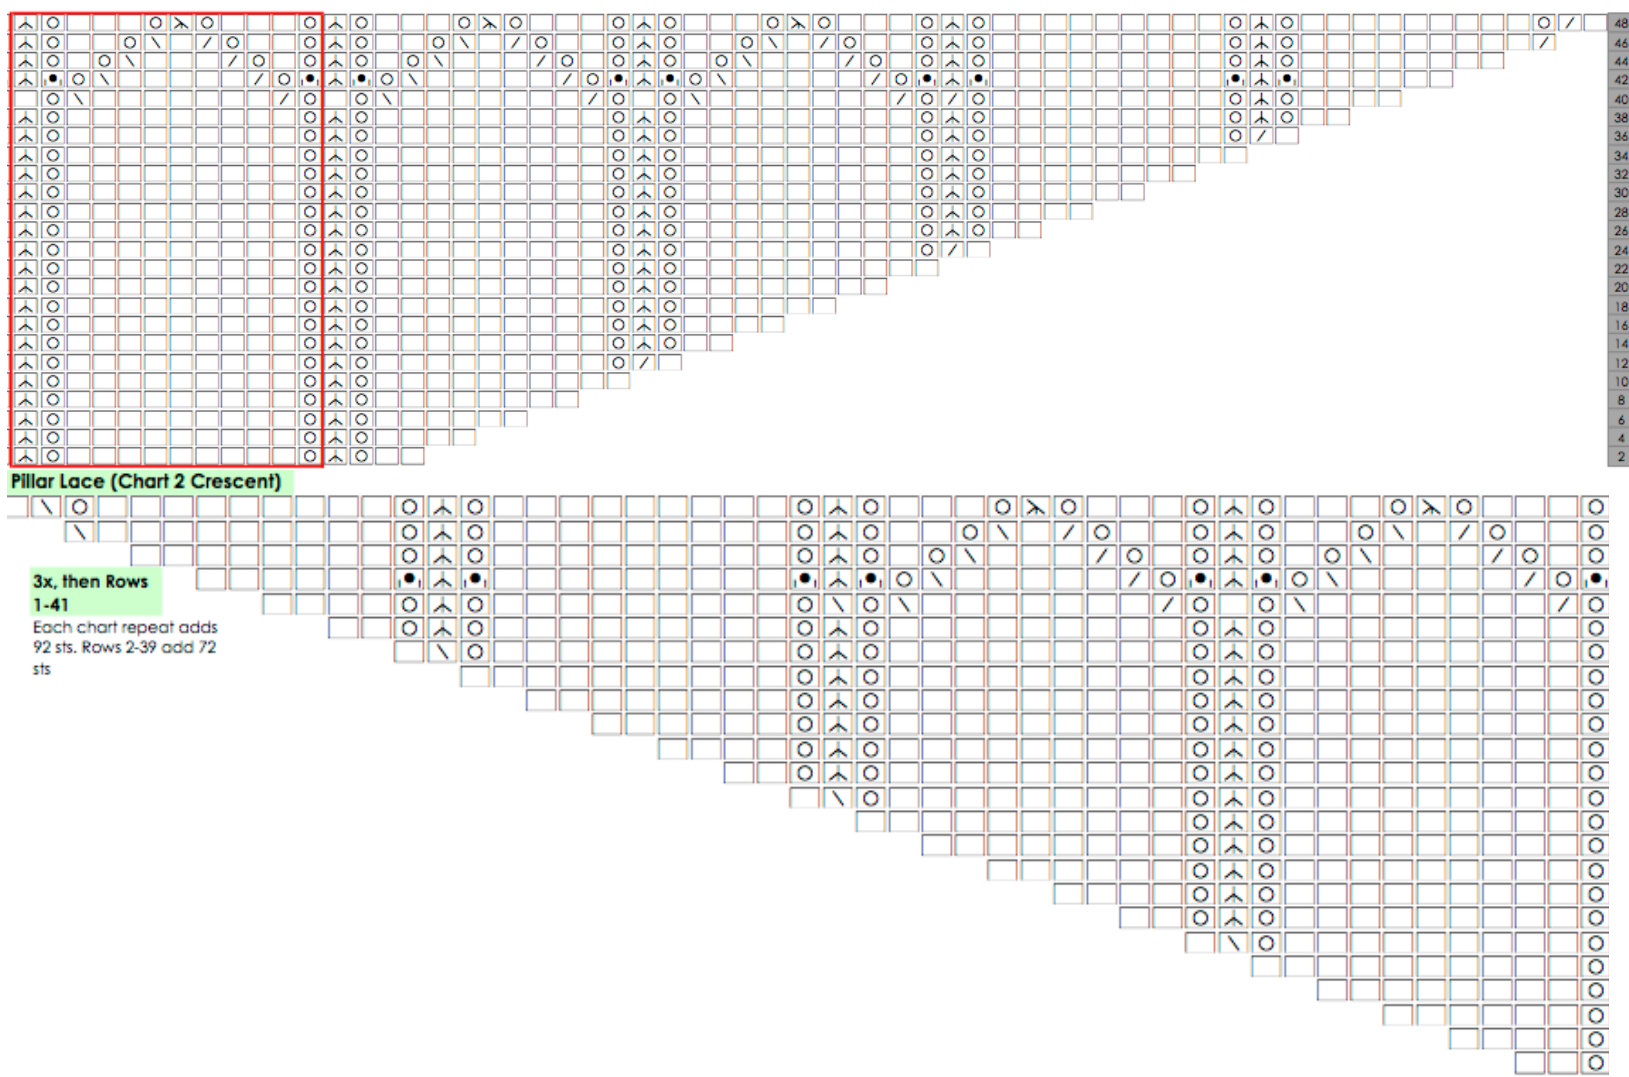
Pillar Lace charts...Page 4-5
Clue 2: Border transition chart (Colour B hereon and after if two colours)...Page 6 (midway) Clue 3: Border chart, cast off, and blocking information...Page 6-7 (midway, after Clue 2)
Casting off & blocking info...Page 8
size: 80 cm x 62 cm/31.5 in x 24.5 in, but customizable with more or less repeats of the main chart. Stole or scarf have directions for 55 inches-60 inch length, depending on your gauge and blocking.
Materials:
- 550-700 yd/458-550 m light fingering weight or fingering yarn. If doing 2-colour, you wil need about 450 yards of Colour A and 200 of Colour B. I used \~400 yds for the triangular in worsted. - 4 mm/Us 6 circular needles (or size to obtain a lacy, open, flexible fabric) - Beads: 6/0 seed beads, 5 per pattern repeat plus \~110-120, but you can substitute with a nupp. The amount of beads will vary depending on your repeats- for a light fingering weight shawl I used 240 beads. - 2 stitch markers recommended to mark either side of the spine on the triangular version
Main body:
-stockinette full body lace
Colours:
- one colour- the splendour of ancient Greece after its heyday - two colour- speculate the colouration the ancient Greeks may have used. Best with the full lace option. http://www.ravelry.com/designers/deviousrose Corinthian Order, @DeviousRose
Basic shawl crash course:
I made my first shawl (triangular) only 2.5 years ago, and my second was a crescent-shaped shawl, so the Confusion of "How the hell do I do this?" is still fresh in my mind. Shawls come in several shapes: triangular, crescent, square, circular, rectangular (stole), and so on. I explain triangular and crescent shapes here.
Shawl terminology:
aepin- iengin ol ine snawi al lis aeepest poini edge/border/selvedge stitches- 2 or 3 garter stitches worked on the outer edges of the shawl to create a smooth line on the outside of the shawl. garter tab cast-on- creates a smoother edge than casting on the beginning stitches and knitting 2 rows before set up. A more detailed explanation will be available in Clue 2 wingspan- width across the top of the shawl
Shaping:
Triangular shawls grow via increases at their edges and centers. It has a spine at its center, most often a singestitch garter ridge or single-stitch line of stockinette. I have made the shawl spine for this design a two-stich, basic cable instead of a single-stitch ridge.
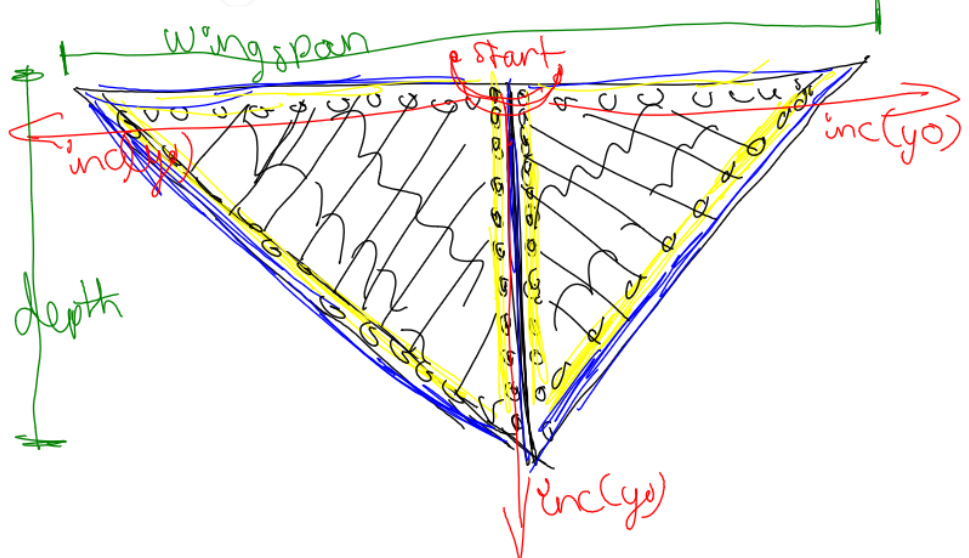
Figure 1: Structure of a triangular shawl, with colouration following that of Figure 3a. The blue edges indicate the border stitches. Circles indicate yarn overs. Crescent-shaped shawls grow out on either edge by two stitches. This means that depth will build up more slowly than in a triangular shawl, and the slope gives the impression of a crescent. Crescent shawls are sometimes worked bottom-up. Their wingspan is wider than triangular shawls in proportion to their depth, which is shallower when compared.
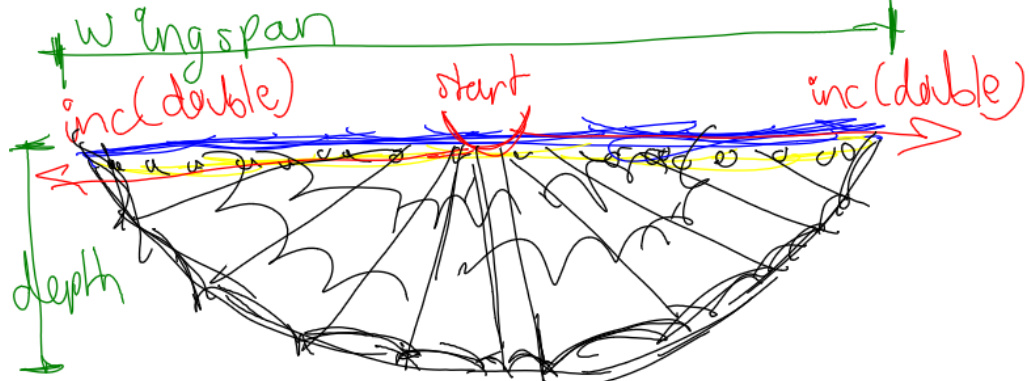
Figure 2: Structure of a top-down crescent shawl, as this pattern will use. The edge increases are always some form of double increase, so the shawl does not grow out towards the bottom, as a triangular shawl does.
Reading a chart:
Shawls are often written in only or mostly charts. I have written directions in the pattern, but charts let you know where your stitches line up in relationship to on another and your overall pattern. Charts in this pattern will be
Corinthian Order, @DeviousRose
RS (right side) only, and for the triangular charts will be worked twice on each side of the spine. I will include edge increases, but many patterns do not.
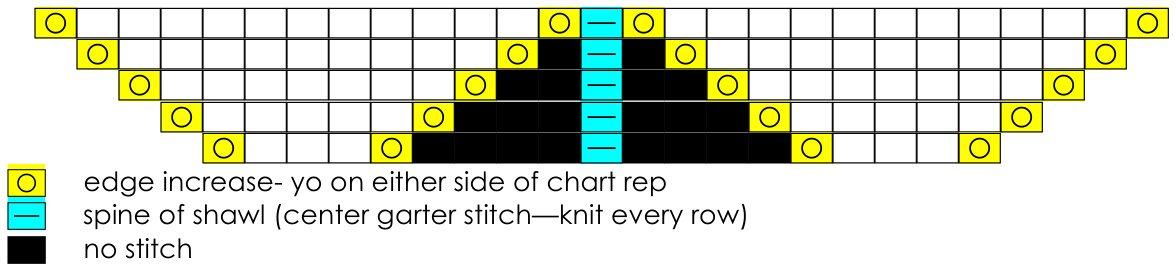
Figure 3a (above): Typical chart (with increases and spine shown) for a triangular shawl, with RS only shown. Figure 3b (below): In patterns, these will often be shown as:
Crescent charts increase by two on either side:

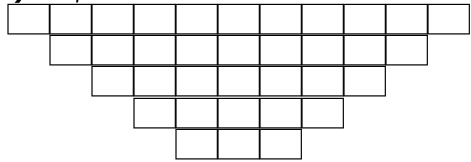
Figure 4 (above): Typical chart (increases NOT shown) for a crescent-shaped shawl, RS only. It is worked once, and the shawl increases by 2 stitches on each side.
Clue 1: Building the temple foundation & columns
Special Abbreviations:
btc- back twist cable (k tbl into 2nd st from needle, k into first st of needle normally, slip both worked sts onto working needle) cdc- centered double decrease (sl 2 kw, as if to k2tog, k next st, p2sso) For other abbreviations, scroll to the bottom of the document and see "Abbreviations." For chart symbols, : the chart key on page 5.
Chart information:
- The stitch repeat for each chart is 12 stitches. One Chart 1 repeat is about as long as the border repeat. - ws (odd) rows are NOT shown on any of the charts. These are simply purled across. - Border stitches (the k2 on either side) and edge increases are also NOT shown on the charts. -All RS rows on the crescent-shaped shawl are worked as k2, yo, ml, chart, ml, yo, k2. - Note that one of the double decreases is a slk2tog psso (slip next st kw, k2tog, pssso). Garter tab cast-on (for both crescent & triangular): CO 2 sts for crescent using knitted cast-on (you may work a provisional CO of your choice, as you will be picking these sts up) Rows 1-6: K across Turn work Cw (CCw if left-handed) and pick up & purl 3 sts, one from every other row. Turn work Cw (CCw if left-handed) and pick up & knit 2 sts [7 sts] This pick up row counts as Row 1 of the pattern (ws row). From here on, move to chart, remembering to k2, yo, m1 at the start of each row and ml, yo, k2 at the end of each row. Alternately, you can CO 12 sts using knitted cast-on and knit 2 rows, then work k2, p8, p2 as your pre-chart row for the triangular, or CO 7, knit 2 rows, then work k2, p3, k2 for the crescent. http://www.ravelry.com/designers/deviousrose
Corinthian Order, @DeviousRose
Unlike the triangular, increases are NOT shown on charts. You must work each RS chart row as k2, yo, m1, chart, ml, yo, k2. Each ws row is just k2, purl across, k2. Stockinette version: Cast on the same way, and work spin as indicated, but work body in stockinette until you have 371 sts on needles, or any multiple of 12 + 11 (all RS rows will be k2, yo, m1, knit to selvedge, ml, yo, k2, and all wS rows will be k2, purl to last 2 sts, k2)
| Chartkey (abbreviations onlastpage) | ||
| stockinette(knitonRS,purlonws) | M1 | |
| yo | btc | |
| k2tog | garterstitch | |
| ssk | pattrepeat | |
| no stitch | stitchcounts | |
| cdc | spine sts | |
| s1k2tog psso(sl1kw,k2tog,psso) | no stitch | |
| yo, M1 on right half of chart, on LEFT half of chart M1,yo | edgeincrease | |
| B pb(placebead and slip stitch without working | knitonwsandRS | |
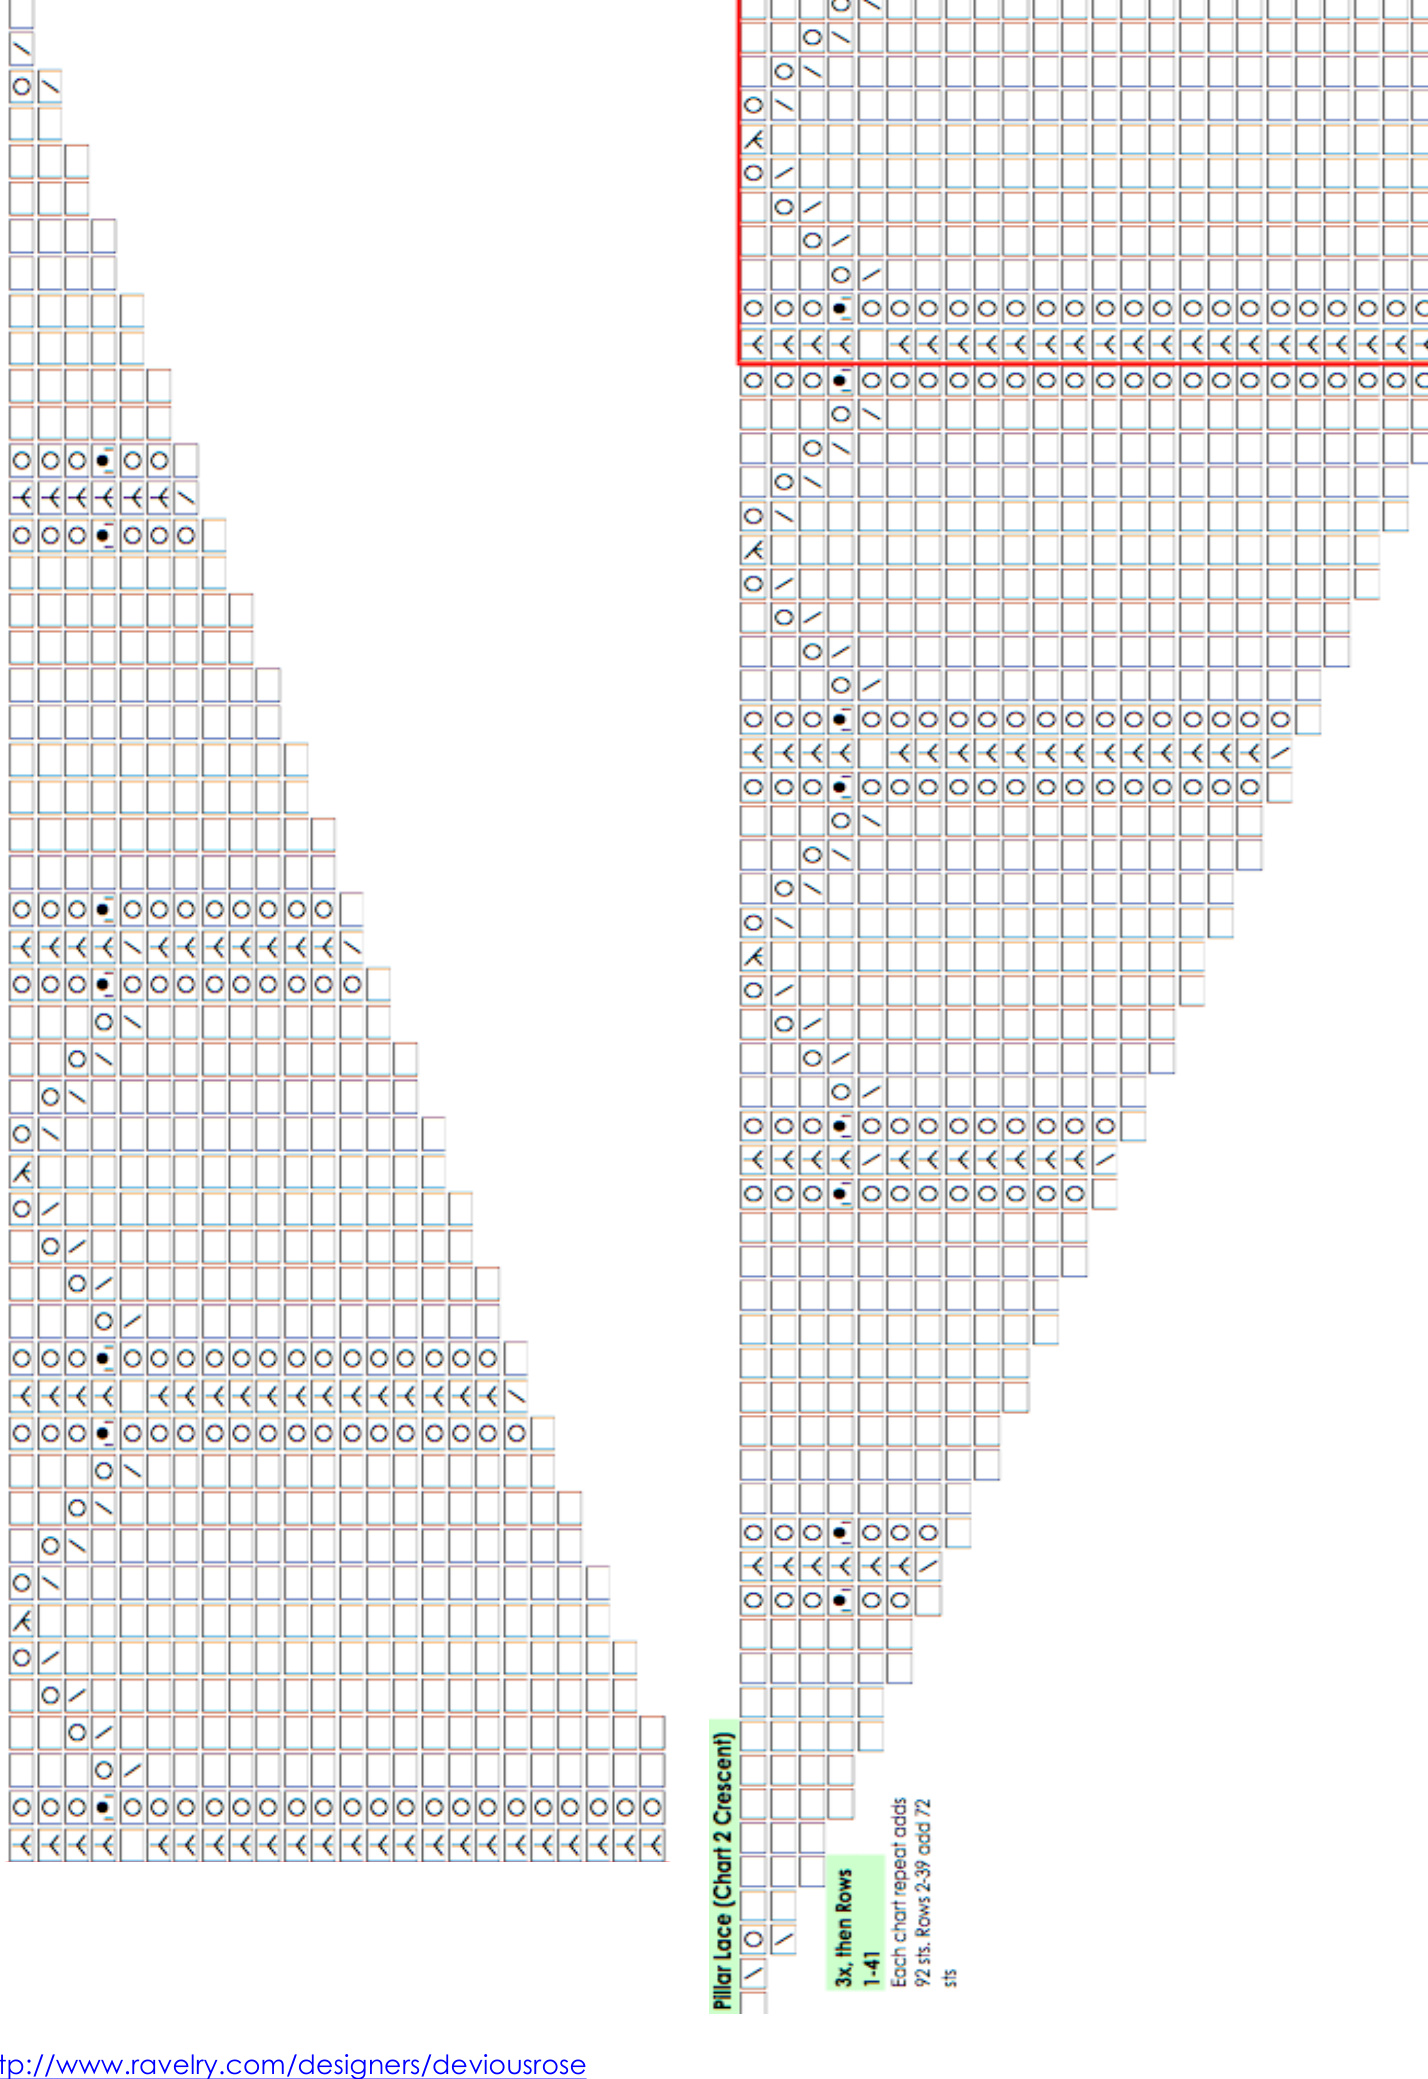
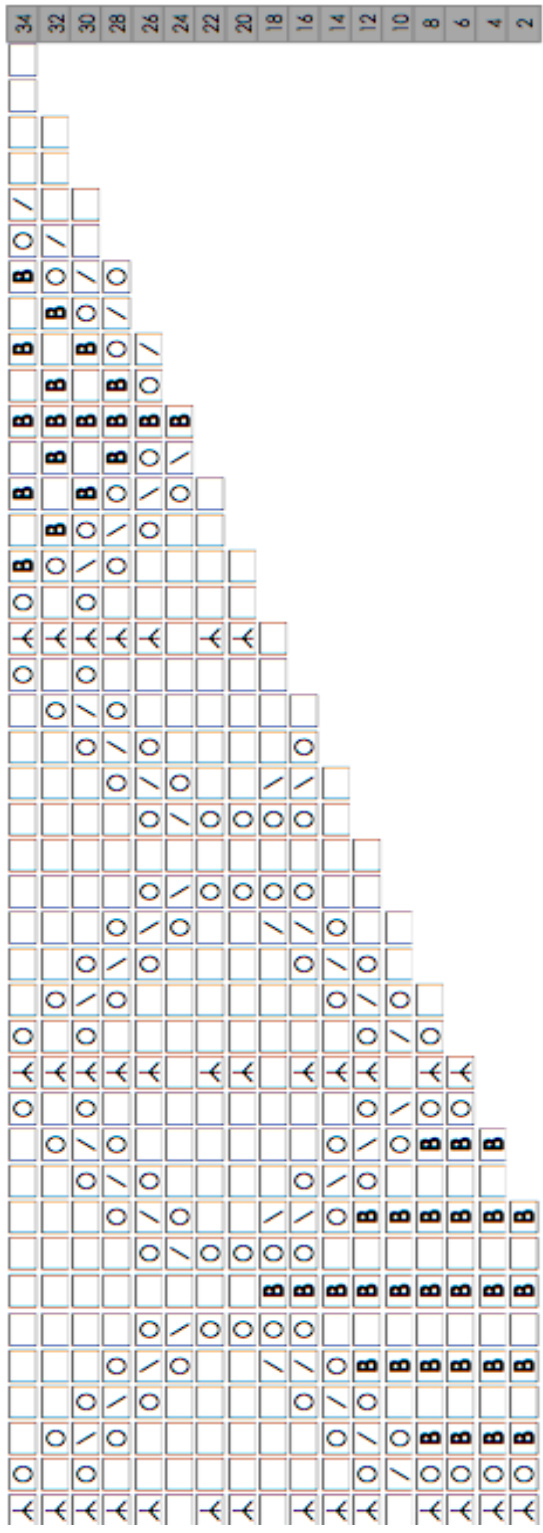
Crescent Chart 2- split in half to fit in document! Rotated on following page
Corinthian Order, @DeviousRose
Abbreviations:
CCW counter clockwise cdc centered double decrease (sl 2 kw, as if to k2tog, k next st, p2sso) cast on or cast off, depending on context CW clockwise k knit k2tog knit 2 together kw knitwise m1 make 1 (pick up bar between sts from previous row and knit) p purl pb place bead (after sliding bead onto stitch, DO NOT work stitch, but simple slip and continue to follow the chart) p2sso pass 2 slipped sts over psso pass slipped stitch over pw purlwise RS right side s1k2tog psso sometimes abbreviated as sssk in other patterns- slip 1 st kw, k2tog, psso (lleff-leaning double decrease) sl slip sm slip marker ssk slip, slip, knit (sl st kw, next st, psso) st(s) stitch(es) tbl through back loop WS wrong side yo yarn over
Clue 2: Preparing the pillars for embellishment
Now, we use beaaaads! Remember, you can replace beads with nupps if you want, but it will have a different effect and nupps are yardage devourers.

Clue 3: Finishing & consecrating (blocking) the temple
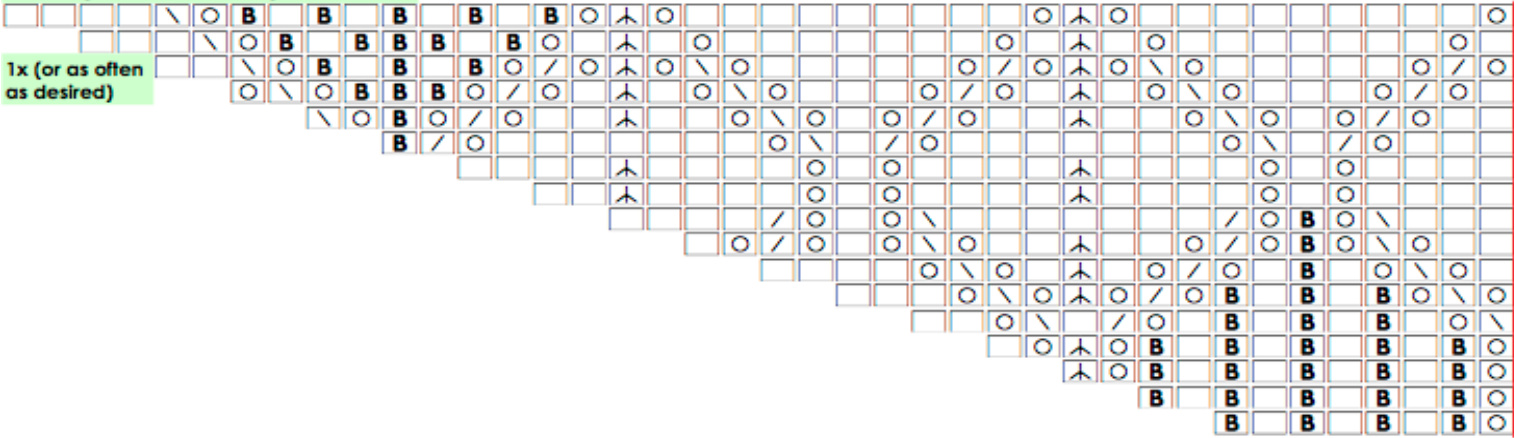
The charts have been split in half for your viewing and printing convenience. It was fun designing this and seeing everyone's progress and takes on the project!
Crescent Chart 4. Rotated version on following page, also split
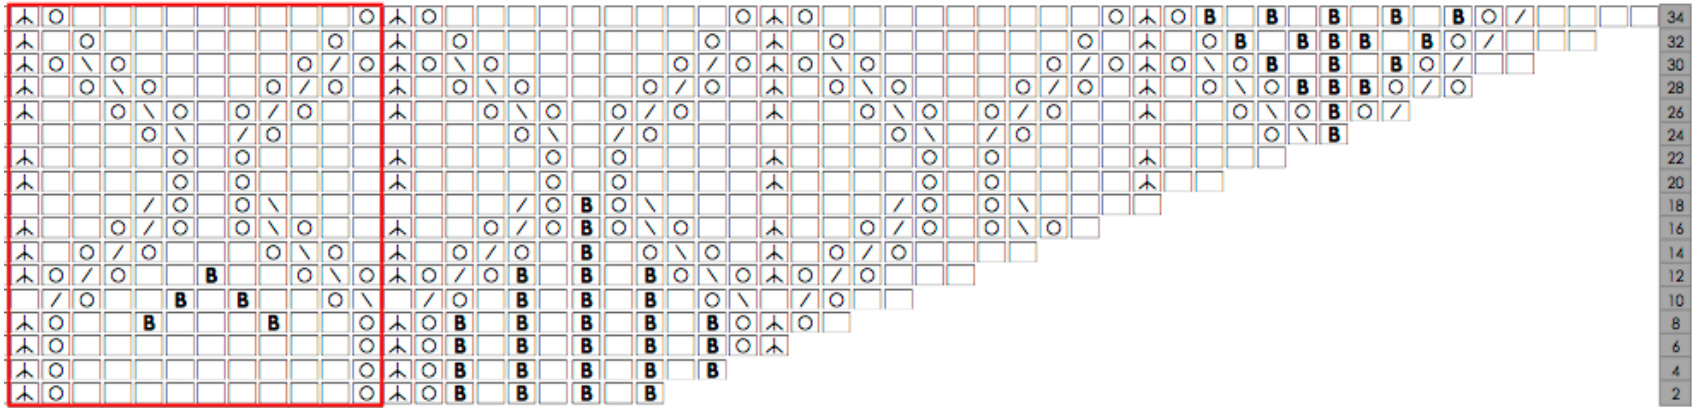
Corinthian Order, @DeviousRose
Casting off (all versions):
K1, \*k1, insert stitch-holding needle(left for right-handed people) into the front of the two stitches on the working (right) needle and k tog through front loop, similar to an sk\*, repeat from \* to \* to cast off all sts. ff and block. I usually weave in ends after blocking, but you can do it before
Blocking a lace shawl:
After casting off, your shawl will look crumpled and not very lacy at all, so if you don't block or don't often block, you wilhave to block your lacework. There is an easy way, without too many pins and no blocking wires, and a hard way to do this. The hard way is to get all your pins and stab through each point, curve, edge, and whatnot to get the shawl into shape. This is fine for patterns with simple edges, but annoying for scalloped, petaled, or any other complex edge motif, such as the points and spires of this design. If your design is complex, it is maddening to get all. Those. Edges. Perfectly in place. Not to mention getting that spine and the top of the shawl to behave! The easy way requires waste yarn for the top edge and the cast off edge (essentially, the whole perimeter), and pins just for the points. A similar method to mine, can be found at http://www.yarnharlot.ca/blog/archives/2005/08/23/walk_around_the_block.html with pictures! You need 2 or 3 lengths of waste yarn: one for the top edge of fhe shawl, at least 20 cm/8 inches longer than your intended wingspan (top dimension), and one length 20 cm/8 inches than the lower outer length around the body of the shawl, or 2 lengths each 20 cm/8 inches longer than the lower outer length of each body half of the shawl. You thread the first string through the top of the shawl, either through the yarn overs or the edge stitches, and the second string through the bottom CO edge. If you have three lengths of string, repeat the motion for the second on the other half of the body with the third string. Now you go about the same way you block any item: wet the item according to the yarn you are using, such as total water immersion for strong materials like merino or other sheep wools, and THEN pinning into shape, or pinning into shape and THEN spritzing until slightly damp for fibers like alpaca or cashmere. Now, don't panic. The "pinning into shape" here isn't the hard way described in the first paragraph. Here, you simply stab two pins through your blocking surface as far apart plus wiggle room as you want your shawl to have a wingspan, and wrap each edge of the top string each of the pins. Now you pull out the center of the shawl to how deep you want it, and pin through where the second string is (or second string and third string). Pin out each scallop. corner, or whatever the shaping is for the edge, and the waste yarns will force the cast off edge to follow the slopes of your lace. For this shawl, you will pull the points of the column tops out to cause them to flare. Whether you gently mist after pinning, or immerse in water before blocking, is up to you and the sort of yarn you'veused.
Pattern support:
If you catch a mistake on the charts or such, PLEASE let me know through Ravelry pm! For troubleshooting the pattern or style options, browse through the original MKAL forum on Ravelry to see people's questions and mods. If you have any other questions or concerns regarding the pattern, feel free to send me a message on Ravelry. You could also e-mail me at deviousrose@hotmail.com, but I do not check that email as offen as I should, whereas I am addicted to Ravelry. As a little side note, I would once again like to thank everyone who knit this up during the MKAL, whether active forum posters or not, or on time or not, but I would especially like to thank those who reported your progress and asked questions. Without you, I would not have been able to release corrections and may not have noticed mistakes or confusing directions for a very long time. This MKAL would not have been successful withoutyou! Happy yarning! Au revoir!


