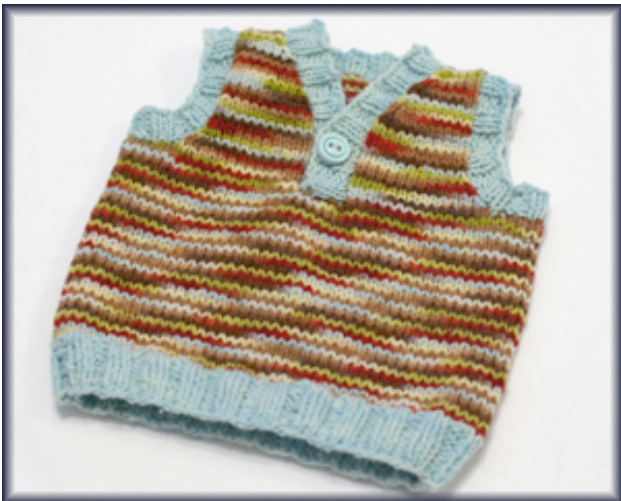
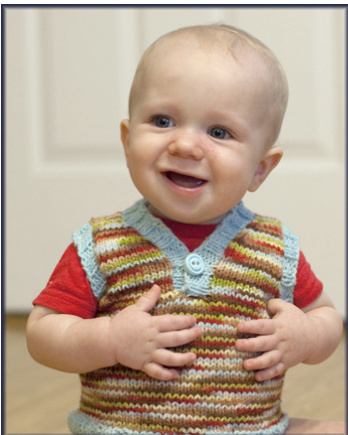
Benedick & Beatrice: a vest for boys and girls
Sizing... 3m (6m, 12m,2T, 4T) Measurements... Chest: 16 (17.6, 19.2, 21.6, 23.2) inches Body Length: 8 (9, 11, 13.5, 15.5) inches Gauge is 5 spi or 20 sts = 4"
Requirements..
Worsted Weight yarn - approximately... MC -120 (140, 160, 180, 200) yards CC - 30 (40, 50, 60, 70) yards US 7 16" circulars; US 7 20" circulars for toddler sizes; US 7 DPNs or 12" circulars for baby sizes or needle size needed to obtain gauge Stitch markers Several stitch holders or spare yarn Tapestry needle 1 button, 1/2" or 3/4" \*\*\*While not required i is helpful tohavean extraS7 circlar needle of alonger length for your comfort when knitting the panels. You also have the option of using two 1/2" buttons for the toddler sizes.
Abbreviations...
CC: Coordinating Color MC:Main color PM: Place marker BO:Bind off YO: Yarn over K2tog: Knit the next two stitches together as one SSK: Slip a stitch, slip another stitch, knit both stitches together as one Named after the comical Shakespeare couple, this vest is fun, sweet, and stylish. The body is knit in the round from the waist up. The front and back panels are knit flat one at a time and then grafted together at the shoulders. Neck and armbands are created by picking up stitches. A single button creates a stylish and functional final touch. Please read through the pattern carefully before beginning. After the body is knit you may choose to transfer your stitches to a longer Us 7 needle, enabling to you comfortably work on each of the chest and back panels individually while the remaining live stitches wait on the cord of your needles. Let's begin!
Body
CO 80 (88, 96, 108, 116) stitches using the long tail method with CC and size 7 circular needles. Place marker and join for working in the round. Work K2P2 ribbing for 1 (1.5, 1.5, 1.75, 2) inches. Switch to MC and work in stockinette stitch (knit all rounds) until piece measures 4 (4.5, 5.5, 7.5, 9) inches fromcast on edge. You will now separate the piece for the vest panels. Knit the following: K 14 (16, 18, 19,21), BO4, K 14 (16, 18, 19, 21), PM, K 48 (52,56, 66, 70)
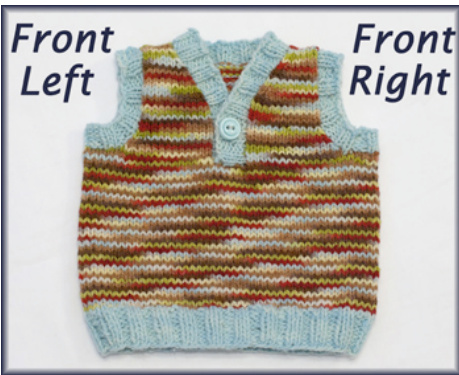
Note:Afterbinding off 4 you will stillhave1 stitch onyour needle.This stitch counts toward your second set of 14 (16, 18, 19, 21) stitches. The first 14 (16, 18, 19, 21) stitches are your Front Right panel; the BO section is for your button band; the next 14 (16, 18, 19, 21) stitches are your Front Left panel; and the final 48 (52, 56, 66, 70) stitches are your armholes and Back panel. will work the rest of the body flat in panels: Front Right, Front Left, and Back
Front Right Panel
You have 14 (16, 18, 19, 21) stitches on your left needle between the bind off area and marker. These stitches make up your Front Right panel. For this section you will only work on these stitches. Knit 14 (16, 18, 19, 21), stopping at the bound off area. Turn your work and purl back to the marker. Turn and knit back to the center bind off area. To decrease for the arms you will work the following two rows a total of 3 times: R1: Purl R2: K1, SSK, K to end of row The Front Right panel now has 11 (13, 15, 16, 18) stitches. Beginning with a purl row, work in stockinette stitch for 7 (7, 9, 11, 13) rows. Now you will decrease for the V-shape at the neck. Work the following 2 rows until 7 (7, 7, 8, 9) stitches remain, ending after a purl row: R1: K to last 3 sts, K2tog, K1 R2: Purl Place the remaining 7 (7, 7, 8, 9) stitches on a stitch holder. Break yarn.
Front Left Panel
Return to the first 14 (16, 18, 19, 21) stitches on the other end of your needles, separated from the back by a marker you placed earlier. This section is your Front Left panel. For this section you will only work on these stitches. Attach the yarn on the right side by the bind off section. Knit 14 (16, 18, 19, 21), stopping at the marker for the underarm. Turn your work and purl back. Turn and knit back to the underarm marker. To decrease for the arms you will work the following two rows a total of 3 times: R1: Purl R2: K to last 3 sts, K2tog, K1 The Front Left panel now has 11 (13, 15, 16, 18) stitches. Beginning with a purl row, work in stockinette stitch for 7 (7, 9, 11, 13) rows. You will now decrease for the V-shape at the neck. Work the following 2 rows until 7 (7, 7, 8, 9) stitches remain, ending after a purl row: R1: K1, SSK, K to end of row R2: Purl Place the remaining 7 (7, 7, 8, 9) stitches on a stitch holder. Break yarn.
Back Panel
Return to the remaining 48 (52, 56, 66, 70) stitches on your needles. Place the first 8 (8, 8, 12, 12) stitches and last 8 (8, 8, 12, 12) stitches on separate stitch holders. These stitches willbe used when adding underarm trim later. You now have 32 (36, 40, 42, 46) back stitches on your needles. Attach the yarn on the right side and knit across one row. Turn your work and purl back. Turn and knit back. Work the following two rows 3 times to decrease for the underarms: R1: Purl R2: K1, SSK, K to last 3 sts, K2tog, K1 You now have 26 (30, 34, 36, 40) back stitches. Beginning with a purl row, work in stockinette stitch for 9 (13, 19, 21, 25) rows. Left Back Shoulder On your next row, K 9 (9, 9, 10, 11), place a marker, drop your working yarn, attach new yarn and knit to the end of the row. Turn and purl back 9 (9, 9, 10, 11) stitches. Place another marker, stop and turn your work. Repeat the following two rows 2 times, working only on the 9 (9, 9, 10, 11) stitches after the marker you just placed. These stitches will make the left back shoulder. R1: K1, SSK, K to end of row R2: Purl to marker Place these 7 (7, 7, 8, 9) stitches on a stitch holder. Place the middle back 8 (12, 16, 16, 18) stitches on another stitch holder. Right Back Shoulder Return to the first 9 (9, 9, 10, 11) stitches at the marker you placed above. For the following, work only on these 9 (9, 9, 10, 11) stitches. Your old working yarn should still be attached. Purl 1 row. Work the following two rows 2 times. @ 2011 - Laura Savastinuk, Rhino Knits. All rights reserved. This pattern may be printed, but may not be republished or distributed. R1: K to last 3 sts, K2tog, K1 R2: Purl Place these 7 (7, 7, 8, 9) stitches on a DPN or spare needle. Use the kitchener stitch to graft the back and front right panels together, and the back and front left panels together.
Neck Trim and Button Band
Using your CC and size 7 needles you will pick up stitches for the neck trim and button band. As you work keep count and make sure your final stitch count is an even number of stitches. Beginning at the bottom of the left front panel work your way up the chest opening, picking up 3 out of 4 stitches. Once you get to the back neck you will knit the 8 (12, 16, 16, 18) back stitches off of the stitch holder. Continue picking up stitches across the right shoulder and down the front right panel. Do not pick up along the bound off area in the center of the chest. Do not join in the round. Work in K2P2 rib for 2 rows. On your next row your will create your buttonhole. For the baby sizes, plan where to place it such that it will fall in the middle of the vertical section of band before the V. For toddler sizes, place it slightly below the center. It does not matter which side you place your buttonhole on. For the toddler sizes you may also elect to create 2 buttonholes for two 1/2" buttons, if you wish. I recommend creating the buttonhole with a YO and either K2tog or P2tog, depending on what stitches follow the YO. For example: .., P2, YO, K2tog, P2, ...etc Work K2P2 rib for another 2 rows and then bind off loosely in pattern, leaving a tail several inches long. Use this tail to sew the button bands on top of each other in place at the center of the chest.
Arm Bands
Now you will pick up stitches around the armholes. For both arms you will want to count and make sure that you pick up a multiple of 4 stitches. This is important, as you need a multiple of 4 to do the 2x2 rib on the trim. Using your CC and size 7 12" or 16" circulars or DPNs, start at the bottom of the arm just to the left of the underarm stitches on the stitch holder. Work your way around the armhole picking up approximately 3 out of 4 stitches and ending by knitting the 8 (8, 8, 12, 12) stitches from the stitch holder. Place a marker and join to work in the round. Work in K2P2 rib for 5 rounds. Bind off in pattern. Pick up the exact same number of stitches for both arms. This will prevent one armband from being smaller or bigger than the other.
Finishing
Sew on the button and lightly block. Dress your little one up and enjoy!


