Grace Notes Dolls
a knit-in-the-round doll with jointed head; nine inches tall before wigging.
Materials:
-Light worsted yarn. Bernat Super Value (7 oz/ 426 yds), Berrocco Vintage (3.5 oz/ 217 yds), Patons Classic Wool (3.5 oz/ 210 yds). Approximately one ounce will make one doll. Models were made with Bernat super value and Patons Classic Wool. -Size 2 dpn's; two sets -Fiberfill -yarn and floss for embroidering face Design by Beth Webber. Please do not copy or sell this free pattern. -tapestry and dollmaking needles -buttonhole and craft thread -chenille stem and Warm&Natural batting to re-enforce the neck -Size D crochet hook (for picking up stitches and crocheting the ears) -Size E or F crochet hook for making wig cap -Yarn of choice for hair. 100% wool yarns, mohair blend yarns, eyelash yarns all make great hair. Gauge: 6 stitches = 1 inch Size: about nine inches tall before wigging Stitches: Kinc = knit in the front and in the back of the stitch to make an increase. This increase is used at the beginning of the foot, hand, and head. Kinc = A lifted increase. Used on the upper leg, upper arm, and torso. This increase is much less visible. Kdec = knit two stitches together to make a decrease Notes: This doll is knit on double point needles in the round. The head is knit separate from the body and jointed to the neck to be move-able. Regarding body yarns: the three yarns mentioned above all have very similar weight and yardage, but they make up differently. 100% acrylic 'grabs' the needles and is harder to knit with than 100% wool or wool blend. Having used all three to make this doll, I would recommend 100% wool or a wool blend yarn. Regarding increases: For the first two prototype dolls, I used the knit in the front and in the back' of the stitch for all of the increases. I did not care for how this looked on the leg, torso, arm and bottom of the head. For the final prototype, I used lifted increases for most of the increases. The only places I did not use this were at the beginning of the foot, hand, and head. In these places it is not as noticeable, and just easier for me to manipulate the needles with the 'front and back' increase.
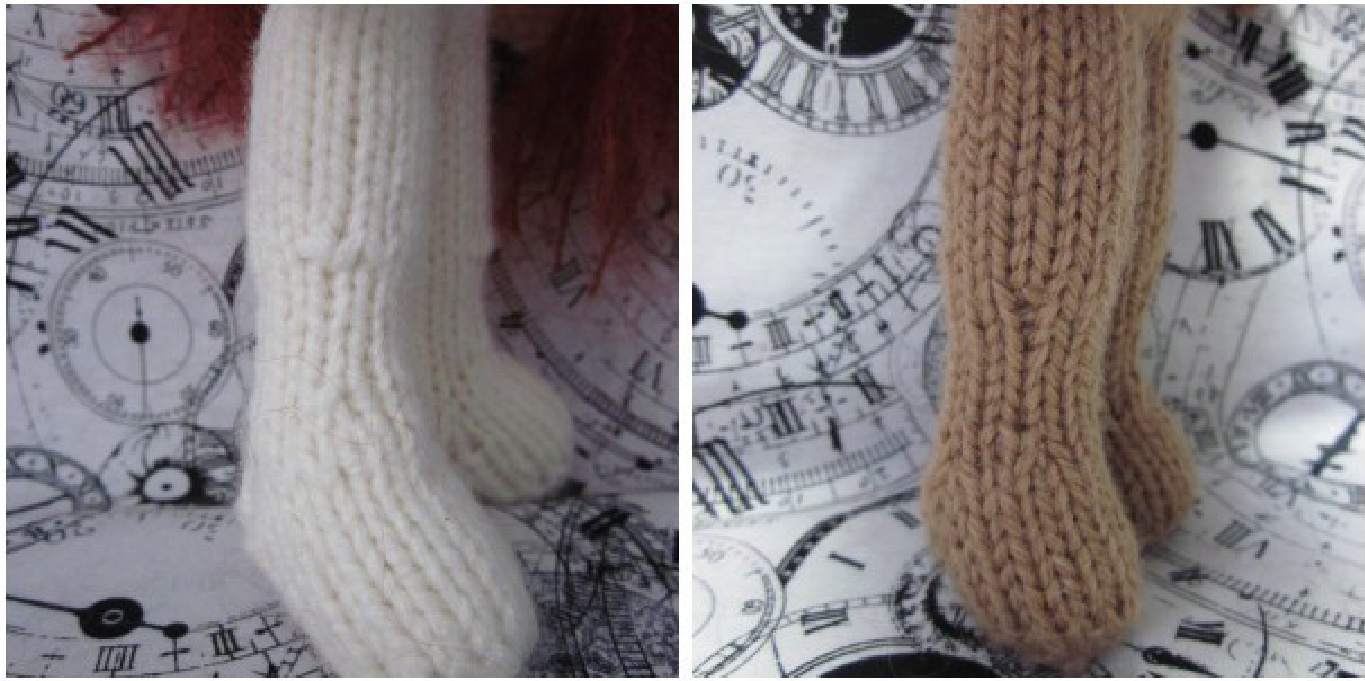
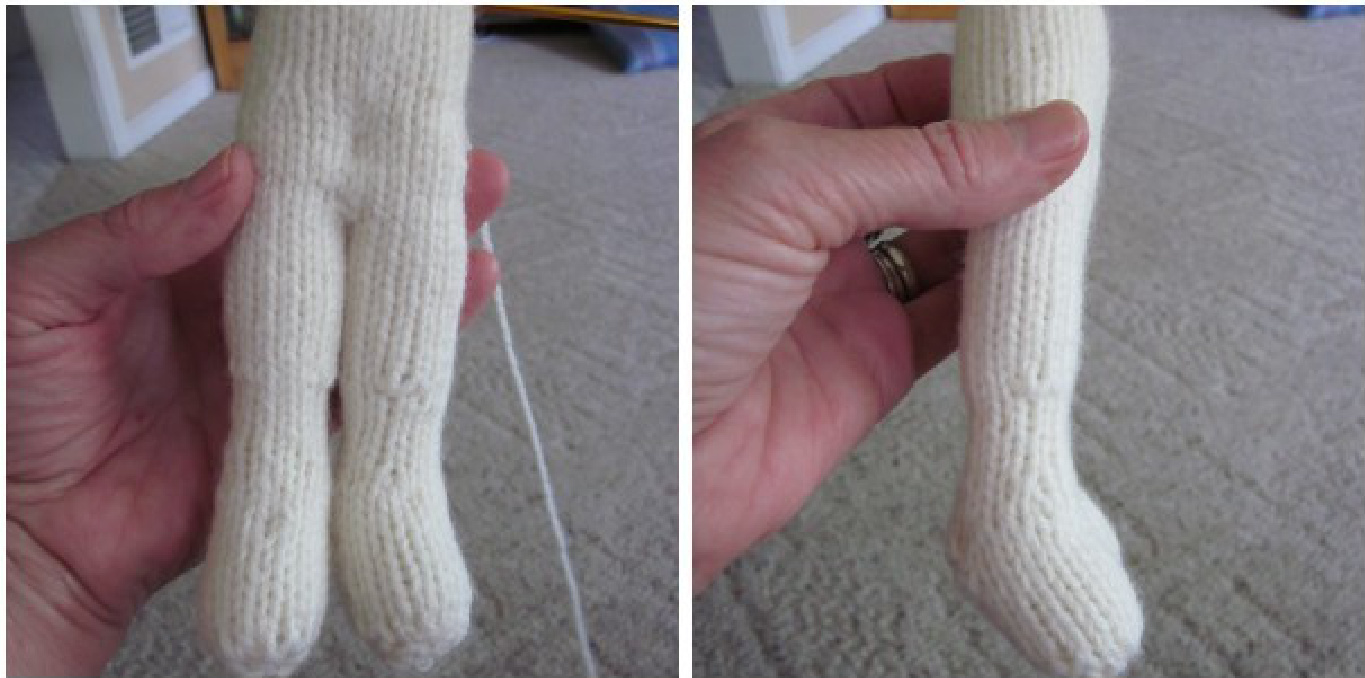
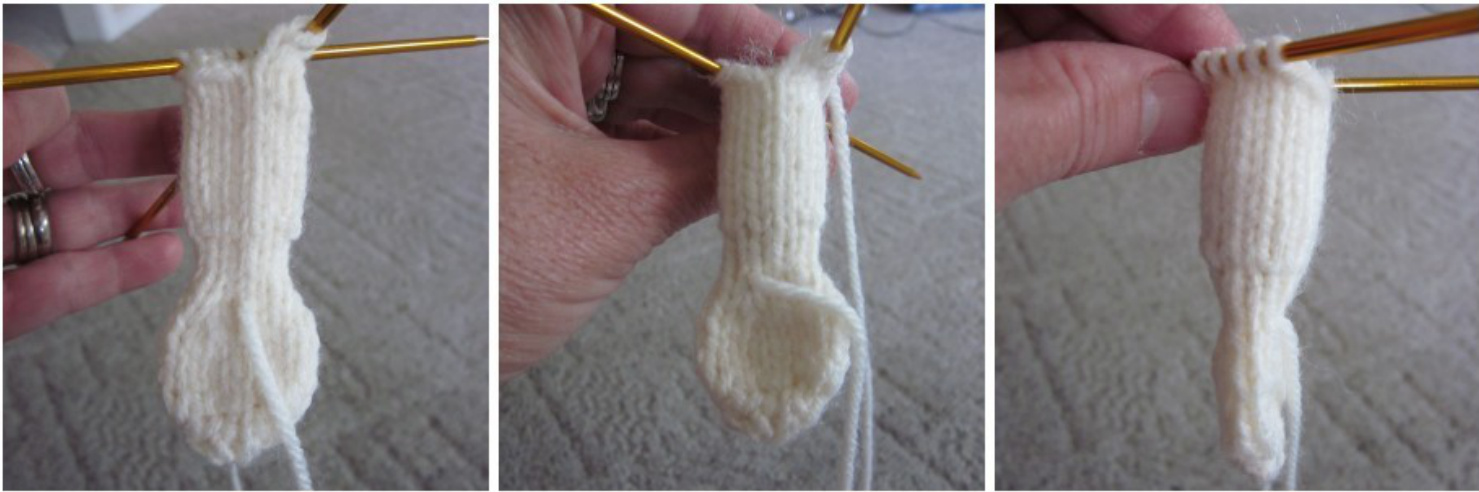
Design by Beth Webber. Please do not copy or sell this free pattern. Regarding knitting in the round on dpns: After my first experience with dpns (making two Arne&Carlos dolls with acrylic yarn) I thought I would never want to use them again. Two years and a bit more experience later, it is easy to see why dollmakers like knitting dolls in the round. Far fewer seams for one: just the crotch seam and two underarm seams. But more importantly, the knit fabric appears to me to be more uniform and tighter, allowing for better stuffing without stretching the stitches. This shows most clearly on the face. Enough chat! Lets knit a doll :-) Begin with foot and leg: Leaving a long tail, cast on six stitches and divide evenly over three dpn's 1: K2 on each needle. 6 sts 2: K1, Kinc on each needle. 9 sts 3: K3 on each needle. 9 sts 4: Kinc, K1, Kinc on each needle. 15 sts 5-8: K5 on each needle. 15 sts 9: working on needle one only, K5, turn. 10: working on needle one only, P5, turn. 11: working on needle one only, K5, turn. 12: working on needle one only, P5, turn. 13: working on needle one, K5 and pick up two stitches on the side of the heel K5 on needle two K5 on needle three and pick up two stitches on the side of the heel. 19 sts. You nov stitches on needle one, five stitches on needle two, and seven stitches on needle 3. Sew the opening in the toe closed and thread the yarn tail up between needle 3 and needle 1 to use as a row marker. 14: Needle one: K5, K2 tog Needle two: K5 Needle three: K5, K2tog. 17 sts 15: Knit 17 sts around. 16: Needle one: K4, K2tog Needle two: K5 Needle three: K4, K2tog. 15 sts Stuff the foot; be careful not to stretch the stitches. 17: K1, K2tog, K2 on each needle. 12 sts 18-24: K4 on each needle. 12 sts. 25: (K1, Kinc with a lifted increase, K3) on each needle. 15 sts 26-38: K5 on each needle; add stuffing gently as you work up the leg. 15 sts. 39: K5, bind off one stitch, K9 including the last st of the bind off. Leaving a long tail, cut yarn of firs leg and divide stitches on two dpn's, 7 sts on each needle on either side of the bound off stitch. Second leg: Work the same as the first leg through round 38. Round 39: bind off one stitch, K14 including the last st of the bind off. Do not cut yarn at the end. Divide stitches over two dpns. Seven stitches on each needle. The bind-off stitches of each leg should be facing each other at the crotch. Design by Beth Webber. Please do not copy or sell this free pattern. Torso: knitting begins at the center front of the body. 1-6: K7 on each needle. 28 sts. Run the long tail from leg 1 to the back of the body just above the crotch opening. Use this tail to sew the crotch opening closed. Leave the tail to make a tiny belly button when the body is stuffed. /: INeeue iallu Z: ro, Nztug, r2 . Needle 3 and 4: K2, K2tog, K3. 24 sts 8-12: K6 on each needle. 24 sts. 13: (K3, Kinc with lifted increase, K3) on each needle. 28 sts 14-16: K7 on each needle. Stuff torso firmly but gently. With the yarn tail you sewed the crotch closed with, make a belly button in the front of the body. 17: K6, bind off 2, K12 including the last st of the bindoff; bind off 2, K6 including the last st of the bindoff. Place stitches on two dpns with 12 stitches on each needle.
2 these pictures are of the first prototype doll, with Knit front-to-back increase rm: Leaving a long tail, cast on six stitches and divide evenly over three dpn 1: K2 on each needle. 6 stitches 2: K1, Kinc on each needle. 9 stitches 3: K3 on each needle. 9 stitches 4: Kinc, K1, Kinc on each needle. 15 sts 5-7: K5 on each needle. 15 sts 8: K1, K2tog, K2 on each needle. 12 sts. 9: K1, K2tog, K1 on each needle. 9 sts. Sew the bottom of the hand closed and thread the yarn up and between needle 3 and needle 1 for a row marker. 10-14: K3 on each needle. 9 sts 15: (K1, Kinc with lifted increase, K2) on each needle. 12 sts 16-25: K4 on each needle, 26: Bind off two sts, K10 including the last st of the bind off. Cut yarn leaving a long tail and place Design by Beth Webber. Please do not copy or sell this free pattern. the stitches evenly on two dpns (will be easer to knit together with the torso if you use two dpns for each arm). With the bound off stitches at the top of the arm facing you, flatten the hand and make two small stitches at the wrist through both thickness's of knitting. Stuff the arm lightly but do not stuff the hand. You will be able to cup the hand gently, so your doll won't look like she is making a fist :-) Repeat for second arm, except do not cut yarn.
Shoulders and neck stub. Beginning at back with yarn from the last arm knitted: 1: K1, K2tog, K6, K2tog, K1 across back, K10 across arm, (work the two needles for the arm back onto one needle in this round) K1, K2tog, K6, K2tog, K1 across front, K10 across arm (work the two needles for the arm back onto one needle in this round). 40 sts 2: K10 on each needle 3: K1, K2tog, K4, K2tog, K1 on each needle. 32 sts 4: K8 on each needle. 32 sts 5: K1, K2tog, K2, K2tog, K1 on each needle. 24 sts 6: K6 on each needle. 24 sts. 7: K1, K2tog, K2tog, K1 on each needle. 16 sts. Stuff the shoulder area. 8: K4 on each needle. 16 sts 9: K1, K2tog, K1 on each needle. 12 sts. Divide stitches evenly on three needles: four stitches pel needle. Sew the underarm openings closed. 10-21: K4 on each needle. Work stuffing lightly into the shoulder and lower neck area as you wO1 the neck stub, but do not stuff the neck stub. Cut the yarn leaving a long tail. Thread tail onto a tapestry needle and thread through the neck stitches. If you don't want to make a move-able head, work the neck stub to round 15, then divide the stitches evenly onto four dpns (three stitches per needle) and work the head from this point. Either way, you still want to re-enforce the neck as described below:
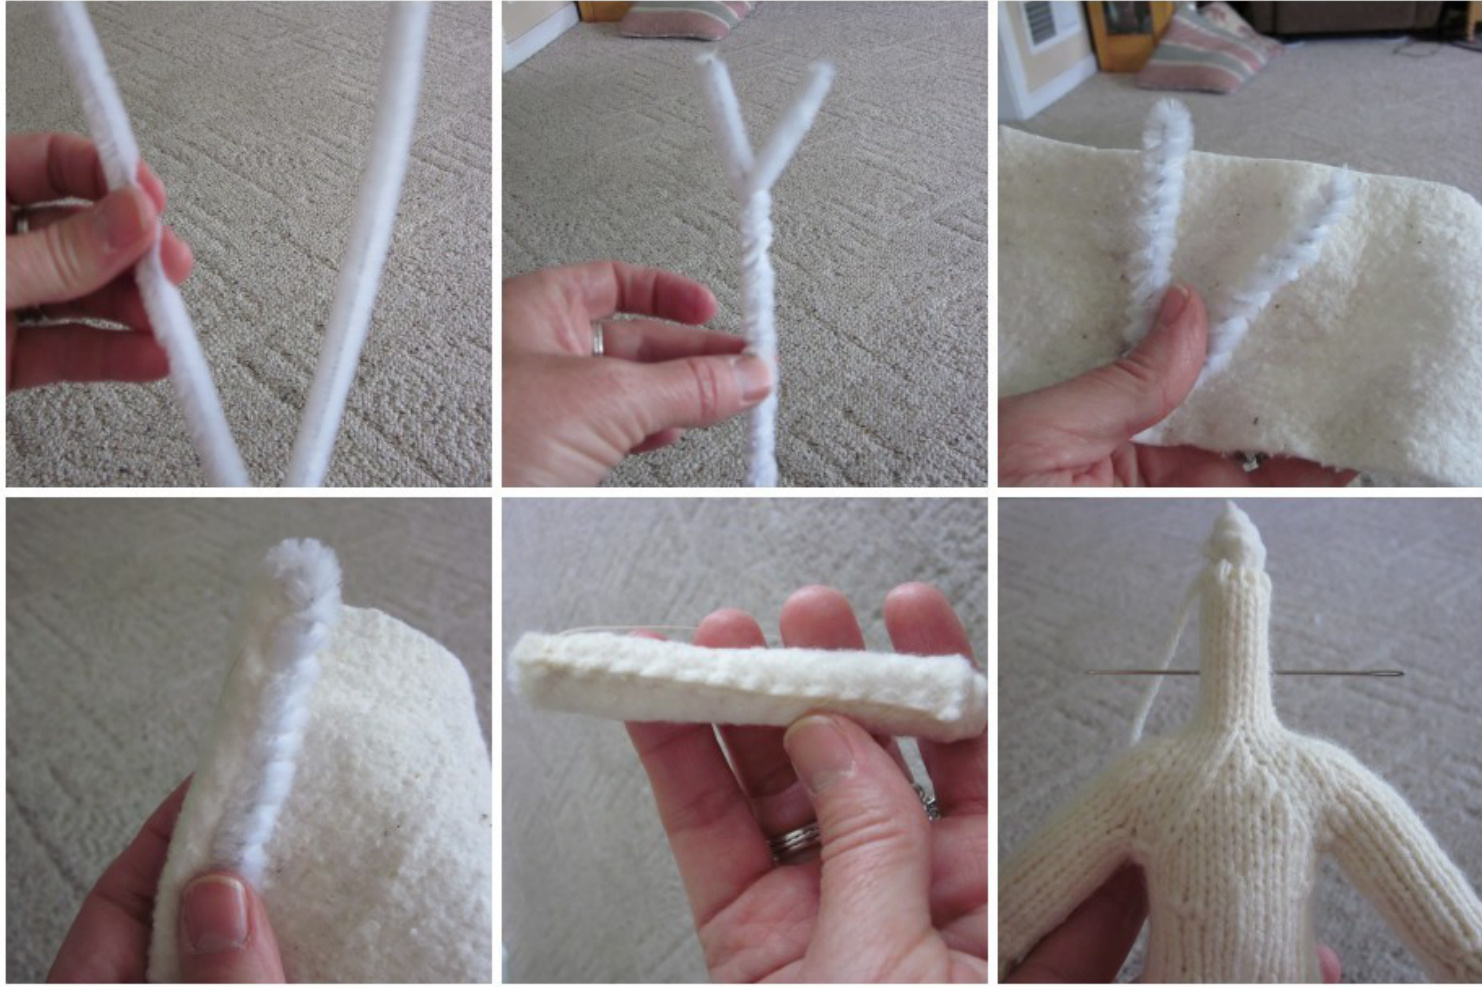
Prepare the neck support:
: so you can joint the head to it, take a 12 inch chenille stem and fold it in half Design by Beth Webber. Please do not copy or sell this free pattern. Twist the halves together tightly, then fold this in half again. Cut a piece of Warm&Natural batting the length of the twisted chenille (about three inches) by about four inches. Place one end of the batting between the folded edges of the chenille and wrap the chenille tightly with the batting. Check that this will fit into the neck without stretching the stitches; if necessary trim some of the batting back. When you have a good fit, stitch the batting to itself to keep it from unrolling. Stuff the shoulder area, leaving a hollow spot you can insert the neck stabilizer into the neck area down into the center of the shoulder area. Make sure you can pass a dollmaking needle through the neck, between the legs of the chenille stems, in order to joint the head. Set this aside until the head is complete. Below is a picture tutorial of creating the neck support:
Head: cast on 12 stitches and divide evenly over four dpns; three stitches per needle. 1: K3 on each needle. 12 sts 2: Kinc in every stitch on each needle. 24 sts (this row only is a front-to-back increase). 3: K6 sts on each needle. 24 sts 4: (Lifted Increase, K2) three times on each needle. 36 sts 5: K9 sts on each needle. 36 sts 6: (Lifted Increase, K3) three times on each needle. 48 sts 7-25: K12 on each needle. 48 sts. 26: (Kdec) six times on each needle. 24 sts Design by Beth Webber. Please do not copy or sell this free pattern. 27: K6 on each needle. 24 sts. 28: (Kdec) three times on each needle. 12 sts 29: K3 on each needle. Cut the yarn leaving a long tail. Thread the tail into a tapestry needle and run through the stitches of the last round. Pull the yarn end at the top of the head tightly and tie off, but don't cut the yarn tail off yet (we'll use it to make the nose and eyelids). Stuff the head, making sure it is nicely shaped and you've not distorted or stretched the stitches.
Facial Features:
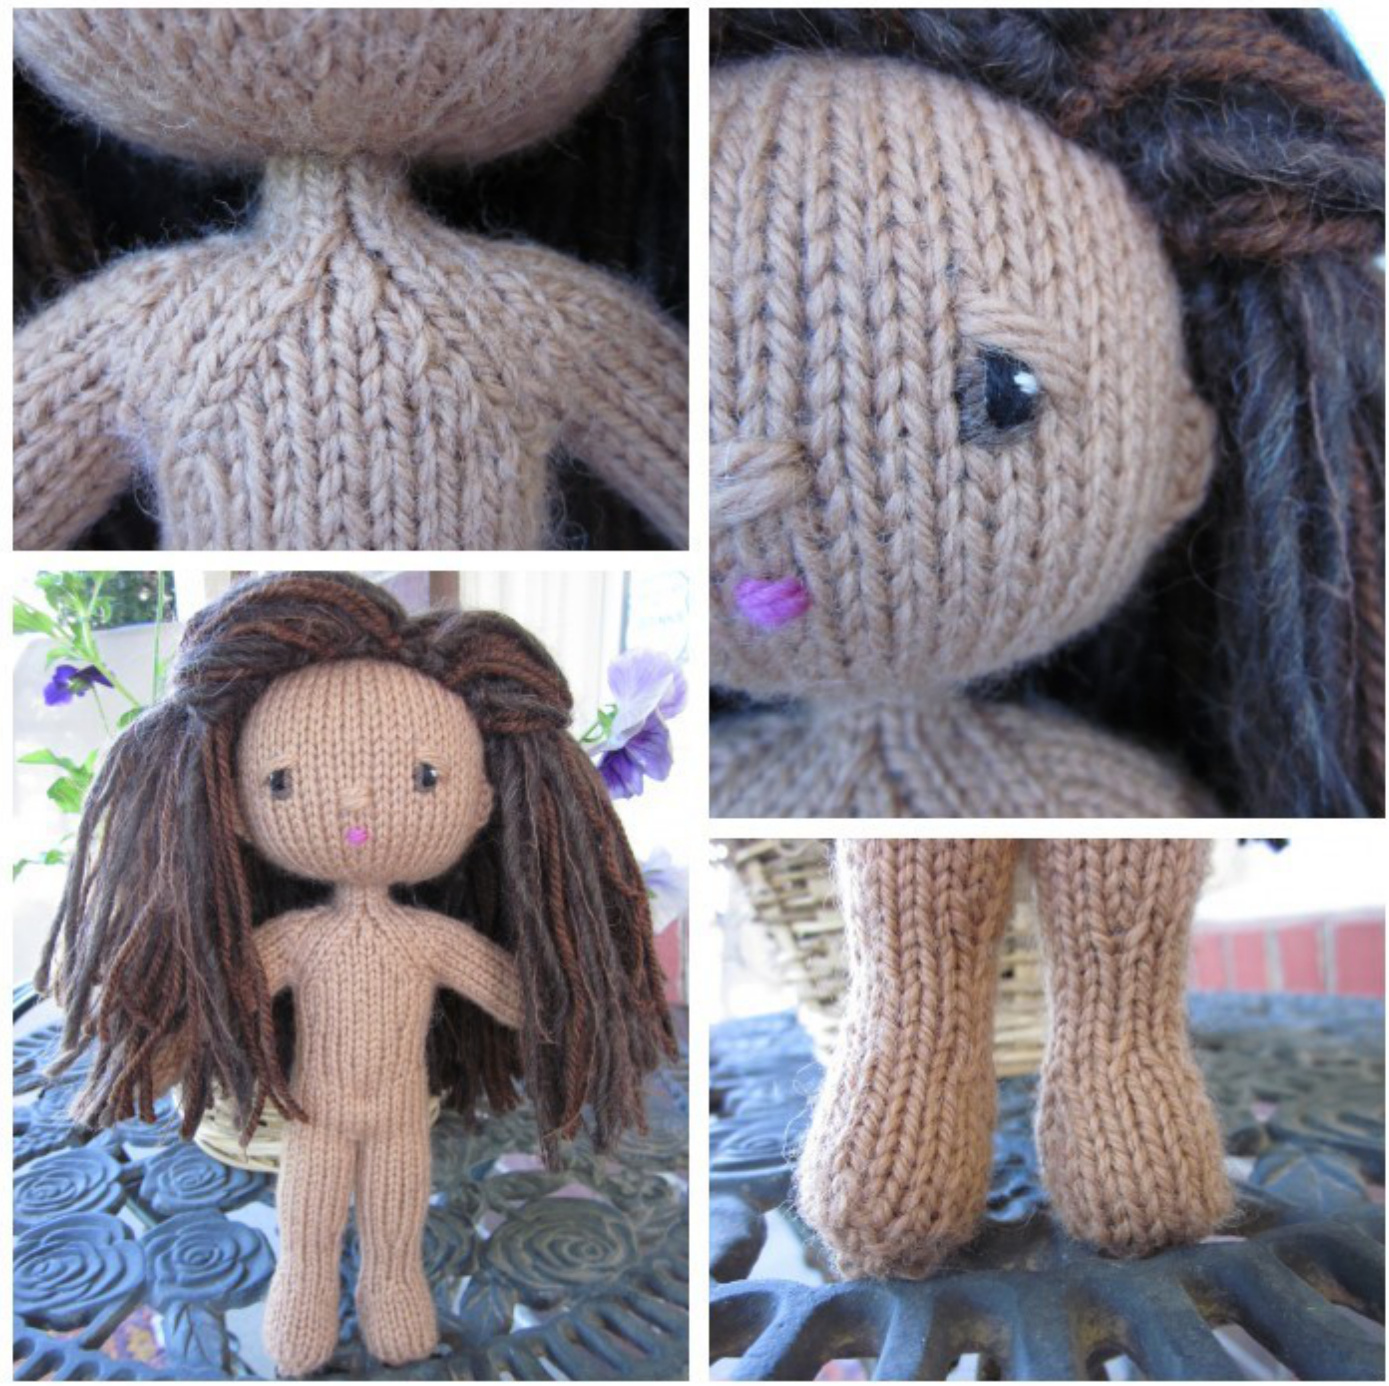
There are several ways to create a pleasing face. If you want to create a more childlike doll, the facial features should be placed in the lower half of the face. Eyes should be large, and I find that a simple mouth works best on knit and crochet. The nose can be a French knot or two or three straight stitches in the yarn you used for the body. Apply the facial features before stringing the head to the neck. To locate the placement of the eyes, tie a string around the dolls head at the widest point; use bead head pins to place the eyes and mouth.
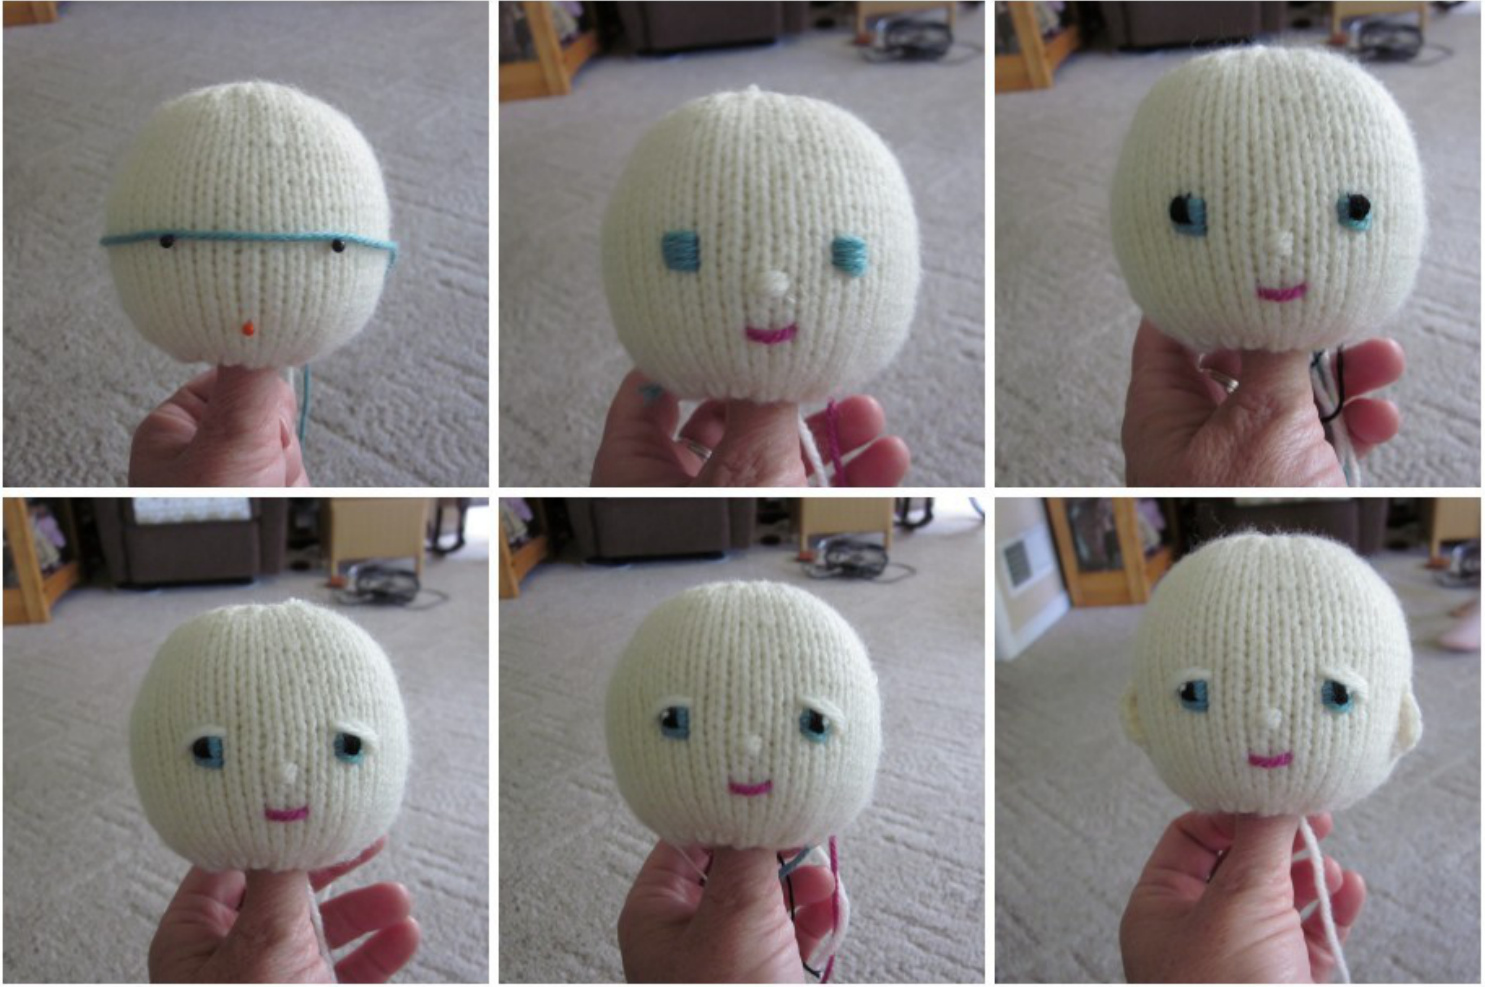
Use a light worsted yarn in eye color to stitch the eyes with four or five satin stitches, 1 12 knit stitches wide and 2 or 3 knit stitches long; work these stitches from side to side. With black six strand embroidery floss, satin stitch the pupils over the eye color, working these stitches from top to bottom. With 3 strands of white embroidery floss, take two tiny straight stitches to add eye shine. Design by Beth Webber. Please do not copy or sell this free pattern. For the mouth, use light worsted yarn and take one or two straight stitches. For the nose use the long yarn tail from closing the top of the head and make two or three straight stitches. Use this same length of yarn to straight stitch eyelids over the eyes. See the pictures above for placement. I like ears on my dolls, but don't like to knit them. Crochet them with a size D hook about five rows away from the eyes and centered between the eyes and the mouth. These ears are simple single crochet stitches.
Assemble the head on the neck as follows:
Create a hollow in the neck end of the head for the neck stub to fit into. Thread a dollmaking needle with two doubled strands of buttonhole and craft thread. Starting at the top of the head, insert the dollmaking needle from the top of the head out through the opening at the bottom. Pass the needle through the neck and back into the head opening and out the top of the head. Gently pull the neck stub into the head opening until the head is well seated on the neck. Tie off the threads with a double knot.
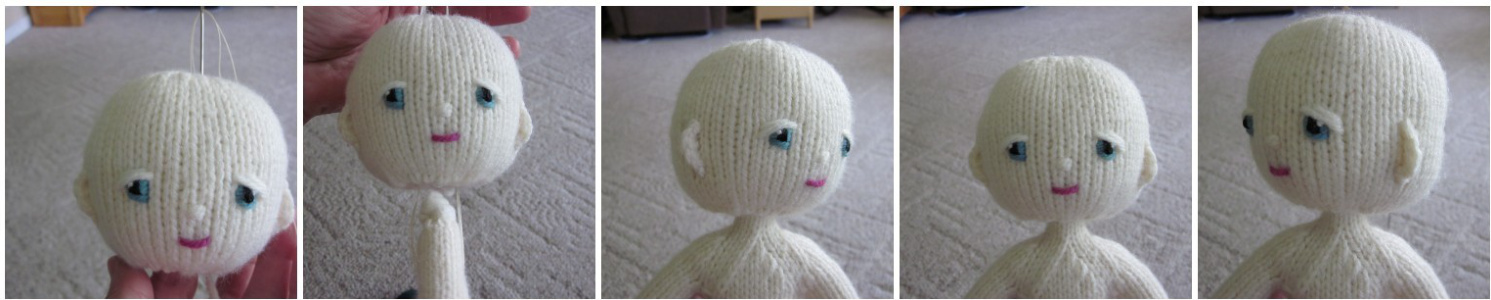
For a neatened finish to the head and neck, take the long tail from the beginning of the head and thread it onto a tapestry needle. Thread the tail through the first row of stitches on the head, making sure you do not catch any of the neck stitches. Pull this tight and it will snug up the head stitches to the neck. Bury the long tail in the head.
Hair and wigs.
It is worth knowing how to do single crochet to make wig caps for your dolls. They can be knit, by simply knitting the first several rounds of the head until you get the right fit, but crochet is quicker. Using either your hair yarn, or a yarn very close in color to your hair yarn, start with ch2 and work eight single crochet in the second chain from the hook. Working in the back loops only and in the round, increase by eight stitches each round for about four rounds (32 stitches in the fourth round). Check the fit, work some more rounds, increasing if necessary. Work until the cap fits nicely on the dolls head, like a watch cap. Sew this down to the head, then use it as a base for any wig you like. The hair yarn does not have to be applied as thickly, since the wig cap hides the scalp color. Design by Beth Webber. Please do not copy or sell this free pattern.
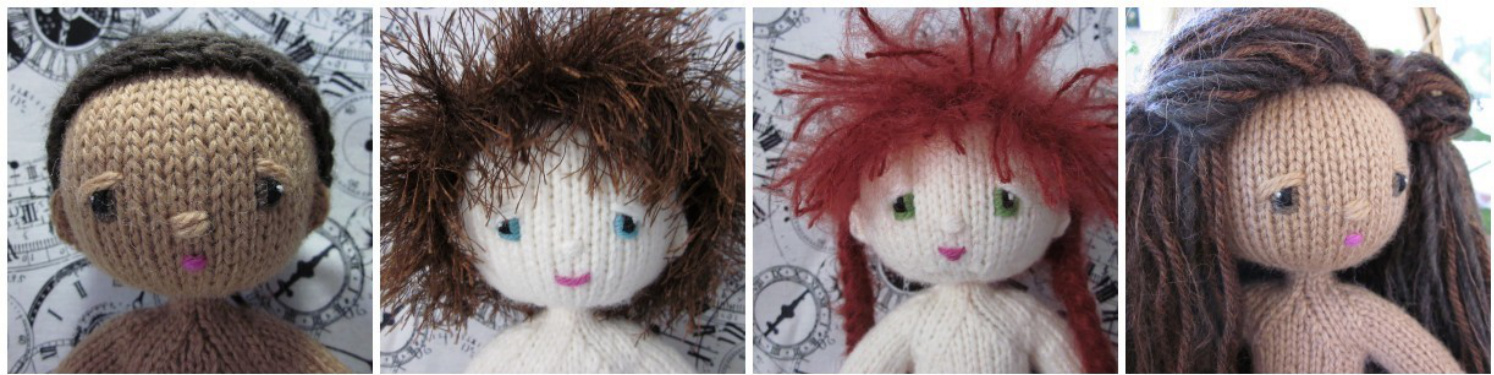
On the far left is the crocheted wig cap, stitched to the dolls head. Second is a wig made from eyelash yarn (Lionbrand Fun Fur in this case). It is worked just as a wig cap, except the last round is (chain 6, slip stitch) in each stitch around. The third wig is made from mohair yarn; this type of yarn is easily available from Waldorf Dollmaking supply companies. The wig cap is crocheted, then all I did was hook some strands in the front for bangs, and several long strands at each side near the ears for braids. I brushed the cap with a slicker brush from the pet store. The eyelash yarn wig and mohair wig each take about an hour from start to finish. The last wig is a 'full styling' wig, using the wig cap on the far left. The cap was crocheted in the back loops only, leaving a loop free to hook strands of yarn into. I cut the strands 12 inches long, and hooked them into every third loop all around the wig cap, except for the last row, where I hooked into every stitch. It took about 130 strands of yarn. I used three different yarns in this wig. Putting hair on your doll should be the most fun part, not to be dreaded. None of these wigs are difficult, but the full styling wig takes a bit longer to do. Enjoy your Grace Notes Doll!


