a fallingblox designs pattern
Corvus This pattern was the first thing I ever designed in double-knitting, and is still my most popular pattern.I attribute its success to its simple elegance and whimsy.
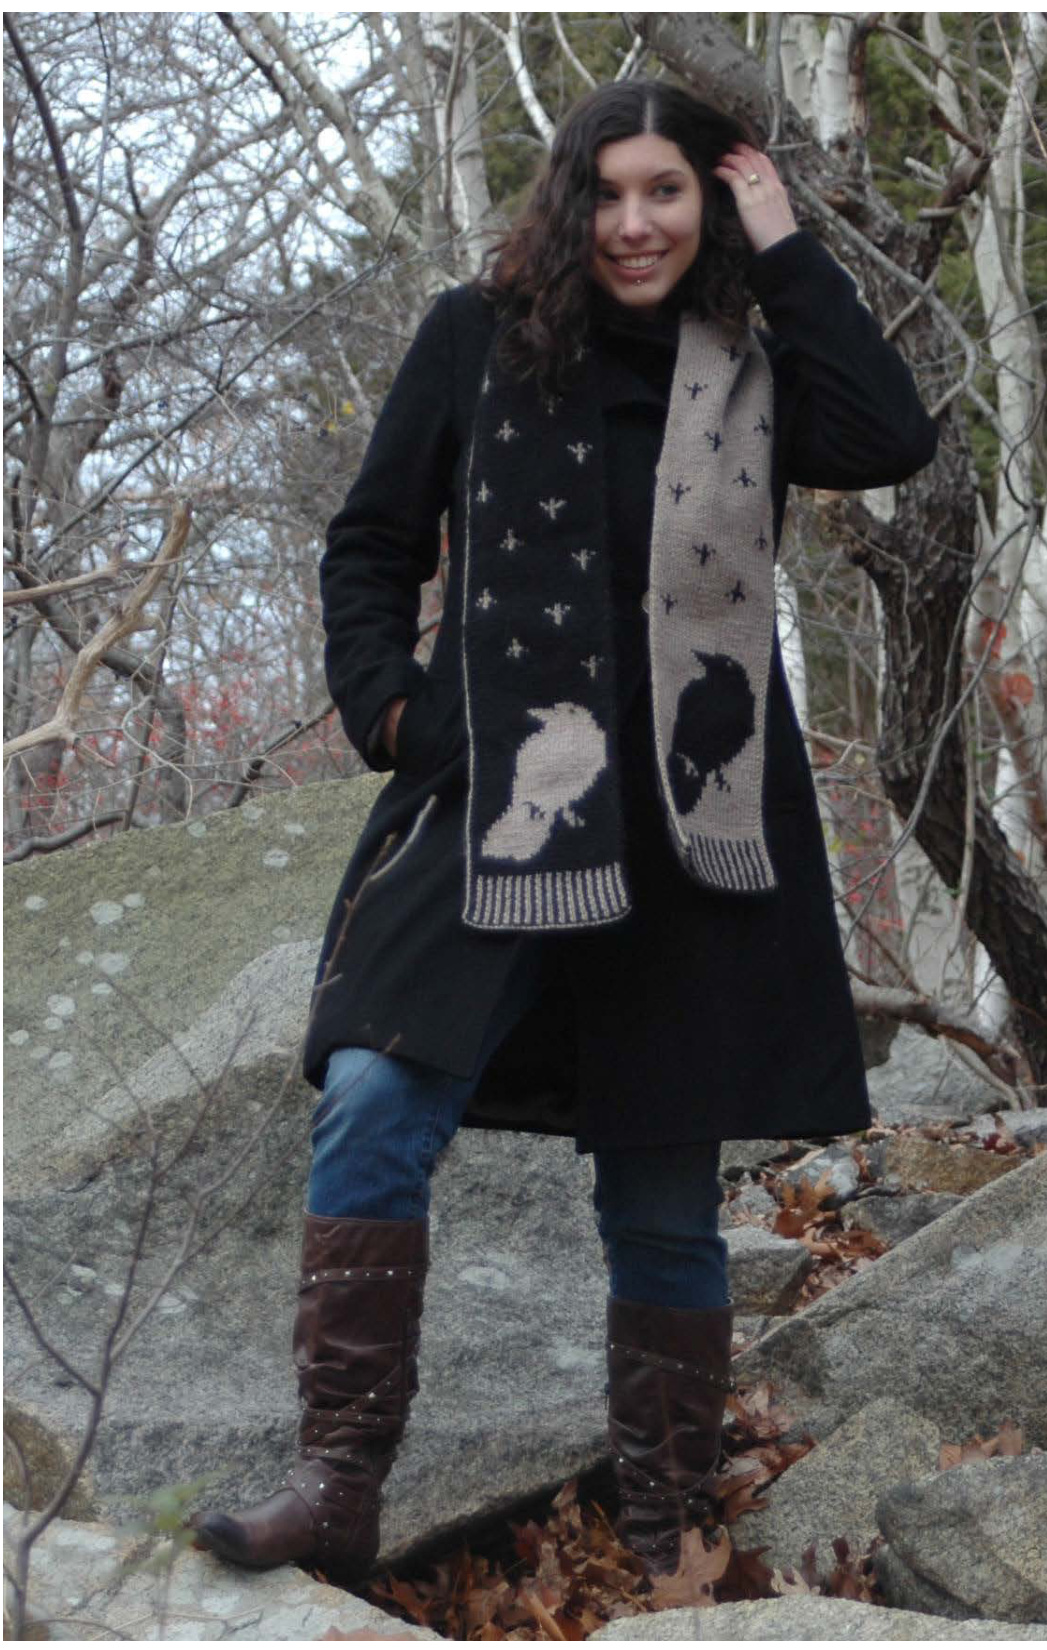
The original pattern was designed for my sister, who was at the time an amateur ornithologist with a particular interest in corvids -- crows, ravens, etc. It has been redesigned a couple of times since then and was included in my 2011 book"Extreme DoubleKnittng" as an introductory pattern. This is a great pattern for anyone who's new to double-knitting. The chart is simple to follow, with few color changes per row, and when you are finished you will have an excellent foundation on which to build new double-knitting knowledge -- as well as a warm and stylish scarf for yourself or a loved one.
Materials:
[Color A] Berroco Ultra Alpaca (50% Alpaca, 50% Wool) #6214 Steel Cut Oats; 2 skeins. 10wpi. [Color B] Berroco Ultra Alpaca (50% Alpaca, 50% Wool) #6245 Pitch Black; 2 skeins. 10wpi. 1 set Us6/4mm straight needles, or needle size required to achieve desired gauge. Tapestry needle
Gauge:
20 sts/27 rows = 4" in standard doublestockinette fabric. Dimensions as charted are 6.5" wide x 70" long. Model: Laura Ceredona Photo: Shannon Okey Sample knit by: Beth Levine
Standard Double-knit Cast-on
So that the cast-on instructions are universal - i.e. they can be applied to any pattern whether done flat or in the round - we willrefer to the two colors not as the well-known MC and CC, but as TC (thumb color) and FC (finger color). This cast-on is based on the long-tail method I learned from my mother - but there is no long tail. Instead, you will be using the long-tail techniques on the active ends. The nice thing about this is that you get the clean edge usually associated with the long-tail cast-on without all the tedious guesswork. To begin, make a slip-knot with both colors held together, insert the needle through the loop and tighten. Leave about a 4-6"tail for weaving in. Don't worry about which direction the slip-knot colors are facing -- you will remove and untie the knot after you completeyourfirstrow. Position your hands. With the needle in your right hand and the tails held out of the way in that hand, put your left forefinger and thumb together and put them between the two hanging active ends. The color hanging over your thumb will be called TC (thumb color) and the color hanging over your finger will be called FC (finger color). Close the rest of your fingers over the hanging ends; spread your thumb and forefinger into a Y-shape, and pull the needle back like a slingshot. The ends should come from the needle, pass through the middle of the Y, around each finger from the inside to the outside, and continue down into your closed hand, out the bottom of your loosely-held fist, and into your wound source balls. You will need to differentiate among the four end segments for the next several steps. From the front to the back, you should have the outer TC, the inner TC, the inner FC and the outer FC.
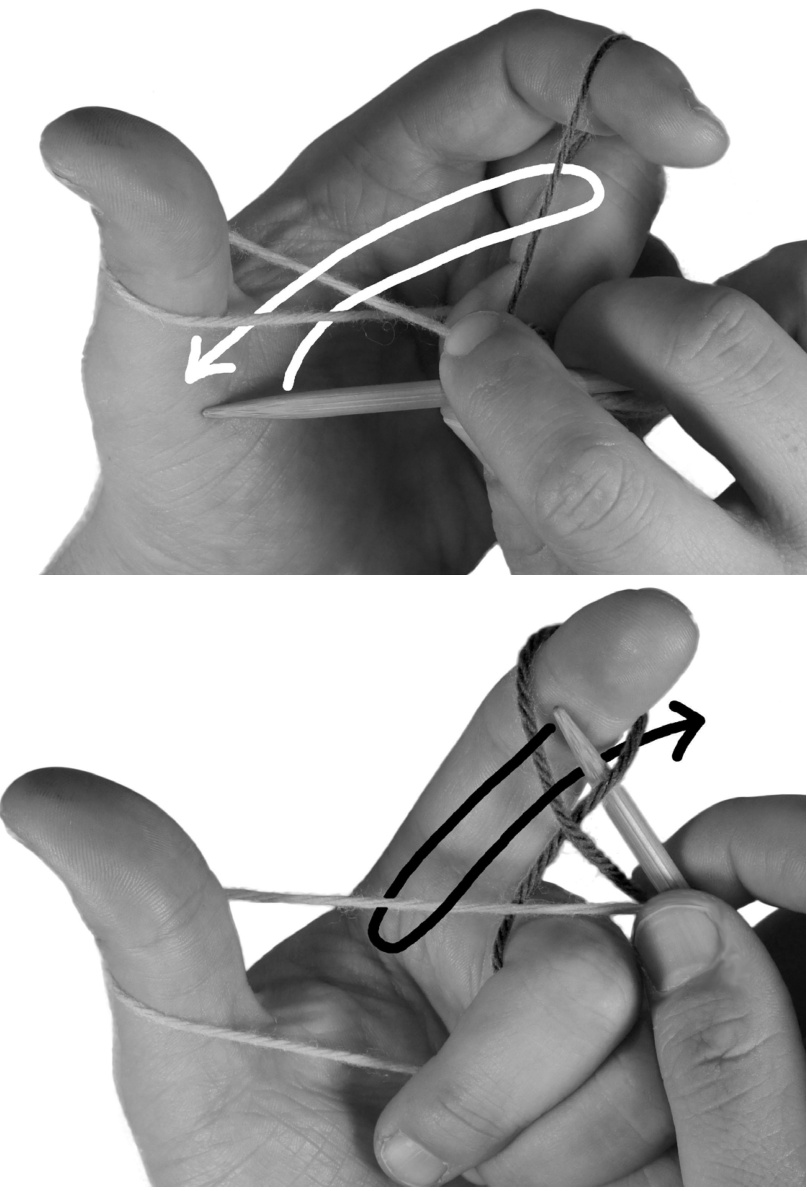
With your needle in front of all the ends, bring it up underneath the outer TC. Pass the needle over the top of both inner TC and inner FC then down between the inner FC and outer FC. Pull the inner FC down with the needle tip; with that loop of FC on your needle, pass the needle back down between the inner and outer TC ends (the same way you came in). Drop the thumb loop, pick up the hanging end of TC on your thumb again, and tighten. You should have a loop of FC on your needle. Next, we'll do the same thing in mirror image for a reverse longtail cast-on stitch. Bring your needle in back of all of the ends. Bring your needle up from underneath the outer FC. Pass the needle over the top of the inner FC, then down in between the inner FC and inner TC. Pull the inner TC up with the needle tip; with that loop of TC on your needle, pass the needle back up between the inner and outer FC ends (the same way you came in). Drop the finger loop, pick up the hanging end of FC on your finger again, and tighten, This has created a pair of stitches, the first in your FC and the second in your TC. Continue doing one regular and one reverse long-tail cast-on stitch to continue alternating cast-on colors. I recommend you tighten this cast-on a little more than you normally would for a long-tail cast-on. It will make the first row after the cast-on more diffcult, but the final edge will be much cleaner.
Double-Knitting
These are the rules of standard double-knitting: All double-knitting is worked in pairs. The frst stitch in every pair is always the front stitch, is always a knit stitch, and is always worked with both ends in back (wyib). The second stitch in every pair is always the back stitch, is always a purl stitch, and is always worked with both yarns in front (wyif). Whenever Color A is the first stitch in the pair, your second stitch will be Color B, and vice versa. Because you are knitting a flat piece here, with every other row you will be working the"wrong side" of the work. Of course there is no"wrong side" in double-knitting, but there is a side that doesn't look like the chart. The opposite side is reversed in color and mirrored in orientation. This means that every other row you will have to mentally translate the pattern to reversed colors and follow therowbackward.
Selvedges
Edges in flat double-knitting can be tricky. It is very difficult to get them to be both clean and structurally sound at the same time. For structurally sound edges, you need to twist the ends together once before starting each row. This seals the edge so that it doesn't come open. However, that twist can cause the edge's tension to be less stable and look funny, until you have perfected your tension -- which can take a long time in double-knitting. Ihave discovered a great double-knit selvedge which effectively hides the twist and helps with the tension issues at the same time. It works like this: 1) Double-knit your row as normal, but stop before the last pair on the needle. 2) With both yarns in back, slip the first stitch purlwise 3) With both yarns in front, slip the second stitch as if to purl through the back loop. 4) Turn, insert your needle into the next stitch knitwise. Both strands should already be in the back. Twist the color strand you need at least 180 degrees counterclockwise around the other strand and complete the knit stitch with this strand. 5) With both yarns in front, purl the second stitch in the pair with the opposite color. .. and continue with your row. Every last pair gets slipped, and every frst pair gets worked with a twist.In the chart, the selvedges are notated by a series of "bumps" that run up both edges. For the purpose of chart counting, these "bumps" are counted as single pairs, just as any other chart element.
Binding Off
This is really quite easy. Essentially, you willbe working a standard double-knit row, and every time you have two stitches on the needle, you pass the first over the second and off. When you reach the end, break the yarn and passit through the final loop. In essence, it's the same as the most basic bind-off you know, but rather than working in stockinette, you are doing the same thing with a double-knit row.
Weaving in ends
If your yarn is grippy enough (wool or most other animal fibers), you can get away without anchoring your ends. Allyou really need to do is tuck the ends down into the space between the layers. Take a tapestry needle with both ends through the eye and feed it into a convenient hole -- wiggle the needle around inside the work, checking both sides to make sure the needle is staying inside. Push the needle through several color-changes -- this is where the sides grip each other most tightly -- then when it's gone as far as it can, pop it out through one side or the other. Pull the yarn through, being careful not to tighten it too much and distort the fabric. If you have enough yarn, send the needle through the same hole but in a different direction. When you're done, pull the ends out of the needle. Cut the yarn near where it comes out, then give the fabric a tug and the ends will get sucked inside, never to be seen again. If you're weaving in ends at a new-skein join, you can tie a loose half-knot in the two ends and weave them in opposite directions.
Pattern
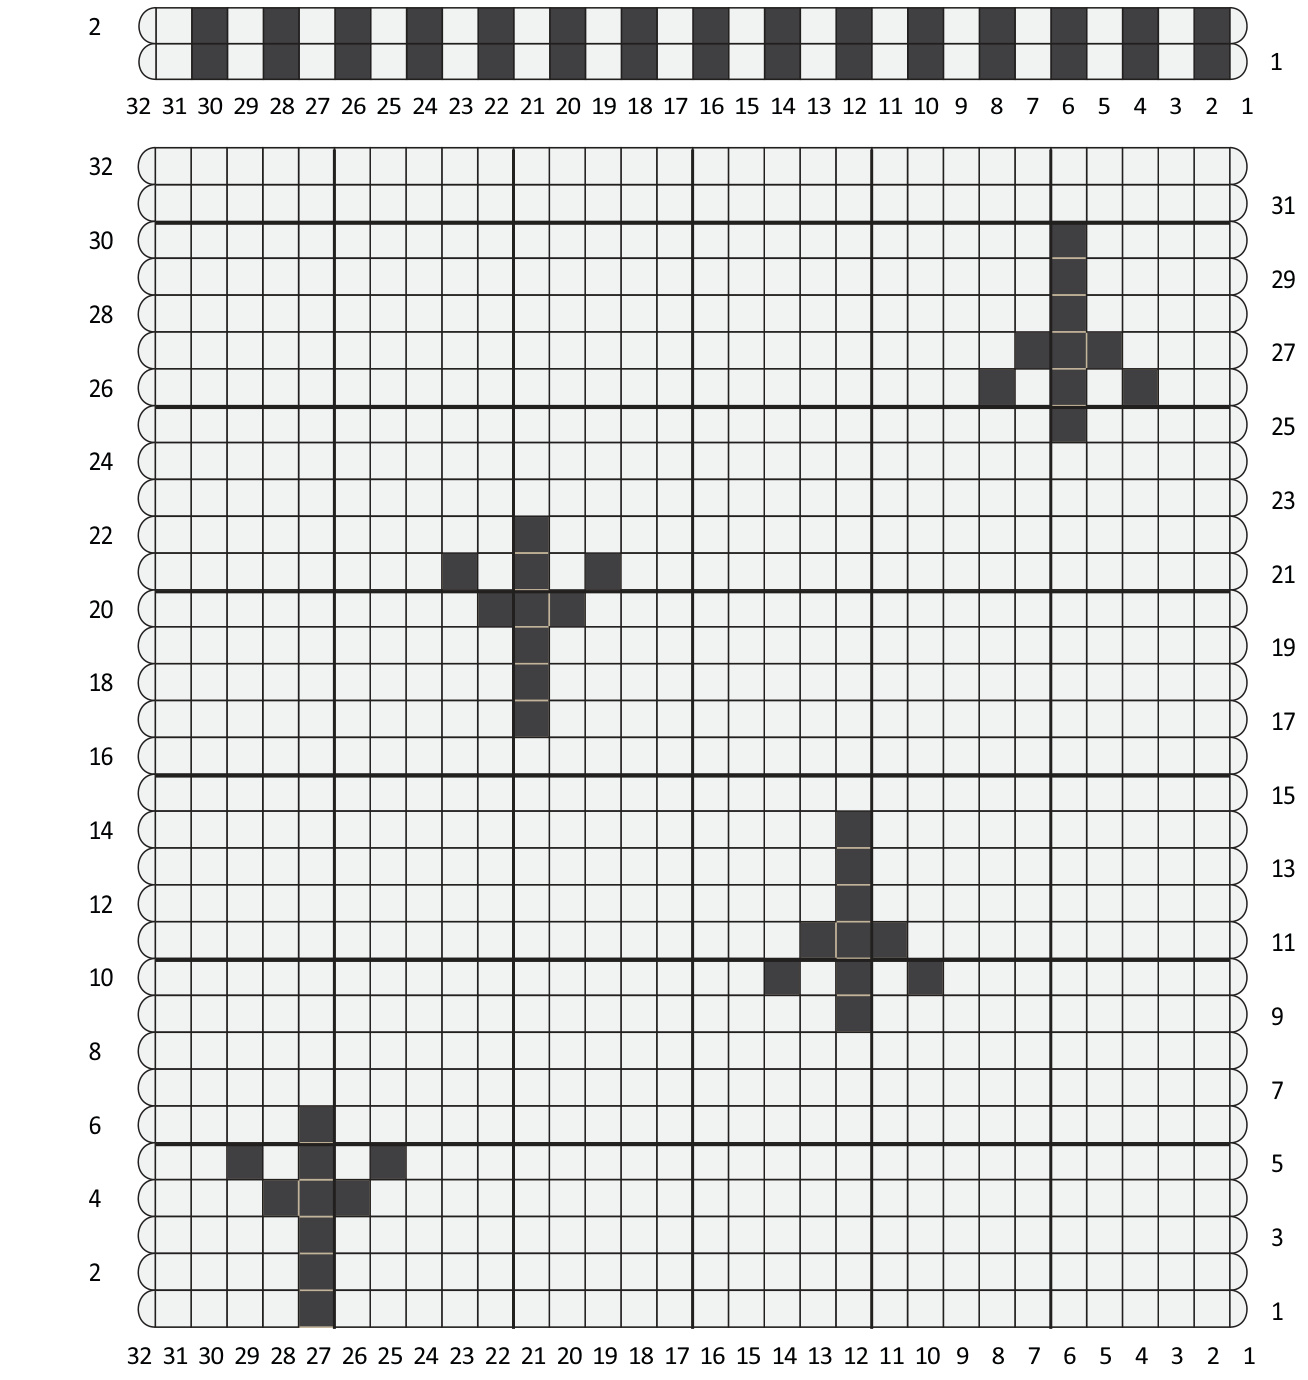
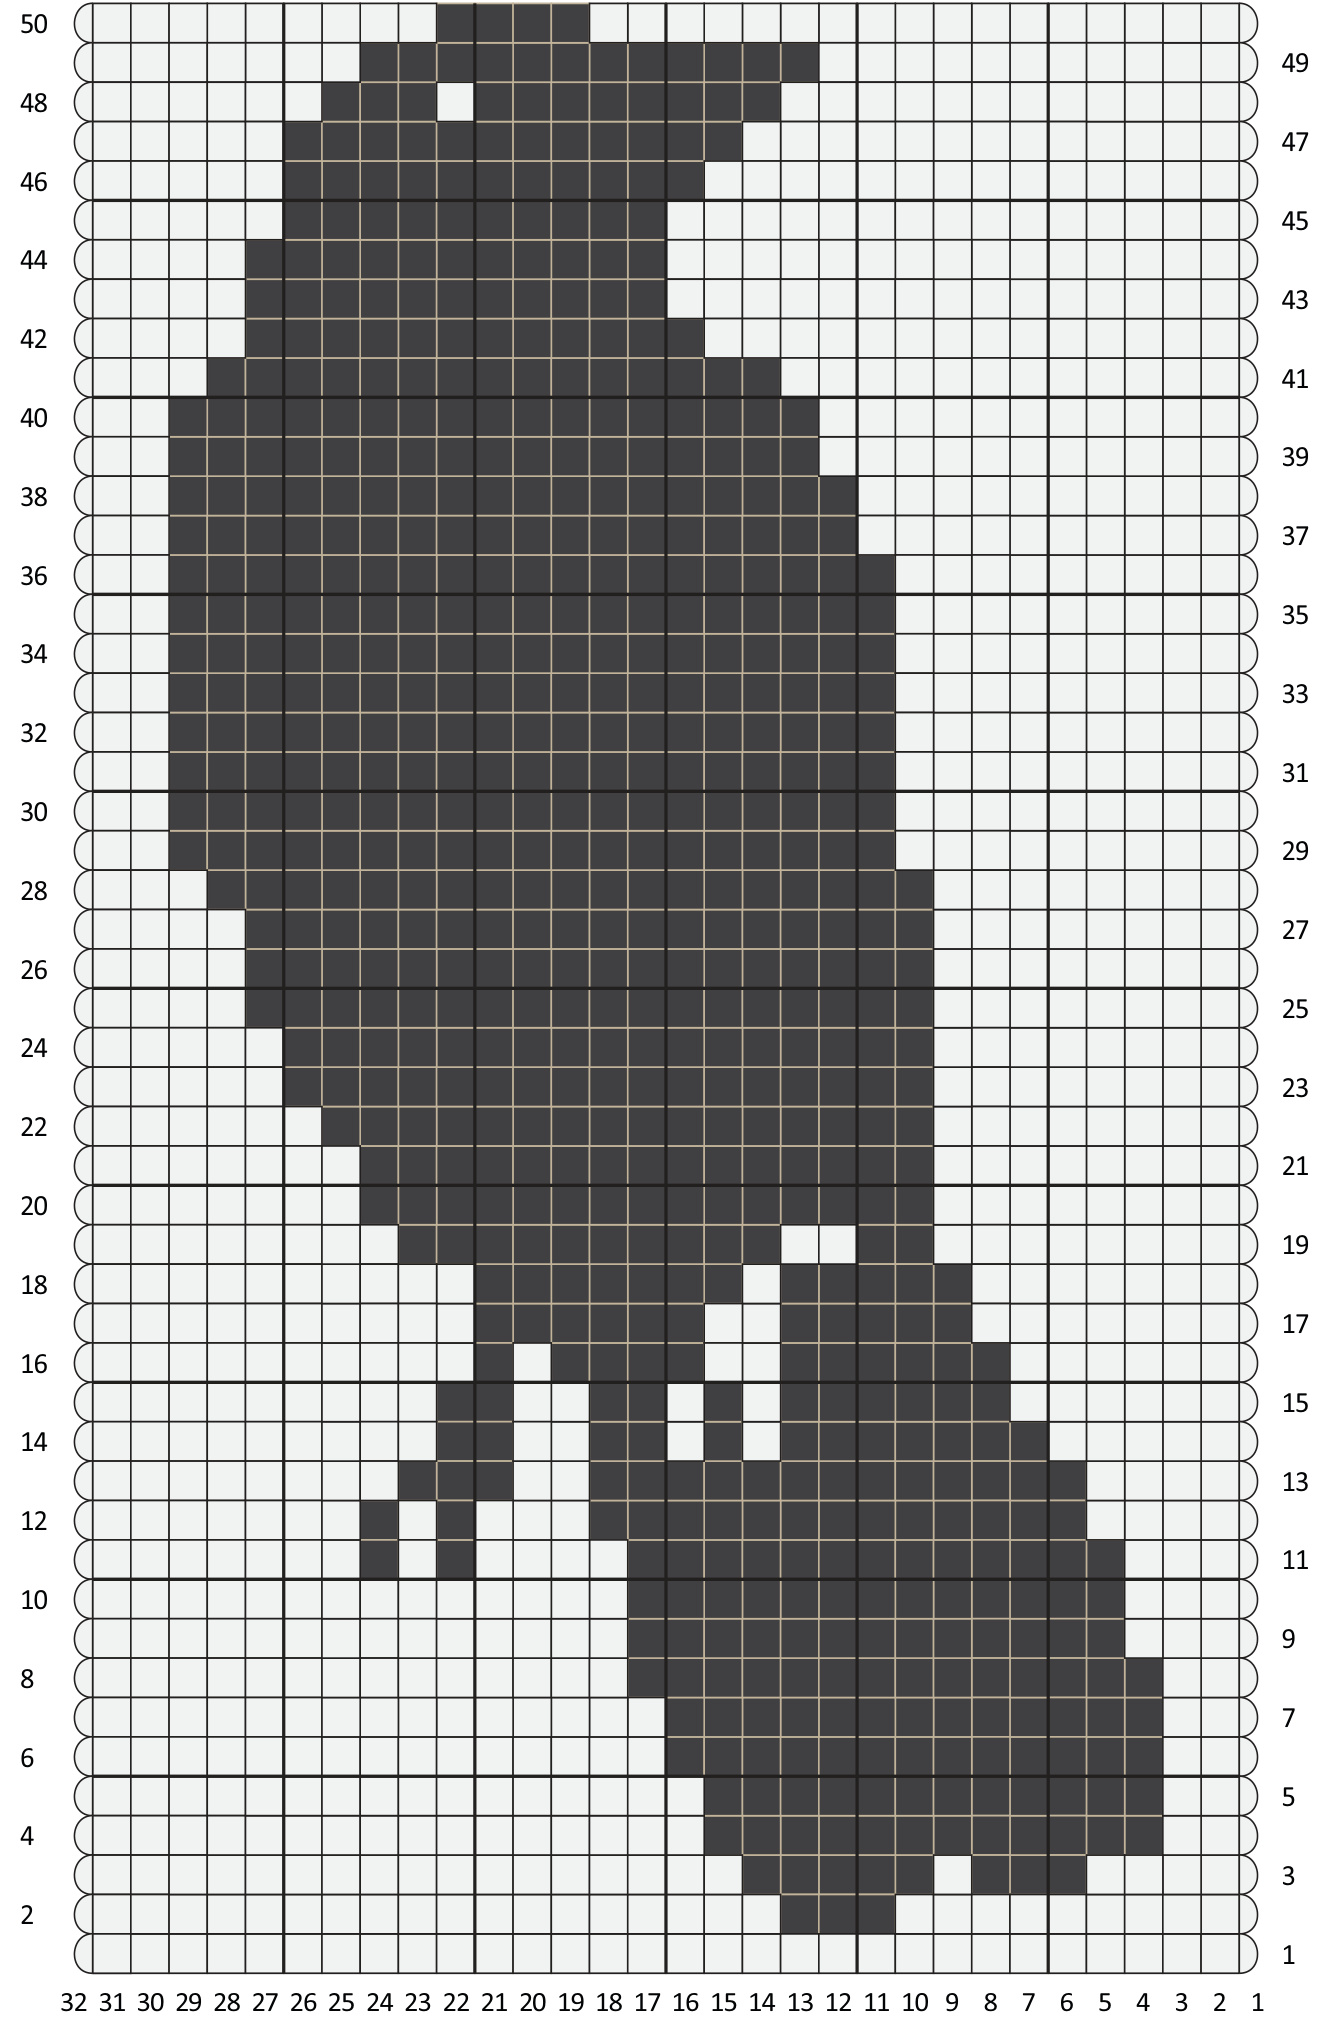
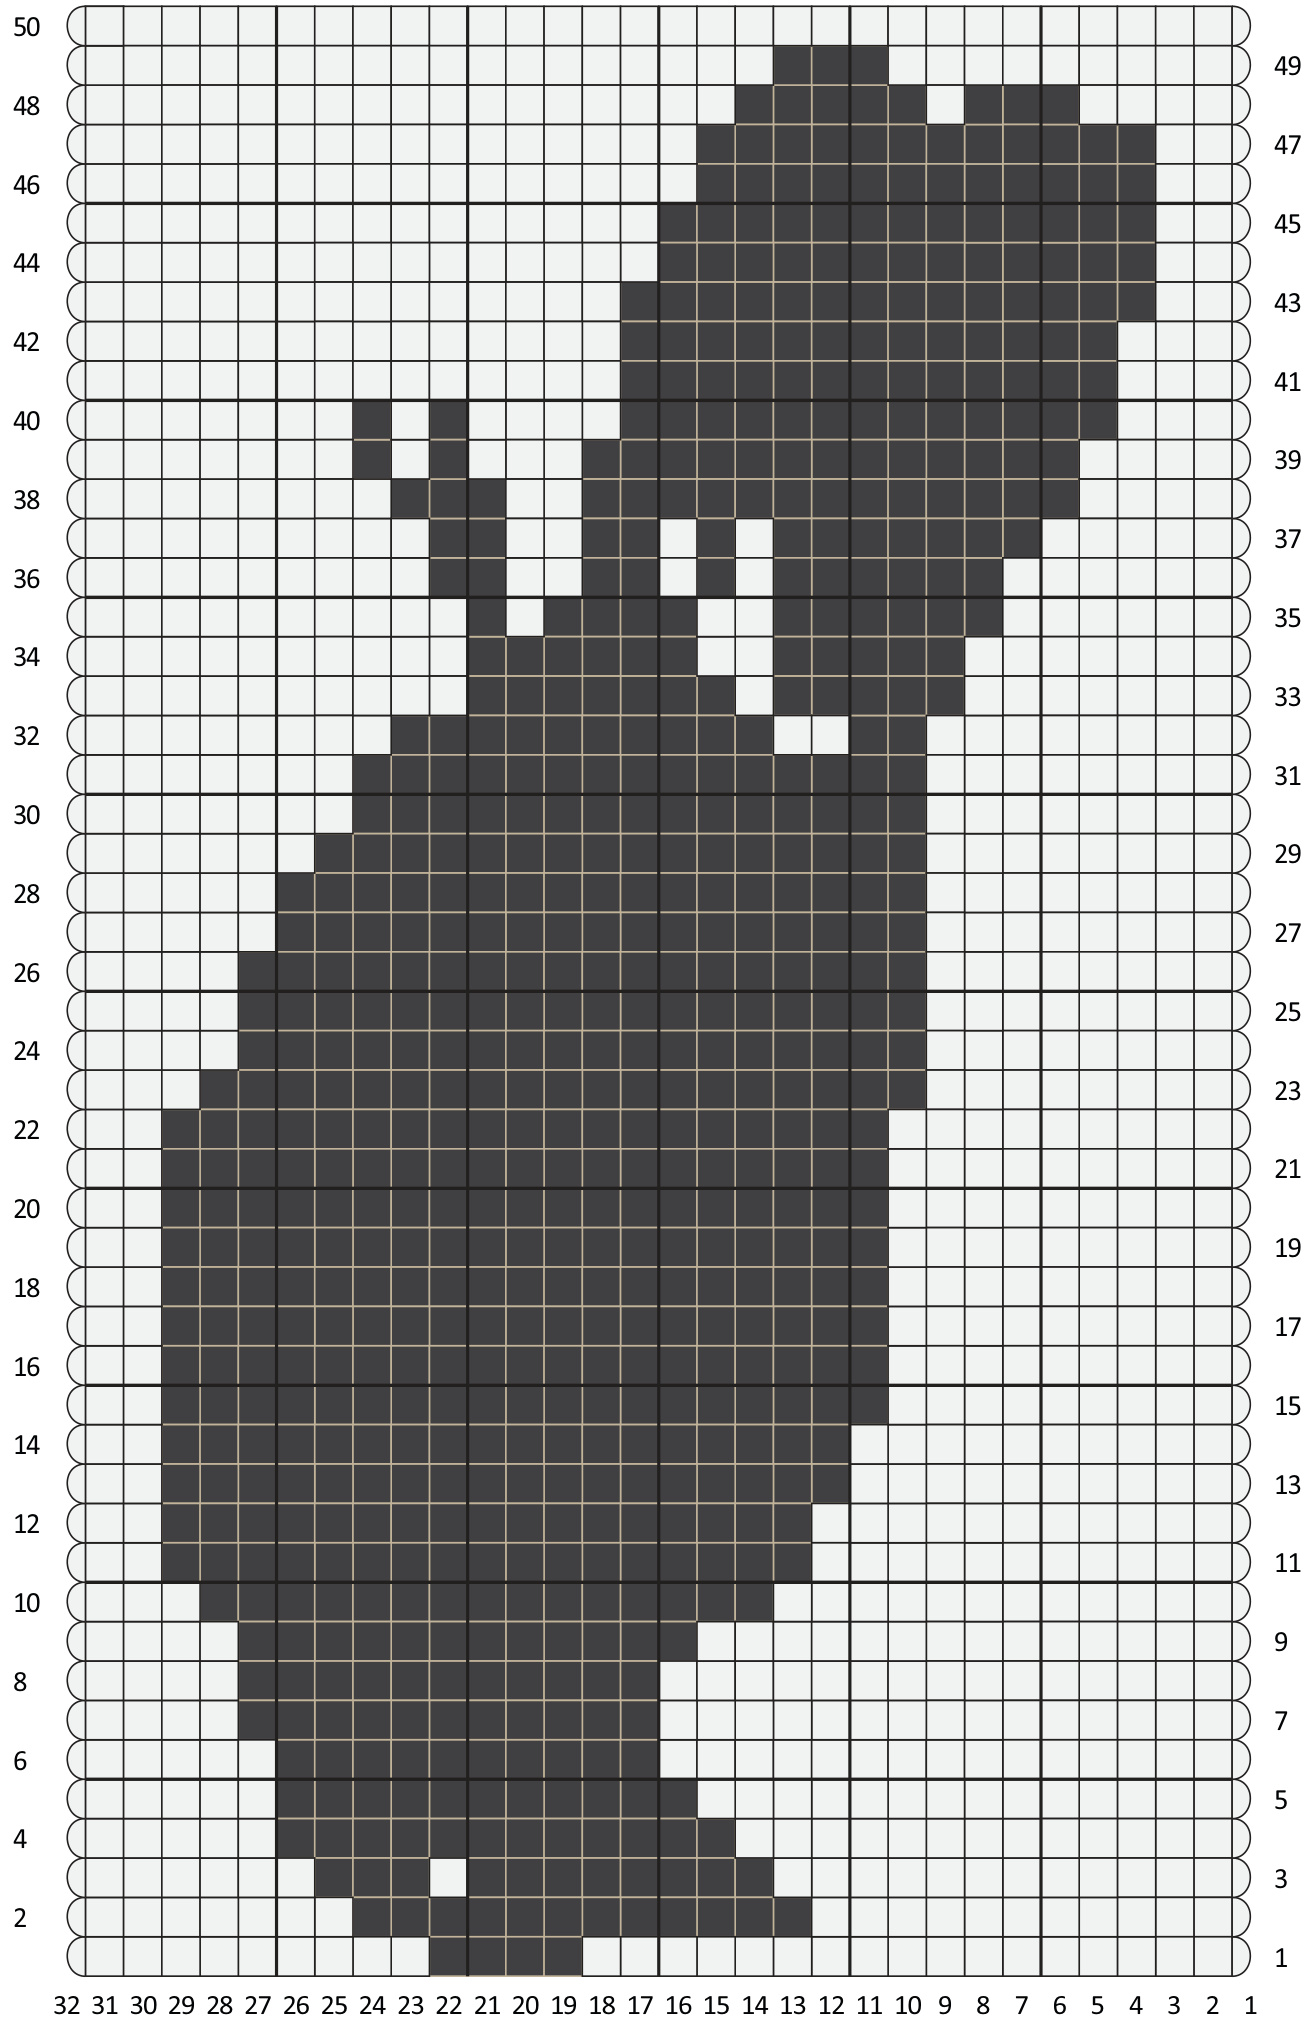
With Color A as TC and Color B as FC, CO 32 pairs or 64 total stitches. Turn and begin. 1) Follow Chart 1 8 times (16 rows). Remember, each odd-numbered row will be followed right to left, and each even-numbered row will be followed left to right. The idea is to make a section of 1x1 mock ribbing -- not a 1x1 checkerboard! 2) Work 4 rows in background color orientation (A/B on facing side). 3) WorkChart 2. 4) Work 6 rows in background color orientation. 5) Repeat Chart 3 until you don't have enough yarn to finish another repeat. Count your completed Chart 3 repeats. Work the same number of Chart 3 repeats again, switching to the second pair of skeins when necessary. This is done to make the scarf as long as possible while guaranteeing you won't run out of yarn! 6) Work 4 rows in background color orientation. 7)WorkChart 4. 8) Work 4 rows in background color orientation. 9) Follow Chart 1 8 times (16 rows). Bind off and weave in all ends.
Key
Color A (Color B on opposite side) Color B (Color A on opposite side) Selvedge at end of facing-side row and beginning of opposite-side row Selvedge at end of opposite-side row and beginning of facing-side row
Chart 1
Please do not distribute or modify this pattern without permission. Support hardworking knitwear designers! This pattern copyright 2006, 2013 Fallingblox Designs. Visit www.double-knitting.com for more info and patterns
Please do not distribute or modify this pattern without permission. Support hardworking knitwear designers! This pattern copyright 2006, 2013 Fallingblox Designs. Visit www.double-knitting.com for more info and patterns.
Please do not distribute or modify this pattern without permission. Support hardworking knitwear designers! This pattern copyright 2006, 2013 Fallingblox Designs. Visit www.double-knitting.com for more info and patterns


