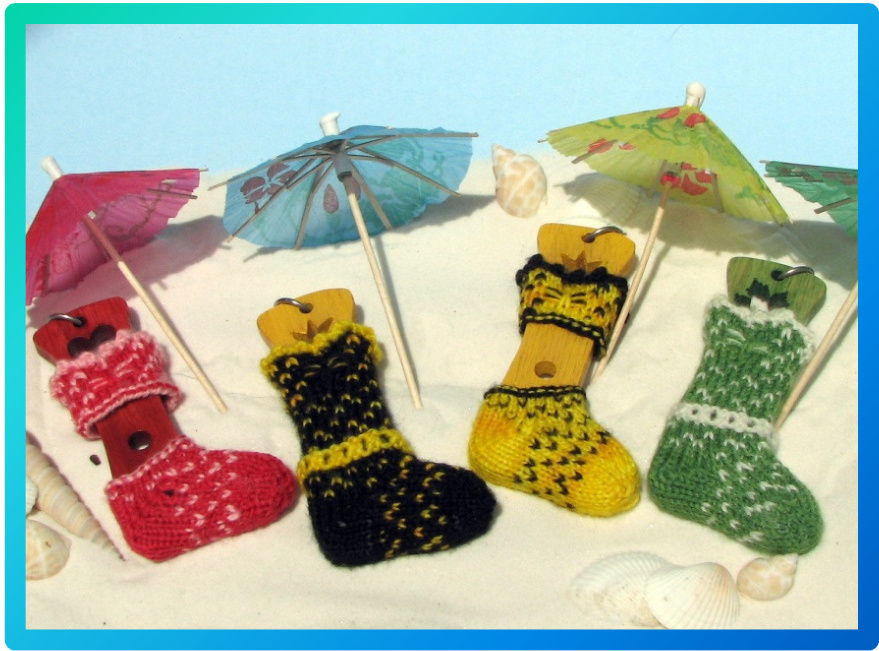
Beach Party!
I'm having a beach party and Id love it if you could come. We'll relax and enjoy the sun, with some fruity umbrella drinks for refreshment. Make sure to bring your suit and towel for a dip in the lake.
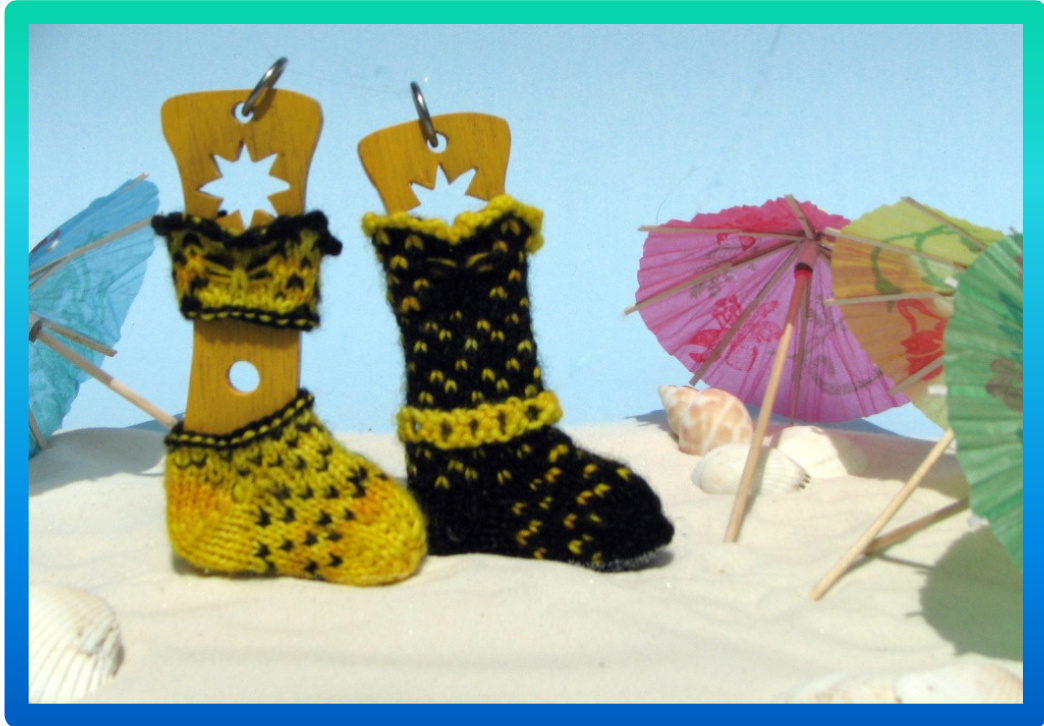
Ill be wearing my pew suit - it's an .
Itsy Bitsy Teenie Weenie Vellow Polka Dot Sockini!
A Wee Tiny Sock pattern by Meg Bakewell for the Wee Tiny Sock Club, July 2009 including two options: a top-down tankini worked in one piece & a bikini with a top down top and a bottom up bottom.
Materials
Fingeringwightarn,forbikiniabout10yardsMand5yardsC.Fortankini, about 12yards MCand 7ard CC.Kit includes about 19 yards each of Beyond BasicKnits $100\%$ MerinoSuperwashSockinMezzonite(black) and $70\%$ Merino/ $30\%$ NylonSuperwashSockinJustCallMeHappy (yellow)If youusedifferentMCandCCfor each option, you willikely have enough to knit both versions. Needles: 2.25mm/US1 set of 4 DPNs and $1.75\:\mathsf{m m}/\mathsf{U S O}0$ setof4DPNs NoteIfyoudon'tave ize0OedednotdespairThemalledearenludfrthicotcastn at thetpinlargeeedlesthanwilreultinrffierdrif oureucanrelaat on for a less ruffly look.
Abbreviations
w&t: wrap and turn k2tog: knit 2 together tww: lift the wrap that is around the next stitch onto the left hand needle and knit this stitch together with p2tog: purl 2 together ssk: slip slip knit YO: yarn over sl: slip stitch purlwise the wrap.
Pattern 1: Bikini
Bikini Top
Note that the first 2 rows after the cast on are worked flat, and then the work is joined in the round for the third row. This makes the optional short row shaping in Row 2 easier to do. This short row shaping creates the neckline of the "sockini" - alternative row 2 instructions are given if you'd rather not do the short rows. Using size 00 needles and CC, \*CO 3, k2tog, (now you have one st on each needle), slip the stitch from the right hand needle back to the left\*. 2 sts on the left needle. Repeat from \* to \* 11 more times. 24 sts cast on. Break yarn. Note: I use a knitted cast-on for this border. If you usually use a different cast-on, check out this video for a clear demonstration of the knitted cast-on. http://www.youtube.com/watch?v=APSqlPSz1Eo Row 1: Using size 1 needles and MC, starting at the end where you finished the cast on, purl 14, YO, purl to end. 25 sts. Continue with rows 2-9 following Chart 1 or written instructions below. Row 2 with optional short row shaping: Knit (1CC, 4MC, 1CC, 4MC), w&t,(you are wrapping the YO from the previous row) Purl (2MC,1CC,3MC), w&t, Knit (1CC, 5MC, 1MC tww, 3MC, 1CC, 2MC), w&t, Purl (1cc, 5MC), w&t, mark this wrap with a safety pin or split ring marker (mark the wrap only, not the stitch), Knit (2MC, 1CC, 3MC, 1CCtww, 3MC, 1CC, 3MC) Whew! With any luck, you are now at the end of needle 3. You did it! Row 2 without short row shaping: Knit (1CC, 3MC) twice, knit 5MC, knit (1CC, 3MC) three times. Divide sts among 3 needles to prepare for knitting in the round. Needle #1 (the needle you will knit first when joining in the round) gets 8 sts, needle #2 gets 10 sts, and needle #3 gets 7 sts. Join for knitting in the round, being careful not to twist. Row 3: Knit (2MC, 1CC,1MC tww, 2MC, 1CC, 1MC). Bring CCto front, knit 5MC, bring CC to back, knit 2MC, knit (1CC, 3MC) twice, knit (1CC, 1MC). Row 4: Drop (but do not cut) C color yarn. This round will use only MC. Knit 8MC, bring MCto front, slip 5 sts, bring MC to back, knit to end. Row 5: Knit(1MC, 1CC, 3MC, 1CC, 2MC). Bring CCto front, knit 5MC, bring CC to back. Knit 1MC, knit (1CC,3MC) twice, knit (1CC, 2MC). Row 6: Knit (3MC, 1CC) twice. Bring MC to front, leave CCin back. slip 5 sts, bring MCto back. Knit (3MC, 1CC) three times. Row 7: Knit (1CC, 3MC) twice, knit 2MC. With the right hand needle, pick up the marked wrap. Note: You are picking up the wrap, not the stitch itself. Remove the marker. Also pick up the 4 floats on the front of the work. Place these 5 strands onthe left hand needle and knit them together with the next stitch through the back loop, using MC. Note: This is kind of like knit 6 together. A little hard to do, but it makes a pretty bow. $\circledast$ Be careful to pick up only one stitch from the working needle when you are making the bow knot. You should have 7 stitches left on the needle after you make the knot. Knit 2MC. Knit (1CC, 3MC) three times. Row 8: Knit (2MC, 1CC, 3MC, 1CC, 8MC). Knit (1CC, 3MC) twice, knit (1CC, 1MC). Row 9: Using MC only, (knit 3, K2tog) 5 times. Break MC. 20 sts remain. Bind off purlwise in CC.
Bikini Bottom
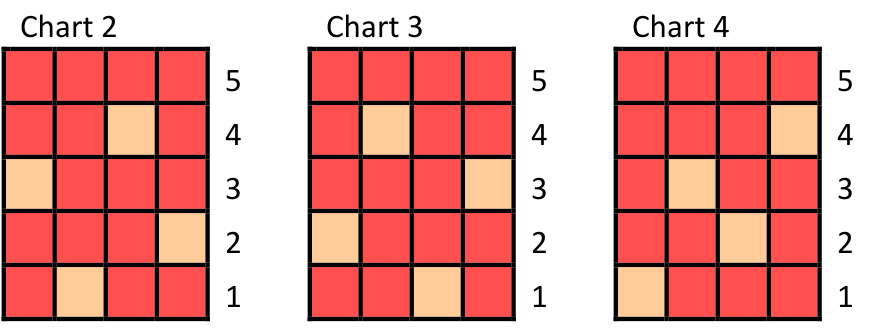
The bikini bottom is worked toe-up with a short row heel. Unlike a top down gusseted heel, where there is a heelflap, followed by turning the hee, picking up gusset stitches and then decreasing the gusset stitches the short row heel is simply a series of short rows that produces the entire heel. Using MC, cast on 8 sts. Continue toe in MC. Row 1: (Knit 1, sl 1) four times. Row 2: Repeat Row 1. Next, transfer 4 stitches to each of 2 DPNs, alternating between the 2 needles for each stitch. In other words, transfer the first stitch to needle #1, the second to needle #2, the third to needle #1, the fourth to needle #2, and so on. Now if you hold the 2 needles side by side and look at the knitting you have done, you will see that one side has a clear ridge from the cast-on, while the other side is smooth. The side with the ridge is the inside of the sock. Using a third DPN, divide the stitches on needle #2 so that each needle has 2 sts. Begin working in the round as follows. Round 1: (Kfb, knit 1) four times. 12 sts. Round 2: (Kfb, knit 3, kfb, knit 1) twice. 16 sts. Round 3: Knit. Round 4: (Kfb, knit 5, kfb, knit 1) twice. 20 sts. Round 5: Knit. Round 6: (Kfb, knit 7, kfb, knit 1) twice. 24 sts. Begin foot following Chart 2 for Rounds 1-5 twice, or the written instruction below. Round 1: Knit 2MC, knit (1CC, 3MC) 5 times, knit 1CC, 1MC. Round 2: Knit (1CC, 3MC) 6 times. Round 3: Knit (3MC, 1CC) 6 times. Round 4: Knit 1MC, knit (1CC, 3MC) 5 times, knit 1CC, 2MC. Round 5: Knit in MC. Round 6-10: Repeat round 1-5. Begin short row heel, using MC only. Knit 11, w&t, purl 10, w&t, Knit 9, w&t, purl 8, w&t, Knit 7, w&t, purl 6, w&t, Knit 5, w&t, purl 4, w&t, Knit 4, knit 1 tww, w&t, (this stitch now has 2 wraps), purl 5, purl1tww, w&t, Knit 6, knit 1 tww (picking up both wraps on this and all subsequent stitches), w&t, purl 7, purl1tww, w&t, Knit 8, knit 1 tww, w&t, purl 9, purl 1 tww, w&t, Knit 10, knit 1 tww. You should now be ready to knit across the instep. There is one double wrapped stitch left at the other side of the heel. When you reach this stitch next round, knit it together with the wraps. Begin leg following Chart 2 for Rounds 1-5, or the written instruction below. Rounds 1-5: Repeat Rounds 1-5 from foot. Using CC. bind off purlwise.
Finishing
Weave in ends. If you plan to display it on a sock blocker, it willstay in place quite well without any further finishing. However, if you'd like to hang it up on its own, use a loop of sewing thread to attach the top to the bottom at the sides. Use a short piece of CC yarn to create a "strap" that goes from the top point of the neckline on one side, around the "neck" and attaches at the other side of the neckline, with which to hang your sockini. Time to hit the beach!
Pattern 2: Tankini
Begin as for Bikini top through Round 8. Round 9: Knit 10, k2tog, knit to end. 24 sts remain. For rounds 10-14, follow Chart 3 rows 1-5, or written instructions below. Round 10: Knit 1MC, knit (1CC, 3MC) 5 times, knit 1CC, 2MC. Round 11: Knit (3MC, 1CC) 6 times. Round 12: Knit (1CC, 3MC) 6 times. Round 13: Knit 2MC, knit (1CC, 3MC) 5 times, knit 1CC, 1MC. Round 14: Knit in MC. Rounds 15-19: Repeat Rounds 10-14. Round 20: Using CC, knit all sts. Round 21: Using CC, purl all sts. Round 22: Using CC, (p2tog, YO) around. Round 23: Repeat Round 21. Round 24: Using MC, knit all sts. Rounds 25-28: Repeat rounds 10-13. Round 29: Knit in MC until 2 sts before the end of the round. Leave these last 2 sts unworked; they will be part of the short row heel. Rearrange sts for short row heel as follows: the next 12 sts are on needle #1, the following 6 sts on needle #2 and the remaining 6 sts are on needle #3. Work the short row heel in MC as for Bikini. (Even though that was toe up and this is top down, the heel is worked exactly the same!) Begin foot following Chart 4 rounds 1-5 twice, or written instructions below. Round 1: Knit (3MC, 1CC) 6 times. Round 2: Knit 1MC, knit (1CC, 3MC) 5 times, knit 1CC, 2MC. Round 3: Knit 2MC, knit (1CC, 3MC) 5 times, knit 1CC, 1MC. Round 4: Knit (1CC, 3MC) 6 times. Round 5: Knit in MC. Break CC. Work toe in MC only. Round 1: (SSK, knit 8, k2tog) twice. 20 sts remain. Rounds 2 and 4: Knit Round 3: (SSK, knit 6, k2tog) twice. 16 sts remain. Round 5: (SSK, knit 4, k2tog) twice. 12 sts remain. Round 6: (SSK, knit 3, k2tog) twice. 8 sts remain.
Finishing
Graft toe and weave in ends. Don't forget your sunblock!
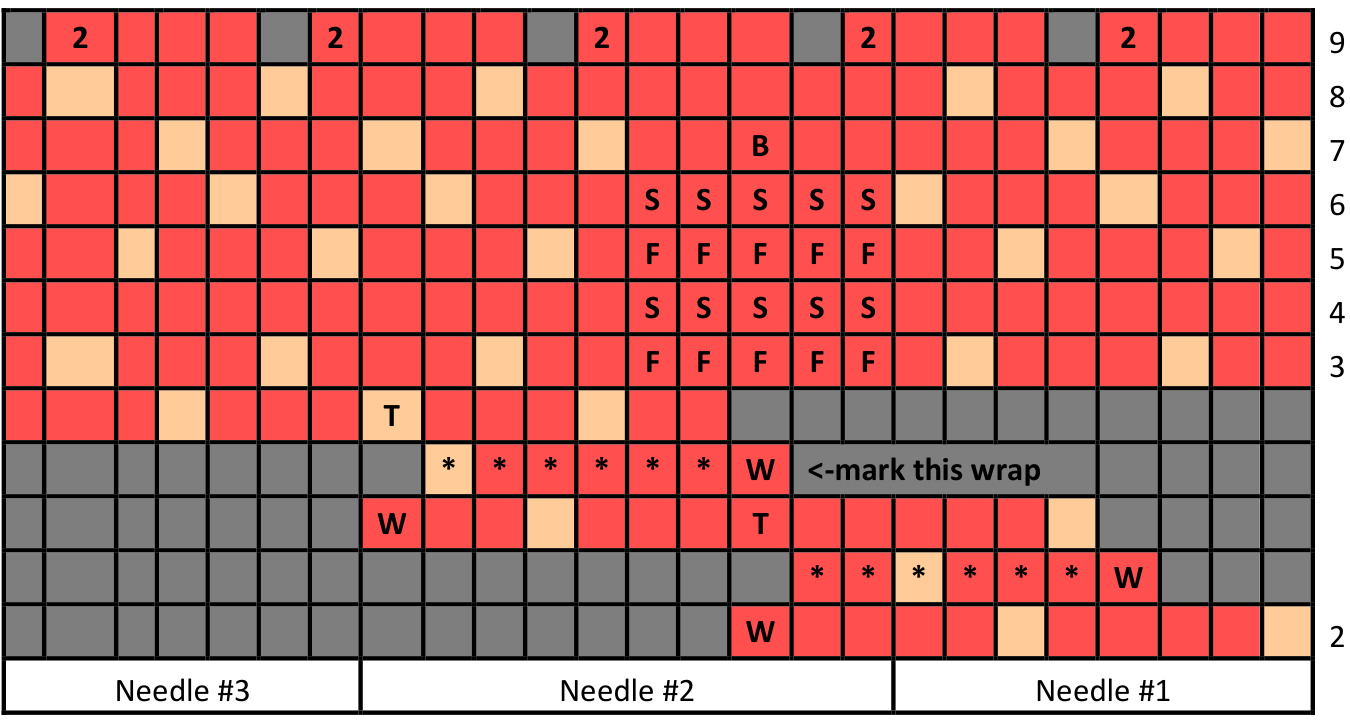
$\mathsf{W}=$ wrap and turn ${\sf T}=$ knit this stitch together with the wrap $\mathsf{F}=$ Knit in MC, CC is carried in front ${\boldsymbol{\mathsf{S}}}=$ slip st, MC is carried in front $\mathsf{B}=$ bow knot, see written instructions. $2=1{\times}2\mathtt{t o g}$

Who's coming to the party...
My best girls D A RCY (KnottyKnitter40) and KA TT (Staarrkatt) will be there early, helping me set things up (test knitting, that is.) ALICEfrom PipingHotPapers.etsy.com is in charge of decorations. (notepads, buttons, and may I add, the finest customer service on the planet!) My new bikini in yellow and black is from BIE TTTE's (KnittinDiva) awesome shop, Beyond Basic Knits, bbknits.com.

Of course, we all need a little bling, so K A TT's (Staarrkatt) bringing sequin stitch markers to this little sock hop. Can't wait to see you, it's going to be a blast! This pattern uses a bunch of fun techniques - starting with a picot cast on, and also including short row shaping, stranded color work and a short row heel-there were so many details Iwanted to pack in to this design,I may have gotten a bit carried away! As always, Ihope you will enjoy knitting the pattern, so there are a few ways it can be simplified if you prefer a more relaxing summer knit. +You could substitute your normal cast on for the picot cast on. + You could eliminate the short row shaping at the top. +You could knit the leg and foot ina single color, too, if you don't mind a polka-dot-less sockini. f you do this, consider repeating round 4, alternating with a knit only round, a couple more times to make the bow knot in one color. +You could even skip the bow knot. If you decide to do this, skip the YO in Row 1 (24sts) and maintain the colorwork pattern around the entire top. The k2tog in round 9 ofthe tankini would become unnecessary in this case. If you are new to toe up socks, the bikini bottom is a great way to give it a try. I chose my favorite toe and heel construction for toe up socks, but of course there are many others out there. If this will be your first colorwork project, you are about to explore a great new adventure in knitting. It can be a bit intimidating (it was for me at first!) but after a little practice I think you'llfind it's simple, fun and opens up many possibilities. Here are a few things to keep in mind: +There is no need to hold both yarns at once.It comes naturally to some, but for me, not so much. My right hand is very dominant, and 'm a thrower, so Ijust pick up the yarn I'm going to use in my right hand as usual, knit the stitches as indicated, and when it comes to the next color, I drop the first one and pick up the other. It probably slows me down a bit, but that's OK! Whatever technique you settle on, make sure it's comfortable for you. \*As you alternate between the 2 yarns, you want to avoid twisting them too much. You can do this by carrying one yarn on the top, and the other on the bottom. Whenever you use the top yarn, just pick it up above the bottom yarn, and vice versa. This will result in nice even lines of stitching on the back of the work, too. The strands that are carried across the back of the work are sometimes called floats.
long stretch knitted in a single color.In this case, every 3 stitches or so, twist the yarns on the back of the work. Basically, just take your working yarn, and bring it around the other color, then keep going. This will trap the opposite color yarn against the back of the work so you don't get a big long float on the back. +Tension is alitle different when working with 2 colors. Itis important to keep your floats long enough that they don't cause the work to bunch up once it's off the needles. The best wayI know of to make sure your floats are long enough is to stretch the work out on the needle whenever you change colors. This way your float has to reach across the work when stretched, and it willbe long enough. Generally,it's better to have them too long than too short. \* For the experienced colorwork knitters in the group, I'd love to hear your favorite tips or tricks for 2 color knitting - please share them in the forum on Ravelry.


