Designed by Margaret Testa www.afewsheepshyofafarm.com
Description
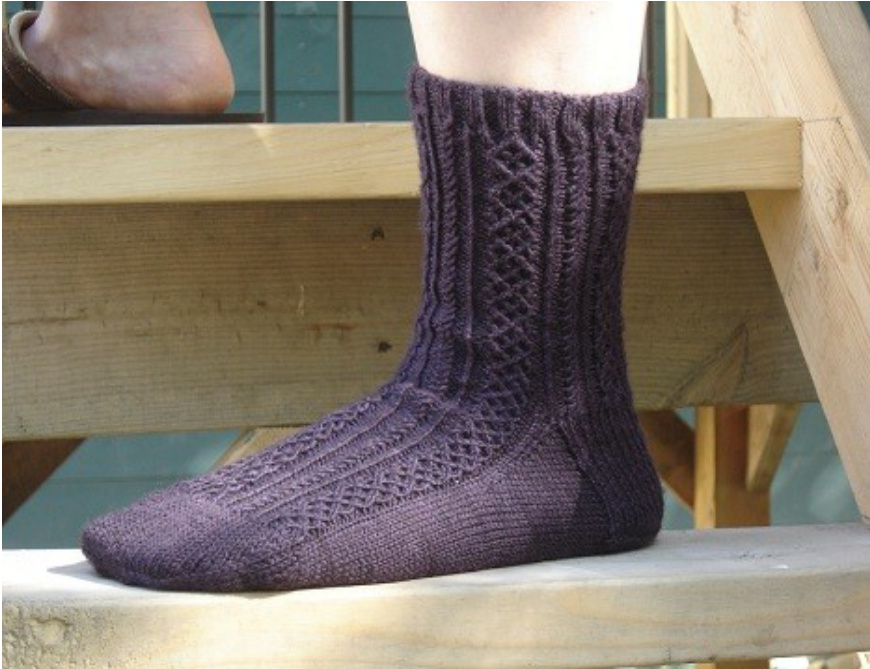
Originally designed with my very particular husband in mind, these Twisted Stitch patterned socks feel cushy on the feet and have a subtle stitchpatternwithout thebulk ofactualcables. These socks are knit from the cuff down to the toe with a traditional heel flap; a short-row heel may easily be substituted if preferred.Pattern includes directions for 3 sizes with two charted interchangeable twisted stitch motifs for both Men's (Chart B) & Women's (Chart C) versions. Sizes Small, Medium, Large (6 inches, 8 inches 10 inches).The Stitch pattern stretches considerably, for best fit, knit size slightly smaller than actual leg circumference. Yarn Men's version shown in Dream in Color “Smooshy" 45C yds/113g; $100\%$ Merino Wool. l [1, 2] skeins. Women's version shown in Cascade Yarns “Heritage' 437 yds/ 100g; $75\%$ Merino, $25\%$ Nylon. 1 [1,2] skeins. Needles Size US 2 $(2.75\mathsf{m m})$ Needles. Pattern is suitable for DPN, 2 Circs or Magic Loop techniques. Notions Stitch Markers, Darning Needles, cable needle if desired. Gauge 17 st/ 2 inches on Size US 2 needles, swatch very slightly stretched.
Men's (Chart B)
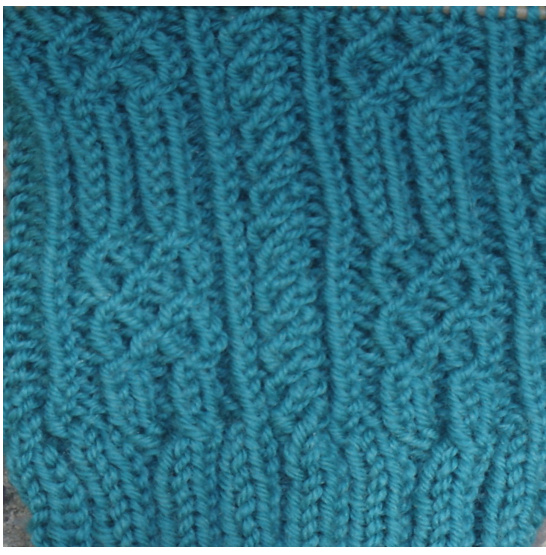
Women's (Chart C)
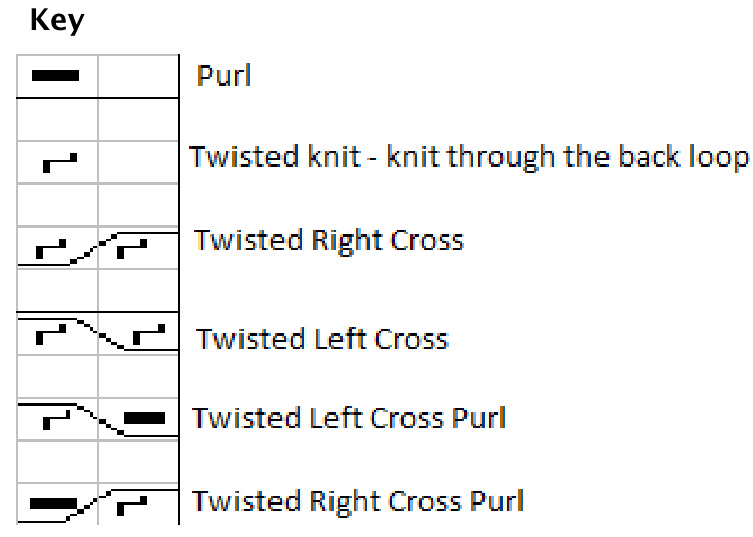
Stitches and Abbreviations Used
the back loop. TLCP - Twisted Left Cross Purl - Slip 1 stitch to cable needle and hold to front of work, purl the next stitch, knit stitch from cable needle through the back loop. K(1) . Knit that number of stitches. Ktbl - Knit through the back loop of the stitch. K2tog . Knit two stitches together. P(1) purl that number of stitches PM - place marker RS . right side of work, ride side row. SSK . Slip stitch, slip 2nd stitch (both knit-wise) to rigl needle, slide back to left needle and knit together Stockinette Stitch . Knit all stitches on right side, purl on wrong side. ST(s) . Stitch(es) TLC - Twisted Left Cross - Slip l stitch to cable needle and hold to front of work, knit the next stitch through the back loop, knit stitch from cable needle through TRC - Twisted Right Cross - Slip 1 stitch to cable : needle and hold to back of work, knit the next stitch through the back loop, knit stitch from cable needle through the back loop. TRCP - Twisted Right Cross Purl - Slip 1 stitch to cable needle and hold to back of work, knit the next stitch through the back loop, purl stitch from cable needle.
Notes
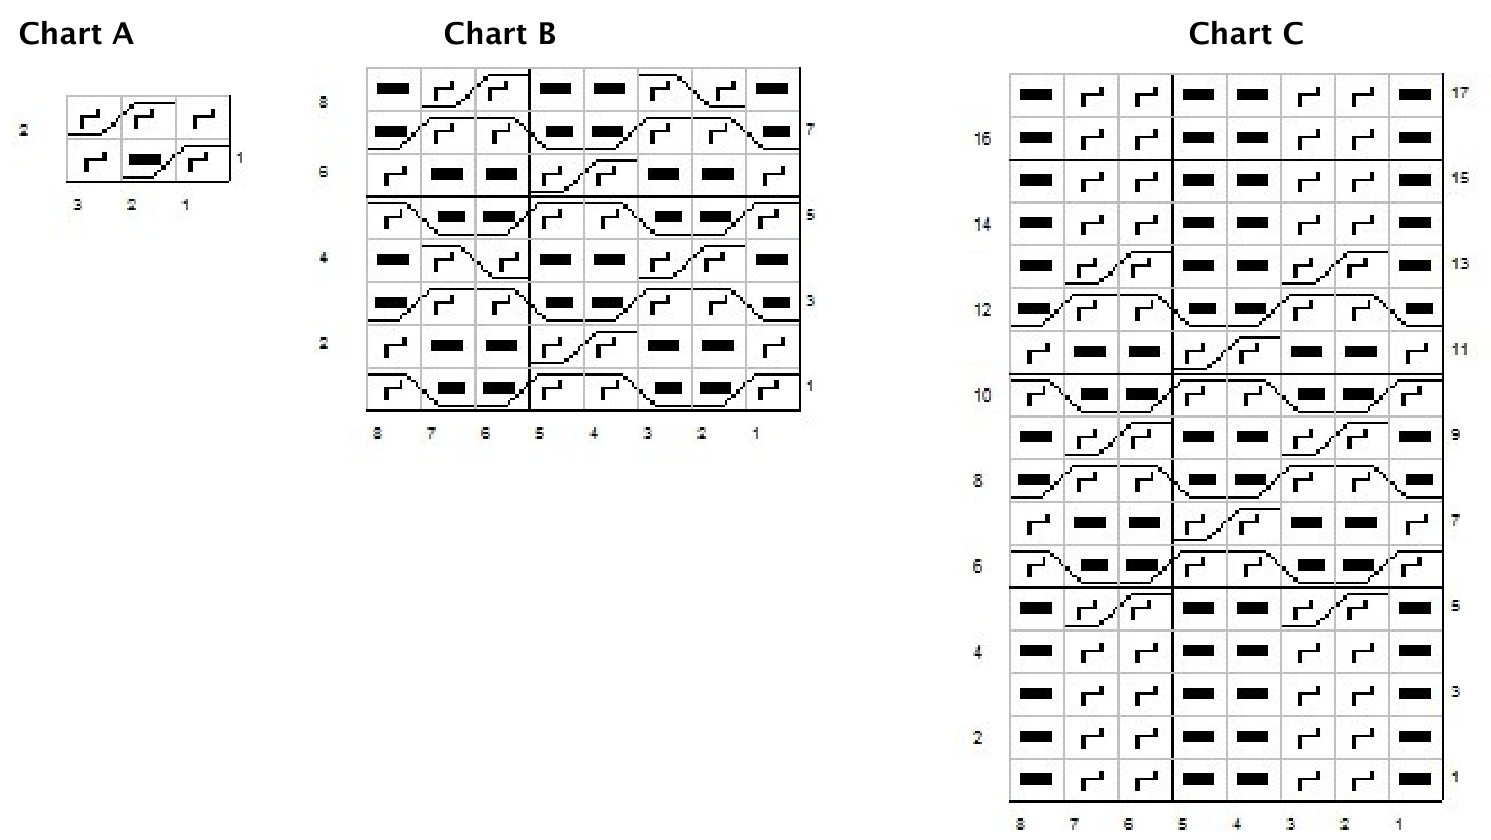
1.) Instructions are written for size Small with other sizes shown in []. If only one number is given it applies to all sizes. 2.) Your choice of two leg stitch charts are provided. Choose either Chart B or chart C to work from while knitting the pattern. Should you decide to alternate charts for a more creative leg, alter Chart C as follows: remove row 1 and begin knitting it on row 5 to align pattern cross rows with the two charts. 3.) The purl 1, knit 1 through the back loop, purl 1 ribbing between motifs has been done with a twisted knit stitch rather than a plain knit to simplify the stitches used.
Cuff
Cast on loosely 48 [64, 84] stitches using long tail method. Use a larger size needle, if necessary, to keep cast on edge loose. If working on DPN divide evenly over 3 or 4 needles. If working on 2 circs or ML divide as. follows: 24 [32, 42] st. on first needle with beg/end round centered in those st. and 24 [32, 42] st on 2nd needle or loop. These two sets make up the back and front of leg respectively. Work in k2, P2 ribbing for 10 rds, increasing 3 [4, 1] st(s) in last rd. [51, 68, 85 sts]
Leg Pattern Setup
Rearrange Sts as follows: 22 sts, pm, 2 sts [16sts, pm, 13 sts; 22 sts, pm, 19 sts] for a total 24 [29, 41] Sole Sts. and 27 [39, 44] Instep Sts. Beginning at marker \*work Chart A (Small Band), p1, kltbl, p1, work Chart B (or C), p1, kltbl, p1\*, repeat from \* to $^*2$ [3, 4] times. Total pattern repeats 3 [4, 5] each round. Work in established pattern until leg measures 4.6 [5.1, 4.9] inches from cast on edge. Make note of which row in the chart you stopped on for when the stitches are picked up again. Setup for Heel: The heel is worked flat, back and forth over just under half of the stitches. For a neater appearance the beginning of round (marker) will be toward the center of your heel, which may require adjusting your needle position before beginning the heel (see above). The pattern repeat will be split between the heel and instep with the chart B (or C) pattern centered in the heel for small size and the Small Band pattern (Chart A) centered in the heel on Medium & Large. Work in pattern to 22 [16, 22] stitches past the marker. Turn, Sl 1, purl 23 [28, 40] sts. Your heel will be worked on these 24 [29, 41] stitches and the remaining 27 [39, 44] stitches will later become the instep. They remain unworked for this portion of the sock. Heel flap: Working back and forth in rows as follows: Note: On first RS row of heel flap only and for medium and large size only, k2tog on last 2 sts to decrease flap by l st. This brings heel flap to an even number of sts while preserving continuity of pattern for the instep sts. worked later. (24 [28, 40] sts.) Row 1: RS facing, $\because S|\bigstar\bigstar|$ ?$\mathsf{K}\mathsf{I}^{\ast}$ repeat to end. Row 2: Ws facing, sl 1, purl to end. Repeat these 2 rows for a total of 12 [14, 20] times. (25 [29, 41] heel flap rows).
Turn Heel
Begin with right side facing, work series of short rows to create heel cup as follows: Note: Sl 1 . slip one stitch purlwise for this section only. Row l: (RS) K14 [16, 22], ssk, kl, turn. Row 2: Sl 1, p5, p2tog, pl, turn. Row 3: sl 1, knit within I st of the gap, ssk, kl, turn. Row 4: sl 1, purl to within one st of the gap, p2tog, pl, turn. Repeat rows 3 & 4 until all heel sts. have been worked.
Designed by Margaret Testa www.afewsheepshyofafarm.com
Gusset
To work the heel gusset stitches are picked up along the side of the heel flap you just created. Directions are given for positioning and picking up gusset for DPN and then for 2 circ & magic loop methods, please follow only the set that applies to your technique.
DPN
With RS facing, slip the first half of the heel stitches to a free needle, then using that same needle pick up and knit 13 [15, 21] stitches along flap edge. This includes picking up one stitch in the row below on the first instep stitch to prevent a hole from forming. Place marker or note this is end of the sole stitches. Using another needle, work half the instep stitches in the established pattern. On a third needle work the other half of the instep stitches in the established pattern. (Or work all instep stitches on one needle if you are only using 4 dpn) Place marker or note this is the end of the instep stitches. On a fourth needle pick up and knit 13 [15, 2l] stitches along flap edge. This includes picking up one stitch in the row below on the first instep stitch to prevent a hole from forming. On the same needle, work the remaining heel stitches. You are now in position to begin the heel gusset decreases.
2 circs or ML
Slip half the heel stitches from the right to the left needle and remove the marker. One half the heel stitches are now on each of the front and back needles. Move all the stitches onto the cable. Count to the middle of the instep stitches and pull a new loop, for ease of working be sure that the first stitch after the loop is a kltbl stitch, even if this means the stitches are not quite evenly distributed. The working yarn is now in the middle of your front needle. Pull the back needle forward to the working position and slip the heel stitches from the left to the right (working) needle. Now pick up and knit 13 [15, 21] stitches along flap edge. This includes picking up one stitch in the row below on the first instep stitch to prevent a hole from forming. Place marker. Work across the instep stitches that are on that needle in the established pattern. Turn and work the other half of the instep stitches in the established pattern. Place marker. Now pick up and knit 13 [15, 21] stitches along flap edge. This includes picking up one stitch in the row below on the first instep stitch to prevent a hole from forming. Knit the remaining heel stitches. You are now in position to begin the gusset decreases.
Note: From this point forward you will continue to work the instep (top of foot) in the established patterns, as per the charts and work all the sole stitches (bottom of foot) in plain stockinette stitches.
Gusset Decreases
Round 1: Knit to 3 stitches before marker (or 3 stitches before end of needle 1), k2tog, kl, sl marker, work instep in established pattern stitch, sl m (or at beginning of needle 4), kl, ssk, knit to end of round. Round 2: Knit all sole stitches and work instep in established pattern, slipping markers as you come to them. Repeat these two rounds until 24 [30, 40] sole stitches remain. End of Gusset.
Foot
The foot is worked in rounds until foot length from back of heel measures 7.7 [8.6, 9] inches or 1.3 [1.9, 2.5] inches before the desired length. For DPN: continue working with needles in same positions. If you are using 2 circs or ML you may wish to reposition your needles as follows: Knit to first marker, slide all stitches back onto cable, pull a new loop where the 2nd marker is located. This gives you the sole stitches on one needle and the instep on the other and will simplify the toe decreases.
Toe Set-up
From this point forward the toe is worked in all Stockinette stitch. Knit all stitches unless otherwise instructed. Follow instructions below to set up toe stitches for your size.
For Small
Work sole sts, sl marker, kl, ssk, ssk, knit to last 3 sts, k2tog, kl, work remaining sole sts. 24 instep and 24 sole sts remain.
Designed by Margaret Testa www.afewsheepshyofafarm.com
For Medium
Work Sole sts, sl marker, kl, ssk, ssk, knit to last 5 sts, k2tog, k2tog, kl, sl marker, work remaining sole sts. Repeat 1x. Next rd: work sole sts, sl marker, kl ssk, knit to marker, sl marker, work remaining sole sts. 30 instep and 30 sole sts remain. For Large Work Sole sts, sl marker, kl, ssk, ssk, knit to last 5 sts, k2tog, k2tog, kl, sl marker, work remaining sole sts. 40 instep and 40 sole sts remain.
All sizes, Toe
Round 1: Work to 3 st. before first marker, or 3 st remaining on needle one) K2tog, k1 (sl m), kl, ssk,knit to 3 sts before next marker (end of instep stitches, or end of needle 3) k2tog, kl, (sl m), kl, ssk, knit to end of round. Round 2: Knit. Work these two rounds a total of 4 [6, 8] times. (24 [28, 40] sts remain.) Repeat Round 1 only an additional 4 [5, 8] times. Knit to the end of the sole stitches, end of needle one or first marker. Finishing: Graft stitches together using Kitchener st. method. Weave in ends. Repeat all directions for second sock.
All images andPattern $\circledcirc$ MargaretTesta2010. This patterns is for personal use only. You may not sellitems made from this pattern. Merchants may not download or print this pattern for sale, free distribution, or class use. Downloading the pattern constitutes agreement with these terms. To obtain additional copies or usage permissions please contact the designer.


