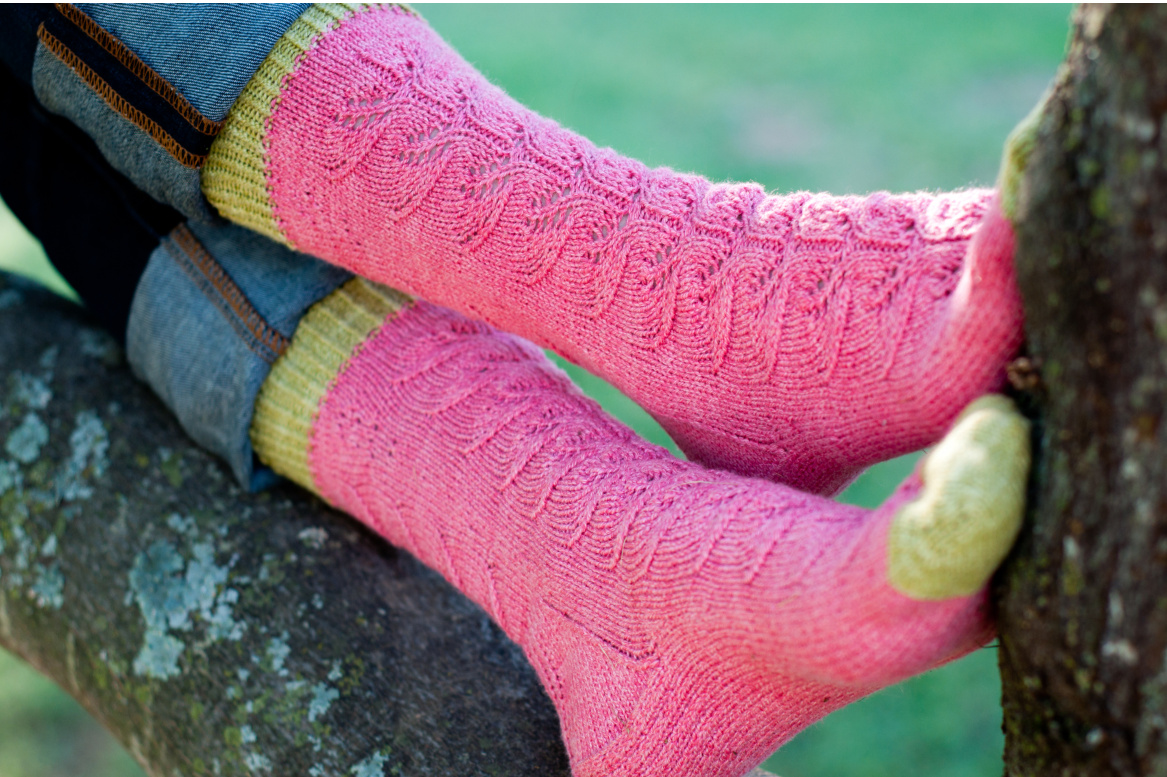
Summer Slice
By Cassandra Dominick
Materials:
US Size 0 (2mm) (or preferred size up to US 3) 40" circular Two balls Classic Elite Yarns Summer Sox in Coral (MC), and one ball in Seagrass (CC) (40% cotton, 40% superwash merino, 20% nylon; 175 yds) C stitch markers yarn needle
Gauge:
7-9 sts to an inch in stockinette stitch Size: Custom
Abbreviations:
ssk: slip two stitches knitwise one at a time, knit (this is a left-leaning decrease) k2tog: knit two sts together (this is a right-leaning decrease) sl 1: slip 1 pm: place marker M1R: This is a lifted bar increase. Lift the bar between the stitches from the back with the left needle. Knit this new st through the front loop. This will twist the stitch and make it invisibly blend with the Others. M1L: Lift the bar between the stitches from the front with the left needle. Knit new st through the back loop, twisting the stitch as you knit it. p2tog: purl two stitches together
Notes:
Many people have a specific needle size they like for socks. I have a loose tension, so I knit on 2mm needles for sturdier socks. You may choose your favorite size, since the custom fit process is more important than actual gauge. You can try your sock on as you knit it. You may increase on the instep or sole edges as you like if the gusset or calves feel tight and the center lace pattern will not be disrupted. For this pattern you customize the size as you go. You end toe increases when the toe barely touches the pinkie toe and you begin the heel flap when the instep of the sock touches the ankle bone. If you are making these for another person, you should measure the total foot length, length to ankle bone from toe, and foot circumference. The circumference of the knitted sock should be about 1/2-1 inch less than the actual foot circumference to keep the sock from sagging
Cast on:
Cast on 15 sts on each needle with CC (30 total) using the toe-up cast on method of your choice. I recommend Judy's Magic Cast On found here: http: / /knitty.com/ISSUEspringO6/FEATmagiccaston.htm After you cast on for the first toe, slide the stitches onto the cable and cast on for the second toe in the same way. You will knit into the first side normally, but will knit into the second side through the back loop since the cast on will make the second side of stitches twisted. You do this only on the first round. Pm at the beginning of the round. You should mark the first st, rather than placing the marker on the needle, as it will slide off. Knit two rounds. On the first round I like to knit my tail into my stitches. This is optional, but makes for less finishing work later. Begin increases. You will be increasing every other round on both sides of the toes. The increases will be mirrored M1R and M1L. You will increase until the toe sections are wide enough to cover your toes and just barely touching the top of your pinkie toe. The sock will stretch as you wear it, so a snug fit is good at first. If you have a stitch count you have used in other socks that works well for your foot size, feel free to increase to a number close to that size. On an increase round: k1, M1R, k till one before the end, M1L, k1 When the toes are wide enough to barely cover the top of pinkie toes finish the round then change to MC. Knit 3 rounds, then begin lace pattern over the center 23 sts. You may wish to place markers on both sides of the 23 center stitches. Remember, the amount of stitches on your instep varies depending on your custom fit. For example, if you have 66 total stiches, and 33 on your instep, there will be 5 sts on either side that are not part of the lace pattern. Continue the lace pattern on the instep until the sock reaches the ankle. You may increase evenly outside of the lace stitches as necessary for a good fit. Note where you are in the lace pattern, since you will not be returning to the instep until the heel flap is done.
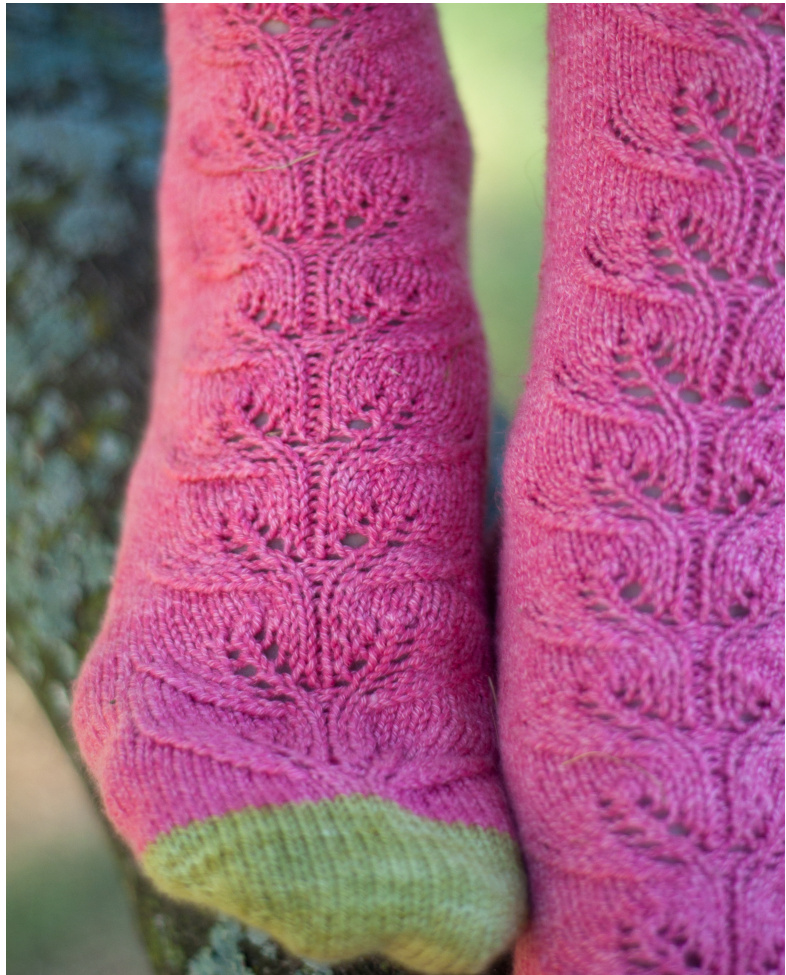
Lace:
The lace pattern is repeated only on the instep (top) side of the sock. The lace pattern is a 12-row repeat. R1: K8, k2tog, yo, k1, p1, k1, yo, ssk, k8. R2: K7, k2tog, k2, yo, p1, yo, k2, ssk, k7. R3: K6, k2tog, k1, yo, k2, p1, k2, yo, k1, ssk, k6. R4: K5, k2tog, k3, yo, k1, p1, k1, yo, k3, ssk, k5. R5: K4, k2tog, k2, yo, k3, p1, k3, yo, k2, ssk, k4. R6: K3, k2tog, k4, yo, k2, p1, k2, yo, k4, ssk, k3. R7: K2, k2tog, k3, yo, k4, p1, k4, yo, k3, ssk, k2. R8: K1, k2tog, k5, yo, k3, p1, k3, yo, k5, ssk, k1. R9: K2tog, k4, yo, k5, p1, k5, yo, k4, ssk. R10-12: K11, p1, k11.
Summer Slice
I Heel: To make the heel flap, you will cease knitting on the instep side and will knit back and forth on both soles to make the heel flaps. You will repeat the next two rows until the flap is about /2 inch from the end of your foot. Try the sock on as you go to check the length. End the repeats with a purl row. Row 1: Sl1 knitwise (as if to knit), \*k1, sl 1 st purlwise (as if to purl), repeat from \* to last 2 sts, k2. Repeat for the second sock sole. Row 2: Sl 1 st purlwise, purl to end. Repeat for second sock sole. When your heel flap is 1/z in shorter than the total sock length, you will do the heel turn. The heel turn is made with short rows and now you will work on only one sock at a time. The second sock rests on the cable of the needle. To make the heel turn, first place markers on either side of the 11 center sts. Row 1: Sl 1 st knitwise, \*k1, sl 1 st purlwise, repeat from \* to second marker, remove marker, sk, k1. Turn Work. Row 3: S1 1 st knitwise, work in k1, sl 1 st purlwise pattern to the stitch before the gap created by the p2tog in the previous row. Ssk the st before and after the gap to close the gap. K1. Turn work. Row 4: Sl1 st purlwise, purl to the st before the gap, p2tog the st before the gap with the st after the gap, k1. Turn work. Repeat rows 3 and 4 until you have completed the short rows and no stitches remain outside of the markers. This is the end of the first sock heel turn. Place a marker on the left corner of the back heel (as worn). Using the working yarn, pick up and knit the selvedge stitches on the left side (as worn) of the heel flap. The slipped stitches that you made as you knit the flap are easy stitches to pick up. Make note of how many stitches you pick up. This number should be the same on each side of the heel flaps for consistency in size. To prevent a hole at the corner of the gusset next to the instep, knit one extra stitch next to the instep through the center of a corner st. Let this first heel flap and partial gusset rest on the needle as you repeat the heel turn and left gusset pick up on your second sock in the same way. When the second sock is finished, knit across the instep of both socks at the appropriate row in the lace pattern. When you have knit across both insteps, pick up selvedge sts and knit along the right side (as worn) of the gusset of the sock you just knit the instep of (the first sock you turned the heel of), remembering to add an extra st to prevent a hole near the instep. When you have picked up the gusset sts, pm on the right (as worn) corner of the back heel. Knit across the back heel sts of the first sock. Sl m and knit the left gusset sts. From this point forward, you will be alternating a knit round with a sl st pattern (k1, sl 1 purlwise) pattern on every other row between the markers that designate the back of the heel. The plain knit round takes the place of the purl round that was done on the heel flap to maintain the pattern. Continue the sl st heel through the gusset decreases, and as long as you like after. It provides a sturdier point of contact for shoe rubbing.
Summer Slice
Move to the second sock. The working yarn should be at the right corner of the instep. Knit up the extra st, then pick up and knit the selvedge sts. Pm on the right (as worn) corner of the back heel. You should now have all of the heel, gusset, and instep sts on your needles. Complete the round by knitting across the heel sts, sl m, and knit the left gusset sts. Work across the instep of both socks.
Decreases:
Beginning at the corner of the right (as worn) gusset on a new round, k1, ssk, k to marker, work across heel sts in the sl st pattern to the second marker, sl m, k to last 3 gusset sts, k2tog, k1. Repeat for second sock. Knit across instep in lace pattern for both socks. You have finished one decrease round. Decrease twice more, then begin decreasing only every other round. Continue until the number of sts on the back of the leg matches the number of sts on the front of the leg.
Leg:
When you have finished your gusset decreases, you may want to continue the sl st pattern until you finish a lace repeat on the front of the leg, then begin a new repeat on both sides of the leg and cease making the sl st heel thickness on the back. If you find it helpful, mark both sides of the 23 center sts on the back of the leg. Continue in pattern until you are almost out of the MC (and finishing a lace repeat) or until the socks are about 1.5 inches shorter than you prefer for the total cuff length. Switch to CC and knit in 1x1 twisted rib (\*k1 through the back loop, p1) until your cuff is about 1.5 inches (or longer if you prefer).
Bind off:
For a nice stretchy cuff bind off, try either Jeny's Surprisingly Stretchy Bind Off found in Knitty at http:/ /www.knitty.com/ISSUEfall09/FEATjssbo.php or a tubular bind-off from http://www.knitty.com/ISSUEfall09/FEATjssbo.php. Weave in all ends. Put feet in socks and dance around because you are done with both socks!
Please send questions about this pattern to cassy@knitthehellout.com. 1 will respond to this email faster than Ravelry inquiries. @Cassandra Dominick 2011. The pattern, photos, and illustrations contained in the pattern are subject to copyright protections. This pattern is for personal use only and may not be used for profit. You may not sell items made with this pattern. Merchants may not distribute this pattern freely or distribute it as part of a class freely without written permission of the author. Printing or downloading this pattern implies agreement with these terms.


