Timeline Mitts
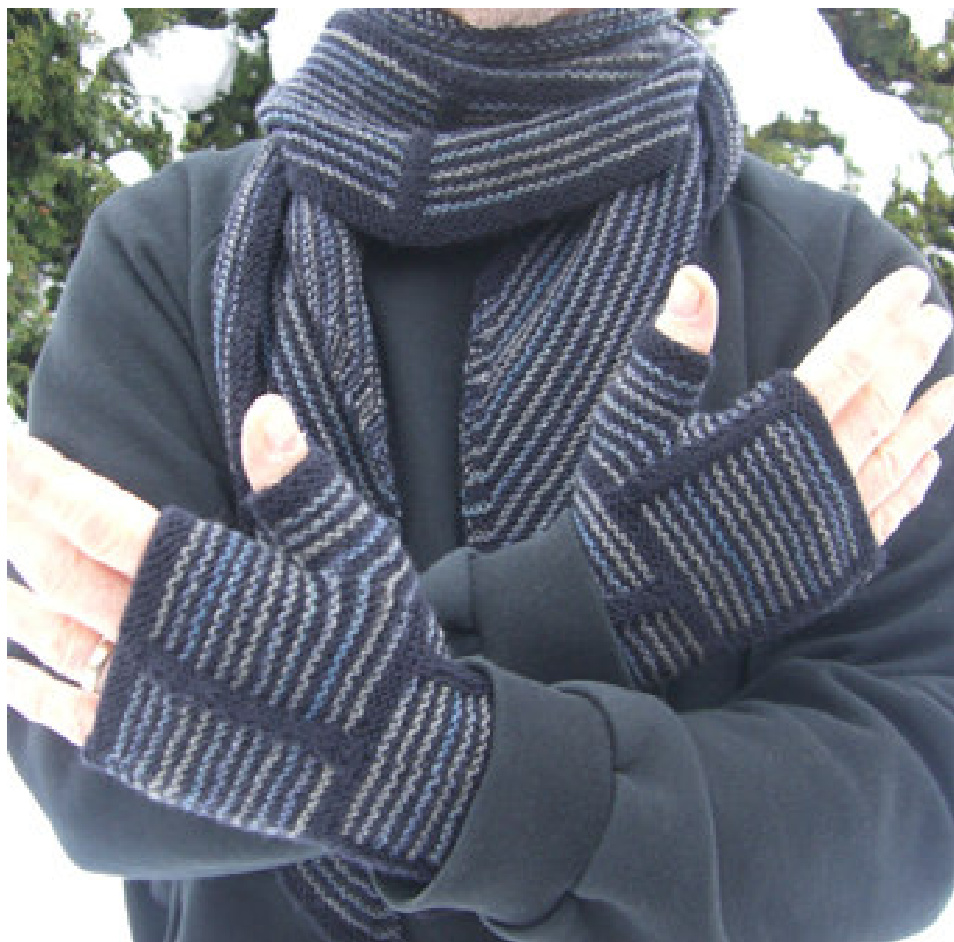
Garter stripes interrupted by bold slipped stitch columns form an interesting structure. The mitts were inspired by Westknit's‘ClockworkShawl' and they not only make a nice match to the shawl but they alsoneed onlylittleyarn. Yarn Fingering weight yarn (100g/about 430 yd) Main colour A: \~ 105 yards, Contrast colour B:\~95 yards Sample shown in Cascade Yarn Heritage in black and Heritage Paint in Thunder' Needles Size US 1.5 (2.5 mm), DPNs or circular(s) for your preferred way to knit in the round Notions Stitch markers, darning needle Gauge 25 stitches = 10 cm/ 4" (unstretched in garter stitch)
Size and measurements
Women's medium, approximately 17 cm (6.5 inches) long from top to bottom, approximately 19 cm (7.5 inches) around, without stretch. The pattern makes these mitts stretch to larger circumferences. Smaller or bigger sizes can be achieved by going down or up in needle size. Keep in mind that changing the needle size might result in the need of additional yarn. There is a difference between right and left mitt. Please read through the whole pattern before youstart toknit. Slip all stitches purlwise with yarn in back. The main colour is referred to as 'A', the contrast colour is 'B' in the pattern.
Abbreviations
→k -knit M1p (make 1 purl) - pick up the strand of yarn betweenneedlesfrom thefrontwiththeleft needle, purl the newly picked up stitch through the back loop m - marker p-purl pm -place marker rnd(s) -round(s) →sl - slip sm -slip marker → st(s) - stitch(es)

Instructions
Cuff (for both mitts) Using colour A (main colour) loosely cast on 48 stitches, place marker for beginning of round and being careful not to twist join to work in the round. Divide the stitches evenly on your needles, the first 24 stitches form the top of the hand, the next 24 stitches the palm of the mitt. Work six rounds in 2/2 ribbing (knit 2, purl 2) OR six rounds in garter stitch (knit 1 round, purl one round - repeat 3 times).
LEFT mitt hand
Rnd 1: In B (contrast colours): k2, sl3, k15, sl3, k to end of round. Rnd 2: In B, p2, sl3, p15, sl3, p to end of round. Rnd 3: In A, k to end of round. Rnd 4: In A, p2, k3, p15, k3, p to end of round. Repeat last 4 rnds 10 more times, then repeat rnds 1 and 2 once (total of 12 stripes in colour B). PLEASE NOTE! Start the thumb gusset increase during the 1oth repetition in round 4. Work said round as follows: Work in pattern to last 2 sts, pm, M1p, p1, M1p, pm, p1. Continue to work thumb gusset increases every fourth round; please see thumb gusset instructions below. Interrupting Stripe: Rnd 1: In A, knit to end of round. Rnd 2: In A, purl to end of round. Repeat rnds 1 and 2 two more times. supeusecton 2: Rnd 1: In B, k11, sl3, k to end of round. Rnd 2: In B, p11, sl 3, p to end of round. Rnd 3: In A, k to end of round. Rnd 4: In A, p11, k3, p to end of round. Repeat last 4 rnds 10 more times, then repeat rnds 1 and 2 once more (total of 12 stripes in colour B after the interrupting bold stripe in colour A). PLEASE NOTE! End the thumb gusset increases during the 6th repetition in round 3 (See thumb gusset instructions). Finishing stripe at top of hand: Rnd 1: In A, knit to end of round. Rnd 2: In A, purl to end of round. Repeat Rnds 1 and 2 two more times. Bind off loosely. RIGHT mitt hand StripedSection1: Rnd 1: In B, k10, sl3, k to end of round Rnd 2: In B, p10, sl3, p to end of round Rnd 3: In A, k to end of round Rnd 4: In A, p10, k3, p to end of round Repeat last 4 rnds 10 more times, then repeat rnds 1 and 2 once (total of 12 stripes in colour B). PLEASE NOTE! Start the thumb gusset increase during the 1oth repetition in round 4. Work said round as follows: Work 25 sts in pattern, pm, M1p, p1, M1p, pm, p to end. Continue to work thumb gusset increases every fourth round; please see thumb gusset instructions below. Interrupting Stripe: Rnd 1: In A, knit to end of round. Rnd 2: In A, purl to end of round. Repeat rnds 1 and 2 two more times. Striped Section 2: Round 1: In B, k1, sl3, k15, sl3, k to end of round Round 2: In B, p1, sl3, p15, sl3, p to end of round Round 3: In A, k to end of round Round 4: In A, p1, k3, p15, k3, p to end of round Repeat last 4 rnds 10 more times, then repeat rnds 1 and 2 once more (total of 12 stripes in colour B after the interrupting bold stripe in colour A). PLEASE NOTE! End the thumb gusset increases during the 6th repetition in round 3 (See thumb gusset instructions). MM-Maschenmarkierer QuerfadenvonvornnachhintenaufdielinkeNadel M1P (make 1 purl) - Zunahme einer linken Masche. nehmenundlinksverschranktabstricken.
Thumb Gusset:
Start the gusset increase during the 10th repeat of the Striped Section 1. In round 4 work the first 24 stitches according to the pattern, then for the 24 palm stitches work: For left mitt: P22, pm, M1p, p1, M1p, pm, p1. For right mitt: P1, pm, M1p, p1, M1p, pm, p22. The three stitches between the markers form the base of the gusset increase. Continue increasing every fourth round as follows: Work according to the pattern until you reach the marker, sm, M1p, p to next marker, M1p, sm, p to end of round. The thumb gusset is completed once you have 17 stitches between the markers. Work two more rounds according to the pattern. In the following round (the 3rd round in the 6th repeat of the second striped section) place the 17 thumb gusset stitches on waste yarn or a stitch holder. Using the backward loop cast on method cast on 3 stitches to close the gap ( 50 sts total) and continue in pattern.
Thumb
Return thumb stitches to needles and pick up an additional 3 stitches = total of 20 stitches. PM for beginning of round. Rnd 1: In A, knit to end of rnd. Rnd 2: In A purl to end of rnd. Rnd 3: In B, knit to end of rnd. Rnd 4: In B, purl to end of rnd. Repeat last four rounds once more. Repeat rounds 1 and 2 only three more times. Bind off loosely. Weave in all ends. Use the tail at the base of the thumb to neaten the junction between thumb and hand and to close any gaps.


