KATNISS
Gauge
8.5 STS per inch and 12 row per inch in stockinette stitch on US 1 needles.
Size
Women medium to large. To make a smaller size use a thinner yarn with a smaller needle.
Yarn
400 yards of heavy fingering sock yarn needed for sock shown or to do a smaller size small use regular or thin sock yarn and go down a needle size.
Needes
One 32in US 1 circular Needle Notions Darning needle Stich markers
Abbreviations used:
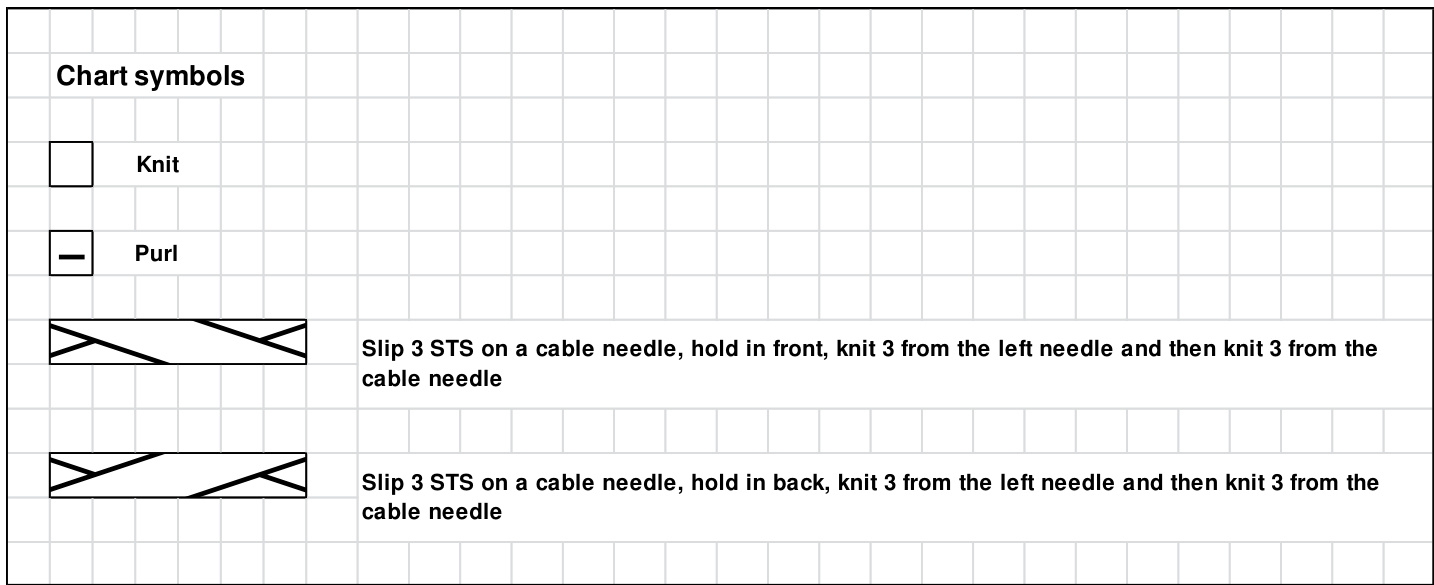
CO- Cast on K - Knit P-Purl P2TOG - purl 2 stitches together PU - pick up RND - round(s) RS - right side SL1P - slip stitch as if to purl SSK - Slip 2 stitches knit wise one at a time to the right needle, insert tip of left needle into front legs of these stitches, from right to left (front to back) and knit them together. ST - stitch (s) WS - wrong side \*- instructions between \* \* are to be repeated X times
KATNISS by RoseHiver Page \~1-of5
KATNISS
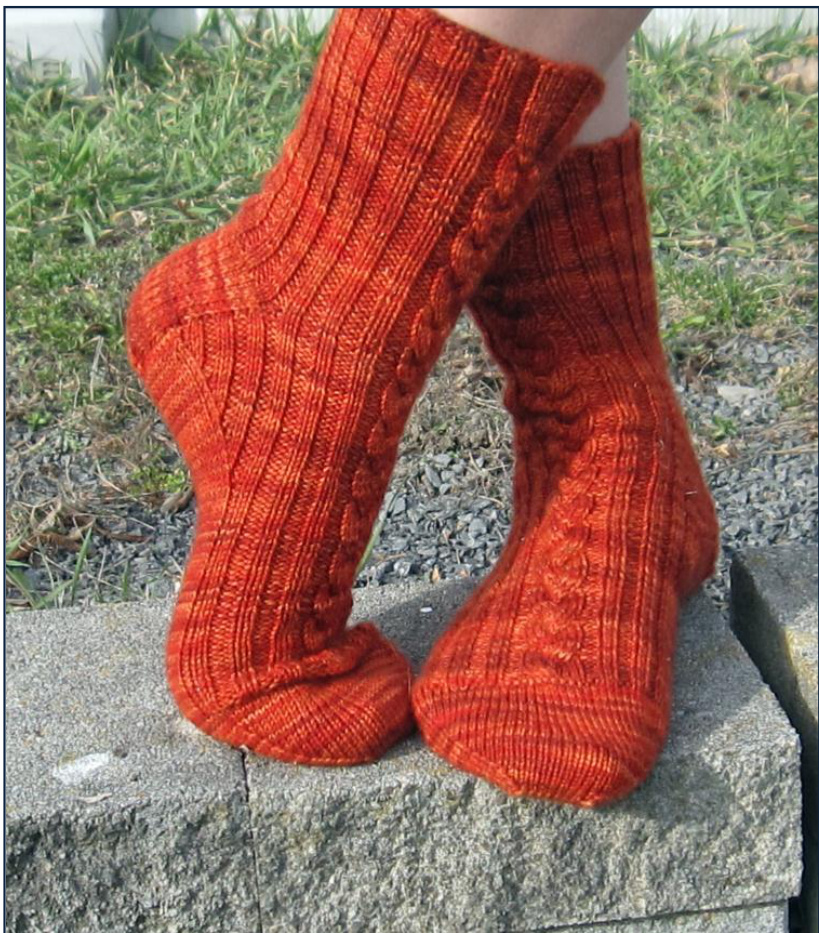
Socks shown were knit with Bugga yarn by The Sanguine Gryphon (experimental redorange colorway). Unstretched sock measures 7 inches circumference and stretches to 13 inches circumference. Measurements are 8 inches from cuff to heel (5 for the leg and 3 for the heel) and 9 inches long from end of toe to back of heel turn. Length of socks can be adjusted by adding or removing rows in multiple of 4 rows. Socks used 3.75 ounces (386 yards). Note: Pattern is written cuff down with the Magic loop or 2 circular needles method. Needle 1 is the front or instep needle and Needle 2 is the back or sole needle. If you want to use DPN just distribute the stitches evenly on four needles and use needle 1 and 2 for the front and needles 3 and4fortheback.
Pattern instructions
Using twisted German CO over 2 needles, CO 70 STS (or you can use your favorite CO). Arrange STS to have the same number of STS on each needle. Beginning of round is the first ST of the front needle. Work the one row Cuff chart twice per RND (once per needle) until cuff measures approximately 1.5 inches.

KATNISS
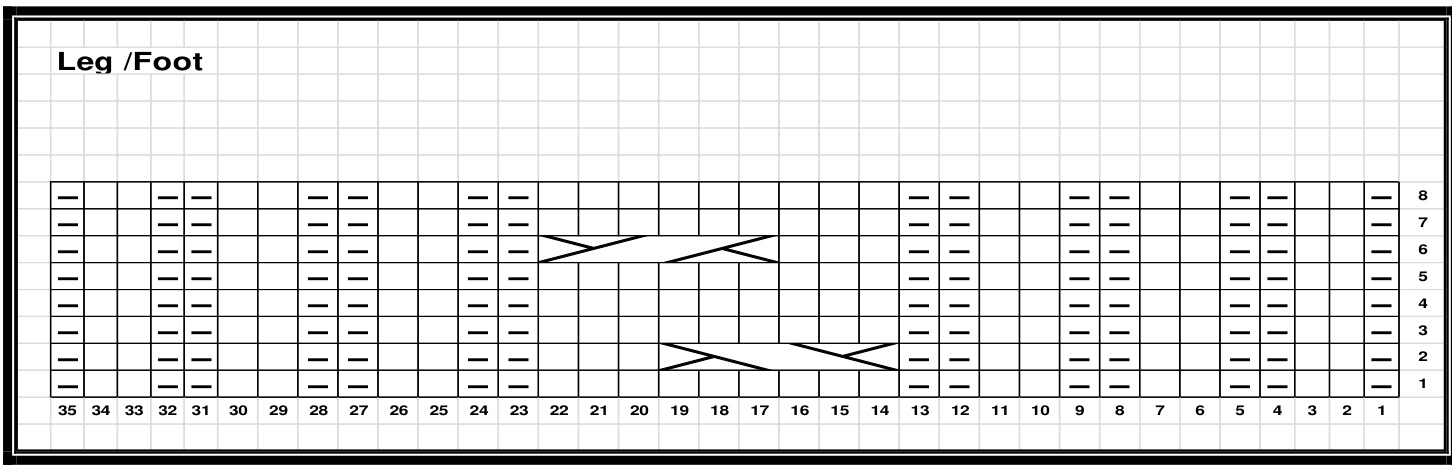
Work 5 repeats of the leg chart (twice per RND once per needle), and then work rows 1 to 6 once. (Total RNDS 5x8=40+6=46)
Heel flap
Heel flap is worked on needle 2 only, in flat knitting (back and forth in rows).
Sock is made with in Heel ST and has a German selvage ST. Row 1(WS): K1, purl to last ST, SL1P with yarn in front, turn Row 2 (RS): K1, \* K1, SL1P with yarn in back repeat from\* to last 2 STS, K1 and SLP1 with yarn in front, turn Repeat these 2 rows until heel flap is 2.75 in or up to desired length ending with a completed RS row.
Heel turn
Continue working back and forth using short rows as follows. Row 1 (WS): SL1P with yarn in front, P19, P2TOG, P1, turn Row 2 (RS): SL1P with yarn in back, K6, SSK, K1, turn Notice that there is a small gap that forms between the working stitches and the unworked stitches. Row 3 (WS): SL1P with yarn in front, P to 1 St before gap, P2TOG, P1, turn Row 4 (RS): SL1P with yarn in back, K to 1 St before the gap, SSK, K1 turn Repeat row 3 and 4 until the entire heel STS have been worked, rows (21 STS left on needle).
KATNISS
Gusset
Resume working in rounds, with the RS facing you, PU and knit into each slipped ST along the edge of heel flap, PU 2 additional STS, one on each side of the gap between instep and gusset and knit those 2 STS together to avoid gusset hole. On Needle 1 , continue knitting in established pattern as per LEG/FOOT chart. On back needle (needle 2), pickup 2 additional STS one on each side of the gap between instep and gusset and knit those 2 STS together to avoid gusset hole and then PU and K a St for each slipped St along the edge. Knit about half of the heel turn stitches (9 or 10). You have about half of the STS worked on your back needle and half to be worked. Placing of ST markers: We want to put ST markers on each side of the 33 central STS of Needle 2. There is a little math involved in order to center the sole STS. Here's the math equation to do this. Take the Total number of STS of Needle 2 only (both worked STS plus those that have to be worked), subtract 33 from this number and then divide that number by 2. For example I had 64 STS on my back needle when I subtracted 33; I had 31 left, which I then divided by 2 to get 15 12. Since I don't have %2 a ST, I counted 16 stitches put a marker, counted 33 STS put a second marker and then I had 15 stiches left on the other side of marker (16+33+15=64STS). If you have an extra ST like me put it on the right side of the right marker and this extra ST will be decreased by replacing a P1 with a P2TOG. At this point, I thread a different colored yarn where I want my markers and replace the thread by a marker when I get to those STS. Needle 2: Now that that the markers are in place, you have to finish knitting the heel turn STS so knit to first marker, SM, SSK and then use the Gusset ribbing chart to set up your gusset pattern. Count the number of STS left on your needle (I had 13 out of my original 15 since I used 2 to do a SSK). Use Top numbers of the Gusset Ribbing Chart to set up the ribbing pattern. I had 13 STS so working the chart from right to left and using the Top numbers I worked the chart STS in the following order 13, 12, 11... up to 1. In other words the last stitch of needle 2 is stitch number 1 of the top numbers. So if you have for example 14 STS left after doing SSK start at ST 14 and work your way down up to ST 1.
| Gussetribbing | ||||||||||||||||||||||||||||||||||
| 6 | 6 | 10 | 11 | 12 | ||||||||||||||||||||||||||||||
| 1 | 2 | 3 34 | 5 | 7 | 8 | 13 | 14 | 15 | 16 | 17 | 18 | 19 | 20 | 21 | 22 | 23 | 24 | 25 | 26 | 27 | 28 | 29 | 30 | 31 | 32 | |||||||||
| 二 32 | 3130 | -一 29 | 9282726 | 25 | 24 | 23 | 22 21 | I | 二 | |||||||||||||||||||||||||
| 20 | 19 | 18 | 17 | 16 | 15 | 14 | 13 | 12 | 11 | 10 | 9 | 8 | 7 | 6 | 5 | 4 | 3 | 2 | 1 | |||||||||||||||
Needle 1: continue in established as per Leg/Foot chart pattern Needle 2: Start the gusset ribbing pattern on the other side as follows; use the bottom number of the Gusset ribbing chart. If you had an extra stitch start the Gusset ribbing with a P2TOG instead of P1 which counts as the first stitch of the chart. If you did not have an extra stitch then work as per Gusset ribbing chart using the bottom numbers until the last 2 STS before marker, K2TOG,SM, K33,K1, knit the STS as they present themselves (knit the knit and purl the purl) to the end of Needle 2.
KATNISS
Gusset decreases
Rnd 1:
Instep (Needle 1): continue in established as per Leg/Foot chart pattern Sole (Needle 2): knit stitches as they present themselves up to last ST before marker,K1, SM, K33,SM, SSK knit stiches as they present themselves to the end of needle
Rnd 2:
Instep (Needle 1): continue in established Leg/Foot chart pattern Sole (Needle 2): Knit STS as they present themselves up to 2 STS before marker, K2TOG, SM, K33,SM, K1, knit STS as they present themselves to the end of needle. Repeat these 2 RNDS until you have the same amount of STS on the front and the back needle, 35STS per needle (Total STS 70).
Foot
Continue knitting instep as per Leg/Foot chart and sole in stockinette until foot length is approximately 2 inches less than desired sock length from the back of the heel turn; ending after completing row 1 or 5 of the Leg/Foot chart. Knit the sole STS in stockinette.
Set up RNDfor toe:
Needle 1: Work as per RND 2 or as per RND 6 of chart depending on where you ended the foot but when you get to 6 ST cable knit the 3rd and 4th ST of the cable together then knit as per chart for the rest of the needle. (34 STS on needle, decrease is done to prevent puckering when ending a cable) Needle 2: Knit in stockinette. (35 STS on needle)
Set up RND 2 for toe:
Needle 1:K11, P11, with your right needle lift the loop (bump) directly underneath the next purl ST and put it on the left needle and purl that loop and then purl the ST it came from, K11. (35 STS on needle) Needle 2: Knit in stockinette. (35STS on needle) Work 4 optional RNDS of stockinette before working the toe decreases.
Decreases RNDS for toes:
RND 1(regular RND): Knit around. RND 2 (decrease RND): Instep needle: K1, SSK, knit to last 3 STS, K2TOG, and K1 Sole needle: K1, SSK, knit to last 3 STS, K2TOG, and K1 peat RNDS 1 and 2 until desired toe length ending after a completed RND 2. and sole STS together with Kitchener St and weave in all yarn ends and block


