DAYLoNG SoCkS, BotH WAYS
The Sock Pattern with the Princess Foot, by Susan Luni
After a day-long shopping trip, I wished for a pair of socks with princess soles that put the smooth side of the stockinette stitch against my sore feet. I had knit princess-soled socks as gifts, but I did not like purling the soles. That's when I started turning my socks inside out mid-sock. I knit the foot from the wrong side. Once the foot was done, I turned the sock right side out again, putting the purl bumps to the outside and the smooth knit side against the sole of my foot. Without any extra purling, I had knit a sock with princess sole, a princess heel and a princess toe-altogether, a regal foot. This basic pattern produces a pair of socks are stretchy, soft and smooth-soled, simple enough to knit up quickly, pretty enough for a gift, especially for someone whose feet are sensitive or have a hard road to walk. Both cuff-down and toe-up instructions are included. Materials: Misti Alpaca Hand Paint Sock (50% Alpaca, 30% Merino, 10% Nylon, 10% Silk; 437 yds/400 m per 100 gram hank) color: C04, Taos; 1 hank (orange pair); also shown in Patons Kroy Socks FX (75% Wool, 25% Nylon, 166 yds/152 m per 50 gram skein) color: Cascade; 2 skeins (blue-green pair) Gauge: 32 sts/44 rows = 4" in stockinette stitch 48 sts/44 rows = 4" in unstretched 2x2 ribbing 24 sts/44 rows = 4" in stretched 2x2 ribbing Needles: size US #1.5/2.5 mm. Adjust needle size to obtain the correct gauge. Size: 7(8, 9) inches foot circumference--will stretch to fit 9 (10, 11) inches comfortably. Notions: tapestry needle; stitch marker if needed to mark beginning of round. A skilled beginner can knit this simple pattern. More experienced knitters will be able to use this technique to make any patterned pair of socks more comfortable. Knit according to pattern, and then turn the sock inside out, or right side out if knitting toe-up, at the heel. Almost any pattern can be worked from the wrong side, even cables and lace.
CUFF DOWN Leg
CO 56(64, 72) sts, using twisted German or any other stretchy cast on. Blue socks use a two-stranded tubular cast on; orange socks use Jeny's Stretchy Slipknot Cast-On. Join to knit in the round. Round 1: [k2, p2] repeat to end of round. Repeat round 1 until work measures 7 inches or desired length.
Heel
Knit 13(17, 21) sts, turn, sl1, purl 27(31, 35) sts. This centers the heel flap on the end of the round, with a knit stitch at each end. Continue heel flap: Row 1: (sl1, k1) repeat across flap, turn. Row 2: sl1, purl remainder of flap, turn. Repeat these two rows until the heel flap measures 2(2.25, 2.5) inches or about 28(32, 36) rows. Begin heel turn.
Cuff Down, continued
Heel Turn
Row 1: RS: sl1, k15(17, 19), ssk, k1, turn Row 2: WS: sl1, k5, ssk, k1 (reversing the stockinette pattern) Row 3: RS sl1, p6, p2tog, p1 Row 4: WS sl1, k7, ssk, k1 Row 5: RS sl1, p8, p2tog, p1 Row 6: WS sl1, k9, ssk, k1 Continue in this manner, stopping one stitch before the gap between the stitches and decreasing over the next two stitches. Final rows WS sl1, k13(15, 17), ssk, k1 RS sl1, p14(16, 18), p2tog, turn WS sl1, k14(16, 18), ssk There will be 16(18, 20) sts remaining on the heel. Turn sock inside out by reaching inside the leg, grasping the cuff and pulling the sock through the needles. Working from the wrong side, pick up and purl 14(16, 18) sts along the heel flap. Pick up an additional st between the heel flap and the instep. This additional stitch will be worked as a purl from the wrong side. Combined with the single knit stitch on the side of the instep, it will complete the ribbed pattern for the foot. Work instep stitches in pattern, starting with p1, k2, p2, ending with p1 for 29(33, 37) sts total. Pick up a stitch between the end of the instep and the heel flap. Purl it. Pick up and purl 14(16, 18) stitches on heel flap. Knit 8(9, 10) sts on heel. Place marker for beginning of the round. Stitch count: 74(84, 94) total, 44(50, 56) sts total in heel, 30(34, 38) sts total in instep. Best arrangement if knitting on 4 dpns is 24(27, 30) sts on N1 (half the heel sts plus the first 2 purls of the instep), 14(16, 18) sts on N2 and N3 for the instep and 22(25, 28) sts on N4 for the other side of the heel. All st counts in instructions below start at the beginning of the round. Next round: k8(9, 10), k14(16, 18) tbl, knit instep sts in pattern, k14(16, 18) tbl, k8(9, 10). Begin gusset decreases: Round 1: K 20(23, 26) or to last 2 sts before instep, k2tog, work instep stitches in pattern, ssk, k20(23, 26) or to beginning of round. Round 2: knit all sole and gusset stitches and work instep in pattern. Repeat rounds 1 and 2, decreasing 2 sts every odd-numbered round, until 56(64, 72) sts remain. Cuff Down, continued
Foot
Continue knitting in even rounds without decreases, working the sole in knit sts and the instep in pattern. When foot measures 2.25" less than desired length, begintoe.
Toe
Move 1 purl st on either side of instep to sole needles. 28(32, 36) sts for sole, 28(32, 36) sts for instep. Round 1: (setup round) k17(19, 21), (k2, p2), repeat across instep until 4 sts remain, k4, k14(16,18). Round 2: (decrease round) K across sole to 4 sts before beginning of instep sts, k2tog, k2. Begin instep sts with k2, ssk, (k2, p2) across to 4 stitches before sole sts, k2tog, k2. Begin sole sts with k2, ssk, knit to end of round Round 3: work in pattern )unds 2 and 3 until 36 sts remain, work one more row in pattern, then Next round: k5, k2tog, k4, ssk, k10, k2tog, k4, ssk, k5. 32 sts remain Next round: k Next round: k to 4 sts remain, k2tog, k4, ssk, k until 4 sts remain, k2tog, k4, ssk, k to end of round. Repeat last round until 16 sts remain. Transfer sts on N2 to N3. Transfer sts from N4 to N1 - 8 sts on each needle.
FINISHING
Graft these stitches together to close toe. Weave in end on knit side of foot. Turn sock right side out.
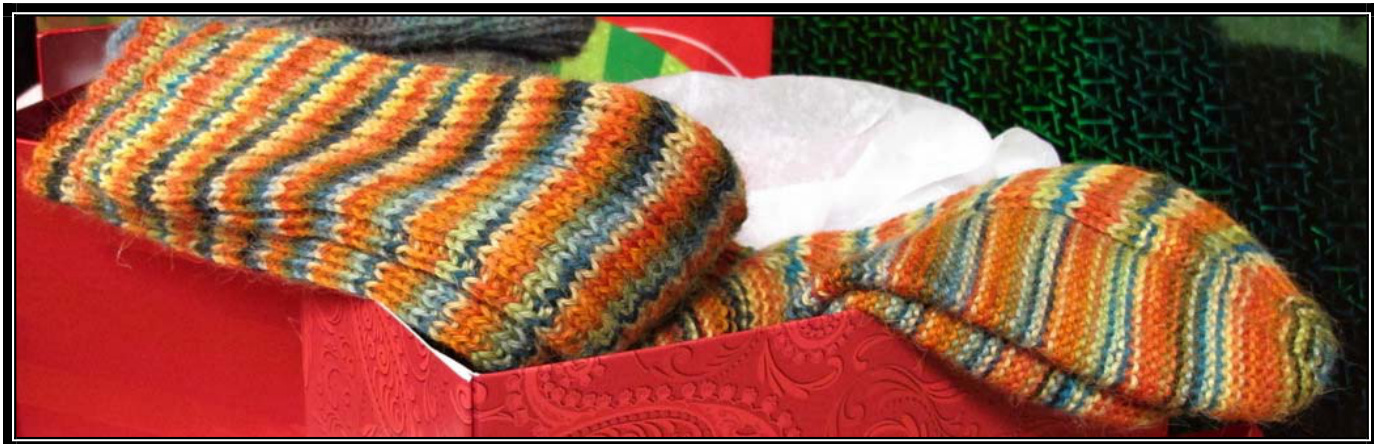
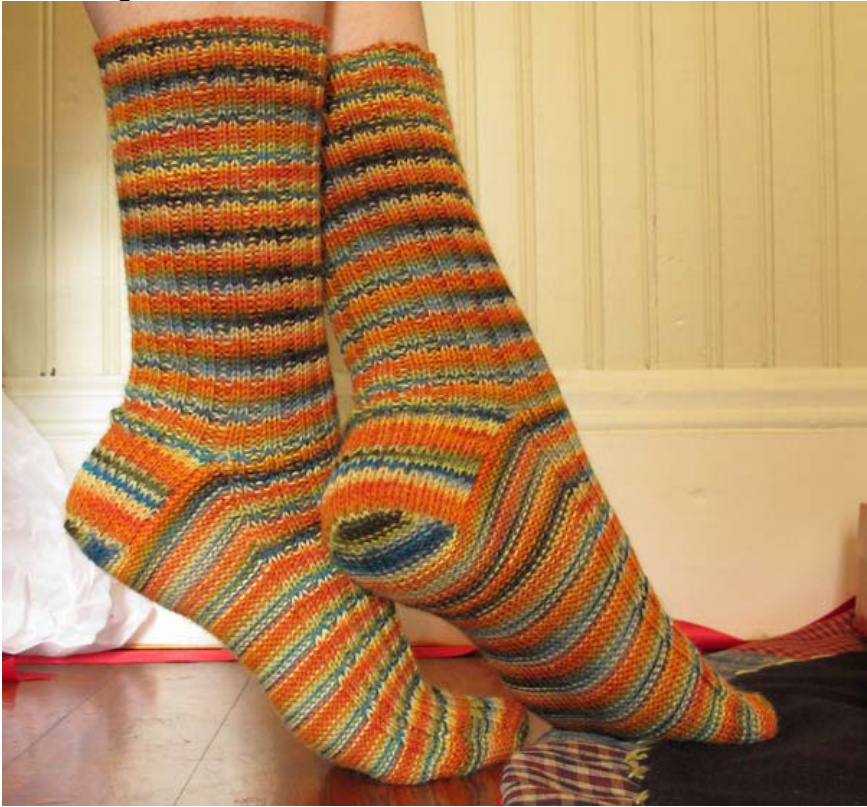
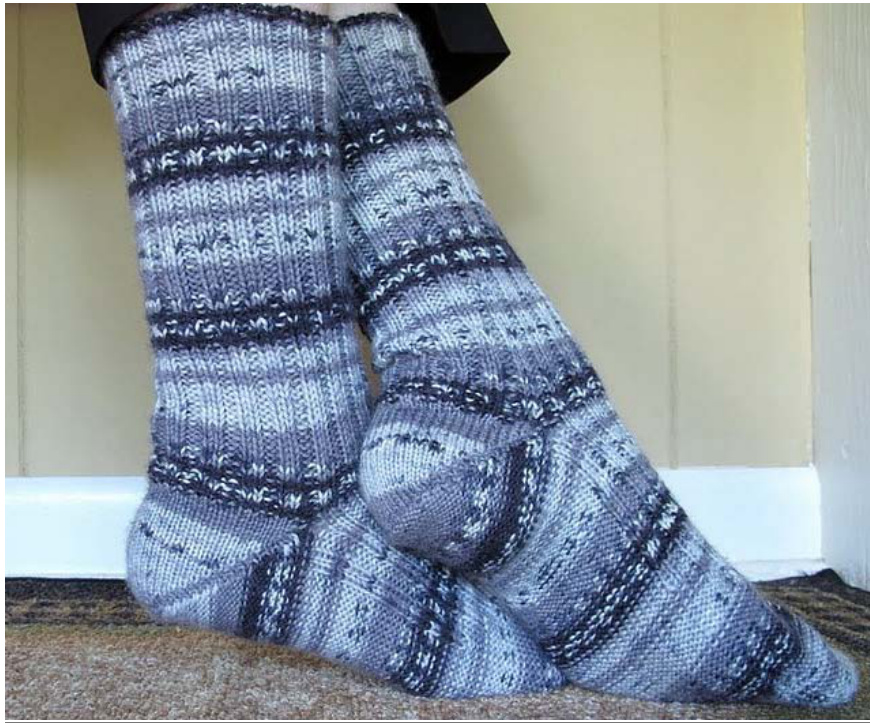
The blue-green socks in this photo were knit in Paton's Kroy FX yarn. The orange and blue socks in the other photos were knit in Misti Alpaca Hand Paint Sock yarn. Both are knit cuff down. The gray socks in the photo on page 6 were knit toe up in Paton's Kroy Jacquards yarn. Using 2 dpns, cast on 16 sts using Judy's magic cast on. (For more info, follow this link to the article at Knitty.com) Using two additional dpns, knitting 4 sts onto each needle, knit 8, k8 tbl. Put yarn tail on the outside of the toe. It will be on the inside when the foot is turned inside out. K4, place marker for beginning of round and follow pattern below: Round 1: (k until one st remains on N1, m1r, k2, m1l); k until 1 st remains on N3, repeat increases; k to end of round. (Optional: substitute kfb for m1 on first round for easier knitting.) (Optional: Experienced knitters can begin the rib pattern explained below (see Foot) after knitting the first 4 rounds of the toe, beginning it as k5, p2, k to end, adjusting the stitch counts thereafter. This produces a more fitted toe.) Repeat Rounds 1 and 2 until there are 56(64, 72) sts. Knit all stitches for 1 additional inch.
Foot
Begin rib pattern: Rounds 1-4: k27(31, 35), p2, k to end of round. Rounds 5-8: k23(27, 31), (p2, k2) 2 times, p2, k to end of round. Rounds 9-12: k19(23, 27), (p2, k2) 4 times, p2 Continue to add 4sts in p2k2 rib on either side of instep until 26(34, 30) sts are worked in 2x2 ribbing. Work in pattern until sock measures 2" less than foot length.
Heel
Heel: The boomerang heel is worked on half of the stitches plus 2, a total of 30 (30, 38). Follow the instructions in Section 1 and Section 2, including the two boomerangrounds. Section 1 Row 1: k15(15, 19), turn Row 2: yo&p, p29(29,37), turn Row 3: yo&k, k28(28, 36), turn Repeat rows 2 and 3, working each row 1 stitch shorter than the last, until: Row 18(18, 26): yo&p, p13, turn Row 19(19, 27): yo&p, p12. Turn sock inside out. 12 plain stitches remain in center of heel. There are 9(9,13) yo and st pairs on each side of heel. Row 20(20, 28): Working from outside, with purl side of Section 1 facing, yo&k k5. Place marker to mark center of heel and beginning of boomerang rounds. Toe Up, continued Boomerang round 1: k7, (royo, k2tog) 8(8, 12) times, k2 tog last yo with first instep stitch, k instep in pattern to last instep st, ssk last instep stitch with first yo in heel, (ssk) 9(9, 14) times, k6. Boomerang round 2: k15(15, 19), work instep in pattern, k to end of round. Section 2 Row 1: k7, turn Row 2: yo&p, p13, turn Row 3: yo&k, k13, royo & k2tog, turn Row 4: yo&p, p14, royo and next st, working yo and st together as a p2tog tbl, turn. Repeat these last two rows, working each row one stitch longer than the last, finishing when all heel stitches have been worked on Row 18: yo&p, p28 (28, 36), royo & p2tog tbl as above, turn. Finish heel with: Row/Round 19: yo&k, k29 (29, 37), royo & k2tog(p2tog, k2tog) with 1st instep stitch. Continue working instep in pattern to last instep st, ssk(ssp, ssk) last st together with the yo at edge of heel sts, continue in ribbing pattern to end of round. Stitch count should be the same as for the foot, 56(64, 72) sts. Round 20: Continue ribbing to match with pattern on instep, continue working ribbing around leg.
directions end with Leg section on page 7. The rest applies to both patterns Leg Work in k2p2 rib until leg measures 7" or desired length. Bind off with a stretchy bind-off, such as Jeny's Suprisingly Stretchy Bindoff or her new Interlock Bindoff.
Abbreviations
k: knit k2tog: knit two stitches together. Kfb: increase 1 stitch by knitting into the front and back of a stitch N: Needle p: purl p2tog: purl two stitches together. royo: reorient yarn over - slip yarn over purlwise, slip yarn over back to left needle so it is not twisted, i.e. the front leg of the stitch is to the right and on top of the needle. sl: slip ssk: slip 1 knitwise, slip 1 knitwise, knit these two slipped stitches together through the back loops. st: stitch sts: stitches yo&k: yarn over and knit - with yarn in front of needle, bring yarn over the needle to the back, knit the first stitch of the row. yo&p: backwards yarn over and purl - with yarn behind needle, bring yarn over needle to the front, purl first stitch.
NOTES
These patterns, step-by-step:
1. Work the leg or the toe and foot of the sock according to pattern. If you are knitting the Cuff Down version, the sock is right side out. If you are knitting Toe Up, the sock is inside out. 2. Work the heel flap or the first half of a short-row heel, switching from stockinette to reverse stockinette on the second row of the heel turn halfway through the short-row heel. 3. Turn the sock to the other side and complete the heel. 4. Work the foot or leg, aligning the ribbing pattern of the instep with the ribbing pattern in the leg. 5. Finish as needed. The entire sole, from the heel turn to the toe, which was worked in knit stitches, is now reversed and the entire sole is purl stitches. 6. When working on the wrong side, remember that all features that are usually placed on the inside of the sock, such as picking up stitches and weaving in ends, are now placed on the outside. In the Cuff Down version, stitches are picked up for the gusset and purled, placing the bumps for the picked up stitches on the outside, which is the wrong side of the sock. Gusset decreases are placed against a set of two purl stitches. These will be knit stitches on the inside, the right side of the sock, once the sock is completed and turned inside out. This princess sole, created with no additional purling required, can be added to any pattern, either by changing to a different pattern after the heel, in step 4, or by working the stitch pattern in reverse, from the wrong side, up or down the instep. The simplest method is to work the entire foot in plain stockinette. This produces the most comfortable sock, one that won't produce strange patterns on your foot when you wear it with a shoe that covers your instep. More explanation and illustrations of this adaptation can be found in the designer's blog, 3 sleeves to the wind, June 6, 2011, Knitting Princess-footed Socks. This pattern for both the cuff-down and toe-up version of Daylong Socks has been test knitted and was published July 11, 2011. Either version can be purchased separately. All three versions, cuff-down, toe-up and combined are available for purchase through Ravelry.com and the designer's blog, 3 sleeves to the wind (http://3sleeves.blogspot.com). The combined version will be available through Patternfish.com. Any questions or corrections should be addressed to the designer on Ravelry or by e-mail to knotingale@gmail.com.

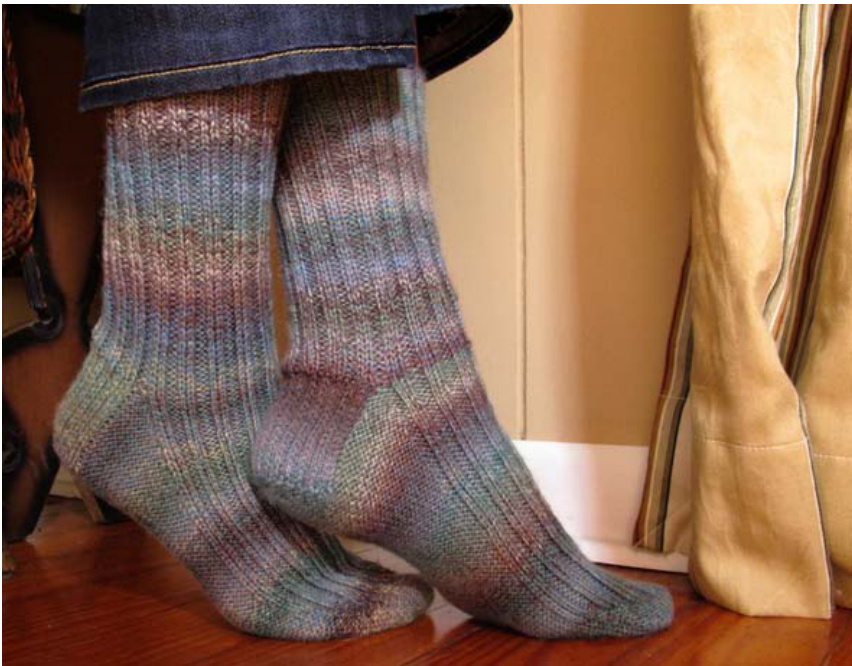
The socks above were knit toe up in Fannie's Fingering Weight, a thicker yarn than those recommended, on size 112 and 2 needles. Knitting the smallest size (56 sts) produced a sock that fits an 8 inch foot. Farmhouse Yarns Fannie's Fingering Weight (80% Merino, 20% Nylon, 400 yds/364 m per 4 0z. skein) color:IndianCorn; 1 skein


