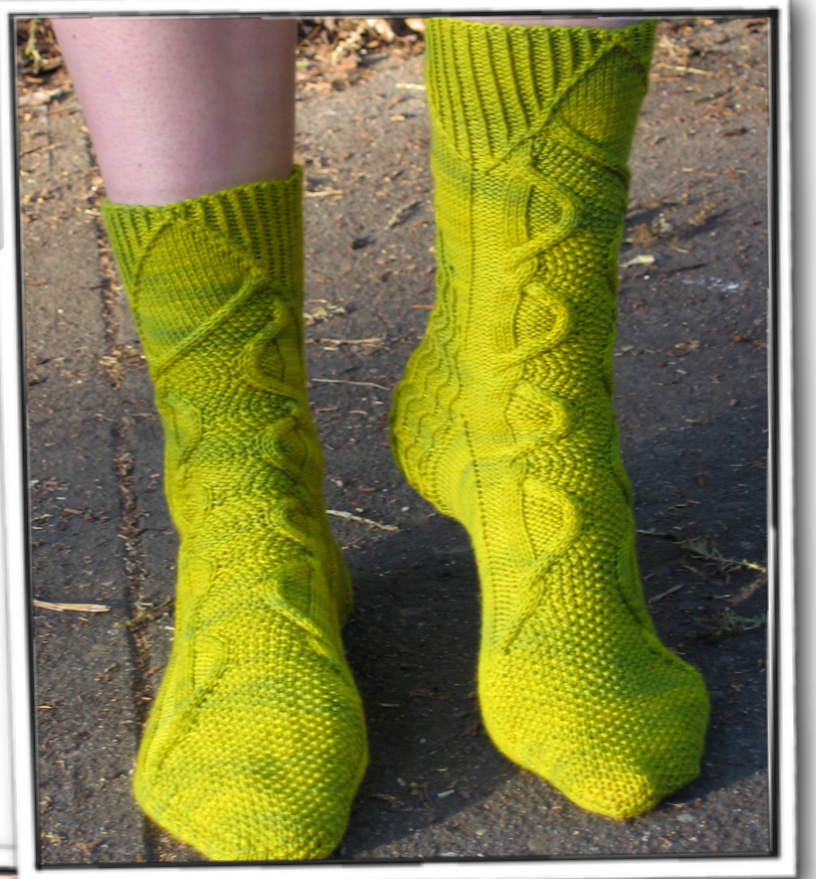
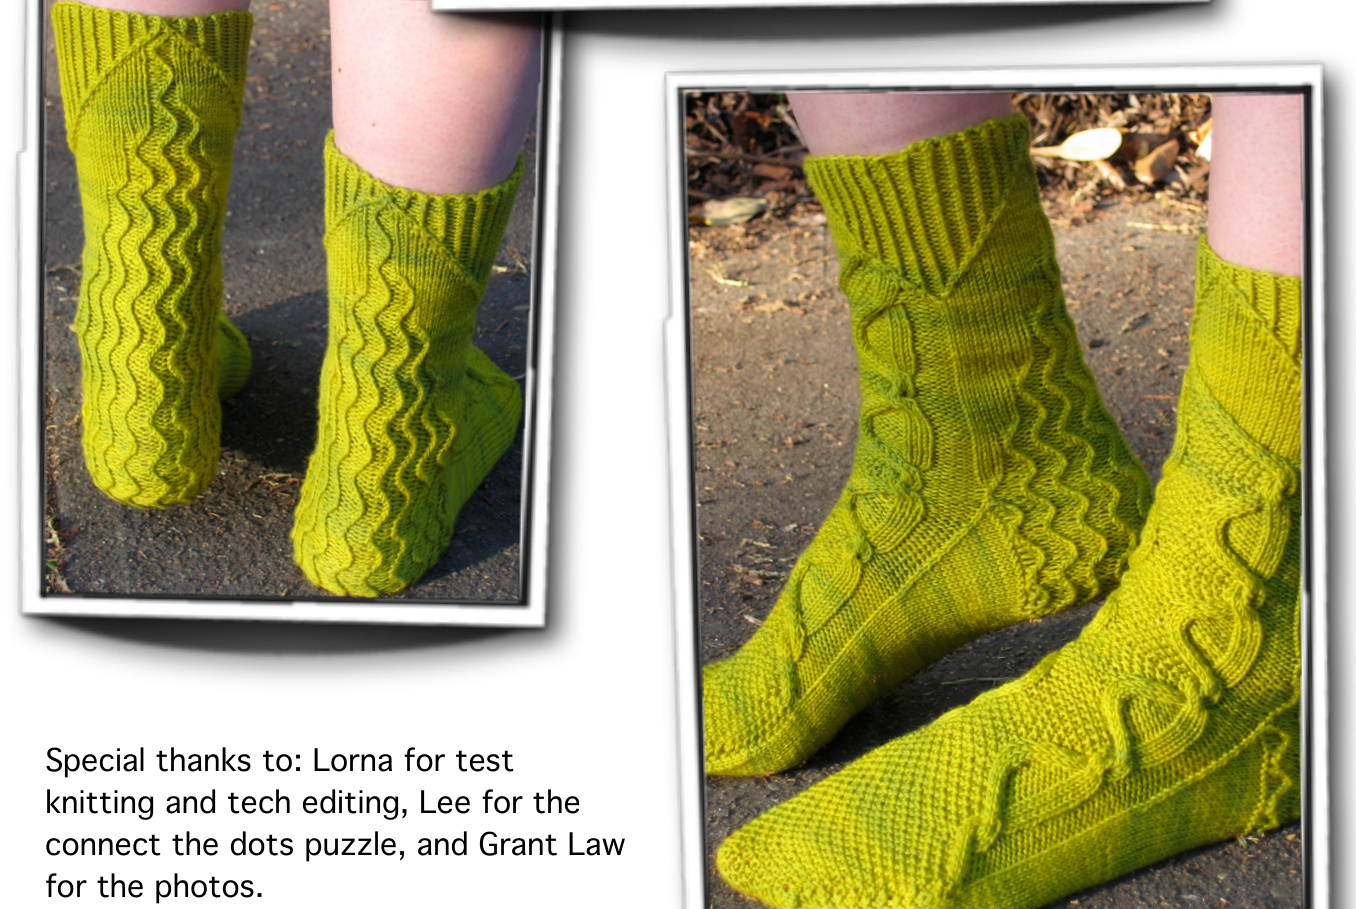
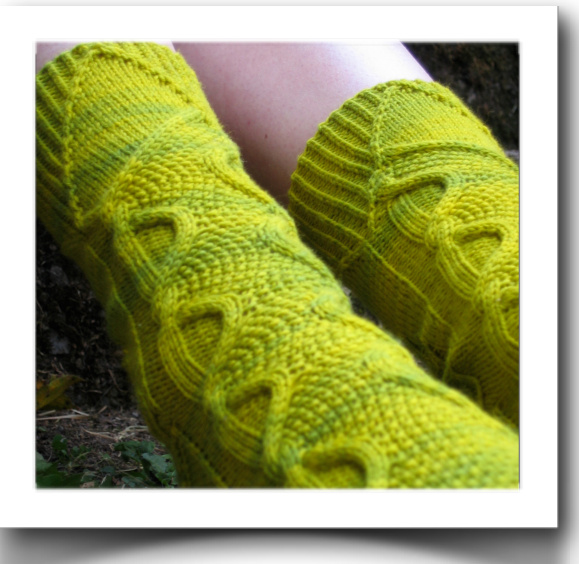
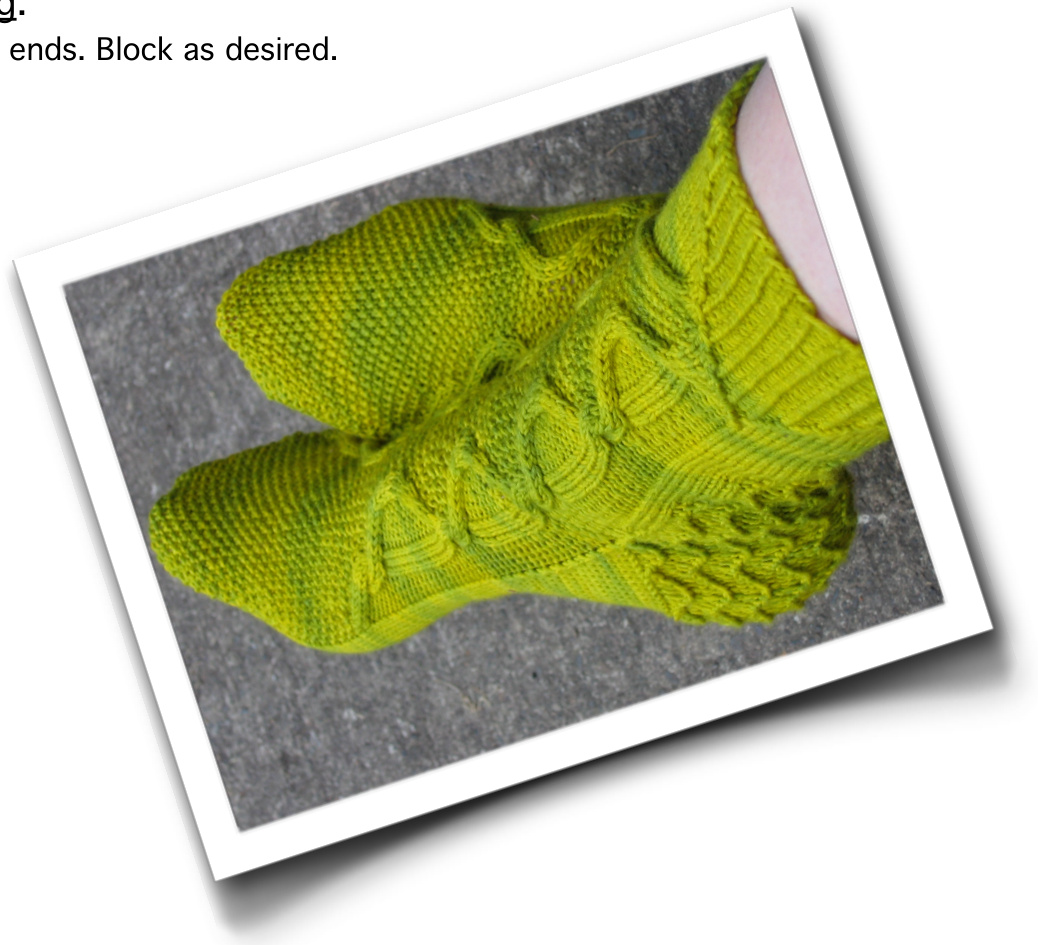
Tour de France by Star Athena
Sizes (3): Small, Medium, Large
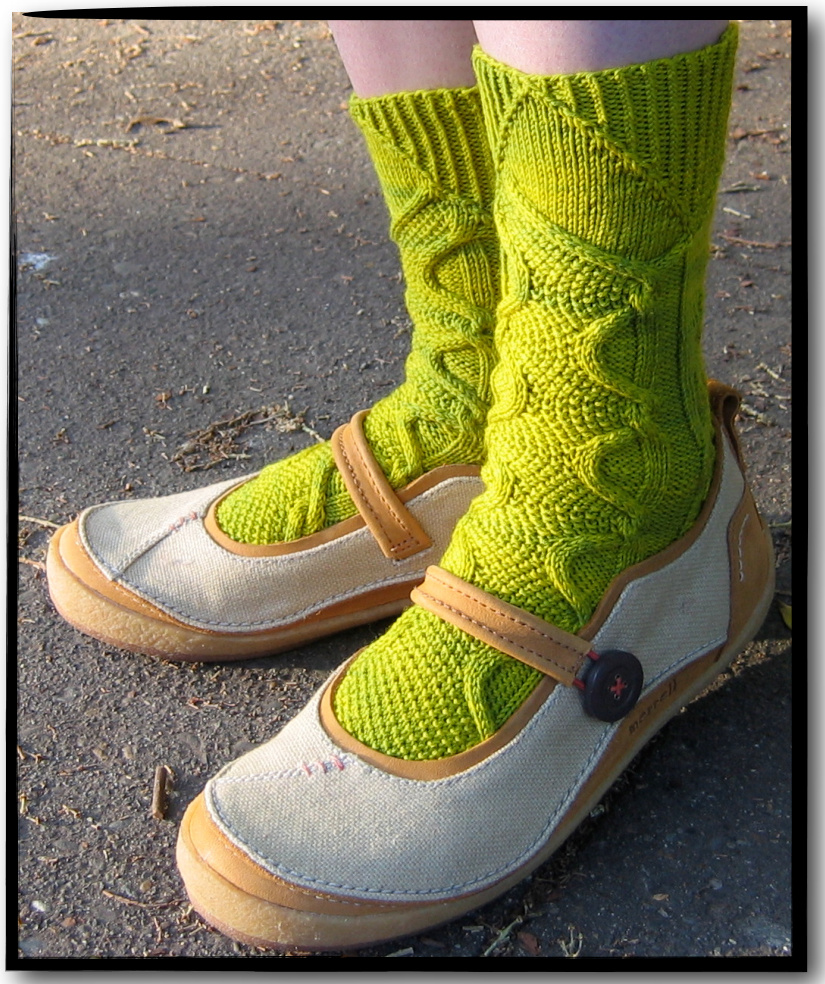
Notions: Tapestry needle, cable needle. Foot circumference: 7 (8, 9) inches 17.5 (20, 23 cm) unstretched. Will stretch to fit 8 (9, 10) inches 20 (23, $25.5\;\mathsf{c m})$ Gauge: 32 sts/48 rows $=4"$ in st st Needles: 1 set US #1/2.25mm $32^{\mathfrak{s}}$ circular needles (magic loop), 2 sets of $24^{\,\ast}$ circulars or double pointed needles, or size to get gauge. Yarn: Fingering-weight yarn that gives you proper gauge. I'm using: Wollmeise Sockenwolle 80/20 Twin [ $80\%$ Wool, $20\%$ Nylon; 510yd per 150 gram ball]; color: Frosch: 1 skein. NOTES: These socks have all that the Tour de France promises and more: cobblestones, winding roads, and a mountain peak inspired by the Alpe-d-Huez (The most famous climb in the world of cycling). Seed stitch suggests the famous cobbles of Paris and cables act as a twisting road winding it's way through the French countryside and up Alpe-d-Huez. It's not the longest or the steepest mountain, but it sure takes it's toll on a cyclist. It means something to make this journey, and in some ways it symbolizes the Tour de France itself. Cyclists know what it takes to survive the climb, and it bonds them in a unique way. To me, that is the heart of knitting a fine pair of socks by hand. They aren't the hardest to do, but they require time and effort. Pull on the maillot jaune and cast on now! Because of the cables, this pattern uses more yarn than a plain sock. This pattern is written using the magic loop or 2-circular method, where half the stitches are on N1, and the other half are on N2. You can easily divide these stitches again for double pointed needles. Working cables without a cable needle: There are many tutorials online to use when learning this technique. Check them out if you want to know more by searching "how to cable without a cable needle." Here are two popular sources: http://www.grumperina.com/cables.htm http://media.wendyknits.net/knit/cablelesson.htm ABBREVIATIONS: CQ: Cast on Est:Established K: Knit Ktbl: Knit through back loop K2tog: Knit two stitches together as one stitch N: Needle P: Purl P2tog: Purl two stitches together as one stitch RS: Right (or public) side of work Sl: Slip. As in, slip the next stitch from left to right purl-wise. SSK: Slip one stitch as if to knit, slip the next stitch as if to knit, insert left needle into front of these two stitches and knit them together. St:stitch Tbl: Through back loop WS: Wrong (or non-public) side of work
Start Sock:
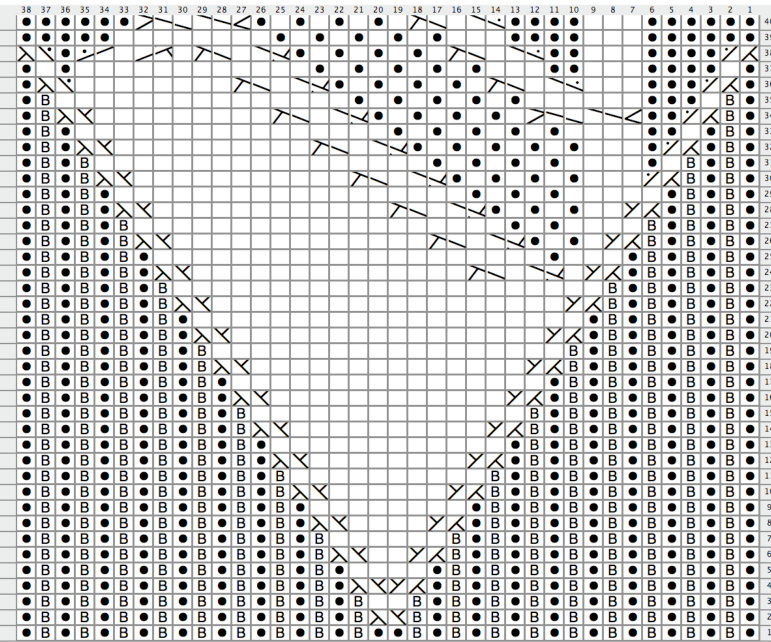
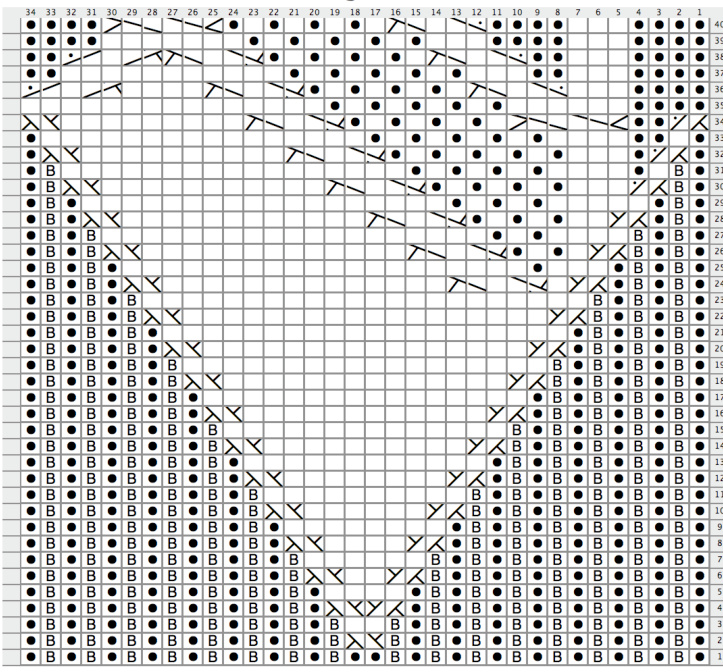
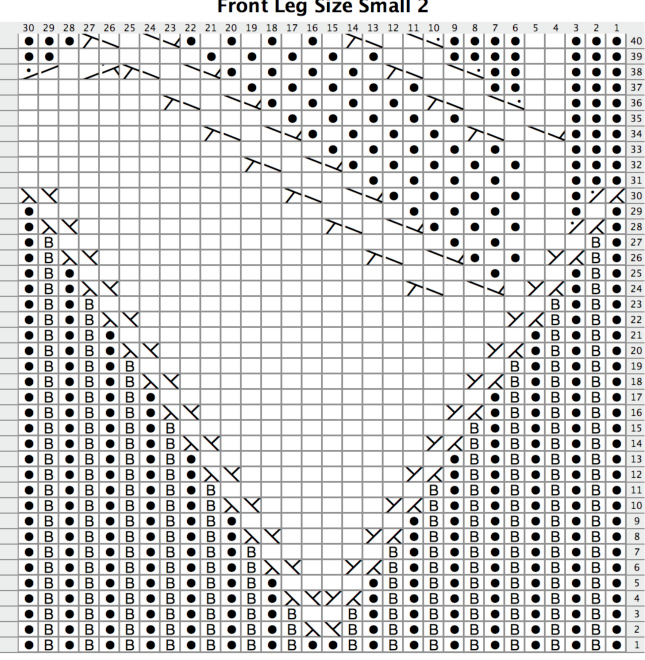
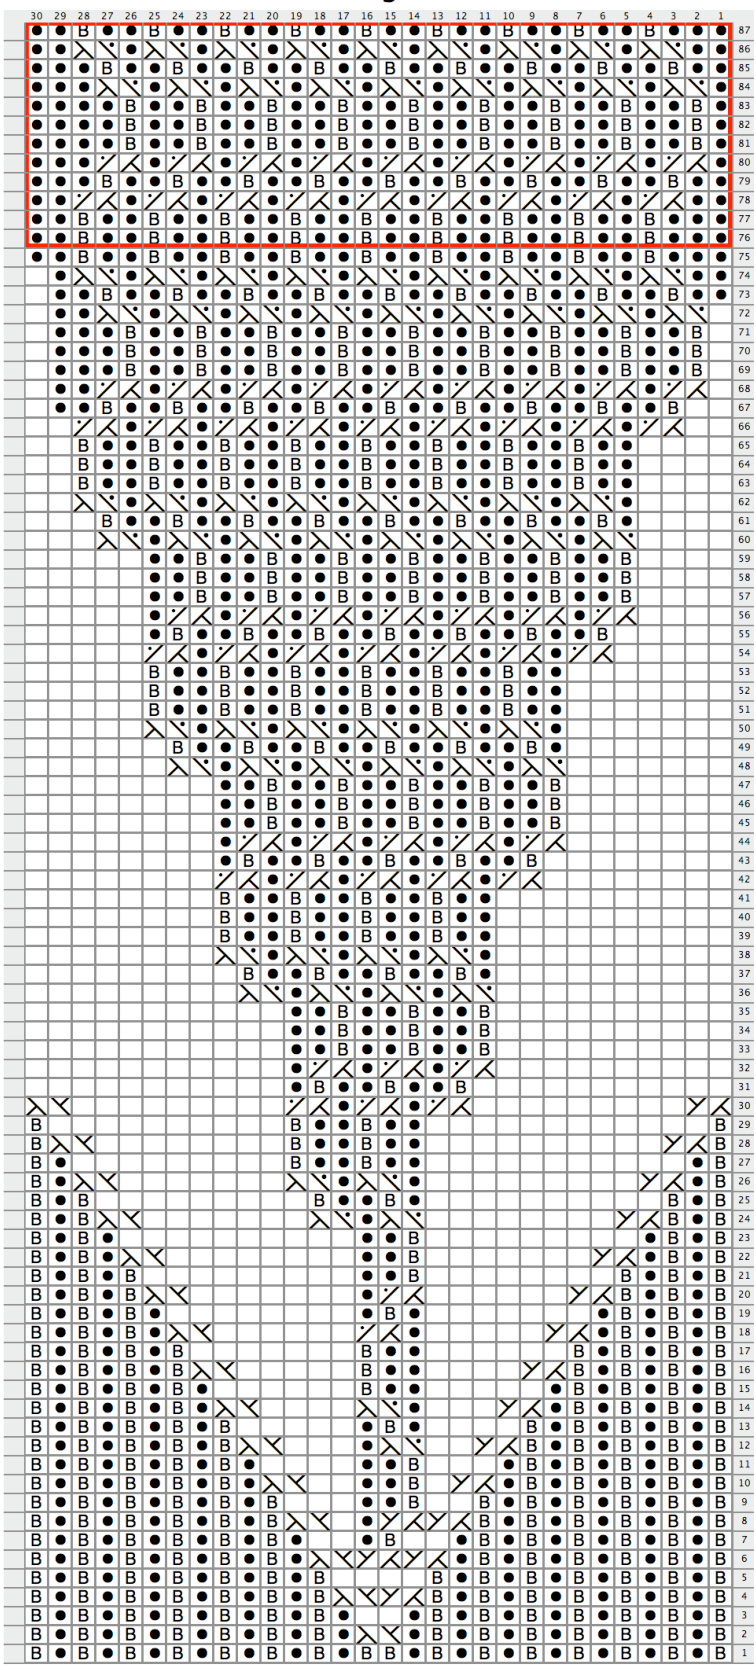
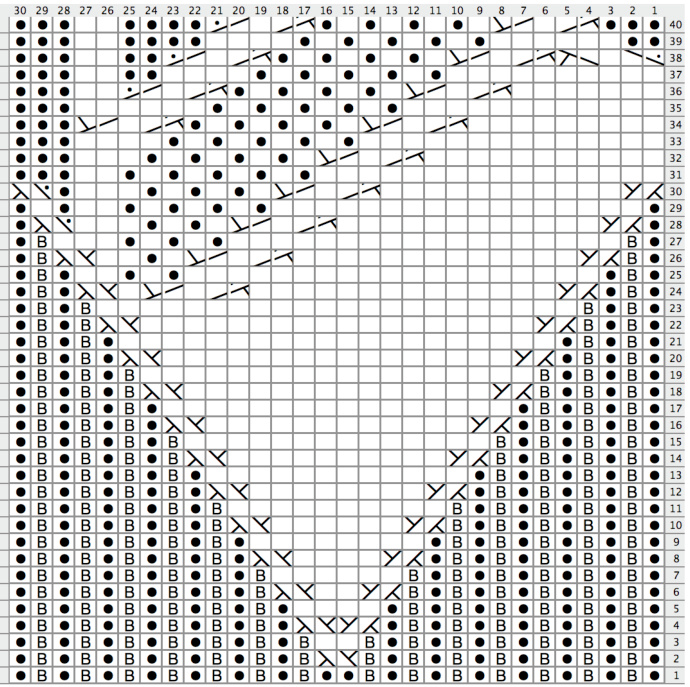
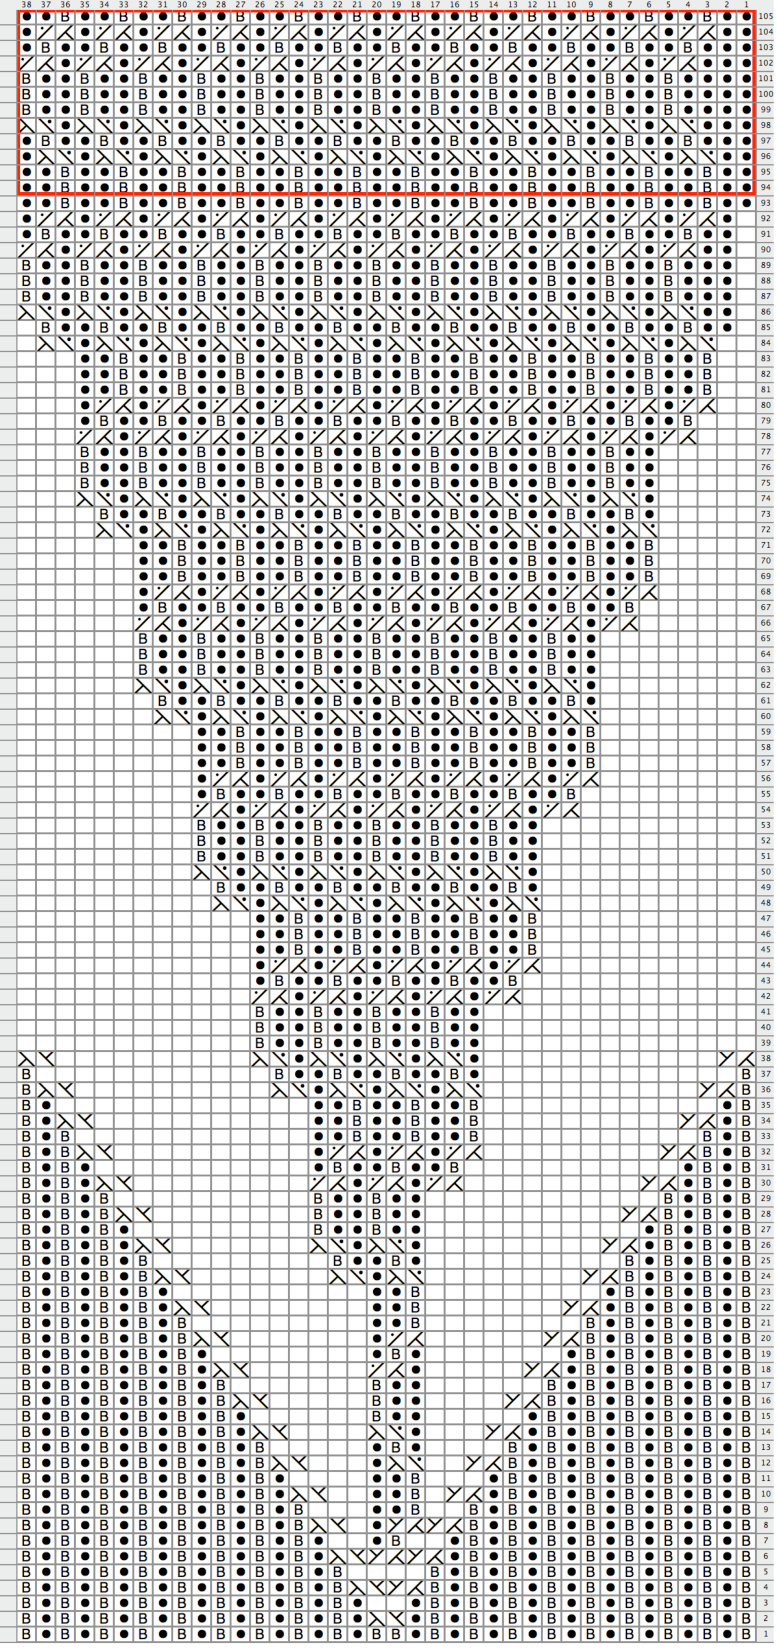
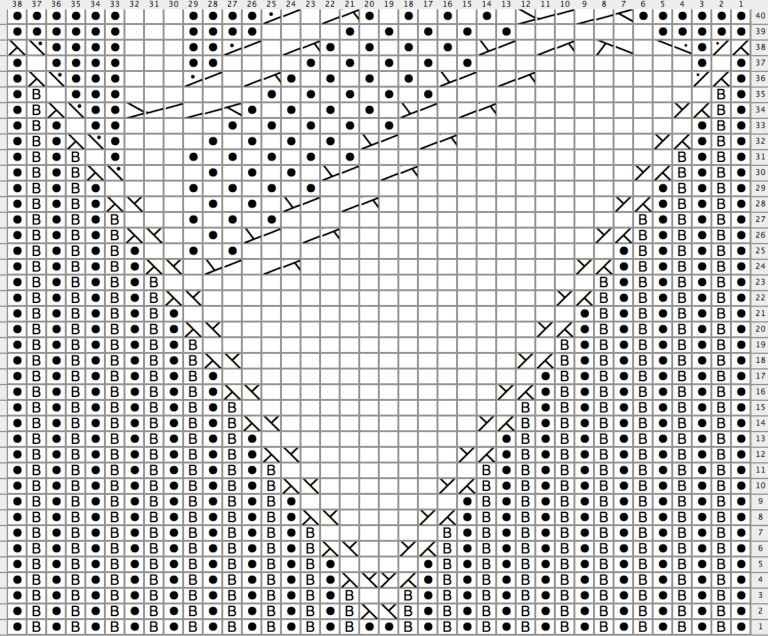
Cuff: CO 60 (68, 76) sts and join to begin working in the round, being careful not to twist your stitches. Leg: NOTE: The left and right sock have mirrored designs on the front of the leg which use different charts. Sock 1: Rnds 1 - 40: N1: Work Back Leg Chart for appropriate size; N2: work rows 1 - 40 of Front Leg Chart. Once complete, work appropriate size instructions below. Small: Rnds 41 - 87: N1: Work rows 41 - 87 of Back Leg Chart Small; N2: work Cobble Chart Small. (Repeat cobble chart on N2 noting last row worked after completing row 87 of Back Leg Chart)
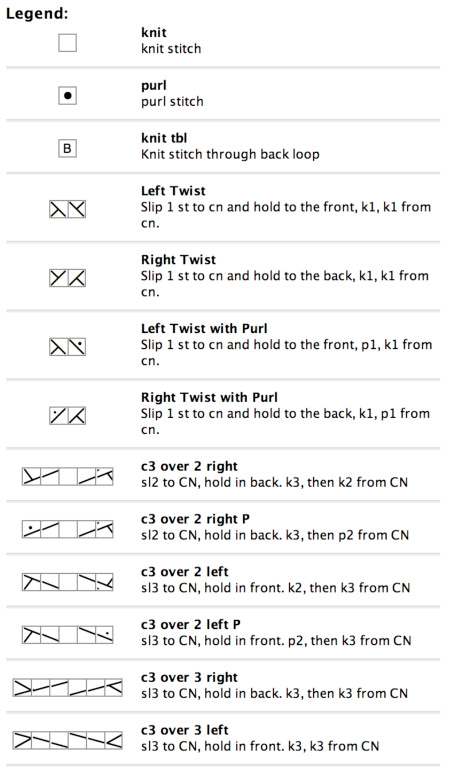
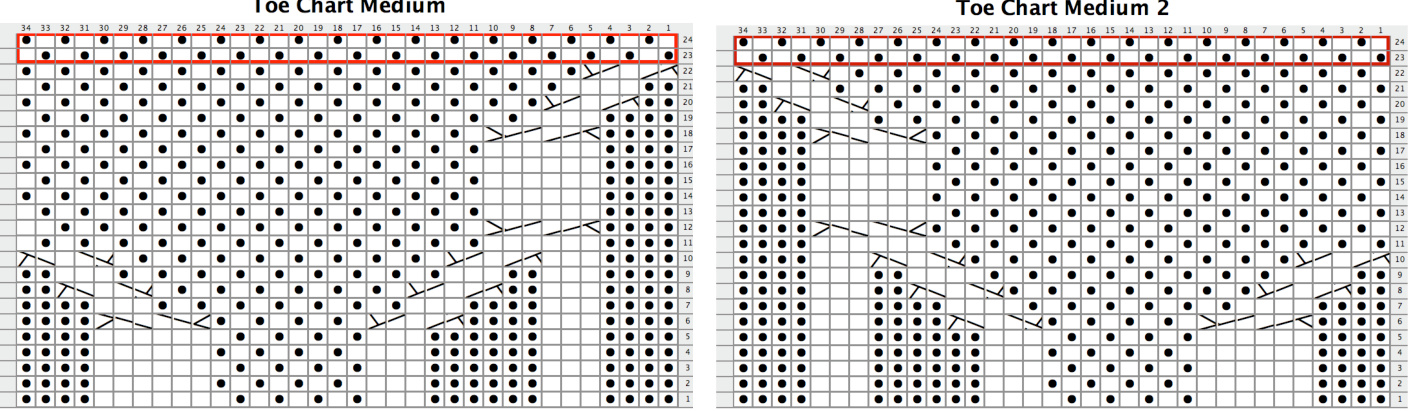
Medium: Rnds 41 - 93: N1: Work rows 41 - 93 of Back Leg Chart Medium; N2: work Cobble Chart Medium. (Repeat cobble chart on N2 noting last row worked after completing row 93 of Back Leg Chart) Large: Rnds 41 - 105: N1: Work rows 41 - 105 of Back Leg Chart Large; N2: work Cobble Chart Large. (Repeat cobble chart on N2 noting last row worked after completing row 105 of Back Leg Chart) All Sizes: Try on sock to ensure fit. Proceed to Heel instructions. For a longer leg, repeat red outlined section of Back Leg Chart across back of leg and Cobble Chart across front of leg. Sock 2: Work as instructed above, substituting Front Leg Chart 2 for the Front Leg Chart. When it is time to start on Cobble Charts, start on row 13. Work from row 13 until row 24. Then repeat Cobble Charts from row 1 to row 24. From this point forward, sock 1 and sock 2 are the same until instep.
Heel:
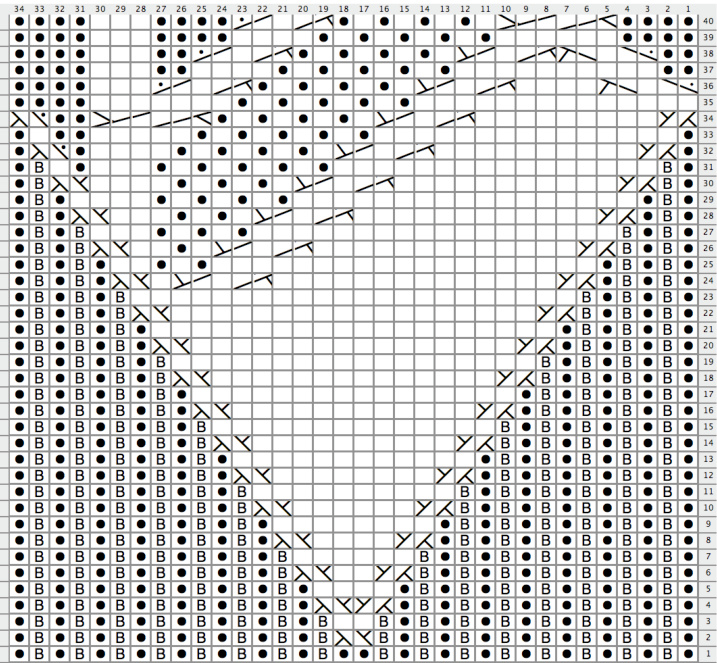
Heel flap is worked back and forth over 30 (34, 38) sts. The heel sts are all on N1. Leave the remaining instep sts on N2 for now. You will not use them while working the heel flap.
Heel Flap:
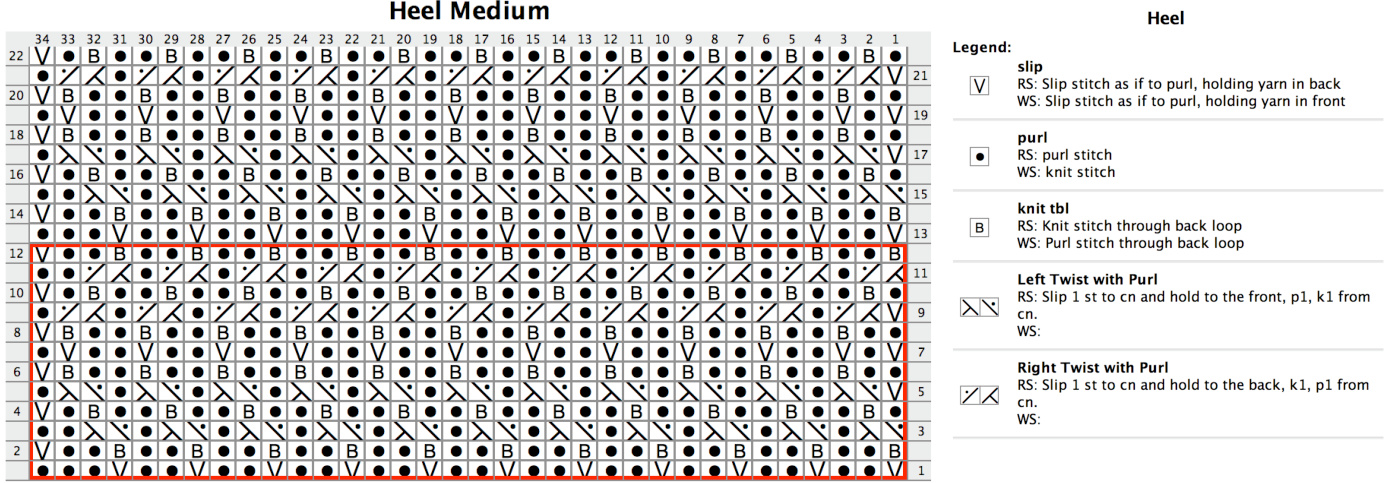
Small: Rows 1 - 30: Work red outlined section twice, then work remaining chart. Medium: Rows 1 - 34: Work red outlined section twice, then work remaining chart. Large: Work rows 1 - 38: Work red outlined section three times, then work remaining chart.
Turn Heel:
Row 1: [RS] Sl1, k17 (19, 21), ssk, k1, turn. Row 2: [WS] Sl1, p7, p2tog, p1, turn. Row 3: [RS] Sl1, k8, ssk, k1, turn. Row 4: [wS] Sl1, p9, p2tog, p1, turn. Row 5: [RS] Sl1, k10, ssk, k1, turn. Row 6: [wS] Sl1, p11, p2tog, p1, turn. Row 7: [RS] Sl1, k12, ssk, k1, turn. Row 8: [wS] Sl1, p13, p2tog, p1, turn. Row 9: [RS] Sl1. k14, ssk, k1, turn. Row 10: [WS] Sl1, p15, p2tog, p1, turn. Row 11: [RS] Sl1, k16, ssk, k1, turn work. Row 12: [WS] Sl1, p17, p2tog, p1, turn work.
Size Small Only:
Row 11: [RS] Sl1, k16, ssk, turn work. Row 12: [wS] Sl1, p16, p2tog, turn work. Row 13: [RS] K18. Proceed to gusset.
Size Medium Only:
Row 11: [RS] Sl1, k16, ssk, k1, turn work. Row 12: [WS] Sl1, p17, p2tog, p1, turn work. Row 13: [RS] Sl1, k18, ssk, turn work. Row 14: [WS] Sl1, p18, p2tog, turn work. Row 15: [RS] K20. Proceed to gusset.
Size Large Only:
Row 11: [RS] Sl1, k16, ssk, k1, turn work. Row 12: [WS] Sl1, p17, p2tog, p1, turn work. Row 13: [RS] Sl1, k18, ssk, k1, turn work. Row 14: [WS] Sl1, p19, p2tog, p1, turn work. Row 15: [RS] Sl1, k20, ssk, turn work. Row 16: [WS] Sl1, p20, p2tog, turn work. Row 17: [RS] K22. Proceed to gusset.
Gusset:
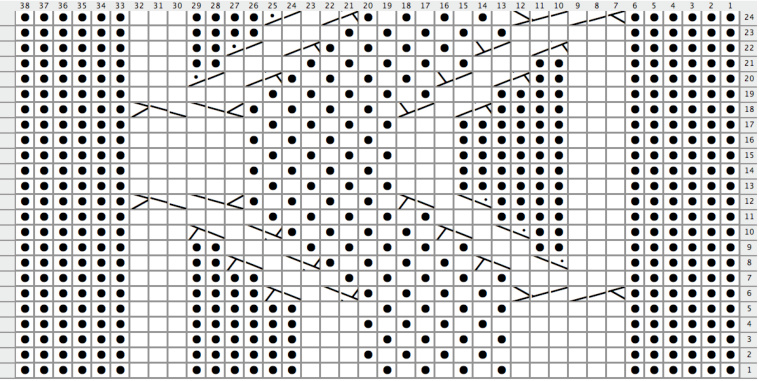
Set up round: With needle 1, pick up and knit 15 (17, 19) sts along edge of heel flap, pick up and k1 st in between heel flap and instep. With needle 2, work next row of Cobble Chart for appropriate size, pick up and k1 st in between instep and heel flap, pick up and 15 (17, 19) sts along other edge of heel flap. 80 (90, 100) sts. N1: 34 (38, 42) N2: 46(52,58) Rnd 1: K18 (20, 22), p14 (16, 18), k2tog, work next row of Cobble Chart, ssk, p14 (16, 18). Rnd 2: K all sts on N1; work next row of Cobble Chart, k to end of rnd. Rnd 3: K to last 2 sts on N1, k2tog; work next row of Cobble Chart, ssk, k to end of rnd. Rep rnds 2-3 until you have 60 (68, 78) sts remaining. Rearrange sts as follows: N1: (sole) 30 (34, 38) sts. N2: (top of foot) 30 (34, 38) sts. Proceed to foot. Foot: Round 1: Work even all sts on N1; work next row of Cobble Chart. Repeat this round until $4^{\,\"}$ from tip of toe, ending after just finishing row 12 (sock 1) or 24 (sock 2). NOTE: You may finish earlier (with $4.5^{\,\"}$ to go is fine) but do not finish later than 4" to tip of toe. Instep: NOTE: The left and right sock have mirrored designs on the top of foot which use different charts.
Sock 1:
Next round: Work even all sts on N1; work first row of Toe Chart for appropriate size. Continue as est, knitting sole sts and working entire toe chart across top of foot. Repeat red outlined section until $z^{\mathfrak{s}}$ totipoftoe.
Sock 2:
Next round: Work even all sts on N1; work first row of Toe Chart 2 for appropriate size. Continue as est, knitting sole sts and working entire toe chart 2 across top of foot. Repeat red outlined section until 2" to tip of toe.
Toe:
NOTE: Continue to work seed stitch on top of toe until end. Round 1: N1: K1, ssk, work to last 3 sts on N, k2tog, k1; k1, ssk, work in est seed stitch as est to last 3 sts, k2tog, k1. (NOTE: It will be impossible to have perfect seed stitch once you start the decreases. There will be 2 sts next to each other in the same orientation. Ignore this, it doesn't show!) Round 2: N1: Knit. N2: Cont. even as est in seed stitch. Rep these 2 rnds until 16 (24, 32) sts remain. 8 (12, 16) sts on each needle. Break yarn, leaving long enough strand to graft toe using Kitchener stitch. Graft remaining stitches together.
Front Leg Size Large 2
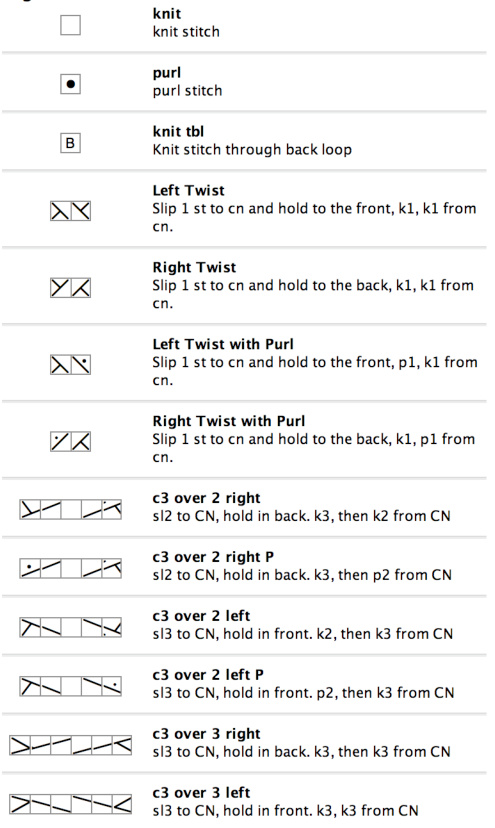
Legend:
Front Leg Medium 2
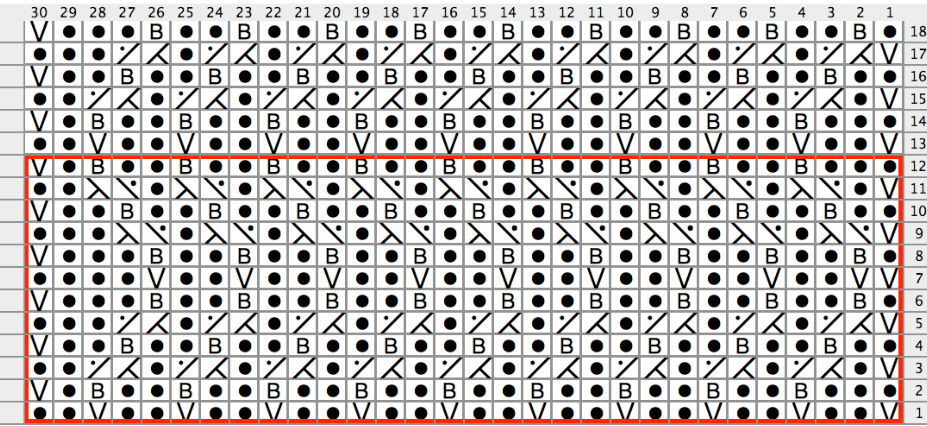
Back Leg Small
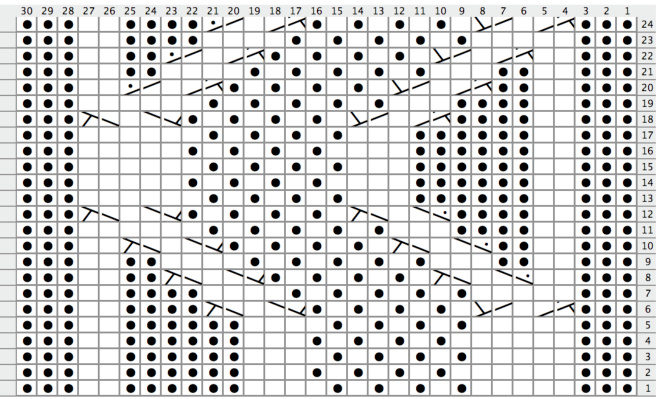
Cobble Chart Small
Front Leg Size Small
Legend:
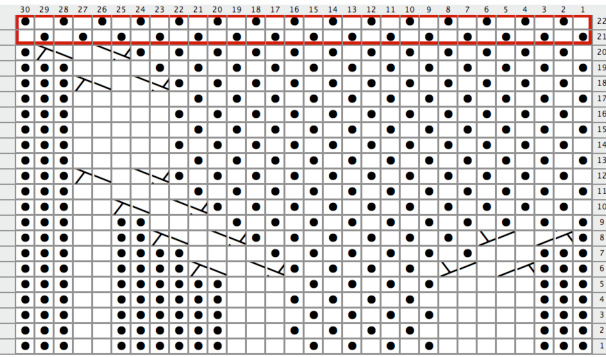
Back Leg Medium
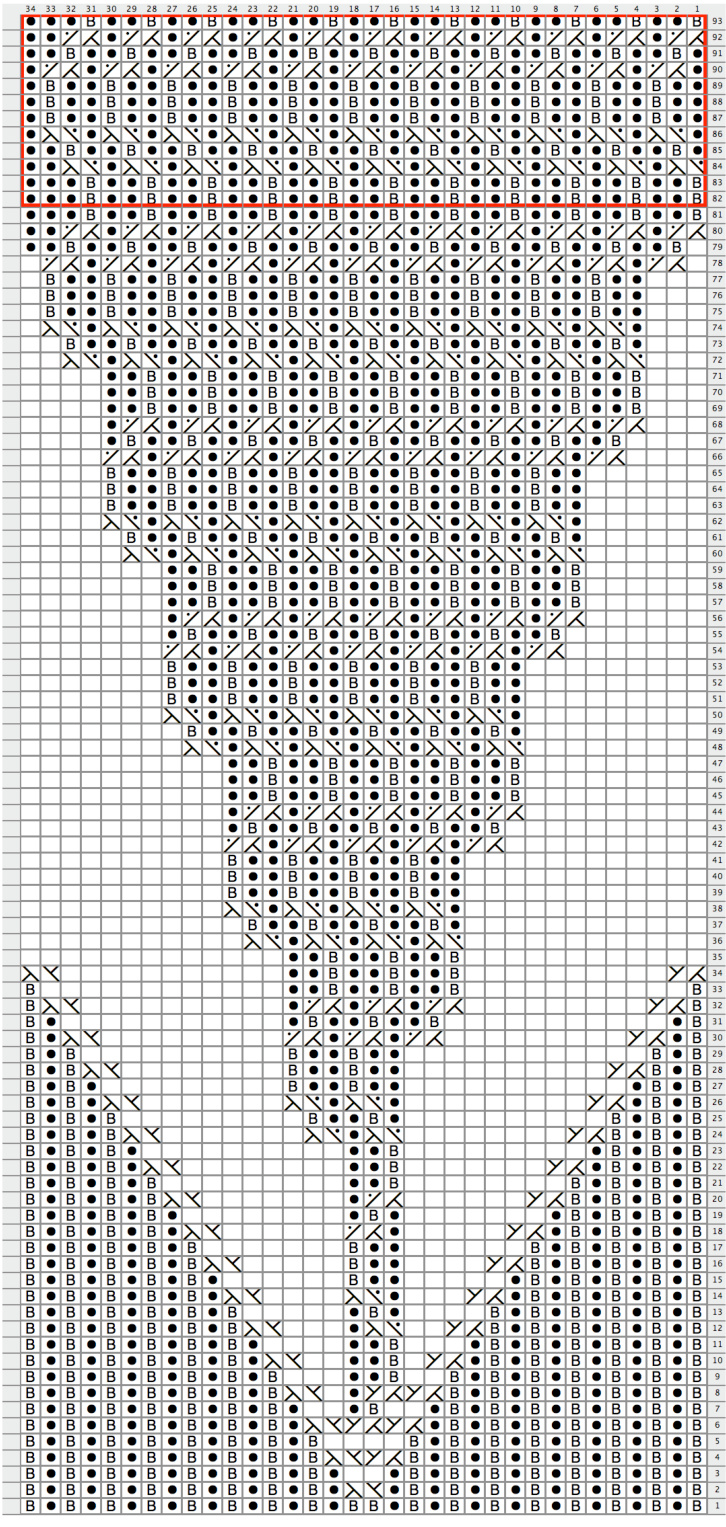
Cobble Chart Medium

Front Leg Medium
Legend:
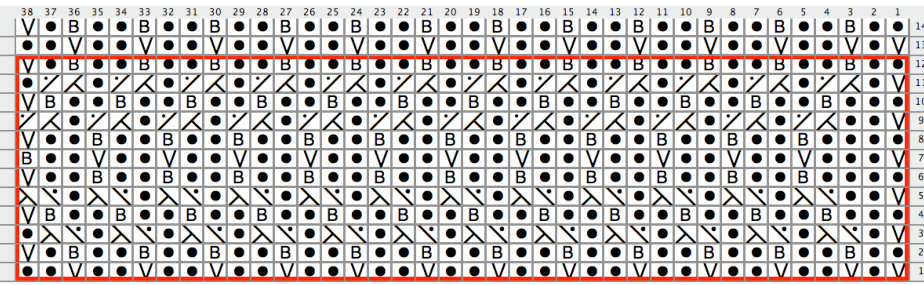
Back Leg Large
Cobble Chart Large
Front Leg Size Large
Legend:
Heel Small
Notes: Rows 1 - 30: Work red outlined section twice, then work remaining chart.
Notes: Rows 1- 34:Work red outlined section twice, then work the rest of the chart.
Heel Large
Notes: Rows 1 - 38: Work red outlined section three times, then work remaining rows.
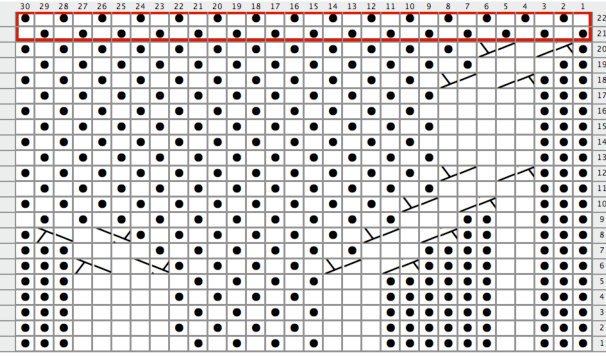
Toe Chart Small
Toe Chart Small 2
Notes: Repeat red outlined section as instructed.
#
Notes: Repeat red outlined section as instructed.
Connect the dots!
Connect the dots graphic provided by Lee Meredith Check out her awesome blog, patterns, kits and connect the dots stitching sets here: http://www.leethal.net