Sea Mineral Mittens
By SpillyJane http://spillyjane.blogspot.com
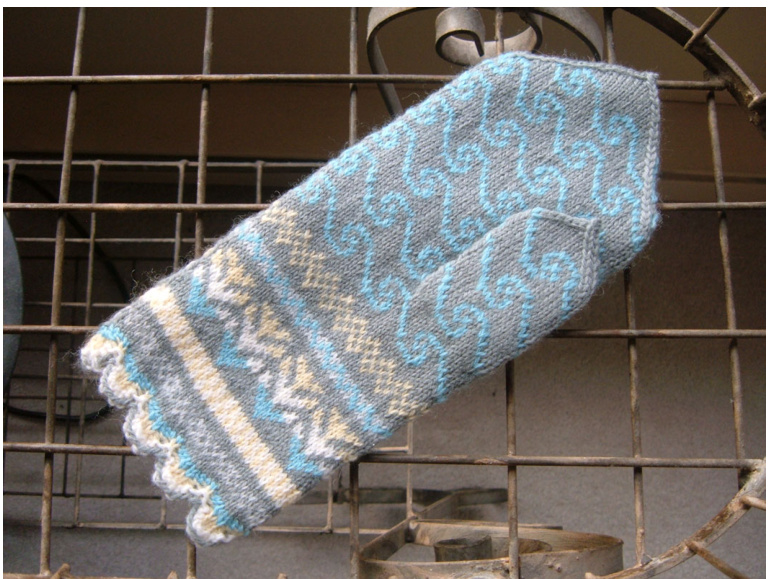
Size: Women's medium, or any other hand that is $8^{\circ}$ in circumference at its widest point (excluding thumb.) Gauge: 10 stitches and 11 rows $\l=\mathbf{1}$ inch $\left(2.5\thinspace\mathrm{cm}\right)$ in pattern Yarn: One ball of KnitPicks' Palette (available at http://www.knitpicks.com) in each of the following colours: White, Mist (light grey,) Fog (medium grey,) Sunlight (pale yellow,) and Sky (pale blue,) or any other fingering yarn in these colours or the colours of your choice. Two $8^{\circ}$ scraps of contrasting waste yarn for thumb placement (any of the other colours used in the mittens works well.) Needles: One set of five (5) double pointed needles in US o $\left(2\,\mathrm{mm}\right)$ or size necessary to obtain gauge. Notions: Stitch markers to mark beginning of round and/or designate palm from back of hand (not required, but could be helpful,) and a sewing needle to weave in ends. The Pattern: Take the medium grey and white yarn together and form a slipknot. Hold two of the needles together in your right hand and tighten the knot around them. Do not count this knot as your first stitch. Cast on 81 stitches using the Long Tail Cast On, being sure to carry the medium grey yarn over your thumb and the white yarn over your finger. This willcreate a medium grey border along the edge of the scalloped cuff. When the stitches have been cast on, carefully remove the extra needle. Slide the slipknot off the needle and untie it. Divide the stiches among four double pointed needles so that there are 18 stitches on each of the first three and 27 stitches on the fourth (81 sts total.) Being careful not to twist the stitches, tie the tail yarn to the working yarn in a snug double knot to begin working in the round. When the mitten is finished this knot will be unravelled and the ends will be woven in.
Scalloped Cuff:
Round 1: Take up white working yarn and purl all stitches. Round 2: Switch to light yellow yarn and work as follows: \*k2tog tbl, k2, yo, k1, yo, k2, k2tog.\* Repeat these instructions eight times more until round is complete (81 sts.) Round 3: Continue using light yellow yarn and work as follows: \*k2tog tbl, k2, yo, slip st purlwise, yo, k2, k2tog.\* Repeat these instructions eight times more until round is complete. Round 4: Switch to light blue yarn and repeat round 2. Round 5: Continue using light blue yarn and repeat round 3. The following round will be the first one worked from the chart.
Patterned Cuff and Palm:
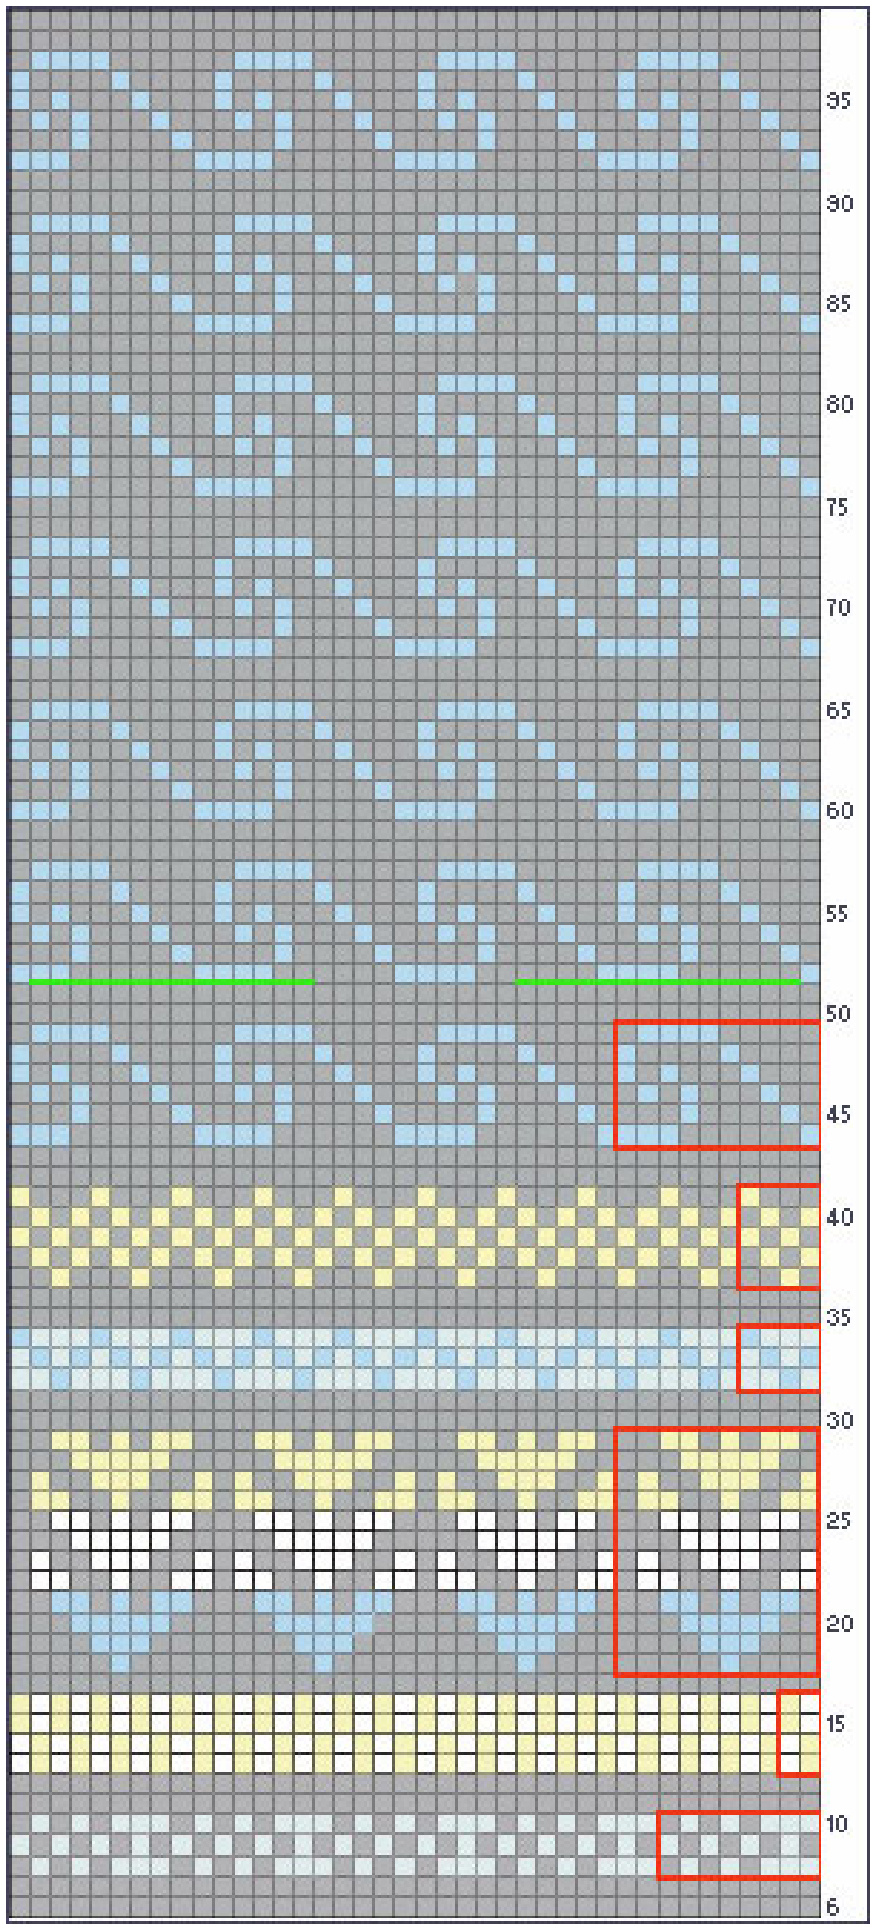
Please Note: The chart included is for the palm of the mitten. The back is identical to the front. Within one round of knitting each line of the chart will be knit twice (right to left) in succession - once across Needles 1 and 2 (the palm) and once across Needles 3 and 4 (the back.) Round 6: Begin working from the bottom right-hand corner reading from right to left and bottom to top. Switch to medium grey yarn and knit all stitches to the last two on Needle 4. Knit these two stitches together (8o sts.) Arrange stitches so that there are twenty (20) on each needle, making sure that the first stitch in the round is at the beginning of Needle 1. Round 7: Continue working from chart. Using medium grey yarn knit all stitches. Round 8-51: Continue working from chart until the end of Round 52. Round 52: This is the thumb round. As the right and left mittens are not identical in their thumb placement please take care to knit ONE of EACH and not two the same. It has happened! The thumb stitches will be knit onto waste yarn and will be picked up and worked later once the rest of the mitten is complete. Please Note: Thumb placement is indicated on the chart by the bright green line. Instructions are below. For the Right hand mitten: Knit the first stitch of Needle 1. Using an 8" scrap of contrasting waste yarn knit the next 14 stitches. Slip these stitches back onto the left hand needle and continue to knit in pattern. For the Left hand mitten: Knit across Needle 1. Knit the first 5 stitches on Needle 2. Using an $8^{\circ}$ scrap of contrasting waste yarn knit the next fourteen stitches. Slip these stitches back onto the left hand needle and continue to knit in patern. Round 53: Continue knitting until mitten reaches the tip of the recipient's little finger (or desired length,) knitting to the end of Needle 4. Begin finger decreases.
Finger Decreases:
Take care that there are 20 stitches on each of the four needles. Continue knitting in pattern taking care to decrease at the beginning of Needles 1 and 3 and at the end of Needles 2 and 4 as follows: Needle 1: Knit in blue. Drop blue yarn. Takeup grey yarn and slip 1 stitch as if to knit, knit and pass slipped stitch over. Knit the rest of Needle 1in pattern. Needle 2: Knit in pattern until the last two stitches. Using grey yarn, k2tog. Needle 3: Knit 1 in blue. Drop blue yarn. Take up grey yarn and slip 1 stitch as if to knit, knit 1 and pass slipped stitch over. Knit the rest of Needle 3 in pattern. Needle 4: Knit in pattern until the last two stitches. Using grey yarn, k2tog. Repeat this every round, decreasing 4 stitches each time. When the mitten becomes too narrow to accommodate another repeat of the palm motif, drop blue yarn and continue working the first stitch of Needles 1 and 3 in grey. When only 2 stitches remain, k2tog in grey. Break yarn and pull the tail tight through this final stitch. Using sewing needle draw tail inside mitten to be woven in later.
Thumb:
Please Note: Like the palm and back of the mitten, the front and back of the thumb are identical. Within one round of knitting each line of the chart as is prescribed for the thumb will be knit twice (right to left) in succession - once across Needles 1 and 2 (the front of the thumb) and once across Needles 3 and 4 (the back of the thumb.) This will ensure that the front of the thumb blends in All pattern elments, written and graphic, copyright JaneDupuis, 207. Patten s fornot-for-rofit ue only. Please do not reproduce, redistribute, or sel the pattern or finished object. with the rest of the palm pattern and will be almost invisible” against it while laying flat. It's not necessary for the back of the thumb to match the palm exactly. Due to the nature of the palm motif both the right thumb and the left thumb differ from each other significantly. It is more important that they match their own mittens than each other. Pick up 14 stitches both above and below the stitches held on the waste yarn for a total of 28 stitches, discarding the waste yarn when finished. Divide the stitches evenly across four needles - 7 stitches on each. You may also wish to pick up 2 stitches at either side of the thumbhole to both make the join tighter and to allow for greater freedom of thumb movement (32 stitches total - 8 stitches on each needle.) Prepare to knit the first thumb round in pattern according to the chart, starting. from the outer lower corner and working across the front of the thumb. This will be Needle 1. Eliminate the 4 stitches picked up to allow for greater thumb movement in the following manner, taking care not to disrupt the palm motif (decrease in the colour dictated by the pattern): Needle 1: k2tog, knit across in pattern. Needle 2: Knit across in pattern, k2tog. Needle 3: k2tog, knit across in pattern. Needle 4: Knit across in pattern, k2tog. 4 stitches decreased for a total of 28 stitches. Divide the stitches evenly across all four needles - 7 stitches on each. Starting back at the beginning of Needle 1, knit, continuing the pattern so that the thumb blends in with the rest of the palm. Refer to the chart and read right to left, vertically from the green line (working from right hand green line for right mitten and left hand green line for left.) Continue knitting until thumb reaches the tip of the recipient's thumb (or desired length,) knitting to the end of Needle 4. Try to complete as many full repeats of the motif on the thumb as is possible (the average number of repeats able to be completed before decreasing seems to be 3.) When 3 repeats have been completed drop the blue yarn at the end of Needle 4, continuing on with the grey yarn only. Begin thumb decreases.
Thumb Decreases:
Take care that there are 7 stitches on each of the four needles. Continue knitting in pattern taking care to decrease at the beginning of Needles 1 and 3 and at the end of Needles 2 and 4 as follows: Needle 1: Knit 1. slip 1 stitch as if to knit, knit 1 and pass slipped stitch over. Knit across rest of needle. Needle 2: Knit until last 2 stitches on needle, k2tog. Needle 3: Knit 1. slip 1 stitch as if to knit, knit 1 and pass slipped stitch over. Knit across rest of needle. Needle 4: Knit until last 2 stitches on needle, k2tog. Repeat this every round, decreasing 4 stitches each time. When only 2 stitches remain, k2tog. Break yarn and pull the tail tight through this final stitch. Using sewing needle draw tail inside mitten to be woven in later.
Finishing:
Carefully untie the knot in the cast on row at the base of the mitten. Turn the mitten inside out and weave these ends in on the wrong side to finish off the edge. Weave in other ends as required. Lay the mitten flat, making sure that the sides of the mitten are straight (the join will be less conspicuous this way.) Place a damp cloth (a tea towel works well) over the mitten and press it with an iron set to the correct temperature for pressing wool. Press until mitten is sufficiently blocked.
Sea Mineral Mitten Chart:
Please Note: The following chart shows only the palm of the mitten. The back is identical to the palm. Please refer to the pattern for further details.
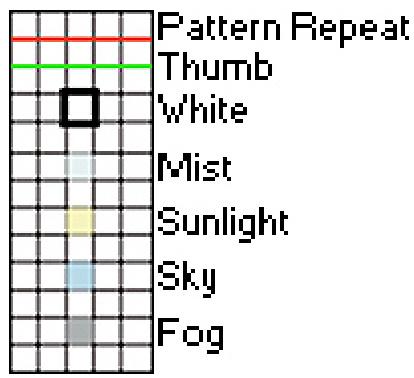
Legend:
All pattern lments, written and graphic, copyright Jane Dupuis, 7. Patten is for not-fr-profit ue only. Please do not reproduce, redistribute, or sellthe pattern or finished object.


