From Top to Bottom
Let's start with a hat...then finish it LOTS of different ways.
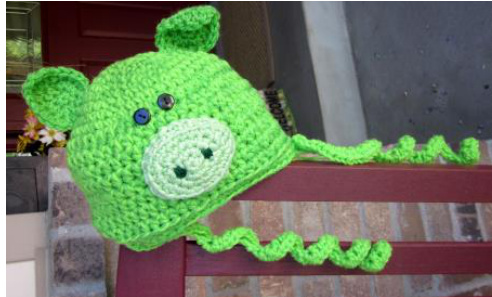
Long Tail Hat
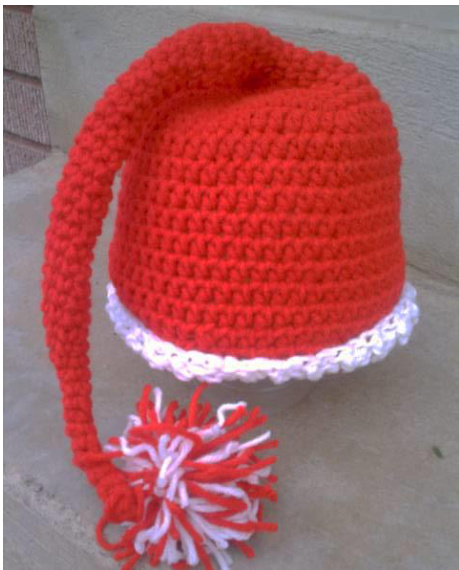
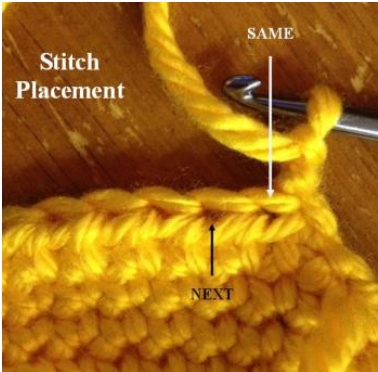
Materials: Worsted weight yarn Hooks: H, I Yarn needle Directions for all sizes: Note: Do not join at the end of each round, unless stated. This hat is worked in a continuous round to avoid a "seam" look. Starting at the tail: With red yarn and size H hook, start with a magic circle of 6sts (or preferred method for starting a circle of 6 sc sts), place a marker. Do not join at the end of each row. Sc each stitch until tube is 5" in length. Change to size I hook. 2 sc in next stitch (7sts). Continue to sc around for an additional 6" (2-4" for smaller sizes). Measure from marker. Increase rounds: 1. 2sc, sc 3, 2sc, sc 2. (9sts) 2-3. sc to end of round. 4. 2sc, sc 4, 2sc, sc 3. (11sts) 5-6. sc to end of round. 7. 2sc, sc to end of round (12sts) 8. \*sc 1, 2 sc in next sc\*, repeat to end of round. (18sts) 9. \*sc 2, 2 sc in next sc\*, repeat to end of round. (24sts) 10. \*sc 3, 2 sc in next sc\*, repeat to end of round. (30sts) newborn 11. \*sc 4, 2 sc in next sc\*, repeat to end of round. (36sts) 3-6 mths 12. \*sc 5, 2 sc in next sc\*, repeat to end of round. (42sts) 6-12 mths 13. \*sc 6, 2 sc in next sc\*, repeat to end of round. (48sts) 12-24 mths 14. \*sc 7, 2 sc in next sc\*, repeat to end of round. (54sts) Child/preteen 15. \*sc 8, 2 sc in next sc\*, repeat to end of round. (60sts) Teen/Adult 16. \*sc 9, 2 sc in next sc\*, repeat to end of round. (66sts) Large adult When increase rows for desired size have been reached, do not join. Remove marker and hdc each stitch until hat (measure from top of rounded hat, as if the tail were not there) is the following length: Newborn: 4"; 3-6 mths: 5": 6-12 mths: 6": 12-24 mths: 6.5": Child/preteen: 7": Adult: 7.5-8" End current row with a sl st and cut red yarn, leaving a 2" tail. Ch 2, \*FPDC (front post double crochet) in next st then, BPDC (back post double crochet) in next st\*, repeat to end of round. Repeat if larger band is desired, or if hat is too short. If it is too long, simply fold up.
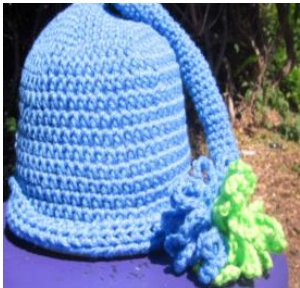
Knot Top
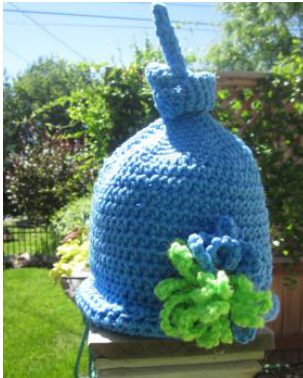
Leave tail down for a long tail hat or tie in a loose knot on top. Loopy flower This is cute attached to the front of the hat or the end of the tail. With H hook (or larger for bigger flowers), and blue yarn, Ch 5. Join with a sl st to first ch. \*Ch 12, join with sl st in circle. Ch 14, join with sl st in circle\*, repeat pattern for 14 loops, or more if desired. Cut yarn, leaving a 6" tail and finish off. With lime green yarn, Ch 5. Join with a sl st to first ch. \*Ch 12, join with sl st in circle. Ch 14, join with sl st in circle\*, repeat pattern for 14 loops, or more if desired. Cut yarn, leaving a 6" tail and finish off. Fold each flower in half and using each tail, tie securely together. Thread these ends through tip of hat tail or through the front of the hat and tie a knot. Make sure each yarn goes through a different space, slightly apart, or it won't attach to the hat.
Worsted Weight Beanie
With H hook and yarn, Ch 6 (or magic loop), join and pull closed. 1. 2sc in each stitch around (12sts). 2. \*sc 1, 2 sc in next sc\*, repeat to end of round. (18sts) 3. \*sc 2, 2 sc in next sc\*, repeat to end of round. (24sts) 4. \*sc 3, 2 sc in next sc\*, repeat to end of round. (30sts) newborn 5. \*sc 4, 2 sc in next sc\*, repeat to end of round. (36sts) 3-6 mths 6. \*sc 5, 2 sc in next sc\*, repeat to end of round. (42sts) 6-12 mths 7. \*sc 6, 2 sc in next sc\*, repeat to end of round. (48sts) 12-24 mths 8. \*sc 7, 2 sc in next sc\*, repeat to end of round. (54sts) Child/preteen 9. \*sc 8, 2 sc in next sc\*, repeat to end of round. (60sts) Teen/Adult 10. \*sc 9, 2 sc in next sc\*, repeat to end of round. (66sts) Large adult Remove marker and hdc each stitch until hat is the following length: Newborn: 5-5.5": 3-6 mths: 6.5": 6-12 mths: 7": 12-24 mths: 7.5": Child/preteen: 7.5": Adult: 8.5"
Bottom Edge Variations
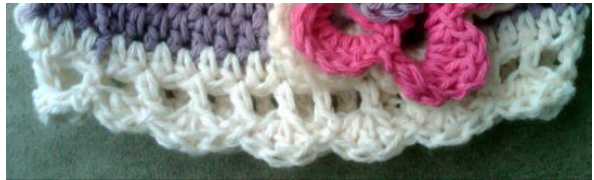
Simple edge: End current row with a sc in next st, then sl st. Band: 1. Sc in BLO (back loop only) of each st to end of round, join. 2-4. Sc each st to end of round, join. Finish off and weave in ends. Band with lace (see picture to right): Complete "band" instructions, but do not finish off. After round 4, ch3, sl st in next st, repeat to end of round, join. Finish off. Contrast Stitching (see picture below): Complete "band" instructions, or can be added to simple edge, then cut a long length of contrasting yarn. Using ayarn needle, weave the yarn through each stitch along the bottom edge. Be careful to not pull too tight. Finish off and securely weave in ends.
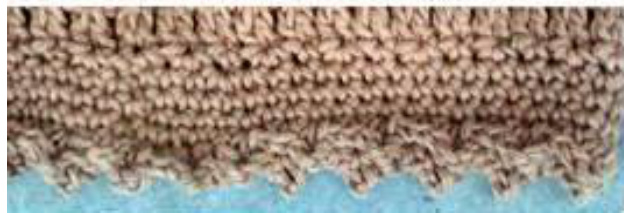

Lacy edge (see picture to right): 1. With same size hook and contrasting yarn, Ch 2, then hdc in each stitch to end of round. 2. Ch 2, \*sk 1, ch1, Dc\*, repeat to end of round. 3. Ch 2, sk first space, sl st in dc, \*sk space, 3dc in next st, sk 1, sl st\*, repeat to end of round, join, finish off.
Regular Braids
Cut 2, 20" strands of 3 different colors.. Fold hat in half to find placement. Use a yarn needle to pull end through one side of hat. Pull through until even with other end and braid. Repeat for other side.
Twirly Tails
With H hook and one strand of yarn, Ch 52. Turn, 2hdc in second chain from hook. \*Sk 1, 3hdc in next ch\*, repeat to end of chain. Finish off, leaving a 6" tail. Fold hat in half to find sides. Pull one yarn tail to inside of hat, approximately 1" from bottom. Pull both yarn tails until twirly tail is in place and tie a secure knot. Weave in ends. Make another twirly tail and repeat on other side of hat.
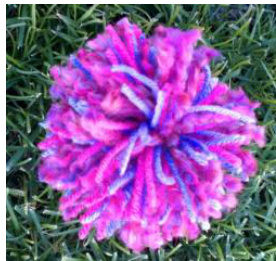
PomPoms
Hold one strand of each color, and wrap 20-30 times around the palm of your hand (wrap more times for a thicker pom). Carefully slide the yarn off your hand and wrap an 8" length of yarn around the center, pulling tight and knotting to hold in place. Do NOT cut this piece of yarn. Cut loops of pompom. Sometimes I leave a few or all loops uncut for a whimsical pompom. Thread end of the yarn you tied around the pom through a yarn needle. Pull through end of hat. Firmly tie a knot next to the hat. Trim pompom as desired. A piece of cardboard or pompom maker may also be used. Note: The pompom in the picture is loosely attached and looks messier than normal. For a whimsy pom: Include a novelty yarn, such as fun fur, in your beginning wrap. When trimming pom, only cut some loops (see pink pom). By changing colors and stripe patterns, this hat takes on a fun new look. Great for Christmas hats or for sports fans in their team colors too!
| Common Crochet Abbreviations | |
| Ch - chain | Sc2tog - decrease, single crochet 2 sts together |
| St - stitch | Dc2tog - decrease, double crochet 2 sts together |
| Sp - space; sps - spaces | Fp - front post |
| Sc - single crochet | Bp - back post |
| Hdc -half double crochet | Fpdc - front post double crochet |
| Dc - double crochet | Bpdc - back post double crochet |
| Beg - beginning | BLO - back loop only |
| Sl st - slip stitch | FLO - front loop only |
| Yo - yarn over | ** - repeat instructions between, as many times as indicated |
| Head Circ:12"-13"Hat Circ:11-12"Hat Height:5"-5.5" | |
| Newborm | |
| Head Circ:13"-14"Hat Circ:11.5"-13"Hat Height:5.5"to 6" | |
| Baby-3to6months | |
| Head Circ: 14"-17"Hat Circ:13”-16"Hat Height:6.5" | |
| Baby-6to12months | |
| Head Circ:16"-19"Hat Circ:15”-18"Hat Height:7” | |
| Toddler(1-3years) | |
| Head Circ: 18"-20"Hat Circ:17"-19"Hat Height:7.5" | |
| Child (3-10years) | |
| Head Circ:19"-20.5"Hat Circ:18"-19.5"Hat Height:8 | |
| Head Circ:20.5"-22"Hat Circ:19.5"-21"Hat Height:8.5" | Preteen/Teen |
| AdultWoman | |
| Head Circ:21.5"-22.5"Hat Circ:20.5"-21.5"Hat Height:9" | |
| AdultMan | |
| Snappy-tots.com | |
HEADANDHATSIZECHART newbabiestoadultmen Iprefer to make hats approximately 1”smaller than thehead circumference so they will stretch and not be too big.Note:All measurements are approximate and based on“averagehead sizes according to several online sources.Hat“height”is themeasurement from top of crown to bottomedge. If you have any questions, comments or suggestions please email heidi@snappy-tots.com. This pattern is copyrighted to snappytots and may not be copied for resale in part or whole. It is illegal to post this pattern online or share with others without written consent from Heidi Yates. Items created from this pattern MAY be sold. Please include a link to snappy-tots.com if selling online.
Snappy Tots \~ snappy-tots.com
This pattern is copyright protected. It is illegal to copy or distribute for free or profit in any manner. Doing so is punishable by law. If you have downloaded this pattern from anywhere besides Ravelry or received from snappy tots, you may be in violation. Please contact snappylegal@snappy-tots.com


