Princess Bonnet - to fit a newborn baby
2015 Rian Anderson
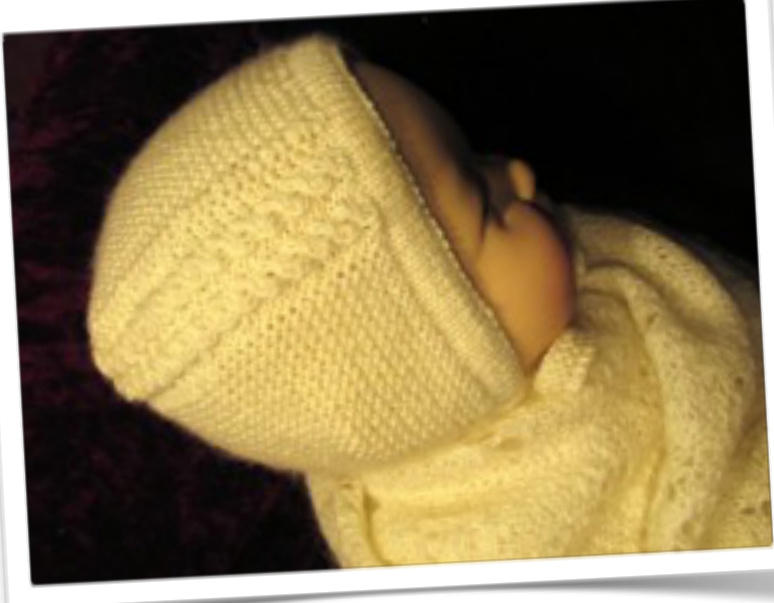
This bonnet is my version of the one worn by the new princess born on the 2nd May 2015 to The Duke and Duchess of Cambridge.
This pattern is "reverse engineered" from photographs and is just my own take on what can be seen (the lower hem is my own invention, it not being visible in the pics). Intermediate level -- not total beginners. Size: to fit a newborn baby - head size between 35 and 40 cms Materials: 3 ply light fingering or thin 4 ply fingering x 50 gms
Requirements
pr 3 mm (US 2 1/2) needles pr 2.75 mm (US 2) needles crochet hook size 3 mm or similar 1 m scrap yarn for provisional cast on thin cable needle 2 stitch markers stitch holder tapestry needle for sewing up
Princess Bonnet
Tension/gauge
27sts, 54 rows to 10 cm (4") in garter st (knit every row) on 3 mm (US 2.5) needles. Before you begin - check that your tension is correct. Work a tension swatch 31 sts and 60 rows. Measure the central 10 cm square: if you have fewer sts than the required tension, use smaller needles or your bonnet will be too big. If you have too many sts, use bigger needles or your bonnet will be too small.
Abbreviations - read before starting work
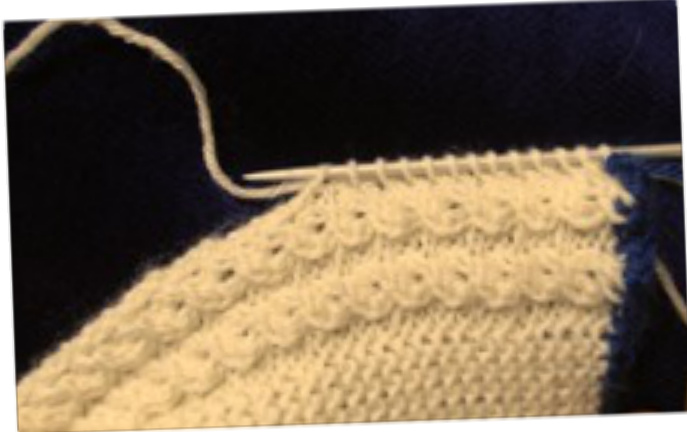
provisional cast on = with a ball of scrap yarn, make a loop and place on a crochet hook. Holding knitting needle braced under your arm, crochet chain by wrapping yarn around knitting needle between each chain st, this forms sts to be knitted straight from the needle. (The chain can be easily unravelled later on), orusing scrap yarn, crochet a chain a few chains longer than the number of sts required. With yarn to be used, knit into the loops at the back of the crochet chain, 1 st per chain, for number of sts required. Later on the cast on scrap yarn is removed and discarded, and the sts are picked up from the base of the first knitted row. There will be one less st than before plus a"halfst" at each end. Use one of these to get the same number as the cast on. cast on (cable method) = after making 2 sts, place right needle between last 2 sts to make next st stocking stitch = knit one row, purl one row garter st = knit all rows k= knit p=purl st(s) = stitch(es) rpt = repeat yrn = yarn over and around right needle to make a st [k2tog, k1] x3 (eg) = instructions inside [ ] brackets to be repeated the number of times after x, therefore this example = k2tog, k1, k2tog, k1, k2tog, k1 k2tog = knit 2 sts together pick up and knit = insert right needle into loop along row edges (from front to back), and pull through a new loop of yarn to form a knit stitch turn = stop before the end of the row is worked, swap the needles around and turn the work to the other side as if starting a new row (stitches at the end of the needle will remain unworked for the moment)
Princess Bonnet
cast off purlwise = \*p2tog, return the resulting st to left needle\*, repeat from \* to \* for number of sts required to be cast off
Construction
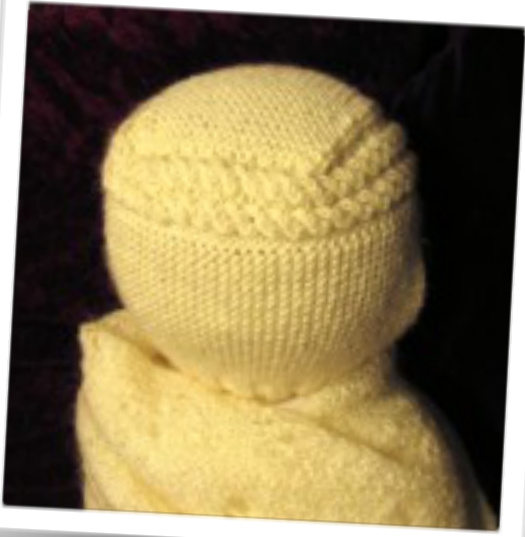
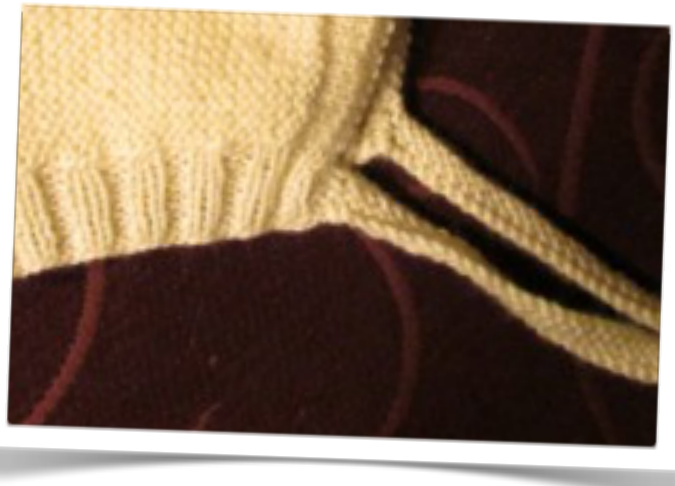
The first part to be knitted is a garter stitch band with two cabled strips on the right hand side. It begins at the front of the right ear and runs all the way around the back of the head to in front of the left ear. Stitches are then picked up along the right hand edge of this band and working from the central third of the row the remaining sts are worked in at the sides along a garter stitch rectangle at the top of the head. Stitches for the front band are now picked up and worked in stocking stitch for a folded edge. The lower hem edge is worked last in 2 x 2 rib. This is all supposing that the bonnet seen in the photos is the right way up - there has been some discussion on ravelry here http://www.ravelry.com/discuss/patterns/ 3194468/1-25 that it may be upside down and the square cable edged part, that is at the top in the pics, might be meant to be at the back of the head. This is certainly a more usual bonnet construction, but I would expect someone would have made sure all was correct before letting the little princess out for her first photshoot! Either way looks good anyway - the baby is so sweet! If you want to make it the other way up, see the alternative version at the end of the pattern.
Bonnet - main part
Using scrap yarn and a provisional method cast on 34 sts, onto a 3 mm (US 2.5) needle. Now use 3 ply / fine fingering yarn to continue: Row 1. p2, [ k3, p2] x2, k22 Row 2. k24, [p3, k2] x2 Row 3. p2, [ hold 1 st at back on cable needle, k2tog, k1 from cable needle, p2] x2, k22 = 32 sts Row 4. k24, [p1, yrn, p1, k2] x2 = 34 sts Rpt the last 4 rows 35 times more - you will have completed 144 rows (= 72 garter st ridges; 36 eyelet holes, including the last row's). Place sts on a holder and break of yarn. Turn piece on it's side so the right side is facing you and the eyelet cable edge is at the top. With 3 mm (US 2.5) needle pick up and knit 72 sts along the edge (work into the purl sts making sure the sts aren't twisted over). Note: this pick up row counts as row 1. Row 2. k27, place a stitch marker on right needle, k18, place a second marker on right needle, k2tog, k25 to end Row 3. k26, slip marker to right needle, k18, slip marker to right needle, k2tog, turn leaving remaining sts unworked for now Row 4. k1, slip marker, k18, slip marker, k2tog, turn Rpt row 4 until all sts are incorporated (you can remove the markers when you can see where to work the k2togs), ending after a right side row = 20 sts. .
Still on right side knit the 34 sts from the stitch holder at the end of the main piece, knitting the 2 yrns into the back of the loops to close up the holes. Next row (wrong side). knit the 54 sts then undo the provisional cast on and place 34 sts on the left needle, then knit these 34 sts = 88 sts in total.
Front edge
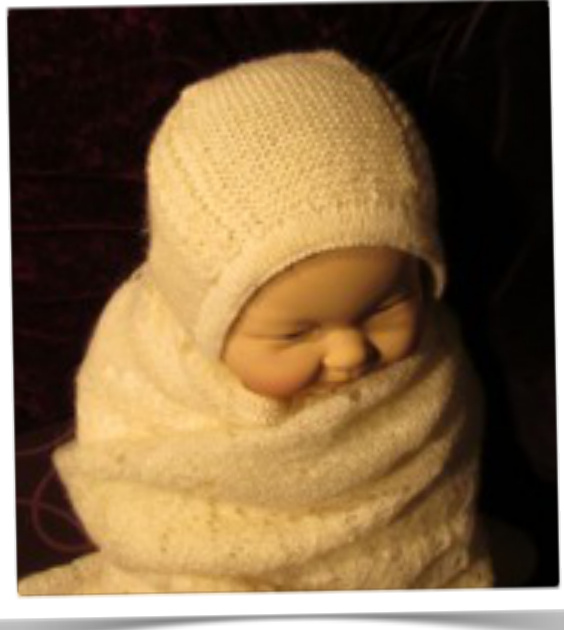
Change to 2.75 mm (US 2) needles. Row 1 (right side). k22, k2tog, [k3, k2tog] x 2, k5, k2tog, k6, k2tog, k5, k2tog, [k3, k2tog] x2, k22 = 80 sts Work 5 rows in stocking stitch beginning with a purl row. Knit 2 rows. Work 5 more rows in stocking stitch beginning with a knit row on the right side. Cast off purlwise (see abbrevs) on wrong side and fold edge at garter st rows to sew cast offedge to inside.
Lower edge
Hold work upside down, with right side facing. Using 2.75 mm (US 2) needles, pick up and knit 4 sts from end of front edge (through both sides at once so the end is closed), then 73 sts from the garter st edges of the main piece, and a further 4 sts from the other end of the front edge = 81 sts. This counts as row 1; continue in 2 x 2 rib and decrease on the next row as follows: Row 2 (wrong side). [p2, k1, k2tog] x 15 (ie to last 6 sts), p2, k2, p2 = 66 sts Row 3. k2, [p2, k2] rpt inside [ ] to end of row Row 4. p2,[k2, p2] rpt inside [ ] to end of row Rpt the last 2 rows 3 times more = 10 rows in total Cast off loosely in rib pattern.
Bonnet strings/ties
Using 3 mm (US 2.5) needles, cast on 65 sts. Knit 4 rows. Cast offloosely. Sew end of to the side of the lower edge, stretching to fit along the 10 rows of rib.
"Other way up" version
If you prefer the cable to go at the back of the head instead of the top I suggest doing this instead (sorry no pic available yet): Work main part and "front edge"as before - only the "front edge" will now sit at the neck. When you come to the "lower edge"work as follows - this will be the new front edge around the face: Hold work upside down, with right side facing. Using 2.75 mm (US 2) needles, pick up and knit 4 sts from end of front edge (through both sides at once so the end is closed), then 73 sts from the garter st edges of the main piece, and a further 4 sts from the other end of the front edge = 81 sts. This counts as row 1 Work 5 rows in stocking stitch beginning with a purl row. Knit 2 rows. Work 5 more rows in stocking stitch beginning with a knit row on the right side. Cast off purlwise (see abbrevs) on wrong side and fold edge at garter st rows to sew cast off edge to inside. Sew the strings to the folded edge of the band you just finished, so they point forwards. I'm sorry about the scary doll model - I didn't have a princess handy...

This pattern has not been test-knitted as yet - please contact me on ravelry if you find an error, and accept my apologies!

If you liked this pattern, please have a look at my others: tiny.cc/rian-ravelry


