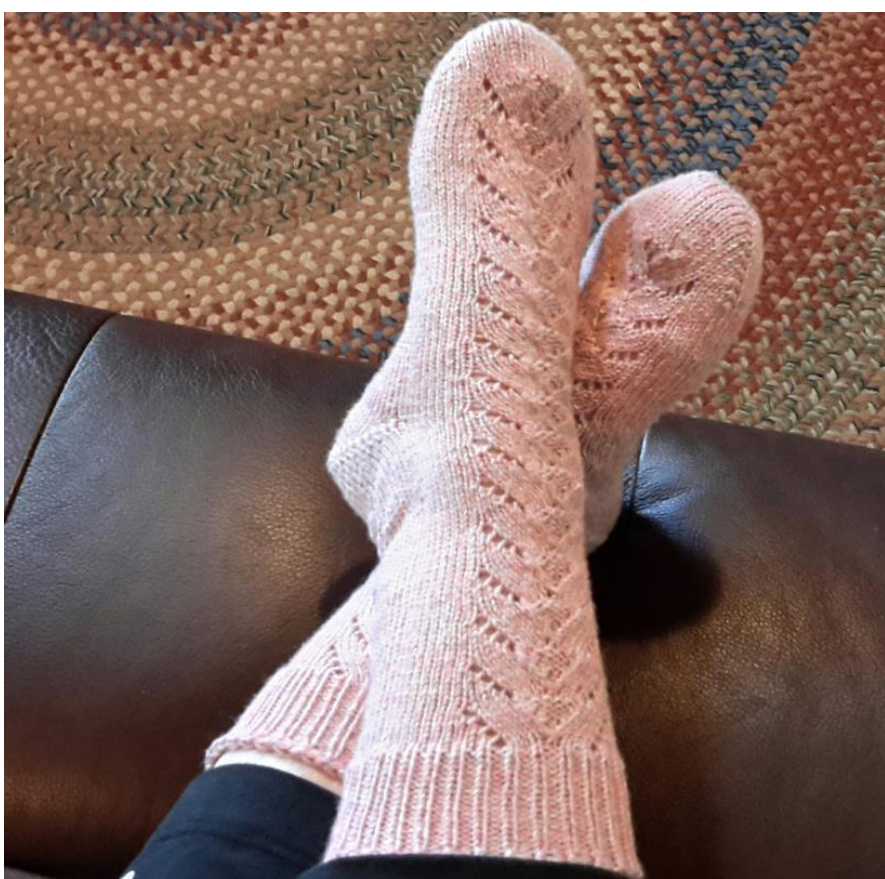
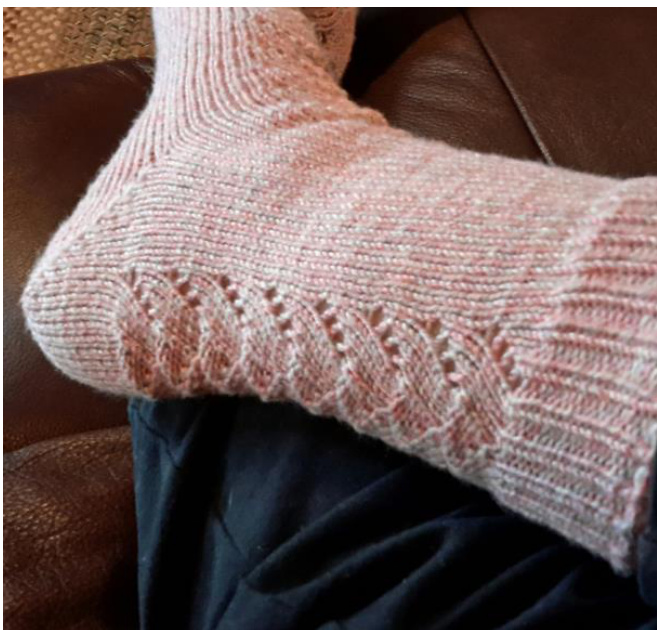
Fish Scale Lace Socks
By Gayle Pounds

Size: Women's Small (Medium, Large) Yarn: SMC On Your Toes Bamboo Seashell Multi O8 (or your choice of non-striping fingering yarn [#1]) EstimatedYardage:356 Needles: US 02 (2.75 mm) I use a 40" circular & knit 2-at-atime but 2 circulars or DPNs work, too.
Abbreviations:
K Knit P Purl K2tog Knit 2 together M1L (&/or M1R) Make 1 Left or Make 1 Right or your preferred sock increase PSSO Pass slipped stitch over knitted stitch(es) Rnd(s) Rounds SSK Slip 2 knitwise, knit together through the back loop S1 Slip 1 stitch St(s) Stitches) YO Yarn Over
Toe:
Using Judy's Magic Loop, cast on 8 stitches each needle, (each sock, if knitting 2-at-a-time). Rnd 1: Sole: K2, M1R, work to next to last st, M1l, k2. Top of Foot: K2, M1R, work to next to last st, M1L, k2. Work Rnd 1 until there are 40(44,48) total sts. Rnd 2: Work even. Repeat Rnds 1 and 2 until there are 60 (64,68) total sts.[30(32,34) instep sts, 30(32,34) sole sts] The Fishtail Lace Panel Pattern requires an uneven number of stitches. Knit next round, increasing 1 stitch (M1) in the center of the instep stitches, only (after the 15th stitch) for a total of 31(33,35) stitches on the instep and 30(32,34) on the sole of both socks.
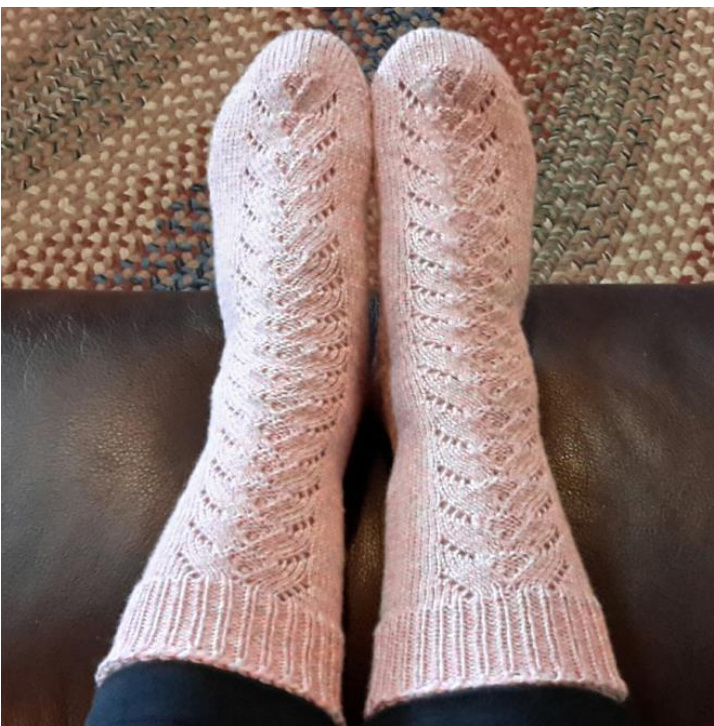
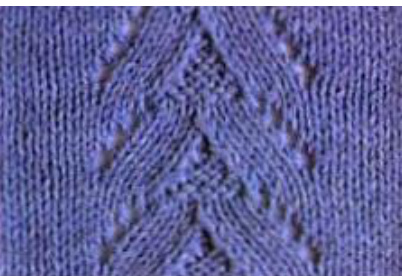
Fishscale Lace Panel Pattern:
Worked over 17 stitches on a background of stockinette stitch. Round 1: K8, YO, k3, SSK, P5, K2tog, K3, YO, k8 Round 2: k13, P5, K13 Round 3: K9, YO, K3, SSK, P3, K2tog, K3, YO, K9 Round 4: K14, P3, K14 Round 5: K10, YO, K3, SSK, P3, K2tog, K3, YO, K10 Round 6: K15, P3, K 15 Round 7: K11, YO, K3, Sl1, K2tog, PSSO, K3, YO, K11 Round 8: Knit
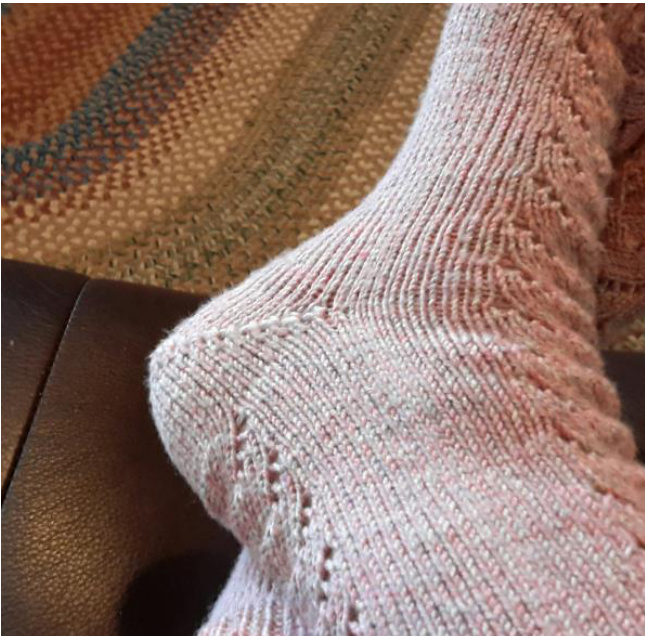
Begin Fish Scale Lace pattern on the instep stitches, only. See explanation above or the chart at the end of the pattern. Continue working in pattern on the instep and knit even on the sole rnds until foot measures 2" less than your total foot length from tip of toe. Next round knit instep stitches in pattern, making note of the pattern row so you pick up the lace pattern where you left off to begin heels. Begin the heel of your choice. I prefer a Double Wrap & Turn heel but a gusset will work just as well. Everyone has a preferred heel so the choice is yours. In this pattern, I've given directions for both a Double Wrap & Turn heel and a gusset heel.
Double Wrap & Turn Heel:\*
NOTE: I use Stoeller Stahl Fortissima Socka Darning Thread for reinforcement on my heels. It's not feasible to reinforce using the Gusset Heel but is with any short row heel. It is available at Elizabeth's Fiber & Yarn (www.fiber2yarn.com) for about \$3 per card. One card is enough for 2 heels except when you are making larger socks, then you'll need about 1.5 cards. I start using this reinforcement yarn in the very first stitch of the heel row. I leave about 3-4" tail then start knitting holding both reinforcing and working yarns together. \*For wonderful, detail explanations and illustrations of Wrap & Turn heels, I highly recommend Janet Rehfeldt's Toe-Up Techniques for Hand-Knit Socks.
Heel Decreases: (If you want to do Single Wrap & Turn, in this section, you'll just slip stitches rather than wrap them. You'll only wrap in the next Increase section) On Sole Stitches Only: Knit across to the last 2 stitches; Bring yarn to the front, slip 1 stitch purlwise from the left needle to the right needle; Bring yarn to the back of the work and slip the stitch back onto the left needle, place marker; You have just wrapped a slipped stitch ..this is how you eliminate holes in the heel. I usually use a different colored stitch marker on each end of the row to separate the wrapped stitches from the stitches waiting to be wrapped. You have 2 stitches on the left side of the knit stitches unworked (1 unworked stitch and the wrapped slipped stitch). Turn your work to the purl (wrong or inside the sock) side and purl back across the row until you have 2 stitches unworked. Put yarn to the back, slip the next stitch purlwise ·Bring yarn to the front of the work and slip the stitch back onto the left needle, place marker. You now have 2 stitches out of work (1 unworked stitch and 1 wrapped stitch) on each side of the row. As you knit and purl rows, wrap the last stitch on the row as outlined above, depending on whether you are on a knit row or a purl row, moving the marker each time. When you have approximately 1/3 of the stitches left unwrapped in the center of the sole stitches, and ending on a purl row so you have an equal number of wrapped stitches on each side, it's time to begin increasing back to your original number of stitches by working the wraps. NOTE: When bringing these wrapped stitches back into work, you need to remember on the Knit Side, slip the stitch as if to purl (purlwise) and on the Purl Side, slip the stitch as if to knit (knitwise).
Working the First Wraps:
· After you have wrapped the last Purl Row stitch, turn your work and knit to the marker Remove the marker and work the first wrapped stitch. This first wrapped stitch will ONLY have one wrap as will the first one on the purl row. To work the wrapped stitch, slip the stitch purlwise (not the wrap but the stitch) to the right needle. With the left needle, pick up the wrap onto the left needle. Keeping the order of the wrap and the stitch, slip the stitch onto the left needle and knit the two together through the back loop. This stitch is now back with the working stitches. Wrap the next stitch on the left needle ... that stitch is now double-wrapped, place the marker and turn your work · Purl across to the next marker Remove the marker and work the first wrapped stitch which also only has 1 wrap. Note: Make sure the yarn stays to the front throughout all steps of working the wrapped stitch process. To work the wrapped purl stitch, slip the stitch knitwise (not the wrap but the stitch) to the right needle · With the left needle, pick up the wrap onto the left needle Again, keeping the order of the wrap and the stitch, slip the stitch onto the left needle and purl the two together as you would purl any stitch, from the front of the work. Wrap the next stitch on the left needle ... that stitch is now double-wrapped, place the marker and turn your work ·Knit across to the next marker
Working the Double Wraps:
· Remove the marker and work the first double-wrapped stitch. To work the double-wrapped stitch, slip the stitch purlwise (not the wraps but the stitch) to the right needle ·With the left needle, pick up the wraps onto the left needle. Keeping the order of the wraps and the stitch, slip the stitch onto the left needle and knit the three together through the back loop. This stitch is now back with the working stitches. ·Wrap the next stitch on the left needle ... that stitch is now double-wrapped, place the marker and turn yourwork Purl across to the next marker Remove the marker and work the first double-wrapped stitch. Note: Make sure the yarn stays to the front throughout all steps of working the wrapped stitch process. To work the double-wrapped purl stitch, slip the stitch knitwise (not the wraps but the stitch) to the right needle · With the left needle, pick up the wraps onto the left needle Again, keeping the order of the wraps and the stitch, slip the stitch onto the left needle and purl the three together as you would purl any stitch, from the front of the work. ·Wrap the next stitch on the left needle .. that stitch is now double-wrapped, place the marker and turn yourwork · Knit across to the next marker · Continue in this manner until you have worked the last double-wrapped stitch on the knit side (left) of your work. You still have one double-wrapped stitch on the right side of the work but you'll take care of that after you knit around the instep stitches. · If you have a gap between the last double-wrapped stitch that you just worked and the 2 stitches left unworked throughout the heel process, I pick up either a bar between the stitches or the left leg of a stitch leg 1 or 2 rows below the last double-wrapped stitch and twist it so it helps to fill the gap, then knit it together with the next stitch .. then knit the last stitch on the needle. If you have not gap, knit the two last stitches normally. · If you are knitting 2-at-a-time, continue to the next sock heel and repeat all steps to this point. If not, go on to the next section: Finishing the Heels.
Finishing the Heel(s):
·Knit in pattern around the instep stitches At the beginning of the heel stitches, you still have 1 unworked stitch plus the last wrapped stitch. Knit the 1st stitch If you have a gap between the 1st stitch and the last double-wrapped stitch, slip the 1st stitch purlwise and pick up a stitch (see above) and knit them together, through the back loop. If no hole, knit the stitch normally. Now, it gets a little tricky but I have found the best way to knit this last double-wrapped stitch is to turn my work and actually do the purl thing with it, as I did with all of the other wrapped stitches on purl side of the work. So, turn your work, pick up the wraps onto the left needle, slip the stitch knitwise, remove the marker, then purl the three together as you did the other wraps. Since your yarn is on the opposite side of your knitting with this stitch, it's a little trickier to get that yarn through the three but it can be done so persevere and you'll get there. Slip the worked double-wrap back onto the left needle so when you turn back to continue the row, it's on the correct needle. Turn your work back to the knit side, being careful not to let your hard-earned stitches slip off the needle and continue working in the round. When you have your work to the point you want to start the pattern on the back of the leg, start your pattern so that it corresponds to the pattern on the insole or front of the sock. I usually knit % to 1" before starting the pattern on the back.
Gusset Heel:
Increases: Increase 1 stitch on each side of SOLE STITCHES ONLY. You can use the kfb for this. That works very nicely and is probably the easiest way to do it. I'm for using the simplest, easiest method when learning then you can branch out and try new techniques after you have the total toe up sock experience mastered. After you have reached 2 to 2.5" less than your total sock length (you may want to do 1 increase in 1 row ONLY in the center of your sole stitches so you have an even number of stitches for this type of heel. If you do this, be sure to remember to decrease 1 stitch at the end of the heel so you have your original uneven number of stitches which should be 2 stitches less than your instep stitches when you start the Fish Scale Lace Panel pattern on the back of the leg: · Knit in Fish Scale Lace Panel pattern across instep stitches; · On the first sole stitch, kfb and knit across to the next-to-last stitch, kfb k1 exactly as you did in the toe increases except all of these will be every other row. This will be 1 increase on each side for a total of 2 st increases every other row. Knit around Repeat gusset increase rows 1 & 2 until you have a total of 2 stitches less than the total stitches around the sock on all needles before you started your increases, you will be ready to turn the heel. If your total is 48 stitches on all needles before starting increases, you'll do the increases until you have 46 stitches; 52 stitches, you'd knit until you have 50 stitches, etc. TIP 3: Unless otherwise noted, always slip stitches purlwise whether you are on the knit side or purl side. If stitches are to be slipped knitwise, it will be so noted in the pattern. Otherwise, they should always be slipped purlwise.
Turning the Heel:
Row 1: Knit in Fish Scale Lace Panel pattern across instep stitches Knit to the center of the sole stitches Place marker Knit 2 Slip 1 st (remember unless otherwise noted, always slip purlwise), k 1, PssO (pass slipped stitch over knitted stitch) Knit 1 Turn Work
Row 2:
Slip 1 Purl to marker, remove marker (or you can leave it if it helps you count as you knit) Purl 2 past marker Purl 2 together (be sure to keep your yarn taut at both this point and the PSsO on the knit side) Purl 1 Turn Work.
Row 3:
Slip one, knit to 1 stitch before gap (on the other side of the center/marker) Slip 1 st, k1, Psso, k1, Turn
Row 4:
Slip one, purl to 1 st before gap Purl 2 together, p1 Turn Repeat Rows 3 & 4 until all stitches on the last knit row are worked. You will have 2 unworked stitches on the right side of the work but you'll deal with them after the heel is worked on the next round after the instep stitches are worked.
Final Heel Decreases & Knitting the Leg\*
\*30(32, 34) Total Stitches with a 17 stitch repeat -1 for the Back of Leg Stitches. You will need to increase by 1 stitch after a gusset heel before you start the fish scale up the back of the leg. After you have turned the heel and before starting up the leg, you have a few more decreases to get back to your original number of stitches — the number of total stitches on all needles before beginning the gusset increases:
Round 1:
· Knit in Fish Scale Lace Panel pattern across instep stitches Beginning on the first stitch of the sole stitches, k1, SSK (slip 2 stitches as if to purl, knit the slipped stitches together through the back loop) Knit across to the last 2 stitches, PssO. Round 2: Knit in Fish Scale Lace Panel pattern across instep stitches SSK Knit across Leg: Work cuff in 1 x 1 rib for 2".
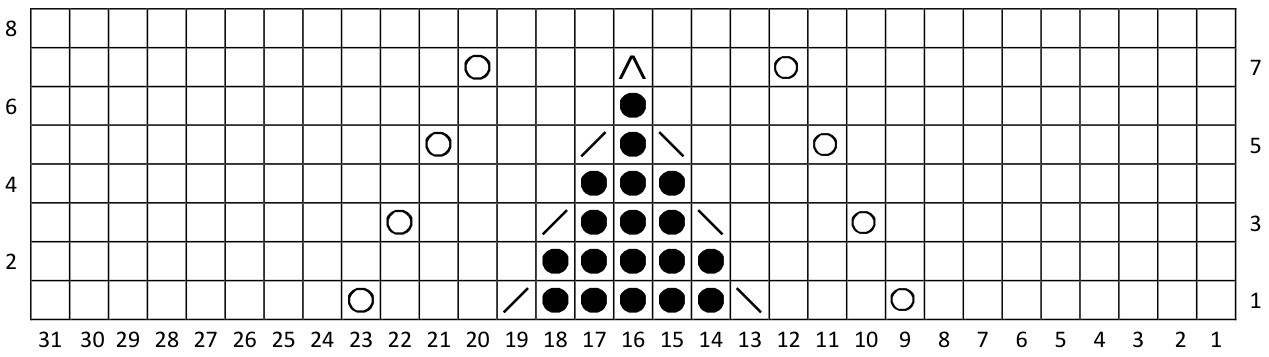
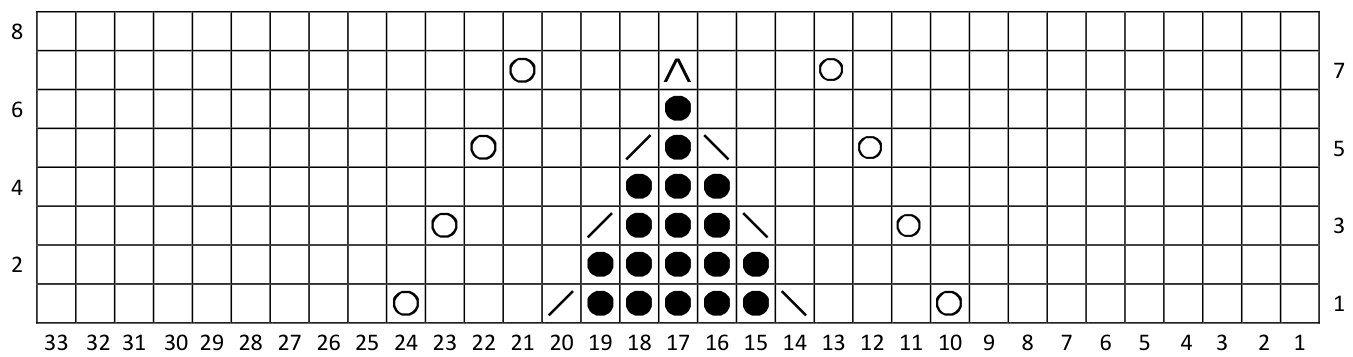
Fishscale Lace Panel:
Women's Small
Women's Medium
Women's Large
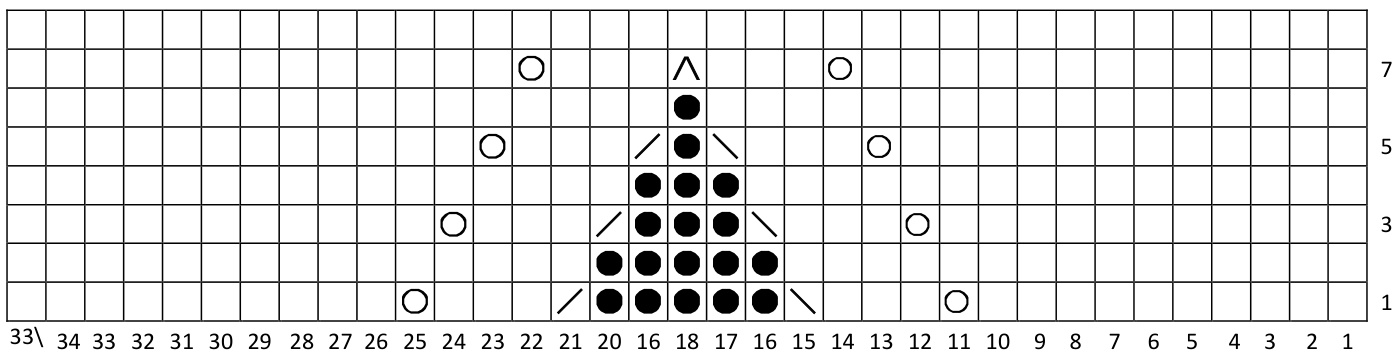
口 Knit Purl YarnOver Knit 2 together SSK (Slip 2 knitwise, slip back onto left needle and knit 2 together through the back loop) > Sl1, k2tog, PSSO (Slip 1, Knit 2 together, Pass slipped stitch over knit 2 together)

PLEASE READ: This pattern is the design and property of Gayle N Pounds and should not be used except for personal use. Please don't post the pattern on any website, forum group or any other printed or digital medium without my permission. Please contact me on Ravelry at GayleP or email at geegeelbs@gmail.com if you have any questions.Enjoy!