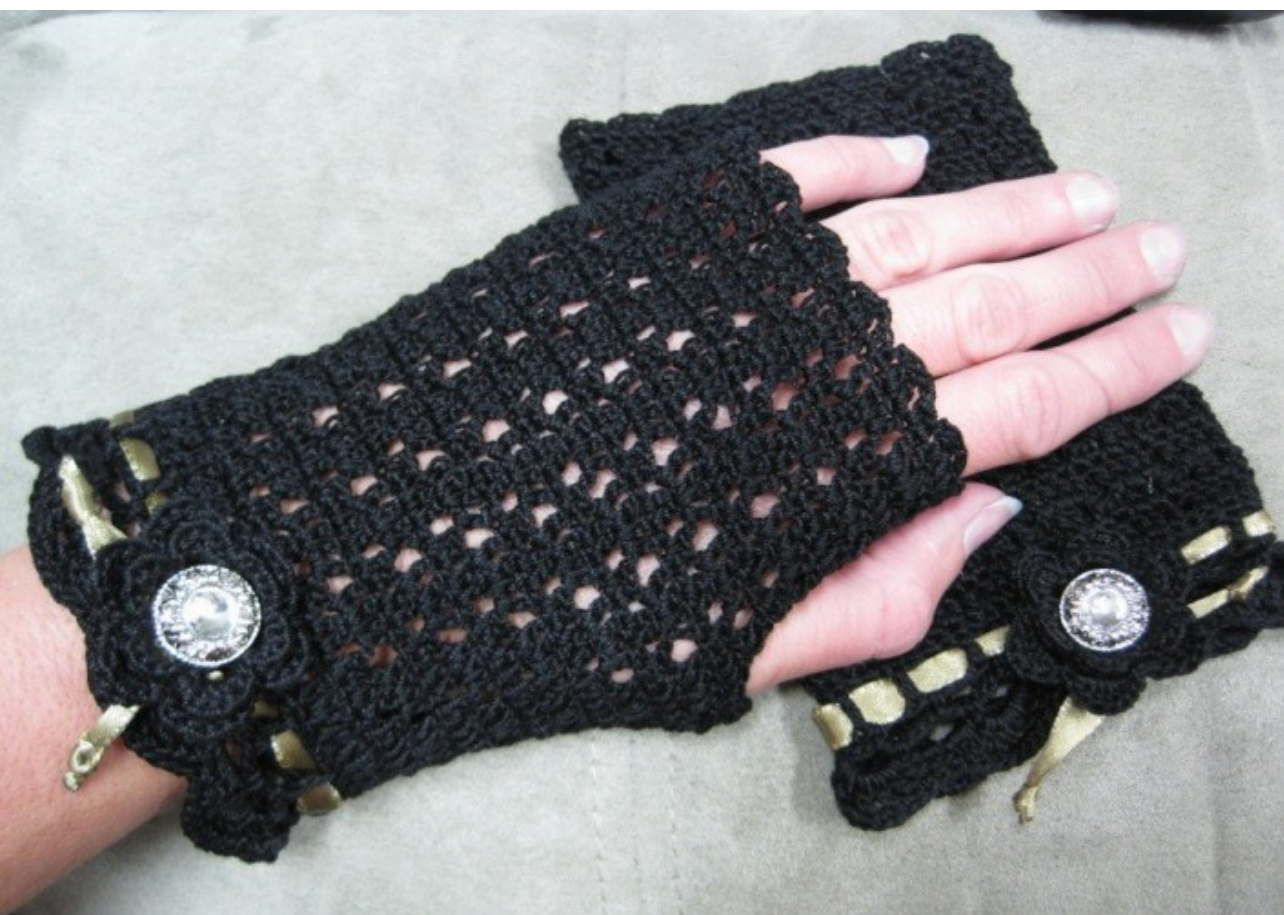
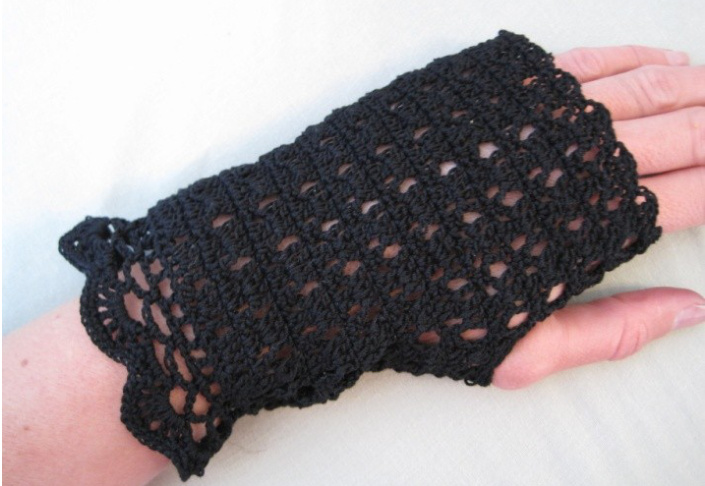
Black Lace Mitts
By Cirsium Crochet
Materials:
Aunt Lydia's #10 Thread, 1 ball or similar 0/lace-weight yarn: project takes approximately 200 yds #8 Steel crochet hook/1.55 mm 1 /8th2 Ribbon @ 24 inches long 2 decorative buttons Blunt tip needle for weaving in ends Scisors
Notes:
Do not turn at the end of each round: Right side is always facing you. Abbreviations: This pattern uses US terminology ch= chain stitch Sl= slip stitch Sk= skip Sc= US single crochet stitch Dc= US double crochet stitch Yo= yarn over Ch-sp= chain space Dc2tog= double crochet together Special Stitches: Dc2tog: (Yarn over, insert hook into indicated stitch, yarn over, draw loop through, yarn over, draw through two loops on hook) repeat () again, then yarn over and draw through three remaining loops on hook.
Hand
Rnd 1 Foundation sc 56, OR Ch 57, sc in second ch from hook and in each ch across, sl st to first st to form ring, being careful not to twist ring. (56 scs) Note: Lace pattern is a 4 stitch repeat--to make a larger or smaller pair of mitts work in multiples of 4 (i.e. smaller go to 52 scs /larger go to 60 scs) Rnd 2 Ch 3, sk next st, [\*dc in next st, 2 dc in next st,\* dc in next st, sk next st] repeat from [to] 13 times, end with \* to \* once more, sl st to top of ch 3. ( I\/l ) Rnd 3 Ch 1, sc in same st, sc in next dc, [\*ch 2, dc2tog over next 2 dc,\*, ch 2, sc in next 2 de] repeat from [ to | 13 times, end with \* to \* once more, dc in first sc. (xoo/\oox) Rnd 4 Ch 3, \* dc in next ch2 sp, 2 dc in top of dc2tog,\* dc in next ch2 sp] repeat from [to] 13 times, end with \* to \*, sl st to top of first ch 3. (I\/ ) Rnd 5-13 repeat pattern rounds 3-4, ending after a round 3 (or continue working the pattern repeat rows until desired length for wrist is reached) Rnd 14 Form thumb hole (right hand) ch 3, [\*dc in next ch2 sp, 2 dc in top of dc2tog,\* dc in next ch2 sp] repeat from [to ] 11 times, fsc 4 sts OR chain 4, skip sk next 2 (sc, ch2, dc2tog, ch2, sc-- x00/\oox ) repeats from rnd 13, and end with dc in last ch2 sp, 2 dc in next dc2tog, sl st to first ch3. Form thumb hole (left hand) ch 3, dc in ch2 sp, 2 dc, dc in ch2 sp, fsc 4 OR chain 4, sk next 2 (sc, ch2, dc2tog, ch2, sc-xoo/\oox) repeats from rnd 13, dc in next ch2 sp, 2 dc in top of dc2tog and continue in pattern around, sl st to top of first ch3. Note: if you desire a larger thumb hole, the lace pattern is a 4-stitch repeat. So, you can increase by 4 more stitches and keep the pattern intact, or adjust by a couple of stitches and work around the difference. Rnd 15 Repeat Rnd 3 until thumb stitches, then sc in first fsc, ch 2, sk next fsc, dc2tog over next two fsc, ch 2, sc in 4th fsc, then end pattern as per end of Rnd 3. Rnd 16-21 continue in pattern edging on a round 3 for a natural scallop edging, or end on a round 4 and reverse single crochet around the top for a straight-edge look. Fasten off. Weave in ends.
Cuff edging
Rnd 1 working on opposite side of fsc, attach thread with a slip stitch near the seam. Ch 4 (counts as dc, ch1), sk next st, dc in next st, ch 1, [sk next st, dc in next st, ch 1] all the way around. Sl st to 3rd ch of beg ch4 (28 ch1 spaces) Rnd 2 Sl st to first ch1 sp, ch 1, sc in same sp,[ch 5, sk next ch1 sp, sc in next ch1 spl around, end with ( 3, dc in first ch5 space. Rnd 3 Ch 1, sc in same ch5 space, [ch 5, sc in next ch5 sp] around, end with ch 3, dc in first sc. Rnd 4 Ch 1, 3 sc in same ch5 sp, [(dc, ch1 five times), dc again allin next ch5 sp (shell made),5 sc in ne ch5 spl around, end with 2 sc, sl st to top of first sc. Rnd 5 Ch 1, sc in each st and each ch sp around. Sl st to first sc. Fasten off. Weave in ends.
Flower
Magic loop, 0r ch 5, sl st to form a ring Rnd 1 12 sc in ring Rnd 2 Ch 1, sc in first sc, ch 3, [sk next st, sc in next st, ch 3] five times, sl st to first sc (6 ch3 sp) Rnd 3 Sl st to first ch3 sp (sc, 3 hdc, sc) in each ch3 space, sl st to first sc Rnd 4 Ch 1, sl st around sc from 2, ch 5, [sl st around sc from round 2, ch 5] 5 times, sl st to first st (6 ch5sp) Rnd 5 Sl st to first ch5 sp (sc, hdc, 3 dc, hdc, sc) in each ch5 space around. Fasten off. Weave in ends.
Finishing
Weave in ribbon through first round/eyelet row/(dc, ch1) round of cuff starting from top center of wrist-tie off with a bow or a square knot. To keep ribbon from fraying, melt the ends a smidge with a lighter or tie a secure knot. Sew button to top of flower and center both on top of mitt just above where the ribbon ties. Sew in place.
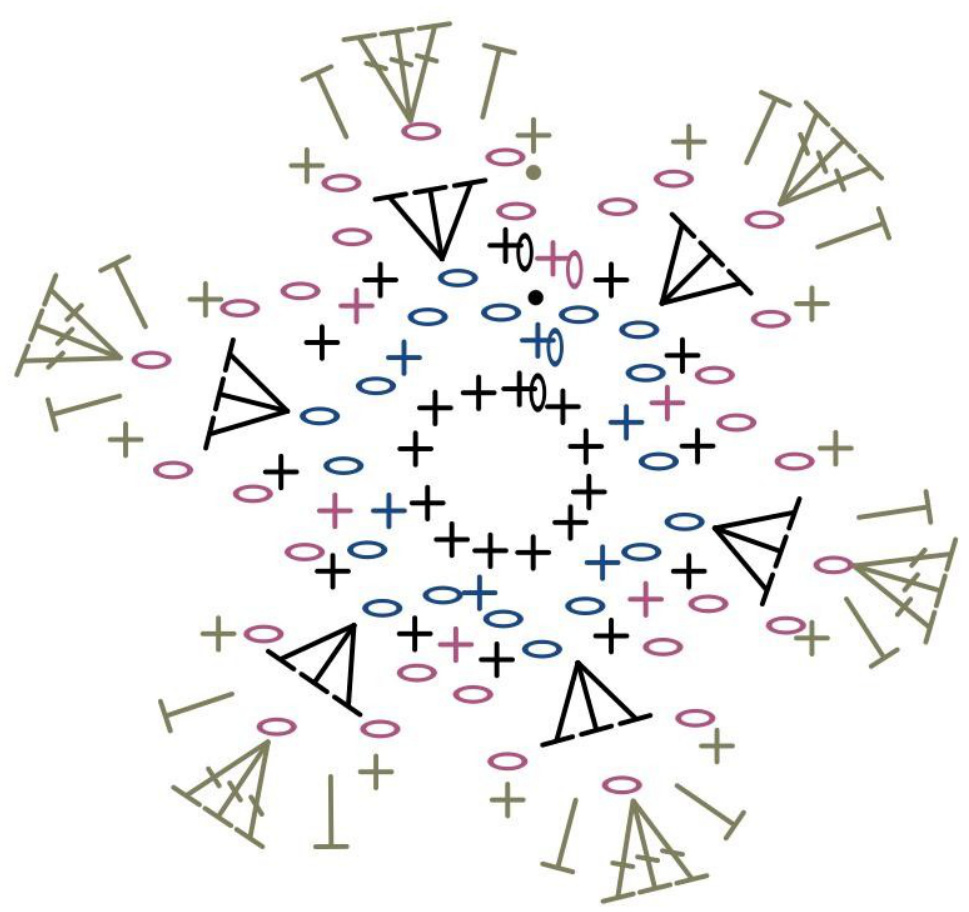
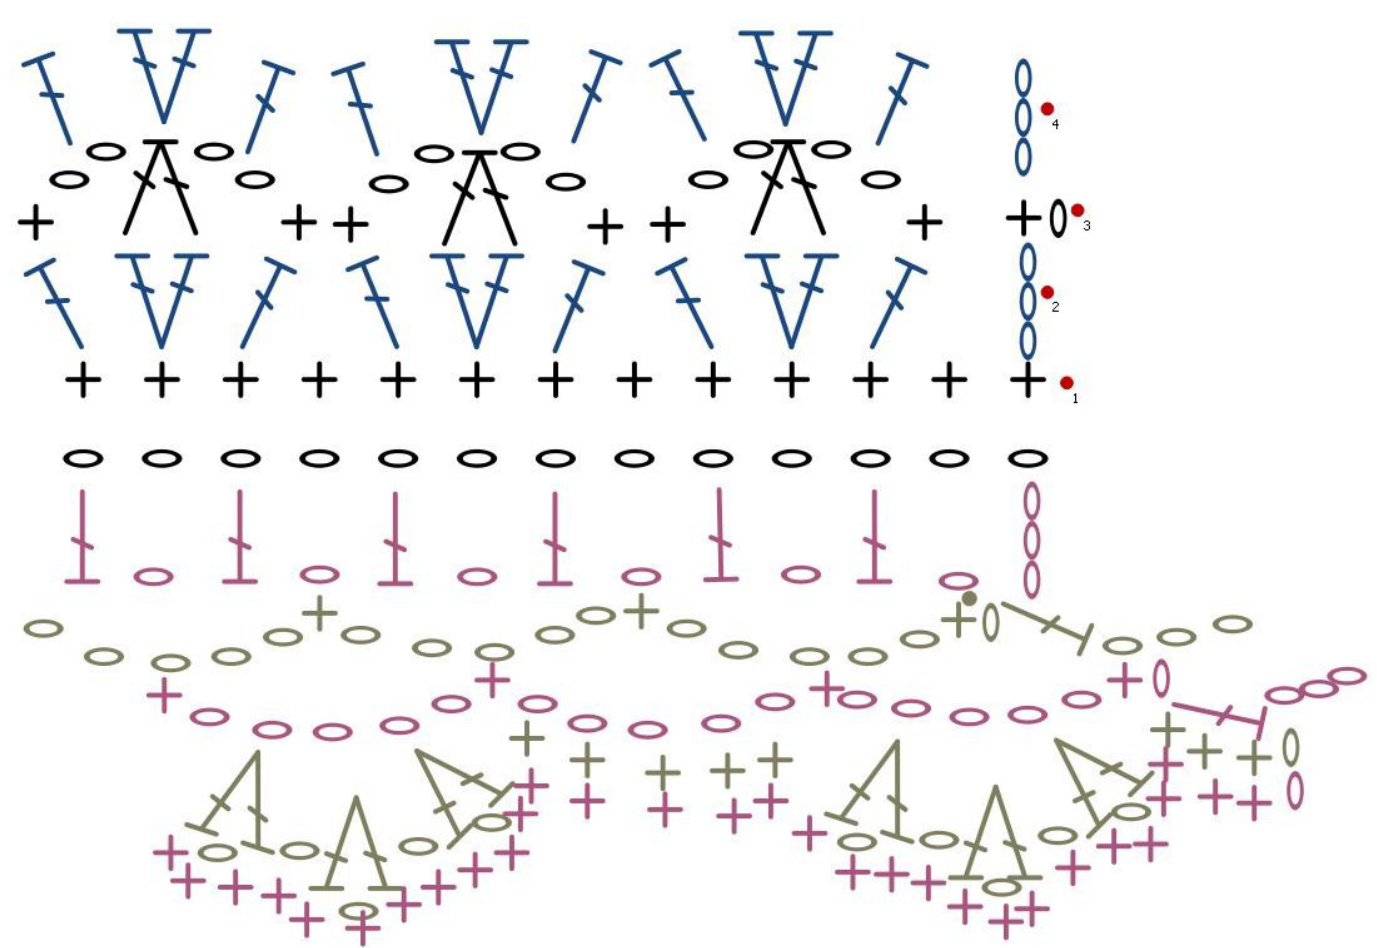
Stitch diagram of lace pattern, edging, and flower.


