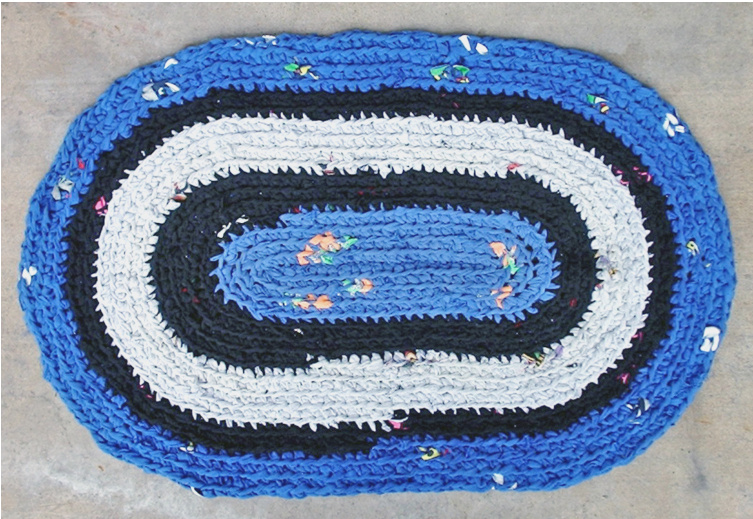
Tarnation Oval Rug by Amanda Steves
Skill Level Easy Yarn 1/2"/1cm-width tarn (not stretched) made from approximately 5-7 adult-sized t-shirts
Additional Materials
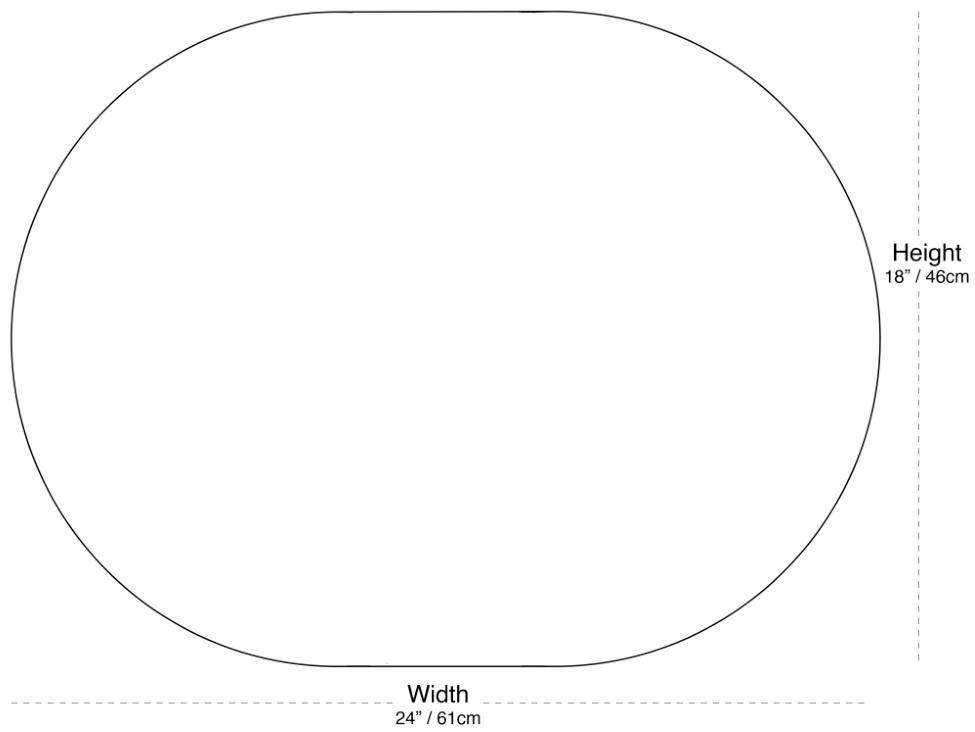
crochet hook: N/10mm 4 removable markers in 2 colors--red and blue are used in the pattern hand-sewing needle & thread Approximate Finished Measurements 24 / 61cm x 18" / 46cm
Approximate Gauge
10 st x 10 rows = 4.5"'x4.5” / 11.5cmx11.5cm square swatch worked in sc-back loops This fast and easy crocheted rug is made from t-shirts that have been cut into tarn (T-shirt yARN) - a great way to recycle old cotton-knit garments and get a good-looking, high-use item in exchange. Your rug can be as large or small as you wish. The number of shirts to use depends on the sizes of the shirts and how large you want to make it. Machine washable and dryable, it's an excellent rug for kitchen, bath, utility, or entry.
How to Make Tarn (T-shirt yARN)
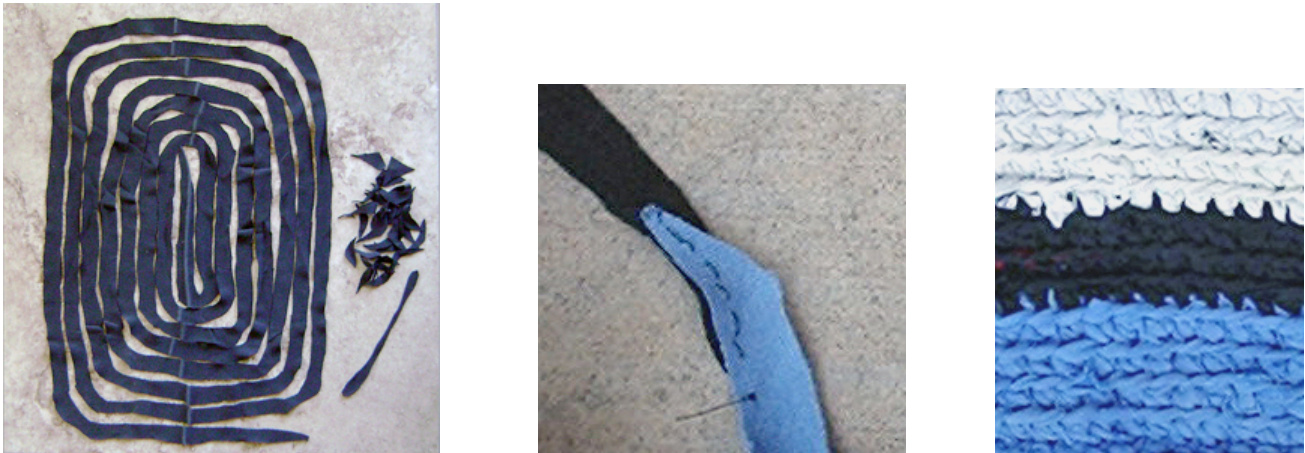
1. Collect your t-shirts or other cotton-knit garments to be used. 2. Cut the hem off the bottom of the t-shirt. If the shirt has side seams, cut all the seams off the front or back section. AmandaSteves http://amandashappyhearth.blogspot.com Please do not alter or redistribute this document or use for commercial purposes. 3. Cut diagonally into the hemless bottom of the shirt until you have a 1/2"'/1cm -wide strip started. This will give you a tapered end, for the needle-and-thread method of connecting strips in step 7. The ends are tapered to avoid tarn that is too bulky at the point of overlap. 4. Tube spiral: If the shirt does not have side seams, you can continue cutting the tarn strip, spiralling up to where the sleeves are attached. Taper-off the end, like the start of the strip. 5. Flat spiral: If the shirt has side seams, continue cutting the tarn across the bottom, up the side, across the sleeve and collar edges, and down the other side. When you get to where you started, angle your cut upward so you can keep going in a flat spiral. Since tarn is stretchy, it's forgiving at the corners, but you can round them off a little by trimming the points. (Save the scraps for stuffing toys, etc.) Taper-off the width when you come to the end. 6. Cut the seams/collar/sleeve hems off any remaining shirt fabric, and cut more strips using the Flat Spiral method in step 5. 7. Connecting strips: Overlap the tapered ends by about 1"'/2.5cm. With a needle and thread, hand-sew 6-7 stitches straight up the middle. Backstitch works well for this. 8. WARNING: Don't cut tarn across the shirt seams. The seam stitches will not hold your tarn together, especially in the wash.
Pattern Notes
·U.S. crochet terms Unstretched tarn was used for the rug pictured. If you prefer, you can use stretched tarn instead, but the gauge and the rug's surface texture may be different. Gauge with tarn can be very hard to pin down. It may vary when going from one shirt to another, or tube-spiral cut to flat-spiral cut. For that reason, the rug dimensions and gauge in this pattern are approximate. You can measure your rug after several rounds to get a better idea of how it's working up, and you might want to have a few extra shirts on hand in case you need to add more rounds. As you step on the finished rug, especially after laundering, the rounds will flatten a bit, increasing the size by a small amount. This pattern makes use of sc-bl: single crochet worked only in the base stitch's back loop (bl) instead of both loops. It produces a flexible rug fabric that dries faster after washing. The foundation chain is located in the middle of the rug, and the first round is worked down the chain, over the end, and down the other side of the chain. AmandaSteves http://amandashappyhearth.blogspot.com Please do not alter or redistribute this document or use for commercial purposes. The oval is worked with increases on the ends and straight sides between. The start and end of each curve is marked with similarly colored stitch markers: 2 reds on the end worked first and 2 blues on the other end. Care for this rug is easy: machine wash and dry. It should hold its shape and size fairly well, depending upon the t-shirt fabric used for the tarn. However, after washing, when it's still wet, it will be stretchy and out of shape. Machine drying corrects this. Please note: if you don't have a dryer, consider using regular single-crochet for this rug. Change colors as desired. If you want the printed surface of the tarn to show on your work, you'll have to turn it out as you go. Most of the time, tarn curls in on itself to shov only the wrong side of the fabric. When you approach a section of tarn with print, just turn it and hold it “inside-out’ so the print shows for the upcoming stitches. If you have an allover print, it's easier to cut the tarn in a top-to-bottom zig-zag pattern, reducing the amount of inside-out tarn to deal with.
Stitch Abbreviations
ch chain stitch pm <color> in lp on hk place <red or blue> marker in loop on hook mkr marker sc single crochet sc-bl single crochet back loop only
Rug Instructions
Foundation Chain: Ch 21, place blue marker in loop on hook. Rnd 1: Starting in 2nd ch from hook, sc to next-to-last ch in foundation chain, place red marker in loop on hook, 3sc in last ch, pm red in lp on hk, continuing down the other side of the foundation chain: sc to 2sts before blue mkr - place it in lp on hk, 3sc in next st, pm blue in lp on hk. Rnd 2: Sc-bl to next marker (red) - pm in lp on hk, 2sc-bl in each of the next 3 sts to mkr (red) - pm in lp on hk, sc-bl to next mkr (blue) - pm in lp on hk, 2sc-bl in next each of the next 3 sts to mkr (blue) - pm in lp on hk. Rnd 3: Sc-bl to next mkr (red) - pm in lp on hk, [2sc-bl in next st, 1sc-bl in next st], repeat to next mkr (red) - pm in lp on hk, sc-bl to next mkr (blue) - pm in lp on hk, [2sc-bl in next st, 1sc-bl in next st], repeat to next mkr (blue) - pm in lp on hk. Increase Rnd: Repeat Rnd 3, adding one sc-bl st each time after the 2, so that each successive increase round has one more than the previous round in the repeat sections. Work increase rounds until the oval's ends start to ruffle. Then work the next round or two without increasing, to straighten the edges. Straightening Rnd: Sc-bl all the way around, transferring mkrs to current round as you go. When the edge is straightened, switch back to increase rounds until the ends ruffle again. Then work straightening rounds until the edge is flat again. Repeat this process until the rug is the size you want. End with a straightening round. After the last round, work 3 slip sts for a smooth finish. Tie off and work in ends. Schematic Diagram
Check my blog for tips and variations on this pattern and on making and using tarn. http://amandashappyhearth.blogspot.com/


