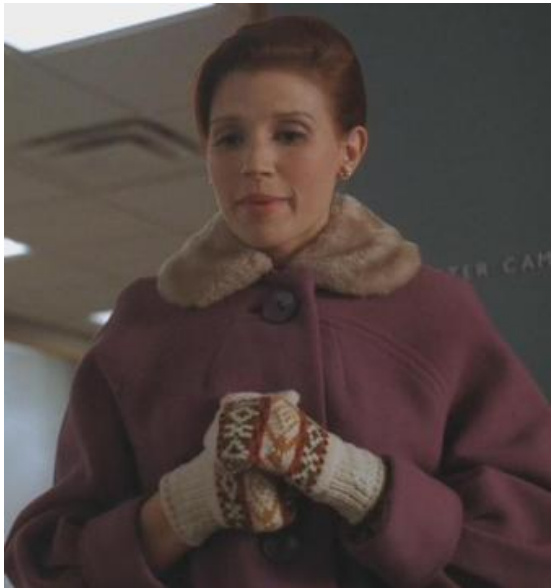
Mad Men Mittens
A knitting pattern by Staci Perry, www.verypink.com
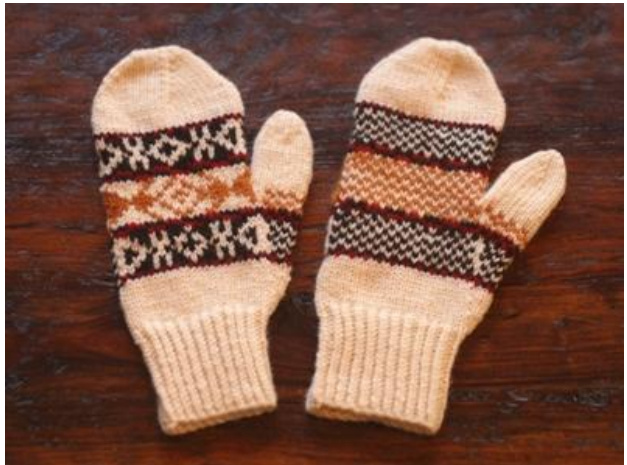
Sizes: Women's medium or large Medium: hand circumference of $7{-}7.5^{\prime\prime}$ ; Large: hand circumference of 7.5- 8" Cream Cranberry red Black (or very dark brown) Pumpkin orange Notes about yarn choice - wool is the very best choice for Fair Isle knitting. Even if your tension is wonky in places, wool is very forgiving, allowing your stitches to block out beautifully. Also, you can easily use three colors instead of four. There is so very little of the red used in the pattern, you can use the orange for the stitches that call for red. Needles: Size Medium: set of 4 double-pointed needles inUs size 3; Size Large: set of 4 double-pointed needles in Us size 4 Additional Tools: 2 stitch markers, row counter, tapestry needle Gauge: Size Medium: 6 stitches ${\bf\omega}={\bf\omega}1{\bf\omega}^{\prime\prime}$ : Size Large: 5.5 stitches $\mathbf{\omega}=\mathbf{\omega}1^{\prime\prime}$
Abbreviations:
K - knit K2tog - knit two stitches together ktbl - knit through the back loop M1L - make 1 left M1R - make 1 right P- purl PM - place marker SM - slip marker
Directions
CUFF Cast-on 46 stitches and put on 3 needles. Join to work in-the-round, and work \*ktbl, ${\mathsf{p1}}^{*}$ aroundfor $2.75^{\prime\prime}$ .Knit one round plain. THUMB GUSSET Setup Round: K 23, pm, M1L, K 1, M1R, pm, K to end.
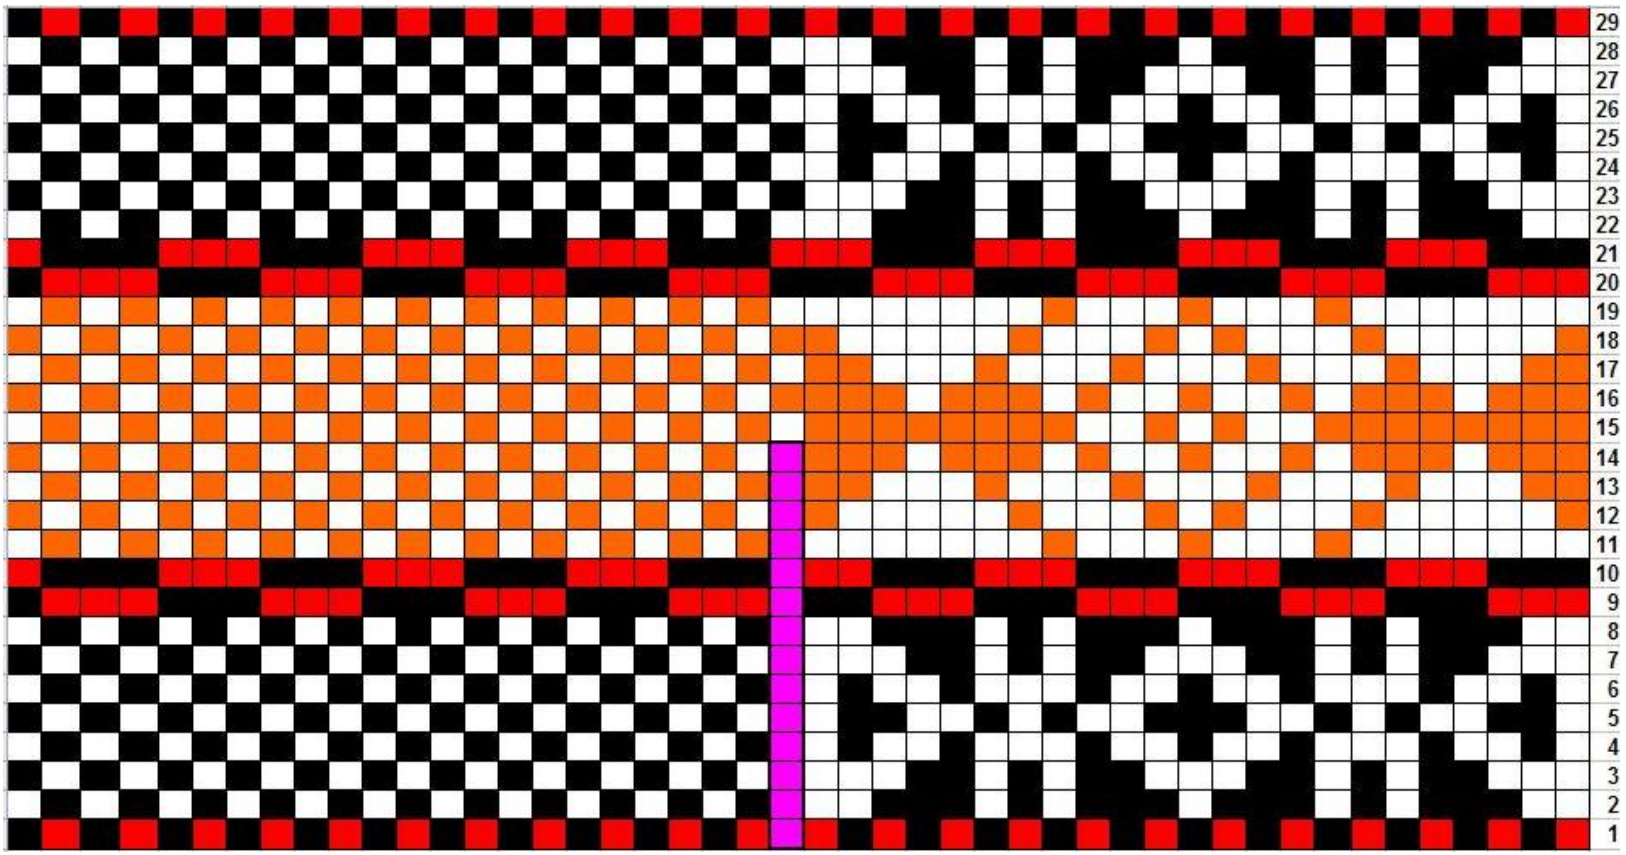
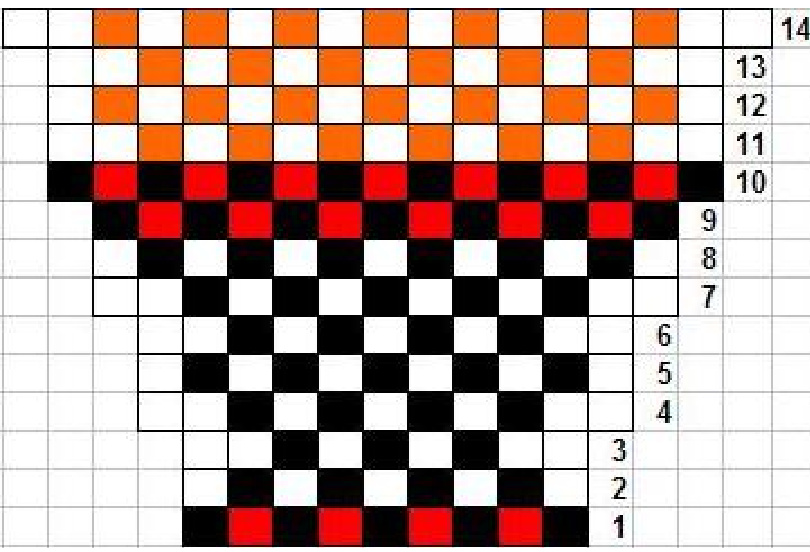
Rounds 1 & 2: K around Round 3 (increase round): K to marker, sm, M1L, K to marker, M1R, sm, K to end. Repeat these 3 rounds twice, then knit two more rounds. You'll have 7 total thumb gusset stitches. COLOR CHART (RightHand) You will now start working the color chart. Beginning with Round 1 of the Right Hand chart, work across the red/black alternating stitches to the purple line in the center of the chart. The purple line marks the thumb gusset stitches, and you'll want to reference the thumb gusset chart for this section. Round 1 of the thumb gusset chart is an increase round, so, sm, M1L with the black yarn, work across the next 7 stitches alternating red and black, M1R with the black yarn, sm, then reference the main chart again to finish the round. Continue working in this manner, working across the back of the hand on the main chart, referencing the thumb gusset chart when you get to the purple line, and going back to the main chart to finish the palm side. You'll see that Rounds 4, 7, 10, and 14 are increase rounds. Work your M1 stitches in the colors indicated on the chart. Round 15: Work the chart as indicated for the back of the hand up to the thumb gusset stitches. Slip the 17 thumb stitches to a piece of scrap yarn, and use the backwards loop method to cast-on one stitch (in white) over the gap. Continuewith therestof theround to theend. HAND Continue working around and around as indicated on the chart. Here are a few pointers - , To leave yourself with fewer ends to weave in, you don't need to ever break the cream yarn. There are only two-round sections where you won't use it, and you can easily float that color on the back of the work. There are a couple of rows in the orange/cream section where you have long strings of orange or white stitches (7 or 8). You never really want to float an unused color more than 4 stitches or so on the back of the work. To secure the orange color across these white stitches, twist the orange and white working yarns together at the back of the work to "grab" the orange yarn in the middle of these 7 stitches. The orange will be secured, and will not show on the front of the work. Since you're using double-pointed needles, watch your floats between the needle gaps. It's easy to get goofy tension here. I usually wrap my working yarns to "grab" the float color (as described above) when I'm going from one needle to the next, even if it's only a 2- or 3-stitch float. Once you have finished the last round of the chart, begin working in cream again until mitten reaches the top of your little finger, or about $1.5^{\prime\prime}$ shorter than total desired length. HANDSHAPING Setup Round: K 22, k2tog, K to last two stitches, k2tog. 44 stitches total Round 1: $^{\ast}\mathsf{K}\,9.$ , k2tog\*, repeat around. (40 sts) Round 2 and all even numbered rows: Knit Round 3: $\ast_{\mathsf{K}}$ 8, k2tog\*, repeat around. (36 sts) Round 5: $\ast_{\mathsf{K}}$ 7, k2tog\*, repeat around. (32 sts) Round 7: $\ast\mathsf{K}\,6.$ , k2tog\*, repeat around. (28 sts) Round 9: $^{*}\mathsf{K}\;\mathsf{5}$ , k2tog\*, repeat around. (24 sts) Round 11: $*_{\mathsf{K}}$ 4, k2tog\*, repeat around. (20 sts) Round 13: $^{*}\mathsf{K}\,3$ ,k2tog\*, repeat around. (16 sts) Arrange these last 16 stitches on two needles, and use Kitchener stitch to graft together.
THUMB
Slip the held 17 thumb stitches from the piece of scrap yarn onto 3 needles. Using cream yarn, knit around, picking up one extra stitch at the backwards loop cast-on. 18 stitches total. Knit around until thumb measures about $\%$ inch shorter than total desired length.
THUMB SHAPING
Round 1: \*K2tog, $\mathsf{K}\,4^{*}$ ,repeat around. (15 sts) Round 2 and all even numbered rows: Knit Round 3: \*K2tog, $\mathsf{K}\,3^{\ast}$ , repeat around (12 sts) Round 5: \*K2tog, $\kappa\geq*$ , repeat around (9 sts) Round 7: \*K2tog, $\mathsf{K}\perp^{\ast}$ , repeat around (6 sts) Break yarn, and use your tapestry needle to thread the tail through the remaining 6 stitches.
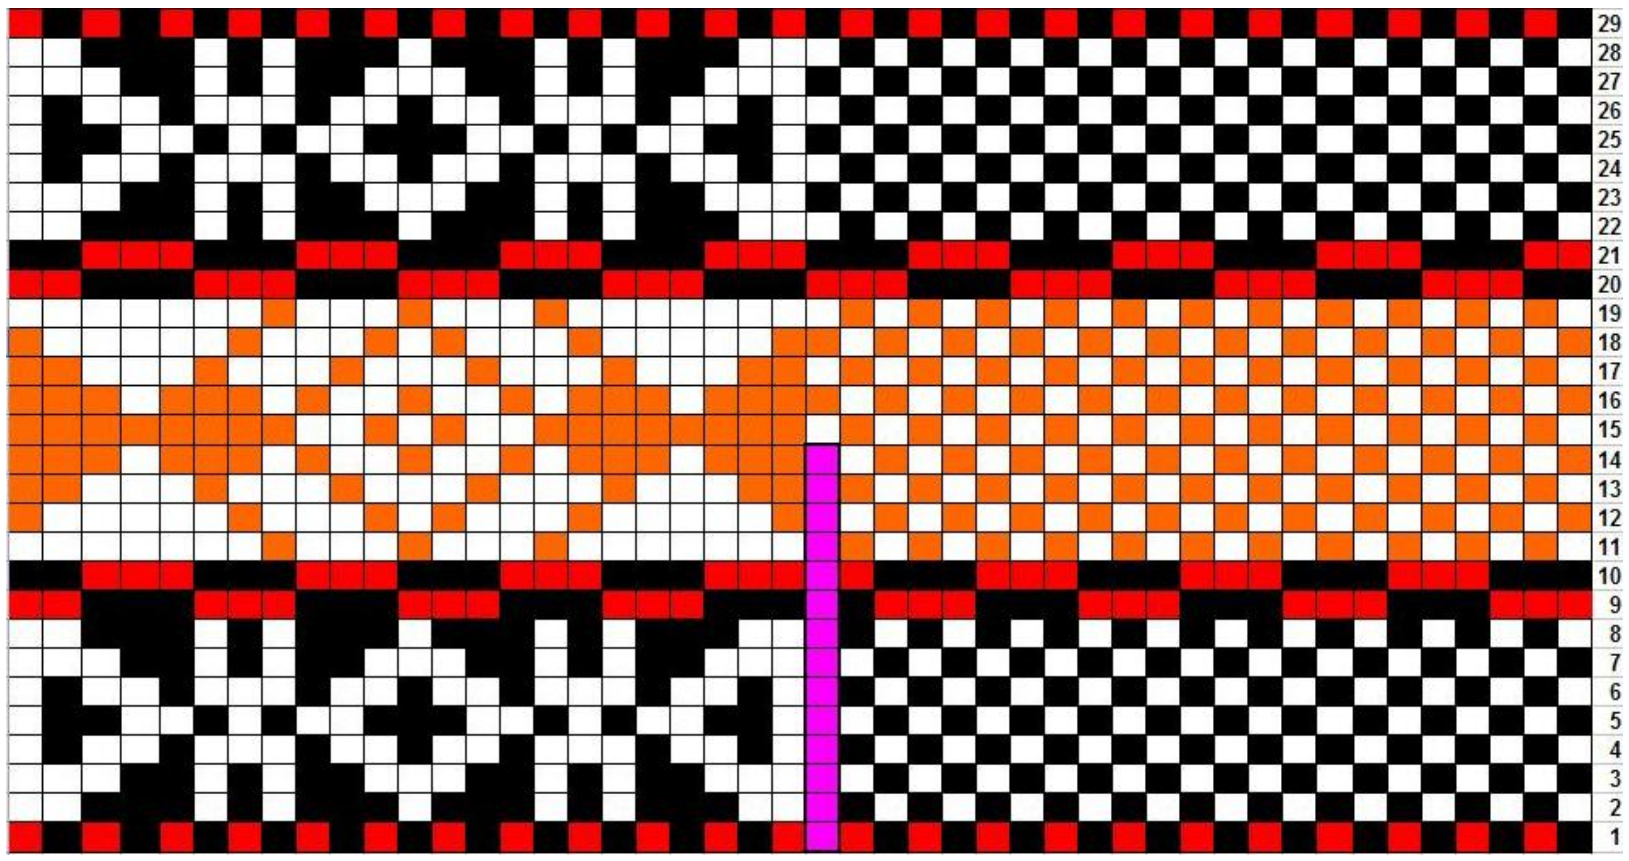
LEFT HAND
Work the left hand as you did for the right with these two differences: ● On the setup round for the thumb gusset stitches, place your first marker after 22 stitches, not 23. ·Work the color chart for the left hand.
Finishing
Weave in all of the ends, and use the tail at the base of the thumb to close up any gaps there. Since you're working with multiple colors that may or may not be colorfast, I recommend giving your gloves a vinegar bath to set the colors,asfollows: Fill the sink with cold water, and add about a cup of plain, white vinegar. Soak the gloves for ten minutes or more to help set the dyes. Drain sink and rinse the gloves, and proceed with blocking in wool wash as usual. Now you can go pour yourself a vodka gimlet. Note: The Thumb Gusset Chart is the same for both hands, but I've put below each hand chart, to save you the trouble of flipping back and forth through pages.
Right Hand Chart
Thumb Gusset Chart

Thumb Gusset Chart
Visit www.verypink.com for more patterns, knitting technique videos, and full video tutorials including: Learn to Knit Socks, Learn to Knit Toe-Up Socks, Learn to Knit a Raglan Sweater, and many more. Copyright 2010, Staci Perry. This pattern and pictures are the property of Staci Perry. All rights reserved. Pattern is available for personal use only. No unauthorized reproduction, in whole or in part, or distribution of this pattern or content, including text or pictures is allowed. No commercial reproduction of garments from this pattern is allowed without prior permission from Staci Perry.


