Nae is a reversible shawl knit from side to side. Its simple and clean lines show off the beauty of the yarn and stitches.

Size 64.75"(164.5cm) width (wingspan) x 20.5" (52cm) height
Needles
US 6 (4mm), 32" (80cm) circular needles
Yarn
Madelinetosh tosh merino light (420 yards / 384 meters / 100g); 1.4 skeins in colorway Calligraphy 588 yards / 538 meters / 140g
Gauge
St st, 24 sts × 31 rows = 4"(10cm)
Notions
2 st markers in diff colors, tapestry needle, blocking aides
Abbreviations
| CO cast on | WS | wrong side | |
| BO | bind off | PM | place marker |
| st(s) stitch(es) | SM | slip marker | |
| k | knit | ktbl | knit through back loop |
| p | μnd | k2togtbl knit 2 together through back loop | |
| st st stockinette stitch | |||
| YO | yarn over asif | ptbl | purl through back loop |
| to k | p2togtblpurl 2 together through | ||
| RS | right side | back loop |
NOTES
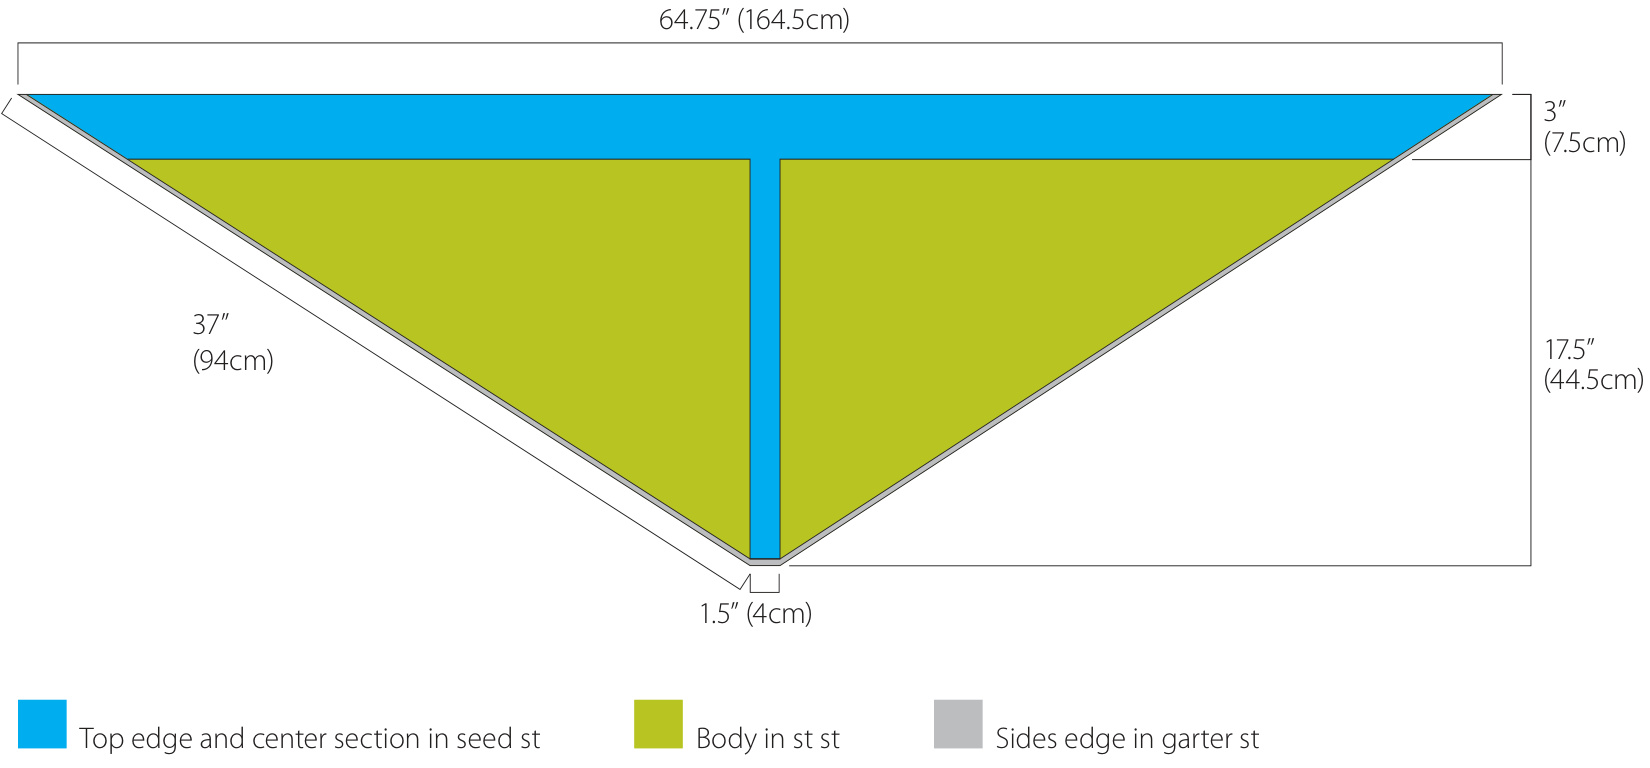
The color of the yarn reminds me of the cherry blossom in Kyoto, especially the beautiful Philosopher's path (Tetsugaku no michi) Nae means seedlings in Japanese. Nae is a shawl that is knit from side to side, consisting of four sections. The top edge and center section are in seed stitch. The main body is in stockinette stitch. The side edges are in garter stitch. The shawl is started on a corner and is knit by increasing 1 stitch on every right side row. Once the desired width and height is established, decreases are made on every right side row until the opposite corner is reached. The height and width on Nae can be easily adjusted by increasing (or decreasing) the number of stitches in the body of the shawl. The shawl is reversible, you can wear it with stockinette stitches or reversed stockinette stitches showing. Stockinette stitches create lines parallel to the top seed stitch edge, and reversed stockinette stitches create lines that are parallel to the center seed stitch section. Nae's simple and clean lines show off the beauty of the yarn and stitches. CO 4 sts. TOP + SIDE EDGES SECTION Edges row 1 (RS): k2, PM, YO, k1, p1 Edges row 2 (WS): p1, k1, ptbl, SM, k2 Edges row 3: k2, SM, YO, p1 (k1, p1) to end Edges row 4: p1, (k1, p1) to 1 st before marker, ktbl, SM, k2 Edges row 5: k2, SM, YO, (k1, p1) to end Edges row 6: (p1, k1) to 1 st before marker, ptbl, SM, k2 Repeat Edges row 3-6 (finishing with row 4) until there are 20 sts in seed st edge section. Next row is RS row.
BODY SECTION
Work Edges row 5, 1 more time. Next row is WS row. (p1, k1) all sts to 1 st before marker, PM in diff color, ptbl, SM, k2 Body row 1 (RS): k2, SM, YO, k all sts to marker, SM, (k1, p1) all sts to endofrow Body row 2 (WS): (p1, k1) all sts to marker, SM, p all sts to 1 st before marker, ptbl, SM, k2 Repeat Body rows 1-2 until there are 100 sts in body st st section. Next row is RS row.
CENTER SECTION
Center row 1 (RS): k2, SM, (k1, p1) to end Center row 2 (WS): (p1, k1) to 2nd marker, SM, k2 Repeat Center rows 1-2, 6 more times. Next row is RS row. Center row 3: k2, SM, k to marker, SM, (k1, p1) to end Center row 4: (p1, k1) to marker, SM, p all sts to marker, SM, k2 Next row is RS row. Body row 1 (RS): k2, SM, k2togtbl, k to marker, SM, (k1, p1) to end Body row 2 (WS): (p1, k1) to marker, SM, p to marker, SM, k2 Repeat Body rows 1-2 until you have 1 st in Body section. Next row isRS row.
TOP + SIDES EDGES SECTION
Edges row 1 (RS): k2, SM, k 1 st from Body section (remove marker) and 1 st from Edge seed st section together tbl, p1, (k1, p1) to end Edges row 2 (WS): (p1, k1) to marker, SM, k2 Edges row 3: k2, SM, p2togtbl, (k1, p1) to end Edges row 4: p1, (k1, p1) to marker, SM, k2 Edges row 5: k2, SM, k2togtbl, p1 (k1, p1) to end Edges row 6: (p1, k1) to marker, SM, k2 Repeat Edges row 3-6 until there are 4 sts on the needle. BO all sts on RS.
FINAL MEASUREMENTS Block and enjoy.


