Edinburgh Hat and Bowl Designed By Noelle Stiles
Photos
Description
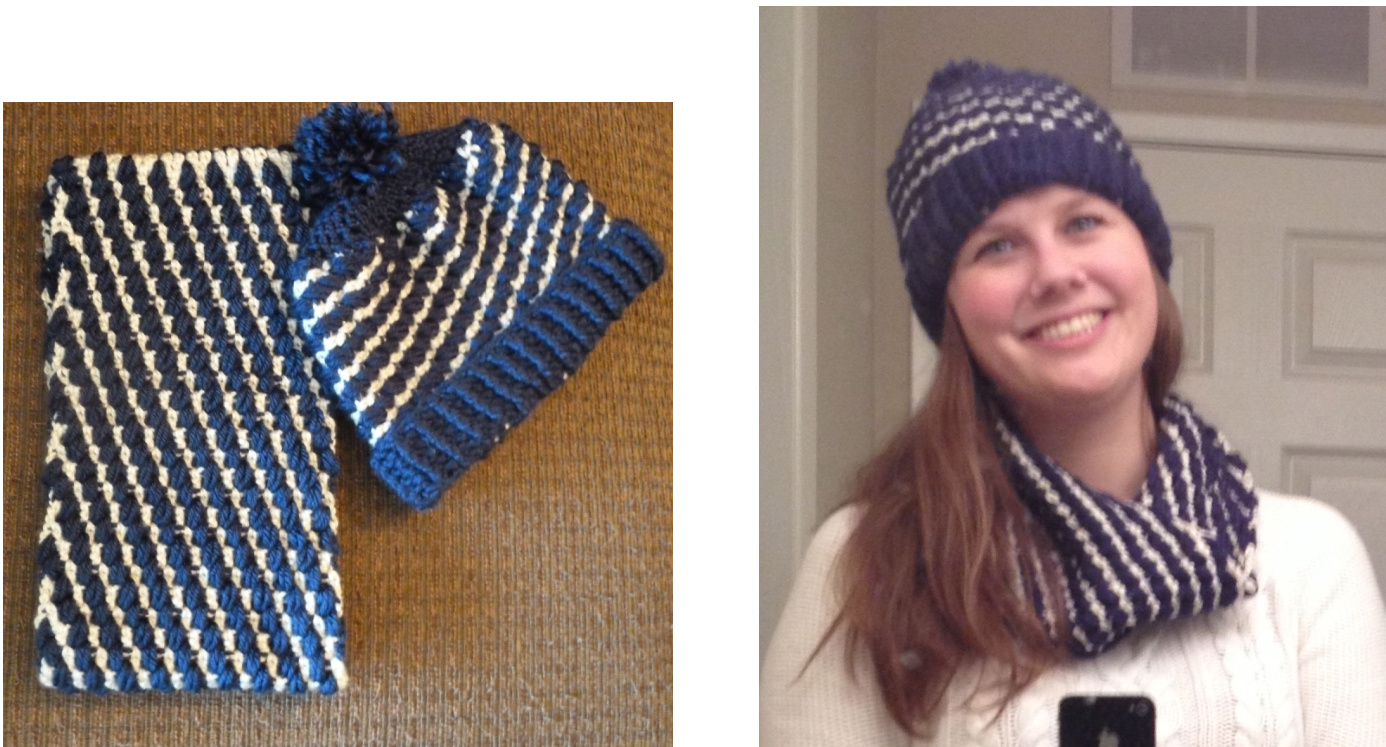
This cowl and hat pattern uses diagonal lines of puff stitches to add sophistication and elegance to the design. The bold color contrasts of cream and navy have a nuanced nautical feeling, and warmth to fight off the cool ocean breezes.
Materials
Red Heart Soft Yarn, Color 1: Navy, Color 2: Off White (2 skeins).
Supplies
6 mm Crochet Hook Cowl and Hat Dimensions: Cowl: 13 inches by 6.5 inches (26 inch circumference) Women's Hat: 8.5 inches by 6.5 inches Note: The pattern is one size, however you can change the size be increasing (larger size) or reducing (smaller size) the number of stitches in the hat body instructions. To get a sense for size, the length of the hat body should be equal to the circumference of the head. Gage: 8 dc are 2.5 inches wide and 0.5 inches tall
Abbreviations and Terminology Single Crochet (sc)
Double Crochet (dc) Puff Stitch (ps): [Yarn over, insert your hook into the gap between stitches, yarn over, pull up a loop]. Repeat the [] two times. Yarn over and pull through all 7 loops on your hook. Yarn over and pull through to secure the stitch. Double Crochet Front Post-Stitch (FPS): Yarn over, insert hook around next stitch (insert from front to back, and then back to front), yarn over, and pull through, yarn over, pull the first loop under the second, and discard 1 loop, yarn over, pull the first loop under the second and third and discard 2 loops, yarn over, pull the first loop under the second and third and discard 2 loops Double Crochet Back Post-Stitch (BPS): Yarn over, insert hook around next stitch (insert from back to front, and then front to back), yarn over, and pull through, yarn over, pull the first loop under the second, and discard 1 loop, yarn over, pull the first loop under the second and third and discard 2 loops, yarn over, pull the first loop under the second and third and discard 2 loops Sc joining stitch: Insert hook in next stitch, yarn over, and pull through, insert hook in next stitch, yarn over, and pull through, yarn over, pull the first loop under the second, and discard 1 loop, yarn over, pull the first loop under the second and third and discard 2 loops.
Scarf Pattern:
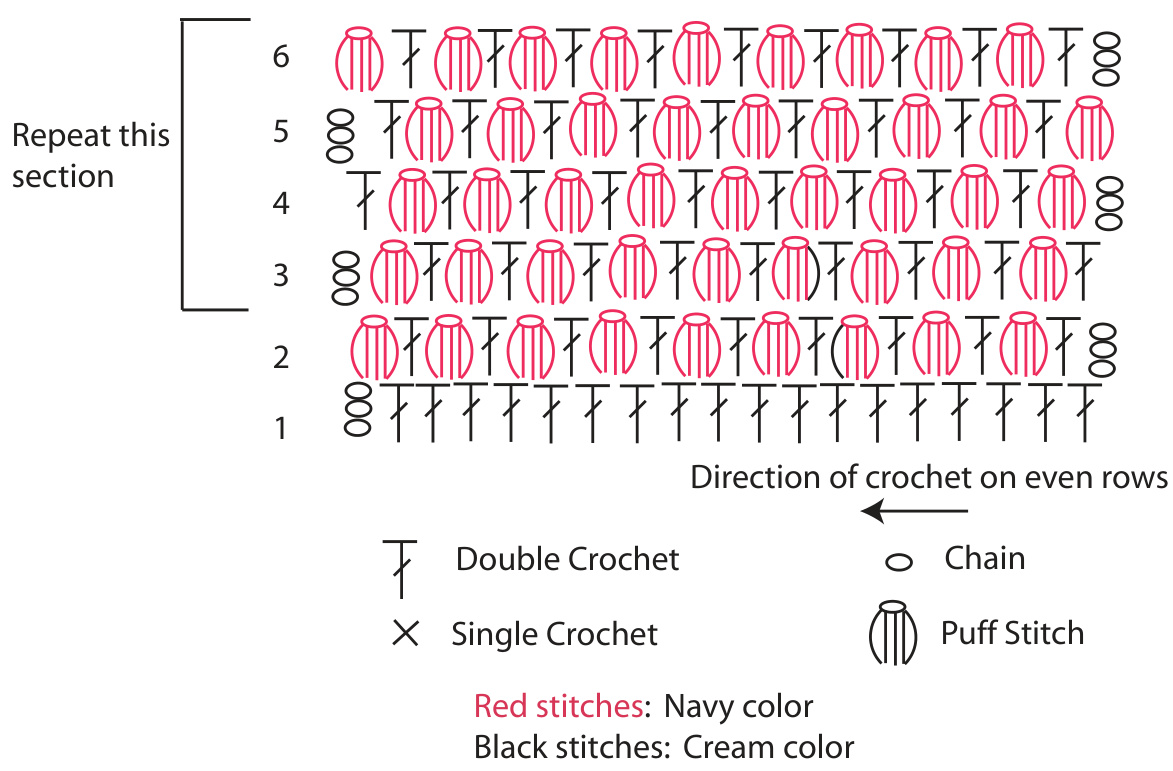
Cowl Diagram:
Hat Diagram:
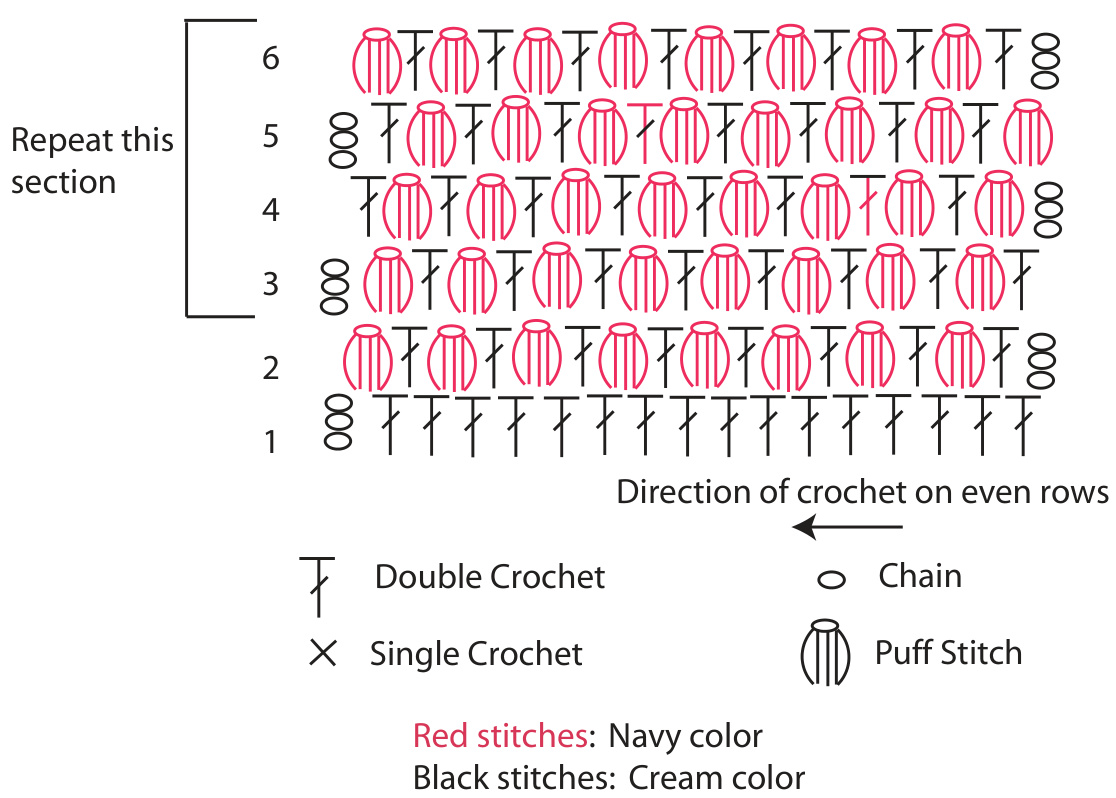
Diagram Instructions:
Cowl: Repeat row 3-6 twelve times or until the cowl is the desired length. Join the edges of the cowl with either a crochet joining stitch or a sewed seam (joining stitch is better at making the seam less apparent). Hat: Repeat rows 3-6 nine times or until length can fit comfortably around the head of the recipient. Join the edges of the rectangle with either a crochet joining stitch or a sewed seam joining stitch is better at making the seam less apparent). Then follow the written instructions starting on Hat top, round 1.
Cowl Written Instructions:
Note: The cowl and hat require switching back and forth between navy and cream yarn. The best way I have found to do this is to attach both yarns to the work, and drop and pick up each color as I progress. I find that on the subsequent row, the stretches of carried yarn (i.e. the yarn not used in the current stitch) are covered (or crocheted over) by the stitches in that next row. To switch yarns from stitch to stitch, I simply yarn over with the new yarn color, and continue to work in that new color until I need to switch again. There are great tips online for colorwork for beginners, I recommend searching for “crochet colorwork" in Google and reading a few helpful hints. For the cowl, all dc stitches are in the cream yarn and the ps stitches are made in the navy yarn. The chain at the end of the rows are made in the cream yarn. Row 1: Chain 21 (including starting loop), dc in the forth chain from hook, and dc across (18 dc, 1 chain) Row 2: Chain 3, turn, [dc, ps]. Repeat [] eight times. Row 3: Chain 3, turn, [ps, dc]. Repeat [] eight times. Row 4: Chain 3, turn, [ps, dc]. Repeat [] eight times. Row 5: Chain 3, turn, [dc, ps]. Repeat [] eight times. Row 6: Chain 3, turn, [dc, ps]. Repeat [] eight times. Rows 7- Row 54: Repeat row 3-6 twelve times or until the cowl is the desired length. Join the edges of the cowl with either a crochet joining stitch or a sewed seam joining stitch is better at making the seam less apparent).
Hat Written Instructions:
For the hat body, all dc stitches are in the cream yarn and the ps stitches are made in the navy yarn. The chain at the end of the rows are made in the cream yarn. Row 1: Chain 19 (including starting loop), dc in the forth chain from hook, and dc across (16 dc, 1 chain) Row 2: Chain 3, turn, [dc, ps]. Repeat [] seven times. Row 3: Chain 3, turn, [ps, dc]. Repeat [] seven times. Row 4: Chain 3, turn, [ps, dc]. Repeat [] seven times. Row 5: Chain 3, turn, [dc, ps]. Repeat [] seven times. Row 6: Chain 3, turn, [dc, ps]. Repeat [] seven times. Rows 7- Row 42: Repeat rows 3-6 nine times or until length can fit comfortably around the head of the recipient. Join the edges of the rectangle with either a crochet joining stitch or a sewed seam joining stitch is better at making the seam less apparent). Hat Top: All stitches on the hat top are made in the navy yarn. Attach the navy yarn to one side of the hat body after joining the edges of the rectangle. This top part of the hat will decrease the number of stitches until it forms a small bowl for the top of the hat. Round 1: In Navy yarn, join the yarn on one side of the hat body. Chain 2, and crochet sc evenly around the edge (41 sc). Slip stitch with the chain. Round 2: Chain 2, turn, [sc, sc, sc, sc joining stitch]. Repeat [] around the hat circumference. Slip stitch with the chain. Round 3: Chain 2, turn, sc around the edge and slip stitch with the chain. Round 4: Chain 2, turn, [sc, sc, sc, sc joining stitch]. Repeat [] around the hat circumference. Slip stitch with the chain. Round 5: Chain 2, turn, [sc, sc joining stitch]. Repeat [] around the hat circumference. Slip stitch with the chain. Round 6: Chain 2, turn sc joining stitch around the edge and slip stitch with the chain.
Hat Edging:
Attach the navy yarn to the side of the hat body that is opposite to the hat top. On this side you will crochet the ribbed edging for the hat bottom. All stitches on the hat edging are made in the navy yarn. Round 1: In Navy yarn, join the yarn at the bottom of the hat. Chain 3, dc evenly around the bottom of the hat. Slip stitch with the chain. Round 2: Chain 3, moving in the same direction as round 1, [FPS, BPS] repeat around the hat, end with a FPS (the chain represents a BPS). Slip stitch with chain. Round 3 - 6: Repeat Round 2 four times or until the border is the desired length. Tie off. Flip this edging upward so that it bends upward and folds snugly around the hat edge (see image on page 1). Note: Do not roll the edging, it is only folded once upward not rolled multiple times.
Hat Pompom:
As a final touch either make (with the navy yarn) or purchase a pompom and attach it to the top of the hat. Pompom tutorials, and makers can be found easily online (search for "Pom Pom tutorials" in Google). I recommend viewing a few of these. I usually make a pompom with a cut out piece of cardboard in a rectangular shape with a cut-out center to allow for tying the strandstogether. If you prefer the fur look, you can buy a faux fur Pompom in off white or black. These can purchased online at Joann's fabric, Amazon, and other websites at 4 to 10 dollars each (search for "faux fur Pom Pom" in Google). Weave in any loose yarn ends.


