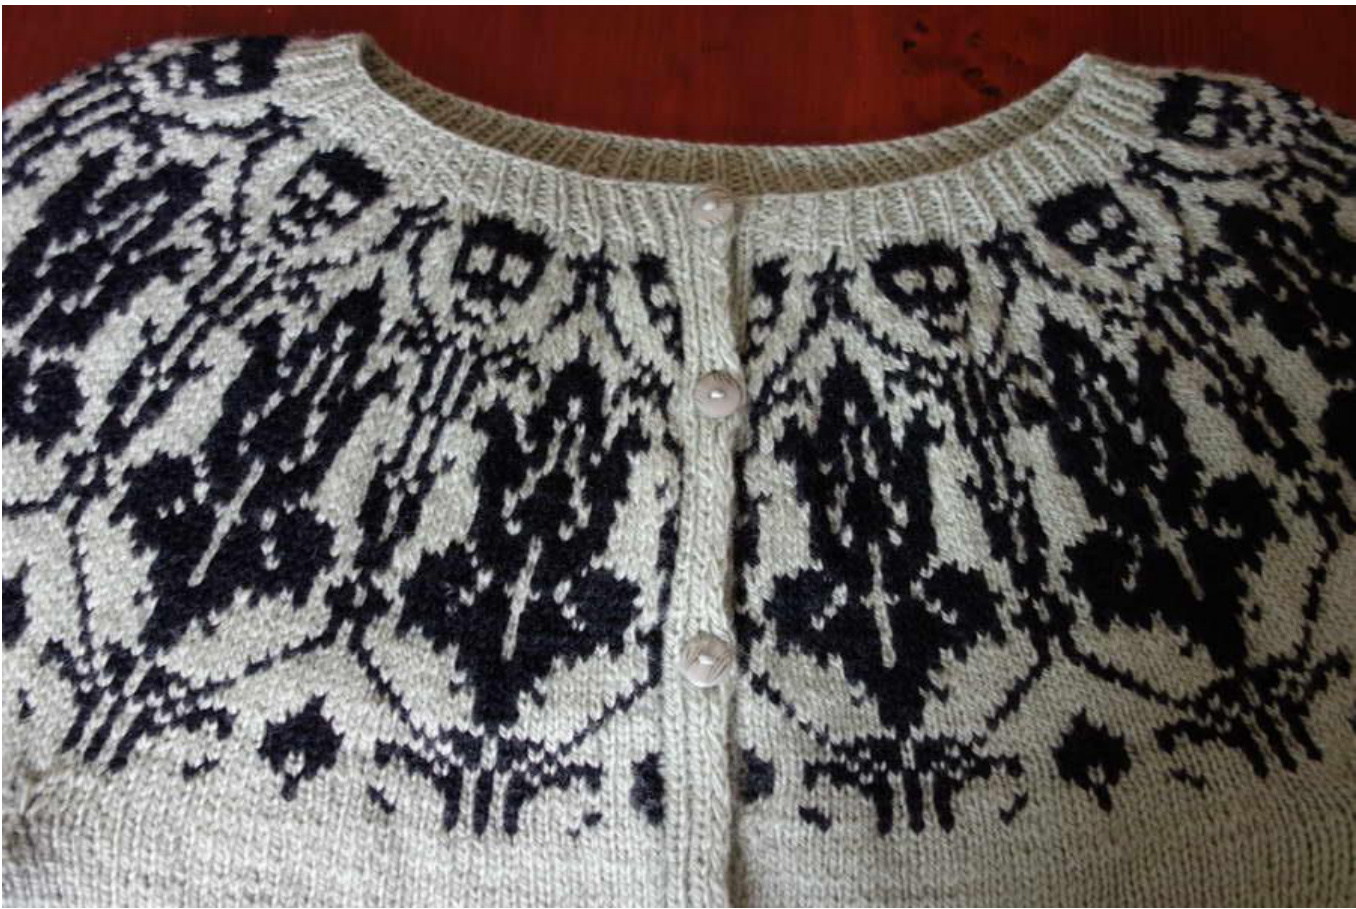
#Sherlocklives Cardi by Professor Fonz PLEASE NOTE: ALL MY PATTERNS ARE INTENDED FOR PRIVATE USE ONLY. I'd appreciate it if you didn't make them up for sale or otherwise profit from them. Thank you! Sherlock Lives! Let's celebrate with a lightweight 4-ply organic merino cardi embellished with my variation of the superb The Wallpaper Had It Coming Again design by Morgen Dammerung. The tiny Moriarty skulls add a touch of morbidity, and the secret message embroidered on the sleeve identifies the wearer as a proud member of The Empty Hearse. First, a warning: this is definitely not a beginner's knit. The fronts and back are cast on as one piece and worked together back and forth up until the armpits, with integrated button band and a purled line indicating a mock seam along each side (to help with shaping). The body is shaped by decreases, increases and short rows. The sleeves are worked in the round and combined with the body; the yoke is then knitted back and forth with integrated button band. The resulting garment is practically seamless. Wallpaper and skull motifs worked in fair-isle techniques. Secret message embroidered in yarn.
Materials:
4 skeins of Skeinz Organic Merino 5 ply in Maju Green 2 skeins of Skeinz Merino 4 ply in Soft Black 8 small buttons 3.25 mm needles - I used a circular 60 cm needle A set of 4 3.25 mm DPNs Stitch holders, safety pins, markers etc. Gauge: 24 x 36 sts to 10 x 10 cm on 3.25 needles with Skeinz Organic Merino 5 ply (NB: I am a particularly loose knitter, so check your gauge carefully). Size: Women's M, which is to say my own measurements. Length 51 cm, sleeve length from neck 50 cm, from armpit 28 cm. Fits hips 94-6cm, waist 75 cm, chest 94-6 cm. This is a wellfitted garment that is close to the body. Size can be somewhat adjusted with increases/decreases in the body; if you want to change the size considerably, you'll need to adjust it by a multiple of 24 sts in the yoke, to account for the pattern. I designed the cardi in a retro cropped, fitted style reminiscent of the 1950s; if you'd like something more casual, you can make it looser and/or longer. OK, here we go. The game is... something.
BODY.
Knitted back and forth on a circular needle up to the armpits. Integrated button band is knitted as part of the body. IMPORTANT: Buttonholes need to be worked into the design approx. every 6 cm. With 3.25 mm circular needle and sage green, CO187sts. Turn. Rib set-up: Row 1 (RS): (K1, P1) until last s, K1 Row 2 (WS): Sl 1 purlwise, (K1, P1) Row 3 (RS): S1 1 knitwise, (P1, K1) Buttonhole set-up: Row 4 (WS): Sl1 purlwise, K1, P2tog, yo, work as established Row 5 (RS): Work as established. Important: Make 7 more buttonholes in the same way every 6 cm or so (it was about 18 rows in between buttonholes for me, with the last one 16 rows from the previous one, which was OK, but it might work differently for you). Continue in rib until band measures 4 cm Body set-up: Row 1 (RS): Work 6 sts button band ( Sl 1 knitwise, P1, K1, P1, K1, P1), K42, (pm) P1 mock seam, K89, (pm) P1 mock seam, K 42, work 6 sts button band (P1, K1, P1, K1, P1, K1) Row 2 (WS): Work 6 sts button band (S1 1 purlwise, K1, P1, K1, P1, K1), P42, K1 mock seam, P89, K1 mock seam, P42, work 6 sts button band (K1, P1, K1, P1, K1, P1) Continue as established for another 8 rows without shaping Next row (RS): Decrease row: Work as established until 2 sts before first marker, K2tog, sl marker, P1, SSK, K until 2 sts before second marker, K2tog, sl marker, P1, SSK, work as established until end of row (4 sts decreased in total = 183 sts) cat dec row twice more every 8"h row (7 rows straight between decreases = 175 sts) Next row (WS): work as established Next row (RS): Short row: Work as established until 3 sts before second marker, W&T, P until 3 sts before first marker, W&T, work rest of row as established, remembering to pick up and knit the wrap with the wrapped stitch. Next row (WS): Work as established, remembering to pick up and purl the wrap with the wrapped stitch. Continue as established for 5 rows without shaping Next row (RS): Increase row: Work as established until first marker, m1, sl marker, P1, m1, K until second marker, m1, sl marker, P1, m1, work the rest of the row as established (4 sts increased in total = 179) at inc row three times more every 8" row (7 rows straight between increases = 19 Continue as established for 5 rows without shaping Next row (RS): Short row (work as per previous short row instructions) Next row (WS): Work as established, remembering to pick up and purl the wrap with the wrapped stitch. Next row (RS): Bust increase row: Work as established until first marker, m1, sl marker, work as established until second marker, sl marker, m1, work the rest of row as established (2 sts increased in total = 193 sts) Repeat bust increase once more every 8"h row (7 rows straight between increases = 195 sts) Next row (WS): work as established Next row (RS): Short row (work as per previous short row instructions) Next row (WS): Work as established, remembering to pick up and purl the wrap with the wrapped stitch Body should measure 28 cm from CO at this point. If it doesn't, work until it does without further shaping. Next row (RS): Divide for back/fronts: Remove markers. Work 6 sts button band, K 40 sts, BO 10 sts, k 83 sts, BO 10 sts, K 40 sts, work 6 sts button band as established. Right front Next row (WS): Work as established until the BO Next row (RS): K2tog, work rest or row as established = 39 sts Next row (WS): Work as established Next row (RS): K2tog, work rest of row as established = 38 sts Next row (WS): Work as established Cul yuiu, iuuve ve vw uu u vt uUiuvi Back Reattach the yarn to the middle section of the body at right armpit edge Next row (WS): P all Next row (RS): K2tog, K until last 2 sts, K2tog = 81 sts Next row (WS): P all Next row (RS): K2tog, K until last 2 sts, K2tog = 79 sts Next row (WS): P all Cut yarn, leave live sts on a st holder Left front Reattach yarn at armpit edge Next row (WS): Work as established Next row (RS): Work as established until the last 2 sts, K2tog = 39 sts Next row (WS): Work as established Next row (RS): Work as established until the last 2 sts, K2tog = 38 sts Next row (WS): Work as established Leave live sts on needle
SLEEVES (make 2)
Rib: With 3.25 mm dpns and sage green, CO 62 sts. Arrange on 3 dpns and join in the round, making sure not to twist sts. Work 6 rds in (K1, P1) rib Rd 7: m1, (K1, P1) until end of rd, m1 = 64 sts inue in rib pattern for another 6 rds, incorporating the increased sts into the patterr Rd 14: m1, K all sts, m1 = 66 sts Next rd: Attach black yarn and start working Sleeve Chart Sleeve chart notes: Increase at the beginning and end of round (m1, work the round, m1) as indicated on chart (2 sts increase per increase rd) every 8" round 5 times = 76 sts NB: Each round is made up of SLEEVE CHART 1 + SLEEVE CHART 2. The chart was to0 complicated/long to fit into my chart maker software separately. SLEEVE CHART 1 takes you up to the mid-point of the round, and SLEEVE CHART 2 takes you the rest of the way. The pattern is symmetrical, with the middle wallpaper motif right at the centre of the round.
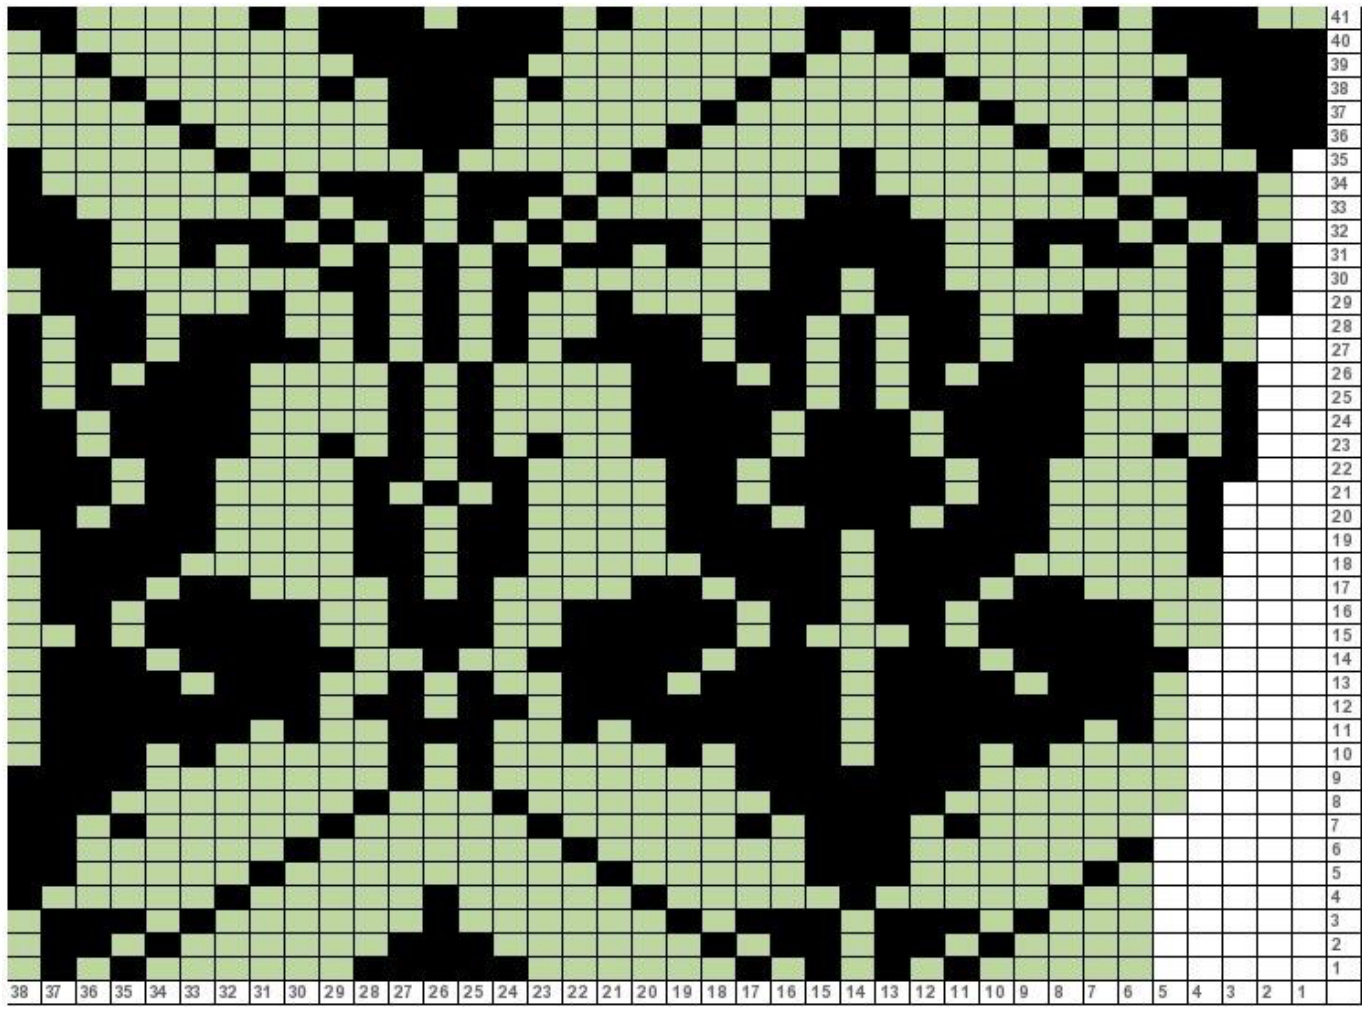
SLEEVE CHART 1
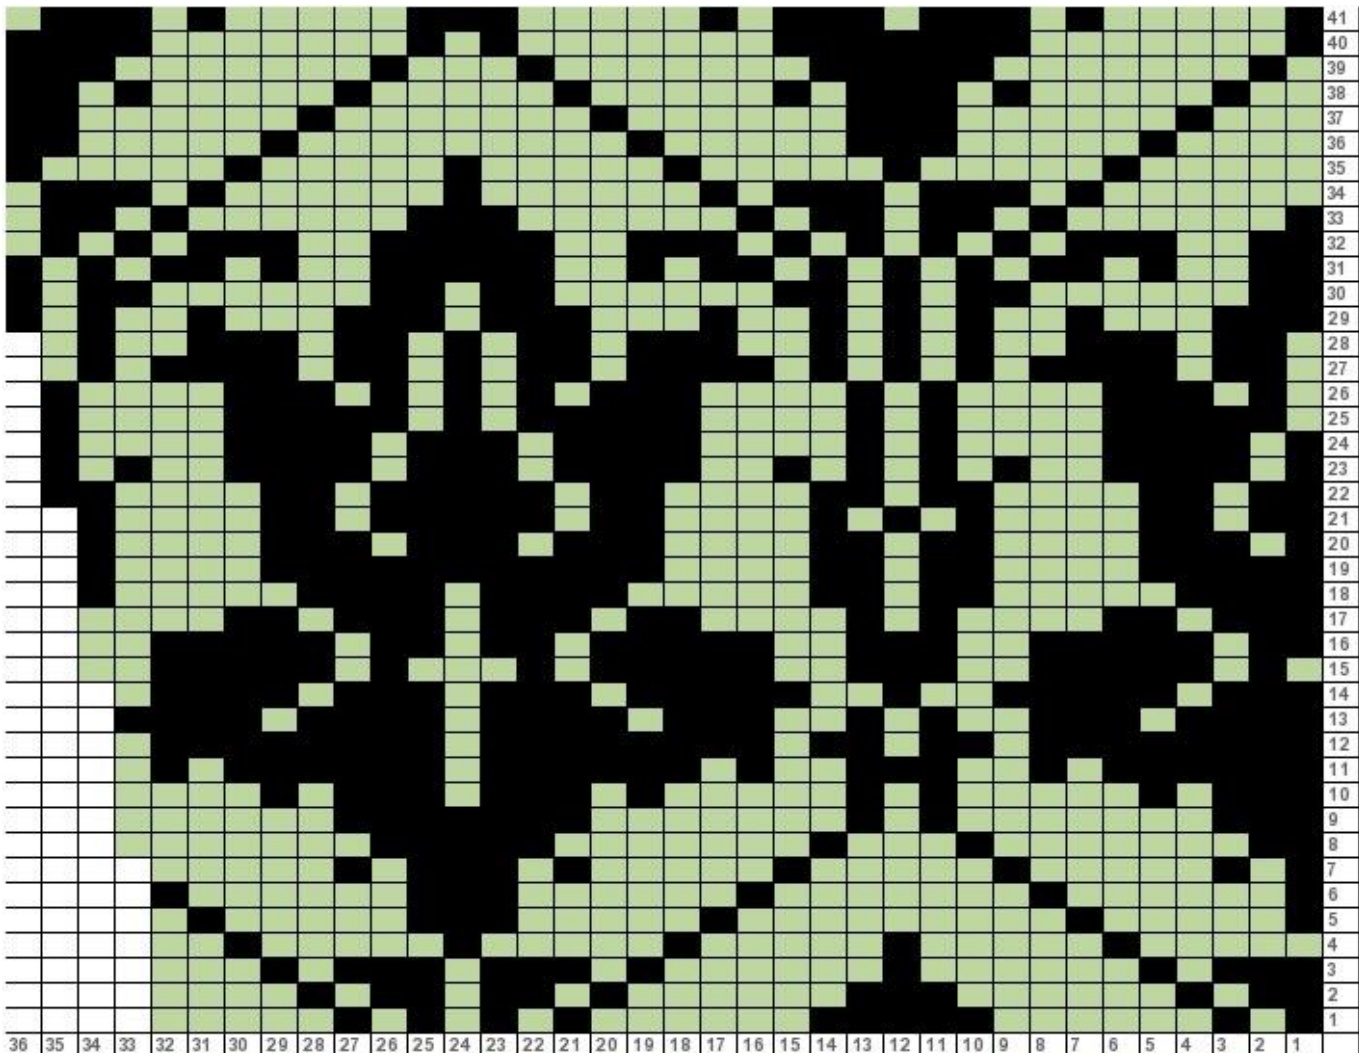
SLEEVE CHART 2
Sleeve continued:
Next rd: Cut the black yarn. K all sts in sage green = 76 sts Next rd: K1, m1, K until one st before end of rd, m1, K1 = 78 sts Continue increases every 7th rd (6 rds straight between increases) until you have 92 sts on the needle The sleeve should be about 32 cm at this stage (you can make it longer or shorter as per requirements by working fewer or more rounds in between increases).
Armpit shaping:
Next rd: K 86 sts, BO the next 10 sts Next rd: K 82 sts, turn Next row: P all sts Next row: K2tog, K to the last 2 sts, K2tog = 80 sts Next row: P all sts Next row: K2tog, K to the last 2 sts, K2tog = 78 sts Next row: P all sts Leave live sts on needle
YOKE
Yoke set up (RS): With 3.25 mm circular needle and sage green, work 6 sts button band + K 38 sts from left front + K78 sts from first sleeve + K 77 sts from the back + K 78 sts from second sleeve + K 38 sts from right front + work 6 sts buttonband = 321 sts. Next row (WS): Work 6 sts buttonband, P 309 sts increasing 2 sts evenly across , work buttonband as established = 323 sts. Next row (RS): Attach black yarn and start working Yoke Chart:

Notes on yoke chart:
1. The button band remains the same throughout - remember work the 6 button band sts in sage as established for the body at the beginning and the end of every row. Make sure you remember to put in buttonholes at appropriate spaces as well! 2. THE FIRST REPEAT of the motif starts from column 2 in order to keep the two sides of the yoke symmetrical. The yoke breaks down thus: (6 sts button band) + (23sts + 12 repeats of the 24sts motif = 311 sts)+ (6 sts button band)= 323 sts 3. Follow the chart back and forth, K on RS, P on WS. 4. Decrease sts as indicated on chart (k2tog when indicated): Row 35 - decrease 26 sts = 297 sts rem Row 37 - decrease 26 sts =271 sts rem Row 43 - decrease 26 sts = 245 sts rem Row 45 - decrease 26 sts = 219 sts rem Row 47 - decrease 52 sts = 167 sts rem Row 49 - decrease 38 sts = 129 sts rem At the end of the chart you should be left with the following: 6 buttonband sts + 117 sts + 6 buttonband sts = 129 sts Next row: Cut the black yarn. (RS) sl 1 knitwise, (P1 K1) throughout Next row: (WS): Sl 1 purlwise, (K1, P1) throughout Work 5 more rows of rib. (Note: You will need to have a buttonhole right at the top of the ribbing. I worked mine in Row 4 and 5 of the rib). BO in rib. FINISHING: Weave in all ends. Close the underarm seams. Sew on buttons. Block to measurements. Enjoy.


