The Perfect Sock by Jo Oorr
Description
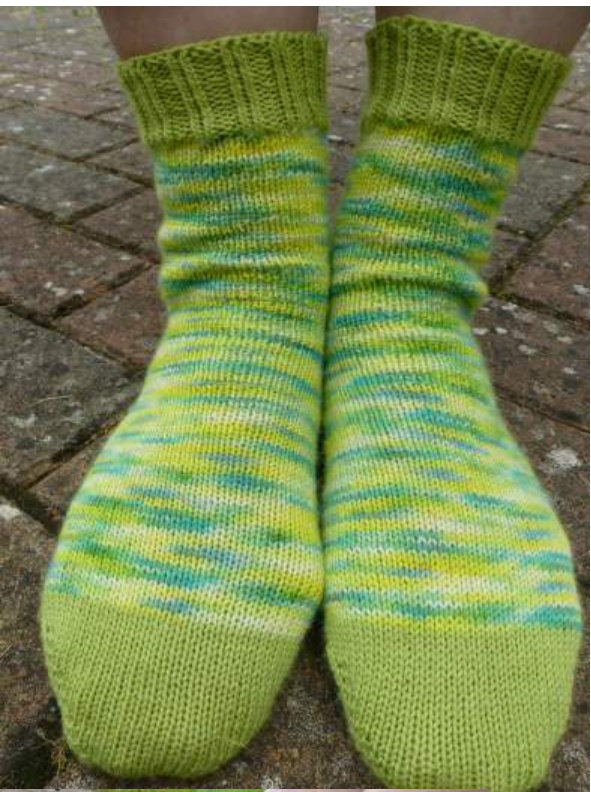
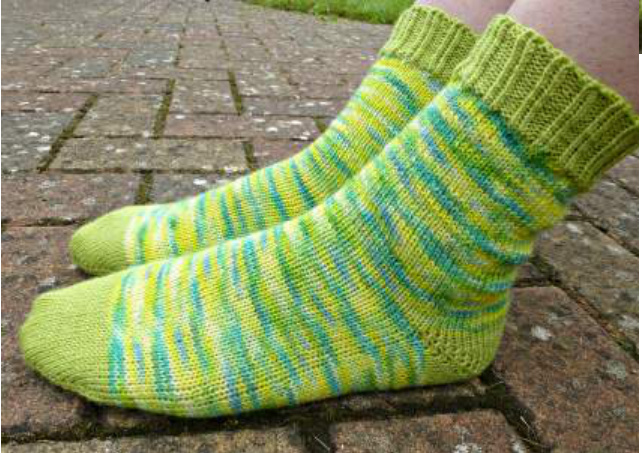
This sock combines my favourite techniques for heels, toes and cuffs and produces what I believe to be "The Perfect Sock". It is a basic toe-up sock with a short row heel, suitable for both men and women. There are detailed instructions for three sizes and instructions for how you can use this as a starting point for a smaller or larger sock. It has been written assuming you will use Magic Loop, but there is no reason why you shouldn't use dpns if you prefer. One thing to be aware of is that short row heels are not suitable for everyone - if you have a high instep you might find that this just isn't a good fit. If this is you, then I would strongly recommend that you try a sock with a gusset and heel flap, for example my Vanilla Sock with Gusset and Choice of Heel, which can be found on Ravelry, LoveKnitting or my own websitewww.jotorr.co.uk.
Techniques Used
If you are unfamilar with any of these, there are many tutorials available on the internet. Magic Loop Judy's Magic Cast On Jeni's Surprisingly Stretchy Bind Off
Sizes (approx), measured around the circumference of your mid-foot
Small 6.5"/16.5cm unstretched, 8"/20.25cm stretched Medium 8"/20.25cm unstretched, 10"/25.5cm stretched Large 9"/22.75cm unstretched, 11"/28cm stretched
Materials
100g 4ply/fingering weight sock yarn, any that gives gauge should be suitable.
Gauge
8 stitches and 11 rows per 1"/2.5cm, measured over stocking stitch in the round.
Needles and Notions
2.25mm/US 1 circular needle (or whatever size is necessary to achieve gauge), 32"/80cm Stitch markers (18, 22, 24) - preferably with no dangles - or loops made from contrasting yarn-oneremovable Tapestry needle for weaving in ends
Abbreviations
K: knit P: purl KF&B: knit into front and back of stitch PM: place marker RM: remove marker SI: slip stitch - always slip purlwise, unless otherwise instructed TBL: through back loop RS: right side WS: wrong side [. repeat instructions within parentheses
Toe
Using Judy's Magic Cast On, cast on 20 (20, 24) stitches, 10 (10, 12) on each needle. Knit all the stitches on each needle for the first round. After this increase as follows: Round 1: 1st needle: KF&B, K to 2 stitches before end of needle, KF&B, K1. 2nd needle: as first needle. Round 2: Knit all stitches with no increases. In case you're thinking that sounds lop-sided, well actually it's not. The KF&B increase creates a little bar that shows to the left of the stitch that it's worked into. This way it shows after the first stitch and before the last, so the sock toe is properly symmetrical. Repeat rounds 1 and 2 until there are 28 (32, 36) stitches on each needle, 56 (64, 72) stitches in total. For the first couple of rounds it seems to lie flat, but don't worry, give a little tug as you move from one needle to the next and it soon starts to shape itself into a recognisable toe. Once you've done a few rounds, as soon as there's enough to support it, attach the removable marker to a stitch in the "corner" at the start of your round (on the first sock if you are doing both at once). I find this is easier than putting my marker on the needle to mark the start of the round as I like to be at the end of a round when I put down my knitting so this would leave it in danger of falling off. As you have distributed the stitches across the needles, the change from one needle to the other nicely marks the start of the round so your marker doesn't need to be too precise.
Foot
Continue in stocking stitch until the desired length. Hmm, what do we mean by that? It's important to get this right if you want your socks to fit properly. Knitting at this gauge, you should begin your heel turn when the sock, measured flat, is approximately 2 (2.25, 2.5)"/5 (5.75, 6.25)cm less than the length of your foot. If in doubt, try it on and continue knitting the foot until you reach the point where your heel starts, directly below your ankle bone.
Heel Turn.
I often do short row heels because I like the look of them better and because they are a good fit for my heel. I love this way of doing short row heels because it doesn't leave any holes in the way wrap and turn can, instead just a nice neat row of little bumps. The heel turn will be worked back and forth across the sole stitches - the 28 (32, 36) stitches on the first needle (Needle 1). The stitches on Needle 2 will be put aside and worked later to form the front of the leg of the sock. If you are doing both socks together, this is one point where you will need to do them individually - first one sock then the other . When you reach the Leg section, you can go back to working them together.
Part 1 - Decreasing
Row 1 (Rs): K27 (31, 35). Turn your work so the wrong side is facing you. Row 2 (WS): PM, Sl 1, P to 1 stitch before end of row. Turn your work. Row 3: PM, Sl 1, K to 1 stitch before marker. Turn your work. Repeat rows 2 and 3 till there are 9 (11, 12) markers on each side and 10 (10, 12) centre stitches, ending after a purl row. Proceed to Part 2 - Increasing.
Part 2 - Increasing - see photo tutorial, p5
Row 1 (RS): Knit to one stitch before marker. Sl 1, RM, pick up bar (the "leg" of the stitch furthest from you) before next stitch, knit together with slipped stitch. Turn your work. Row 2: Sl 1, purl to one stitch before marker. Sl 1, RM, pick up bar before next stitch, purl together with slipped stitch. Turn your work. Row 3: Sl 1, knit to one stitch before marker. Sl 1, RM, pick up bar before next stitch, knit together with slipped stitch. Turn your work. Repeat rows 2 and 3 till all markers have been removed and all stitches are included in the row, finishing with a purl row. As you turn and begin to knit again, this is the start of the first round of the leg and you have 56 (64, 72) stitches in total, 28 (32, 36) on each of front and back of leg.
Leg
If you are working TAAT (two at a time), now is when you can go back to working both at the same time. To make sure you don't get a hole at the side, for the first stitch you knit on each needle, pick up the horizontal bar between the heel and the leg, twist it to form a loop and slip it onto the needle, then knit it together with the first true stitch on the needle. Continue the leg until it is as long as you want it. I've seen it said that the ideal length of a sock leg is the same as the length of the wearer's hand and I have to say that suits me perfectly, but really it's a matter of personal taste. Another rule of thumb that works nicely is that if you fold the sock in half at the heel, with toe to ribbing, then the length of the foot should be the same as the length of the leg. The only thing I would say is not to try to follow this pattern if you want knee length socks as you will most likely need to put in shaping for your calf which hasn't been included in these instructions.
Cuff
I like to do a 2x2 twisted rib. I think that not only is it the most stretchy, but also the twisted rib rather than a "normal" rib makes the stitches stand out more. [K2 TBL, P2] repeat to end. Repeat until cuff measures 2"/5cm or desired length. I've seen books that suggest that the number of rows should equal half the number of stitches on one needle (which in this case would be 14 (16, 18), but I think that's a bit short and prefer to do half as many again 21 (24, 27), but again it's personal choice. One thing that you might want to consider is that a longer cuff has more "memory" - in other words it is more likely to spring back to shape once it's been stretched. Bind off using Jeny's Surprisingly Stretchy Bind Off and weave in all ends. Block if desired. Enjoy, you've finished! If you have any questions about this pattern, please feel free to contact me at http://www.ravelry.com/people/JoHT or support@jotorr.co.uk.
Going It Alone
So, you've read through all that and none of those sizes are going to work for you, you need bigger or Smaller, or you prefer to knit at a different gauge, what to do? Well follow the instructions above, but work out the numbers using these instructions. Total number of stitches for foot: Work this out by measuring around your mid-foot then calculating how many stitches in your gauge it will take to knit this size. Then reduce that number by roughly 10% for negative ease to make your sock fit properly. It doesn't have to be exact, near enough is good. Aim for an even number, all these instructions are for even numbers, and if you want to do a 2x2 rib, then make it divisibleby 4. Number of stitches to cast on: Approximately 1/3 of the total stitches, distributed evenly across two needles (remember to adjust this if you're using dpns). Round this to the nearest even number. low far to knit before starting the heel: For each marker you place when turing the heel, you wil knit one row. So, divide your total number of markers by your row gauge (rows per inch). If you work in centimetres, then you will need to multiply this by 2.54. This is how long your heel turn will be. Add 0.25"/0.75cm to allow for negative ease, then subtract this number from the actual length of your foot. Start turning the heel when the foot of your sock reaches this measurement, measured from the toe. Alternatively, just try the sock on, and start the heel turn when it is level with your anklebone. nany markers each side of the heel turn: When you turn the heel, you are only working on half of the total number of stitches. You need to divide that half into as close as possible to thirds. One third will be the centre stitches, the other two thirds will be the short rows that shape the heel. So, for example, if you are knitting a 60 stitch sock - your heel will be worked over a total of 30 stitches. Divide that by 3 and you will have 10 centre stitches and 10 markers on each side.
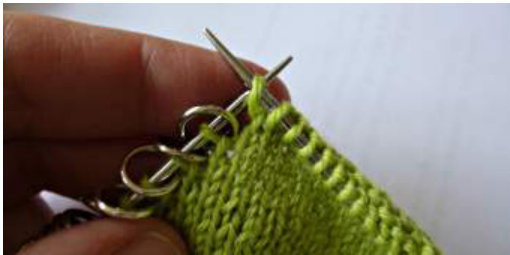
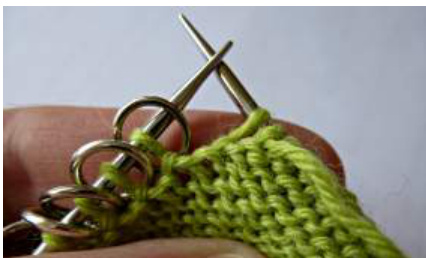
Photo Tutorial for Increases
All the markers have been placed during the decreases. Now ready to start increases.
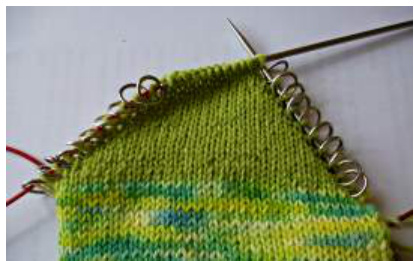
Knit Side
Knit to one stitch before marker.
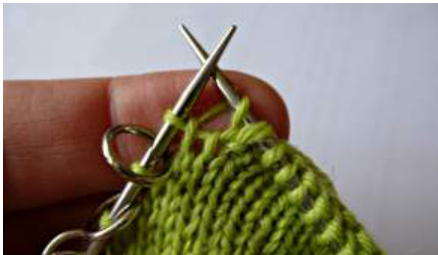
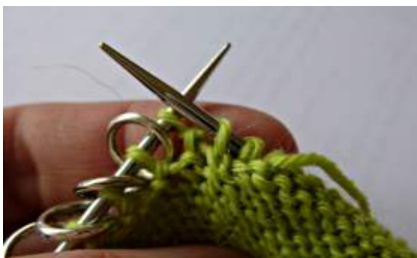
Slip next stitch
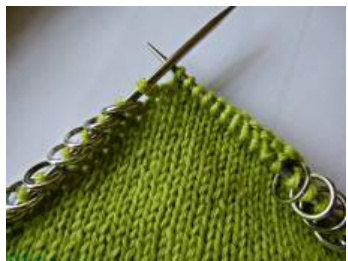
Purl Side
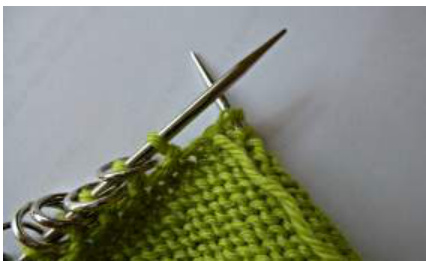
Lift bar between stitches and put onto right hand needle. Purl to one stitch before marker.
Knit bar together with previously slipped stitch, through back of stitches.
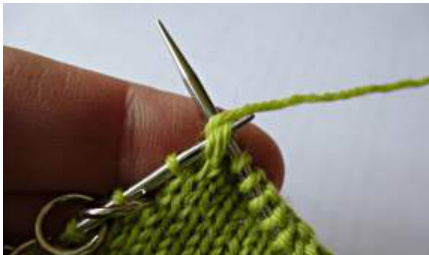
Slip next stitch.
Lift bar between stitches and put onto right hand needle.
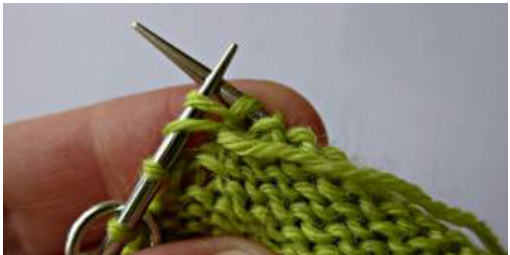
Purl bar together with previously slipped stitch.


