This pattern is not to be reproduced for profit or to be handed out for free. It is only to be copied by the owner and for the owner'suse.
Sprout Boatneck Designed by Gail Rhodes
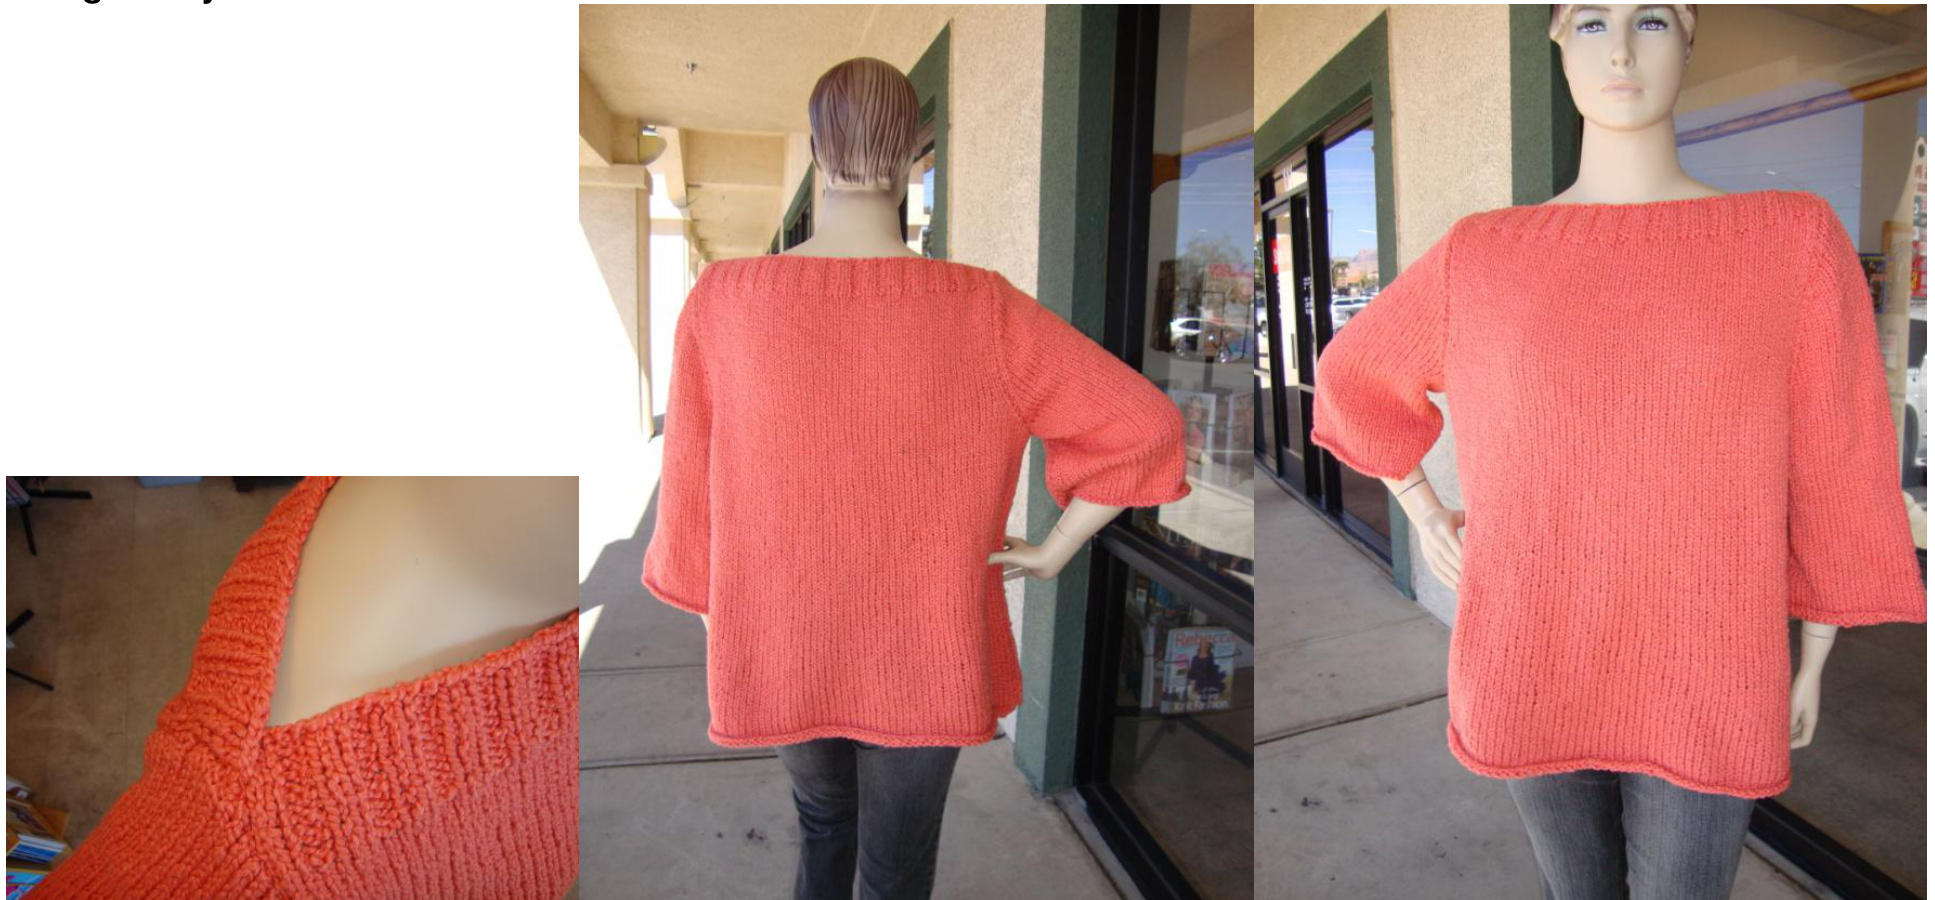
The Boatneck Pullover is made with Classic Elite Sprout, a textured, bulky 100% organic cotton yarn. The garment is A-line, which is achieved by changing the size of the needles, not the number of stitches. Because of the A-line, the fit is loose. Pick your size by your bust measurement or maybe and inch or two more. AdvancedBeginner Cast on, knit, purl, decrease, bind off 34; 37; 40 (43; 46; 49; 52) (55; 58; 61; 64)" 43-1/2; 47; 50-1/2 (54-1/2; 58; 62-1/2; 66) (69-1/2; 74; 77-1/2; 81)" 25; 25-1/2; 25-1/2 (26; 26; 26-1/2; 27) (27-1/2; 28; 28-1/2; 289- Skill Level: Specific Skills: Finished chest: Finished bottom: Length from Shoulder: 1/2) Materials: yards Classic Elite Sprout, 100% organic cotton, 100 grams, 109
Needles:
Sleeve Style: Sleeve Length: Neckline Style: Stitch Pattern: Gauge: 7; 8; 8 (9; 9; 10; 11) (12; 13; 14; 15) hanks #11 to cast on, #10-3/4 for first 6", #10-1/2 for second 7", #10 for remainder Set-in 3/4, slightly fuller at bottom Boat neck, overlap St st 14 sts and 23 rows = 4" on #10 12-1/2 sts & 21 rows = 4"on #10-1/2 11 sts & 18 rows = 4" on #10-3/4 2x2 at neck Borders/Ribbing: Note: To check gauge, cast on 18 sts on #10 needle Work st st for 27 rows. Block swatch. Measure interior 14 sts and 23 rows. If measurement is 4", you are ready to begin your project. If measurement is less than 4" you will need to re-gauge using a larger needle. If measurement is more than 4", you will need to re-gauge using a smaller needle. For most patterns, it will be OK if your row gauge is not exact, but you do have to have the stitch correct gauge. Note: Unless otherwise noted, all increases and decreases should be worked 1 or 2 sts in from the edge. This leaves a more even edge for sewing your garment together. Note: When tying on a new ball of yarn, leave at least 6", this will make it much easier toweave theends in. Definitions are given at the end of the pattern.
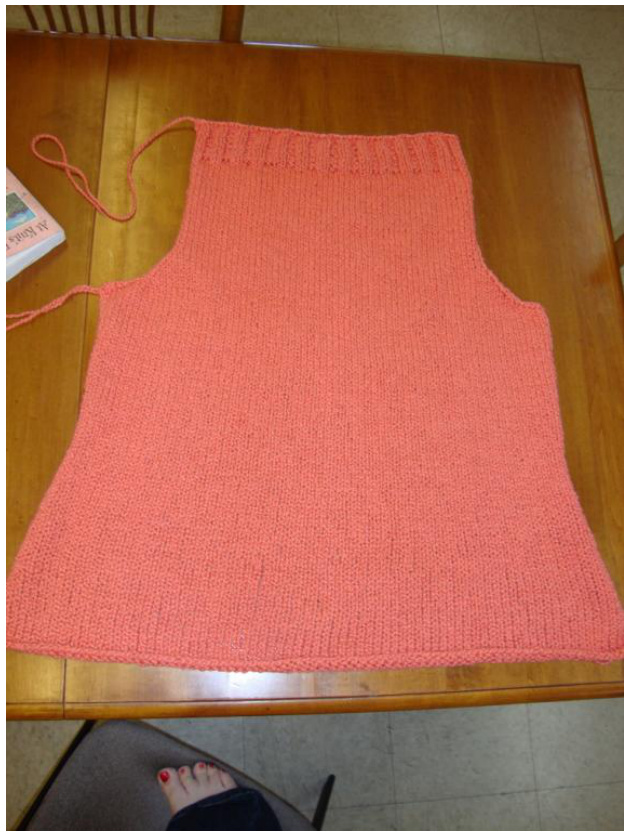
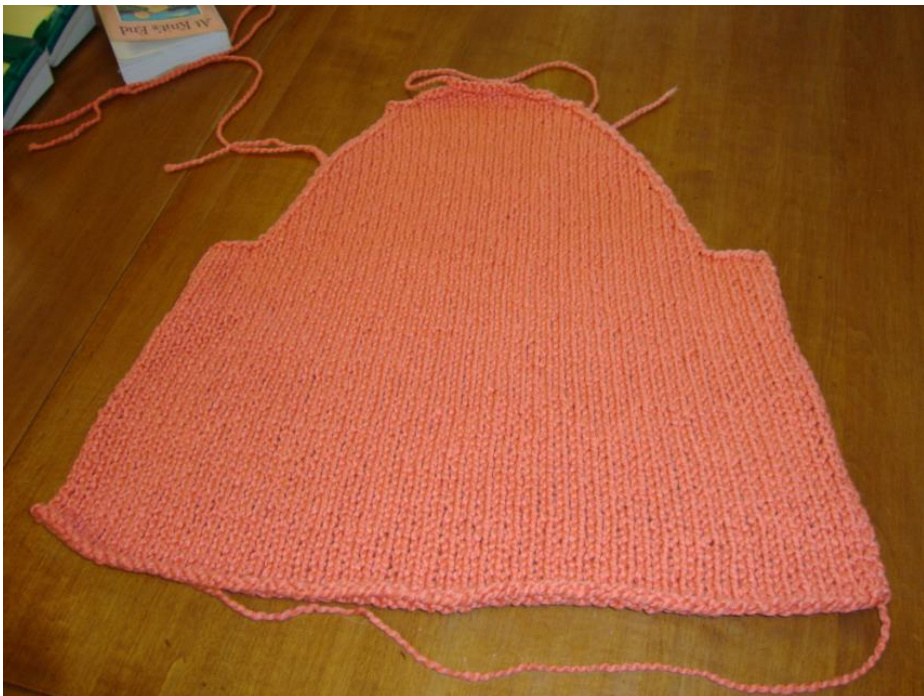
Back
With size 11 needle, cast on 60; 66; 70 (76; 80; 86; 90) (96; 102; 106; 112) sts. Change to #10-3/4 needle, and starting with a knit row, work st st (knit one row, purl one row) for 7-3/4", ready to start a RS row. Change to #10-1/2 needle, and work st st until piece mease 14-1/4" from cast on, ready to start aRSrow. Change to #10 needle and work st st until piece meas 16-3/4" from cast on, ready to start a RS row. ShapeArmhole Bind off 2; 4: 5 (5; 6; 7; 8) (8; 9; 9; 9) sts at beg of next 2 rows [56; 58; 60 (66; 68; 72; 74) (80; 84; 88; 94) sts on needle] Then, dec 1 st each side (see below) every RS row 2; 3; 4 (5; 6; 6; 7) (8; 8; 8; 9), times [52; 52; 52 (56; 56; 60; 60) (64; 68; 72; 76) sts 0n needle]. Sweater Back Armhole Dec Row: K1, SSK, work to last 3 sts, K2tog, K1 Cont in st st until piece meas 25-1/4; 25-3/4; 25-3/4 (25-1/2; 25-1/2; 26; 26-1/2) (27; 28-1/4; 28-3/4; 29" from cast on, ready to start a RS row. Top Ribbing Work Ribbing (see below) for 12 rows Bind off in pattern Top Ribbing RS row: K3, (P2, K2) to last 5 sts, P2, K3 WS row: P3, (K2, P2) to last 5 sts, K2, P3 Front Work exactly the same as the back
Sleeves (make 2)
Vith #11 needle, cast on 48; 52; 52 (54; 56; 58; 62) (66; 68; 74; 78) sts Change to #10-3/4 needle and starting with a knit row, work st st until 3-1/2; 3-1/2; 4 (4; 4; 4; 4) (4; 4-1/2; 4-1/2; 4-1/2) " from cast on, ready to start a RS row. Change to #10-1/2 needle and work st st until 7; 7; 7-1/2 (7-1/2; 7-1/2; 7-1/2; 8) (8; 8-1/2; 9; 9)" from cast on, ready to start a RS row Change to #10 needle and work st st until 9; 9; 9-1/2 (10; 10; 10; 10-1/2) (11; 11-1/2; 12; 12)" from cast on, ready to start a RS row. Bind off 2; 4; 5 (5; 6; 7; 8) (8; 9; 9; 9) sts at beg of next 2 rows [44; 44; 42 (44; 44; 44; 46) (50; 50; 56; 60) sts on needle] Dec 1 st at each edge (see below), every 4th row, 3; 4; 5 (5; 5; 5; 6) (5; 5; 3; 3) times [38; 36; 32 (34; 34; 34; 34) (40; 40; 50; 54) sts 0n needle] Then, dec every RS row, 9; 8; 6 (7; 7; 7; 7) (10; 10; 15; 17) times [20 sts on needle] Sleeve Cap Dec Row: K1, SSK, work to last 3 sts, K2tog, K1 Next row: Purl Next row: SSK, bind off 2, knit to end [17 sts on needle] Next row: P2tog, bind off 2, purl to end [14 sts on needle] Rep last 2 rows, one time more [8 sts on needle] Last row: SSK, bind off rem sts
Finishing
If edges are too curly, steam lightly before sewing. Pin shoulders together, overlapping as shown in photo below

Set in sleeves Sew sleeve seams and side seams Try on and tack shoulders closed to your liking. See photo below Weave inends Block&Enjoy
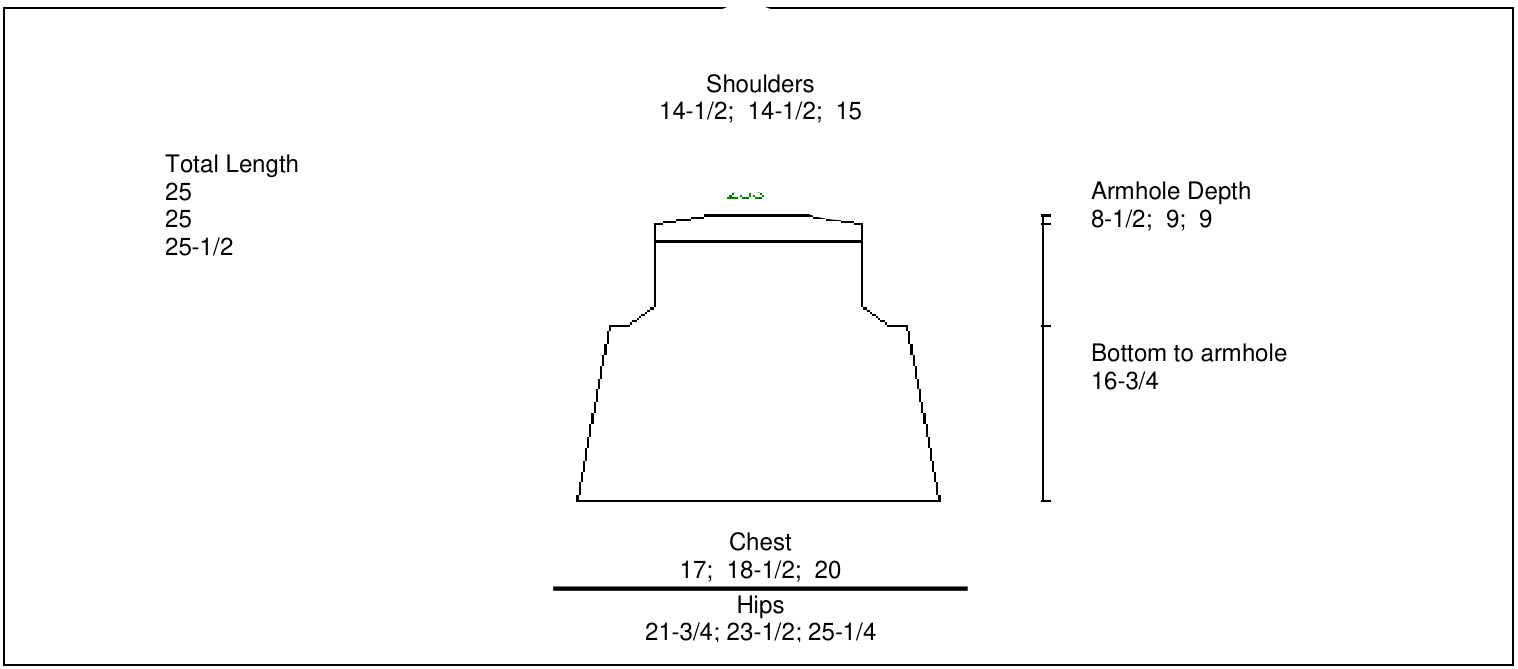
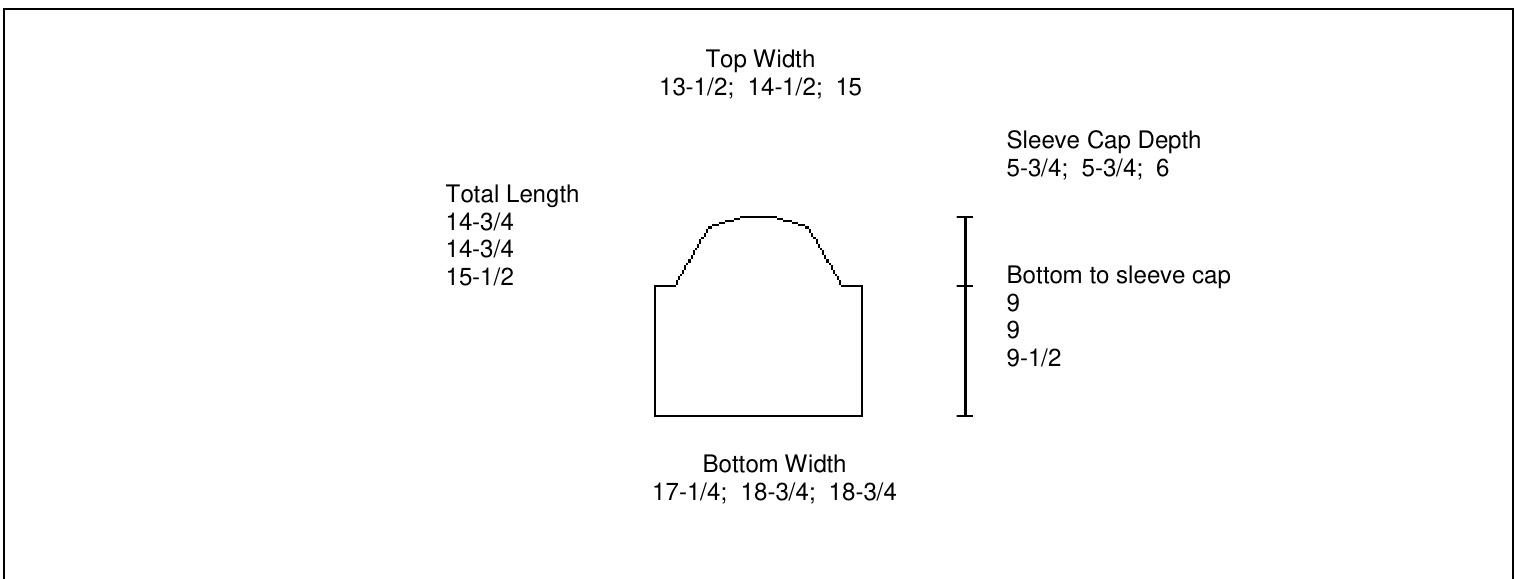
Schematics for 3% Sleeve for 34; 37; 40"
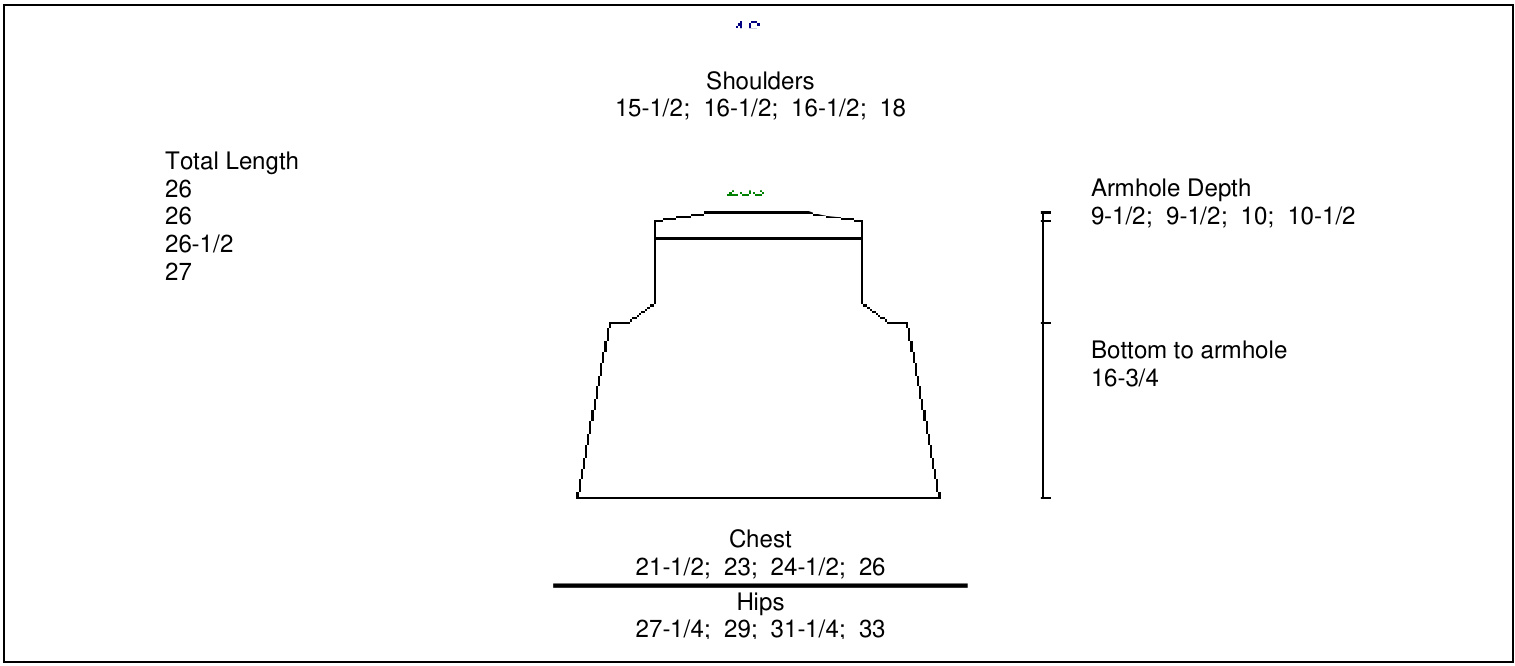
Schematics for % Sleeve for 43; 46; 49; 52"

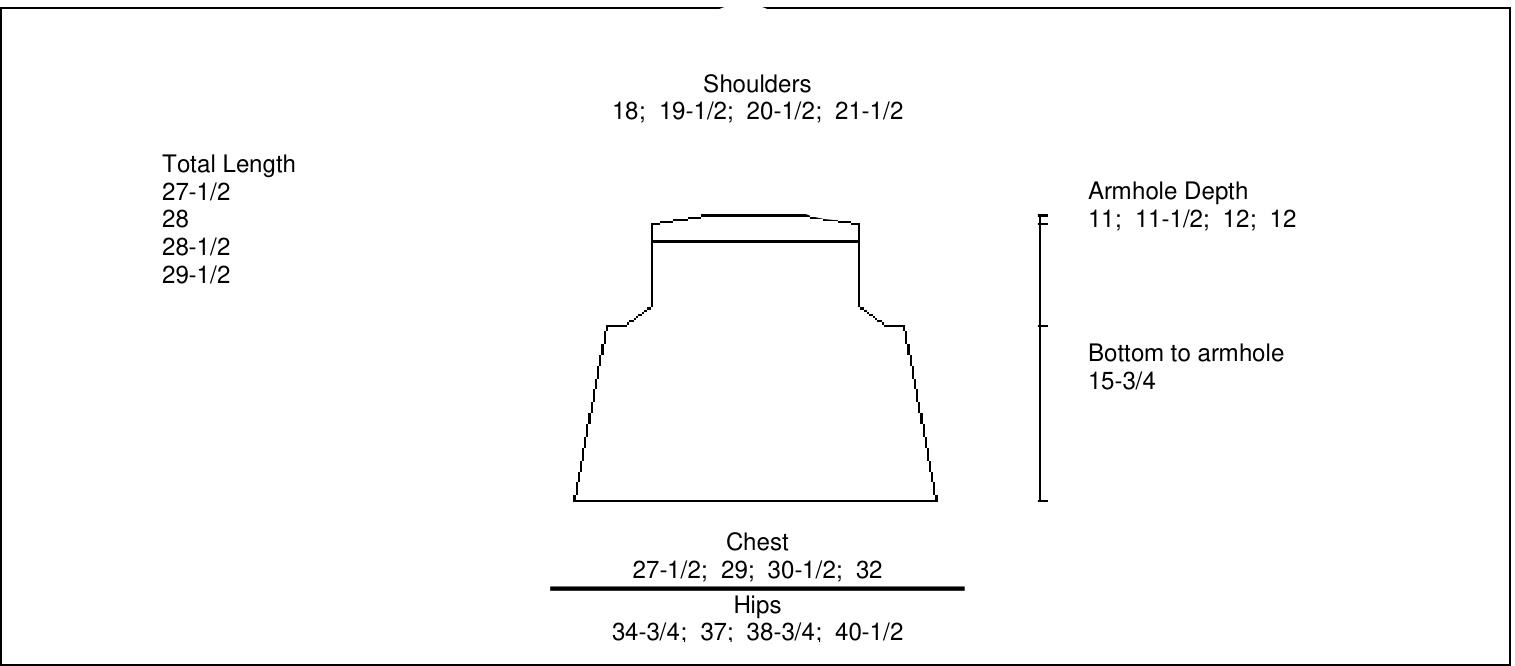
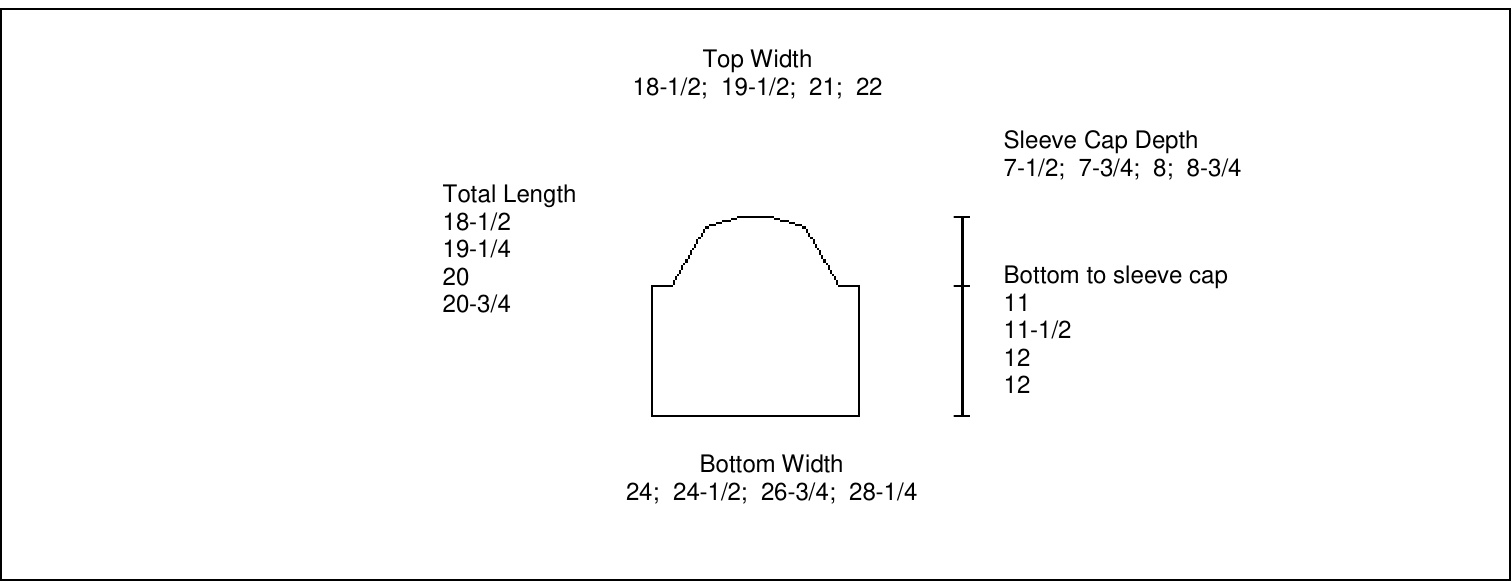
Schematics for 3% Sleeve for 55; 58; 61; 64"
Definitions (in alphabetical order) Beg Beginning CableCastOn \*Insert the right needle between the first and second st of the left needle. Draw up a loop and place it on the left needle. Rep from \*. Dec Decrease EOR: Every other row ERSR Every right side row Est Established Incs Knit into a st without taking it off the needle, then knit into the back of the same st K Knit K2tog Knit 2 together M1 (make 1) Lift the strand between the 2 sts onto the left-hand needle. Knit this strand so as to twist it. Note: The stitch must be twisted, or you will be left with a hole. Meas Measures PI Purl P2tog Purl 2 together P2tog tbl (purl 2 together, through back loop) One at a time, slip 2 sts onto right-hand needle, as if to knit. Slip these 2 sts straight back to left-hand needle. Purl these 2 sts together, through the back loop. PSSO Pass slipped stitch over Rem Remaining Rev st st (Reverse stockinette stitch) Row 1 (RS): Purl Row 2 (WS): Knit Cont these 2 rows RS: right side SSK (slip, slip, knit) One at a time, slip 2 stitches knitwise onto the right-hand needle. Then insert the point of lefthand needle into the front of the 2 slipped stitches, wrap the yarn around the right-hand needle and knit the 2 stitches together. SSP (slip, slip. purl) Slip 2 sts, one at a time, as if to knit. Slide them back onto left-hand needle and purl them together through the back loops. St st (stockinette stitch) Row 1: Knit Row2:Purl Repeat these 2 rows WS: wrong side wyib: With yarn in back wyif: With yarn in front X: times


